

Yes, we're now running our only Summer Sale. All Courses are 30% off until 20th July, 2026:
Learn through the super-clean Baeldung Pro experience:
>> Membership and Baeldung Pro.
No ads, dark-mode and 6 months free of IntelliJ Idea Ultimate to start with.
1. Overview
In this tutorial, let’s discuss the kernel and learn how to recompile it. Often, users decide to customize or build their kernel for different reasons. Frequently, we just want to change our kernel configuration to suit our preferences or those of our systems.
2. The Linux Kernel
The kernel is a computer program that controls everything in a computer’s operating system. A Linux kernel serves as the interface between the hardware of a computer and the OS (processes that run on it).
A kernel runs in an isolated environment called the kernel space. In this space, the kernel has unrestricted access to resources (e.g., memory, CPU, and other system resources). This isolation is essential as it provides system-level protection, stability, and security. If a kernel process fails, there is a higher chance of it crashing the whole system.
On the other hand, user activities reside in User space. In the User space, user-level applications, programs, and services run in a restricted environment. The kernel provides mechanisms for these processes to access the resources they need.
2.1. Kernel Functions
Let’s understand some of the major kernel functions:
- The kernel manages processes, schedules their execution, allocates resources (CPU time, memory, etc.), and ensures proper multitasking through process management.
- It controls the system’s memory, allocating and deallocating memory for processes (active and idle processes), and manages virtual memory.
- The kernel handles interactions between hardware devices and software ensuring effective communication between them.
- Lastly, it implements access control, permissions, and security modules to ensure secure access and prevent unauthorized access.
2.2. Reasons for Building or Recompiling the Kernel
We can decide to recompile our Linux kernel due to different reasons. Let’s see some of the most common reasons.
For systems with older hardware or unique configurations, custom kernel compilation is needed to optimize system resource utilization and ensure compatibility.
Custom kernel compilation allows users to implement their preferred security measures, i.e., by enabling or disabling specific security features.
The default kernel might not support some hardware components. As a result, compiling a custom kernel allows users to include specific drivers or modules to support their hardware.
Customizing the kernel allows users to tweak settings, remove unnecessary features, or add optimizations that can enhance system performance.
3. Prerequisites to Compiling the Kernel
Before we begin compiling, we must ensure that the following prerequisites are met to successfully install a new kernel.
Firstly, we must check our current kernel version:
$ uname -r
6.5.0-kali3-686-pae
3.1. Required Dependencies
Let’s install the following required dependencies:
$ sudo apt-get install build-essential git fakeroot ncurses-dev xz-utils libssl-dev bc flex libelf-dev bison dwarvesWe need these dependencies for the following reasons:
| Dependency Name | Functions |
|---|---|
| build-essential | these are meta-packages that are crucial when compiling software. They include the GNU/g++ compiler collection, GNU debugger, and more libraries and tools that are needed for compiling a program like GCC, make, G++, dpkg-dev e.t.c |
| git | it tracks and makes logs of all changes during development in the source code. Additionally, it allows reverting the changes. |
| fakeroot | it allows us to run a command in an environment with fake root privileges |
| ncurses-dev | provides API for handling and optimizing text-based terminals. |
| xz-utils | it’s a general-purpose fast file compression and file decompression often used by scripts |
| libssl-dev | contains development libraries, header files, and man pages for libssl and libcrypto (necessary for SSL and TSL) |
| bc | it supports arbitrary precision numbers with the interactive execution of statements |
| flex | Fast Lexical Analyzer Generator (flex) is a program for analyzing text by matching patterns |
| libelf-dev | Issues shared library routines to manipulate ELF (Executable and Linking Format) object files, archive files, and archive members |
| bison | converts grammar description to a C program |
| dwarves | allows us to access debugging information in object files |
3.2. The ‘deb-src’ Error
While installing dependencies, one common error is the “E: You must put some ‘deb-src’ URIs in your sources.list”. This occurs when it attempts to use the source package repositories but misses the necessary configurations. This implies that the apt-get command is unable to find the source package repositories set in the system’s sources.list file.
Uncommenting enables the source repositories, thus users can access the source code of packages for inspection, modification, or recompilation. The source package contains the source code that will be used when building the binary packages available for installation.
Let’s make a copy of the sources.list before we begin any modifications:
$ sudo cp /etc/apt/sources.list ./sources.list.copyNext, let’s edit the sources.list file.
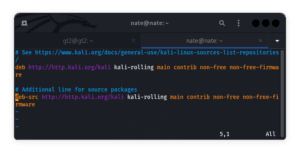
First, let’s find all the lines that begin with “deb-src” followed by a repository URL (the “deb-src” lines are used for source packages). By default, they are commented out.
Let’s locate the “deb-src” lines and uncomment them (by removing the preceding ‘#’ and space):
After we’ve made the changes, let’s save the file and run an update:
$ sudo apt-get updateWe must ensure that when we’re recompiling the Kernel, we should have at least 15 GB of free space on our hard drive so that the kernel compilation may take place seamlessly.
3.3. Kernel Source
It’s necessary to decide which kernel version we’ll use before recompiling since different versions cater to various user needs, such as stability, performance, security, real-time functionality, or specific optimizations:
Firstly, stable kernels are meant for public use and are regularly released. Most users consider them reliable because they’ve undergone extensive testing. Additionally, they include bug fixes, new features, and improvements.
Secondly, mainline kernels refer to the latest actively developed version. These versions are cutting-edge and contain the most recent features and improvements. However, the mainline is less stable compared to the stable kernels as they are in active development.
Thirdly, hardened kernels prioritize security by incorporating extra security features, including patches and configurations aimed at reducing vulnerabilities and mitigating potential exploits. They might have additional security-focused patches or settings enabled by default to enhance system security.
Following, Long-Term Support (LTS) kernels are versions that receive extended maintenance and support for an extended period, typically several years. LTS is well-suited for enterprise use because it provides a stable base with fewer feature updates. Additionally, it ensures stability and security fixes for an extended period.
Next, real-time kernels are optimized for tasks requiring precise timing and predictable behavior. Real-time kernels prioritize low latency and deterministic response times, crucial for applications such as robotics, industrial automation, and certain critical systems.
Lastly, Zen kernels are designed to optimize performance on desktops and workstations. They often integrate various patches and optimizations to enhance responsiveness, throughput, and overall user experience, particularly for gaming and multimedia tasks.
For this example, we’ll use the mainline version, which we can access through:
$ wget https://cdn.kernel.org/pub/linux/kernel/v6.x/linux-6.7.tar.xz4. Configuring the Kernel
Now that we’ve downloaded the kernel version we need, let’s extract it:
$ tar xvf linux-6.7.tar.xzNext, let’s change our directory to the newly extracted directory:
$ cd linux-6.7Then, let’s copy the config file of our currently installed Linux:
$ cp -v /boot/config-$(uname -r) .configUnfortunately, this configuration file contains lots of unnecessary drivers and kernel modules, which significantly increases the build time. We can utilize the ‘localmodconfig’ command to mitigate this problem. This command examines the loaded kernel modules on our system. It then edits the .config file so that only the modules present in our system are included in the build.
As long as we don’t use the generated build on a different machine than that on which we compile the source, this should work perfectly fine:
$ make localmodconfigThen, we must make these modifications to the configuration:
$ scripts/config --disable SYSTEM_TRUSTED_KEYS
$ scripts/config --disable SYSTEM_REVOCATION_KEYS
$ scripts/config --set-str CONFIG_SYSTEM_TRUSTED_KEYS ""
5. Installing the Kernel
After, completing kernel configuration, let’s start compiling it. We’ll break it down into three steps.
First, we’ll compile the kernel using the “fakeroot make” command:
$ fakeroot makefakeroot intercepts file system calls made by the build process that require root permissions. The fakeroot command then modifies these calls to appear as if they were executed by the root user. This way, the build process can proceed without the need for real root access.
Otherwise, if we only run make, the build will terminate. This termination is due to an error (sometimes it doesn’t display the error). If it doesn’t display the error, one can proceed thinking the compilation was successful even if it wasn’t.
We can further check if the compilation was successful by running the echo command. If the output is 0, then it was successful, otherwise, it wasn’t:
$ echo $?
0
We can expedite the process by maximizing the number of cores utilized. To find out the available cores we run:
$ nproc
8
Now, we can use the following syntax to utilize more cores during installation:
$ fakeroot make -j3Next, let’s install the kernel modules:
$ sudo make modules_installAfter that, let’s install the kernel using the ‘make’ command:
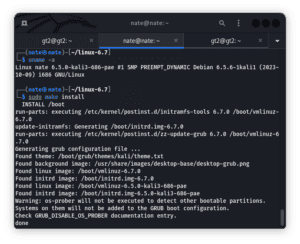
$ sudo make install If the installation is successful, we should see “done” displayed on the terminal:
Lastly, let’s reboot the system:
$ sudo rebootAfter rebooting, we can check our kernel version again if it has updated to the one we’ve just installed:

During compilation, the kernel might enter a kernel panic. A kernel panic occurs when the Linux kernel enters an unrecoverable failure state due to buggy hardware drivers, which causes the machine to become deadlocked, and unresponsive. A reboot resolves the problem.
6. Conclusion
In this article, we’ve looked at the kernel. We’ve briefly discussed the kernel, its functions, and the steps to take when recompiling. Due to various reasons, we might need to recompile our kernels. Before compiling, we must ensure that we have enough storage and we’ve downloaded the right packages.
Lastly, the duration it takes to compile a kernel varies as it majorly depends on our system resources and capability.