Learn through the super-clean Baeldung Pro experience:
>> Membership and Baeldung Pro.
No ads, dark-mode and 6 months free of IntelliJ Idea Ultimate to start with.
Last updated: March 18, 2024

Learn through the super-clean Baeldung Pro experience:
>> Membership and Baeldung Pro.
No ads, dark-mode and 6 months free of IntelliJ Idea Ultimate to start with.
Linux hosts require connectivity to different services on the network. We can think of services such as NTP servers, Mail Servers, DNS, and more. The corresponding servers can reside on different subnets or networks. Hence, on our host, we need to define multiple routing entries to route traffic data to the appropriate destination.
In this tutorial, we’ll learn how to route traffic based on the destination and the source subnet on RHEL-based systems.
Routing is the process of determining the paths through which to send the data.
For instance, two computers on the same network communicate directly with each other. In contrast, two hosts belonging to two distinct networks have to exchange IP packets via a gateway or a router. In such cases, packets sent from the source host can travel from one router to another before reaching the intended destination. We refer to each router or device that a packet passes through along the way to the final destination as a hop.
The routing table provides information about the existing routes on the system. In this section, we’ll explain the Linux routing table. Then, we’ll check how the Linux kernel routes packets to various networks.
Let’s run the ip command with the option route to display a basic routing table:
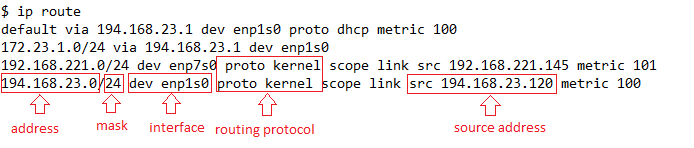
From the above, the address and mask correspond to the destination network. The keyword dev specifies the interface we use to send the data. In this case, it’s enp1s0. The keyword src shows the source address attached to this interface.
The keyword proto refers to the routing protocol. For instance, kernel means that the kernel added the last two routes automatically.
Finally, the keyword default in the first entry in the table indicates the route to the default gateway IP 194.168.23.1:

In the above, we use the head command and pass the line number -n 1 to print the first entry in the routing table.
Let’s now check how the kernel makes the routing decisions based on the above routing table.
Firstly, our host with IP 194.168.23.120 can send packets directly to another host on the same network 194.168.23.0/24. To verify the selected route, we execute the ip route command with the get action:
$ ip route get 194.168.23.132
194.168.23.132 dev enp1s0 src 194.168.23.120 uid 1000
    cache
On the other hand, what happens when we communicate with another host on a different subnet 172.23.1.0/24? In this case, the kernel checks the defined routes one after the other until it finds a match.
To get the selected routing entry for the IP 172.23.1.100, we run the ip route get command. Its output is:
172.23.1.100 via 194.168.23.1 dev enp7s0 src 194.168.23.120 uid 0
    cache
From the route content, we identify the gateway IP 194.168.23.1. That means our host forwards the packets to the gateway. That’s the first hop. After that, the gateway delivers the packets to the destination IP 172.23.1.100.
To confirm, let’s run the traceroute command to display the hops traversed before reaching the destination node:
$ traceroute 172.23.1.100
traceroute to 172.23.1.100 (173.23.1.100), 30 hops max, 60 byte packets
 1 194.168.23.1 (194.168.23.1)  7.537 ms  7.509 ms  7.515 ms
 2  * * *
 3  * * *
 4 172.23.1.100 (172.23.1.100)  0.997 ms  0.996 ms  0.996 ms
But what if we want to send traffic from our host to network 10.1.1.0/24? We don’t have a route that matches this destination network in the above routing table. Therefore, our host forwards the packets to the default network gateway IP 194.168.23.1. The kernel selects the default entry in the absence of a preferred route.
Let’s look next at destination-based and source-based routing.
For routing according to the destination address IP, we can add the routing entries without creating a custom routing table.
In contrast, for more complex routing scenarios, like routing based on the source address, we need to:
Sometimes, we need to add a new route to allow communication between two hosts located in different subnets.
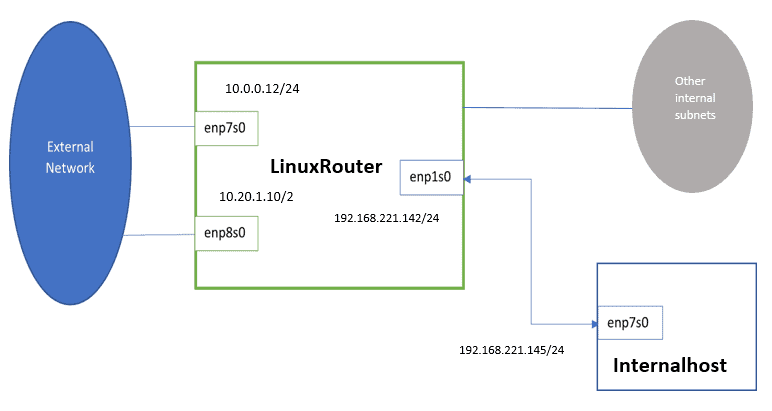
For example, let’s suppose that our host resides in an internal network and can’t access the goal network 100.1.1.0/24.
However, our host, which we’ll call Internalhost, can connect to the local network 192.168.221.0/24 from a second network interface.
Further, on 192.168.221.0/24, we have a node that we call LinuxRouter. Its IP is 192.168.221.142, and it can route packages to the internet. So, LinuxRouter can reach the network 100.1.1.0/24.
Let’s now see how to add a new route enabling communication between Internalhost and a distant web server on the network 100.1.1.0/24.
As a superuser, we add a static route on Internalhost by running the command ip route with the option add:
# ip route add 100.1.1.0/24 via 192.168.221.142 dev enp7s0Now, we forward anything going to network 100.1.1.0/24 to LinuxRouter, which acts as our gateway. Also, we specify enp7s0 as the source network interface.
Let’s run the traceroute to check if this works:
$ traceroute 100.1.1.100
 ...
 1  LinuxRouter (192.168.221.142)  2.993 ms  2.439 ms  2.314 ms
 2  * * *
 ...
 8  * * *
 9  100.1.1.100 (100.1.1.100)  30.835 ms  31.323 ms  33.305 ms
Here, we see that the packets traverse different hops reaching our target IP. Specifically, we see that LinuxRouter is the first hop and our gateway to the external network 100.1.1.0/24.
However, we can lose the route if we restart the system. Therefore, let’s make the changes persistent.
We use the nmcli utility to configure the static route. The command’s basic syntax is:
$ nmcli [OPTIONS] OBJECT { COMMAND | help }First of all, we need to confirm that NetworkManager is running. So, let’s execute the systemctl command with the status option:
$ systemctl status NetworkManager
NetworkManager.service - Network Manager
   Loaded: loaded (/usr/lib/systemd/system/NetworkManager.service; enabled; vendor preset: enabled)
   Active: active (running) since Thu 2022-05-26 06:34:48 EDT; 11min ago
   ...
Next, we want to define two static routes for our existing connection enp7s0. Therefore, let’s execute the command nmcli connection modify as the root user:
# nmcli connection modify enp7s0 +ipv4.routes "100.1.1.0/24, 8.8.8.8 192.168.221.142"With the +ipv4.routes subcommand, we add a route to the destination subnet 100.1.1.0/24 and the Google DNS IP 8.8.8.8 using the gateway with IP 192.168.221.142.
Finally, let’s print the content of the file route-enp7s0 created by NetworkManager in the /etc/sysconfig/network-scripts directory:
$ cat /etc/sysconfig/network-scripts/route-enp7s0
ADDRESS0=100.1.1.0
NETMASK0=255.255.255.0
ADDRESS1=8.8.8.8
NETMASK1=255.255.255.255
GATEWAY1=192.168.221.142
As we see, the new IP routes will load at boot time.
So far, we’ve configured a route on Internalhost to direct all the external traffic to LinuxRouter. Firstly, let’s understand the reason behind the source subnet routing requirement.
Let’s consider the following example.
Our LinuxRouter from above can reach external networks through two interfaces: enp7s0 and enp8s0, with the latter acting as the default one. Similarly, enp1s0 connects LinuxRouter to the internal subnet 192.168.221.0/24.
Let’s say that we need to route traffic from subnet 192.168.221.0/24 via enp8s0 while keeping the default route through enp7s0 for the incoming traffic from other internal subnets:
To do so, we need to enable routing based on the source subnet.
IP masquerading allows LinuxRouter to replace the source IP address of a packet coming from the internal subnet with its outgoing interface address before forwarding the traffic to the external network.
First, we run the firewall-cmd command with the options –change-interface and –zone as the superuser:
# firewall-cmd --change-interface=enp7s0 --zone=external --permanent
The interface is under control of NetworkManager, setting zone to 'external'.
success
# firewall-cmd --change-interface=enp8s0 --zone=external --permanent
...
# firewall-cmd --change-interface=enp1s0 --zone=internal --permanent
...
Here, we change zone to external for enp7so and enp8s0 and add the interface enp1s0 connected to the internal network to the internal zone. Also, we make the change persistent with the option –permanent.
Finally, we enable the IP masquerading with the option –add-masquerade for the zone=external:
# firewall-cmd --zone=external --add-masquerade --permanent
success
Before we dive into the source-based routing configuration, let’s check the available routing tables and rules.
By default, we have three routing tables. On LinuxRouter, the names of the available routing tables are in the file /etc/iproute2/rt_tables:
...
255     local
254     main
253     default
...
Whenever we execute the ip route command, we display the normal routes found inside the main table.
To look up the appropriate table, the Linux kernel relies on a defined set of rules. We can get the available rules by running the command ip rule list:
$ ip rule list
0:      from all lookup local
32766:  from all lookup main
32767:  from all lookup default
Here, the order indicates the rules’ priorities. That means the kernel starts by checking the first rule, which has the highest priority (0).
In detail, the rule selector from all matches any source address. Then based on the action lookup, the kernel checks the matching destination routing entry inside the corresponding routing table. If the lookup fails, then the kernel continues to the next rule.
To enable source-based routing, we start by creating a new routing table.
As a superuser, we use the nmcli command to add static routes to a new routing table for the connection enp8s0:
# nmcli connection modify enp8s0 +ipv4.routes "100.1.1.0/24 10.20.1.1 table=400, 8.8.8.8 10.20.1.1 table=400"Both routes have the gateway IP 10.20.1.1. However, we install the entries to the table with ID 400 instead of our main table with ID 254. By adding the new routes to a different routing table, we preserve the normal routes inside the main table for the default routing.
Next, let’s define a new routing rule for looking up the new routing table.
We create the rule using the nmcli command to instruct the kernel to select table 400 for anything coming from network 192.168.221.0/24:
# nmcli connection modify enp8s0 +ipv4.routing-rules "priority 200 from 192.168.221.0/24 table 400"To achieve that, we use the property +ipv4.routing-rules. In addition, we assign to this rule the priority 200. That means we give it precedence over the main table rule, whose priority is 32766.
The NetworkManager writes the above configuration to /etc/sysconfig/network-scripts/ifcfg-enp8s0. Let’s print its content:
$ cat /etc/sysconfig/network-scripts/ifcfg-enp8s0
TYPE=Ethernet
...
NAME=enp8s0
...
ROUTING_RULE_1="priority 200 from 192.168.221.0/24 table 400"
We see that the ROUTING_RULE_1 directive stores the new policy rule for the enp8s0 connection profile.
Lastly, we apply the changes to the active device enp8s0 as the root:
# nmcli device reapply enp8s0
Connection successfully reapplied to device 'enp8s0'.
Next, let’s check if everything works as intended.
Firstly, to validate that the new static routes are active, we list the content of the new table with ID 400 using ip route show:
$ ip route show table 400
8.8.8.8 via 10.20.1.1 dev enp8s0 proto static metric 102
100.1.1.100/24 via 10.20.1.1 dev enp8s0 proto static metric 102
Indeed, the output of the routing table 400 shows two static routes for the google DNS and the destination subnet 100.1.1.10/24 via enp8s0.
Then, let’s verify the new rule by executing the ip rule list command:
...
200:    from 192.168.221.0/24 lookup 400
...
We confirm that the rule is active and has the correct priority of 200.
Afterward, let’s ping 100.1.1.100 from Internalhost to confirm it’s reachable:
$ ping 100.1.1.100
PING 100.1.1.100 (100.1.1.100) 56(84) bytes of data.
64 bytes from 100.1.1.100: icmp_seq=1 ttl=126 time=2.29 ms
...
On LinuxRouter, we capture and trace those packets using the tcpdump tool as the root.
# tcpdump -i enp8s0 host 100.1.1.100 -n
...
08:38:46.996945 IP 10.20.1.10 > 100.1.1.100: ICMP echo request, id 1618, seq 1, length 64
08:38:46.997861 IP 100.1.1.100 > 10.20.1.10: ICMP echo reply, id 1618, seq 1, length 64
...
Above, we specify the interface enp8s0 with the -i flag. Also, we pass the host option to filter packets by host IP 100.1.1.100. Then, we use the -n option to disable the IP conversion to hostnames.
The output of tcpdump shows that LinuxRouter uses the interface ensp8s0 for the traffic from Internalhost (to 100.1.1.100), which is what we wanted it to do. The address 100.20.1.10 in the output is LinuxRouter‘s IP for external communication.
To summarize, for the destination-based routing:
For the source-based routing:
In this article, we talked about routing on Linux systems. We learned that by default, the Linux kernel performs routing based on the destination address.
However, in some more complex scenarios, we need to route, via different paths, incoming packets with the same destination but from different sources. For that reason, we enable the routing based on the source address criteria by creating a custom routing table and rule.