

Learn through the super-clean Baeldung Pro experience:
>> Membership and Baeldung Pro.
No ads, dark-mode and 6 months free of IntelliJ Idea Ultimate to start with.
Learn through the super-clean Baeldung Pro experience:
>> Membership and Baeldung Pro.
No ads, dark-mode and 6 months free of IntelliJ Idea Ultimate to start with.
In the realm of Linux, we often need to convert a bootable USB drive into an ISO file. This is a valuable skill, as it enables us to efficiently preserve and share the contents of our bootable drives. In this tutorial, we’ll explore various methods for converting a bootable USB drive into an ISO file in Linux.
dd is a powerful Linux tool for a wide range of disk-related tasks:
We can also use dd for converting a bootable USB drive to an ISO file. It enables us to make a bit-for-bit copy of the USB drive’s contents into a single ISO file.
First, let’s create a copy from the bootable USB to a file:
$ sudo dd if=/dev/sdb1 of=myImageFile
1853440+0 records in
1853440+0 records out
948961280 bytes (949 MB, 905 MiB) copied, 54.7537 s, 17.3 MB/s
In this case, we copied 1,853,440 data blocks from the /dev/sdb1 source to myImageFile in the current directory. Furthermore, the result is an ISO file of 949 MB and the operation took about 54.75 seconds, with an average data transfer rate of 17.3 MB/s. Here, we can also use bs=4M and status=progress to make I/O faster and provide a progress report while dd runs.
At this point, we have a raw binary copy of the USB. Hence, we need to convert that to an ISO format. To do so, let’s install genisoimage via apt:
$ sudo apt-get install genisoimageThen, we convert the raw file to an ISO format:
$ genisoimage -o converted.iso -input-charset utf-8 -R -J myImageFile
  1.08% done, estimate finish Mon Oct 16 15:30:46 2023
  2.16% done, estimate finish Mon Oct 16 15:31:32 2023
  3.24% done, estimate finish Mon Oct 16 15:31:47 2023
...
 97.08% done, estimate finish Mon Oct 16 15:30:52 2023
 98.16% done, estimate finish Mon Oct 16 15:30:52 2023
 99.24% done, estimate finish Mon Oct 16 15:30:52 2023
Total translation table size: 0
Total rockridge attributes bytes: 252
Total directory bytes: 0
Path table size(bytes): 10
Max brk space used 0
463541 extents written (905 MB)
Now, let’s explore each part of the command above:
Overall, the output converted.iso will be in a standard ISO format and can be used for various purposes, including burning to optical media or distributing bootable images.
Lastly, to verify the ISO file, we can perform a simple check to examine the ISO’s structure and extract information about its content. Accordingly, we can use isoinfo which is a part of the genisoimage package:
$ isoinfo -d -i converted.iso
CD-ROM is in ISO 9660 format
System id: LINUX
Volume id: CDROM
...
Volume set size is: 1
Volume set sequence number is: 1
Logical block size is: 2048
Volume size is: 463541
Joliet with UCS level 3 found
Rock Ridge signatures version 1 found
As a result, the output confirms that converted.iso is in the ISO format. Moreover, it provides details about its volume and file system attributes and support for extended file names and attributes.
mkisofs is a command-line tool in Linux for creating ISO 9660 file system images, typically for generating CD and DVD images. Hence, we can use it to convert a bootable USB to an ISO file.
First, let’s install mkisofs:
$ sudo apt-get install mkisofsOnce installed, we create a mount point:
$ mkdir /mnt/usb_driveThen, we mount the USB drive:
$ sudo mount /dev/sdb1 /mnt/usb_driveNow, we create the ISO image from the mounted directory:
$ sudo mkisofs -o myImage.iso -R -J -input-charset utf-8 /mnt/usb_drive/
  0.98% done, estimate finish Sun Oct 15 08:52:41 2023
  1.95% done, estimate finish Sun Oct 15 08:53:32 2023
  2.93% done, estimate finish Sun Oct 15 08:53:49 2023
...
 97.70% done, estimate finish Sun Oct 15 08:53:40 2023
 98.68% done, estimate finish Sun Oct 15 08:53:40 2023
 99.66% done, estimate finish Sun Oct 15 08:53:41 2023
Total translation table size: 0
Total rockridge attributes bytes: 3976
Total directory bytes: 12288
Path table size(bytes): 94
Max brk space used 23000
511774 extents written (999 MB)
Let’s break down the command:
As a result, we created an ISO file from the mounted USB device. Moreover, this output displays a progress report and various statistics related to the process.
At this point, we verify the ISO file via isoinfo:
$ isoinfo -d -i mkImage.iso
CD-ROM is in ISO 9660 format
System id: LINUX
Volume id: CDROM
...
Volume set size is: 1
Volume set sequence number is: 1
Logical block size is: 2048
Volume size is: 511774
Joliet with UCS level 3 found
Rock Ridge signatures version 1 found
Finally, the output confirms that mkImage.iso is in the ISO 9660 format.
GNOME Disks is a Linux utility not typically used for converting a bootable USB to an ISO file. Instead, it’s primarily a graphical tool for managing disk drives and partitions, monitoring drive health, formatting disks, and managing disk images.
Let’s explore the steps to convert a bootable USB:
Let’s take a look at the interface of Disks at this point: 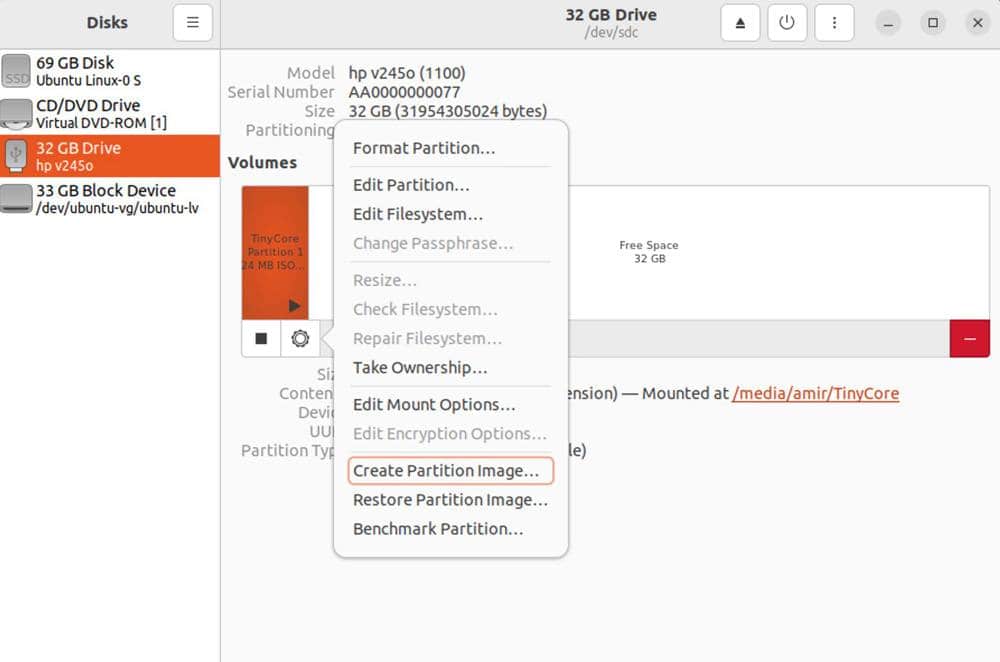 Now, Disks should create an image of the bootable USB drive and save it at the specified location.
In this article, we’ve explored various methods for converting bootable USB drives into ISO files on Linux. These methods offer versatility, with options ranging from command-line tools like dd, genisoimage, and mkisofs to the more user-friendly GNOME Disks utility.