

Learn through the super-clean Baeldung Pro experience:
>> Membership and Baeldung Pro.
No ads, dark-mode and 6 months free of IntelliJ Idea Ultimate to start with.
Learn through the super-clean Baeldung Pro experience:
>> Membership and Baeldung Pro.
No ads, dark-mode and 6 months free of IntelliJ Idea Ultimate to start with.
In this tutorial, we’ll discuss how to create a bootable USB drive in Linux. We’ll look at the dd utility to write the contents of ISO to our USB drive.
In addition, we’ll also go over the handy Ventoy utility to create a multi-boot USB drive, which can contain a collection of ISO files that are ready for installation without any extra work.
dd (data dump) is a command-line utility used for copying and converting data.
By default, it’s installed on most Linux distributions as it’s a part of GNU coreutils. Therefore, we can readily use it on our machines.
Before creating a bootable USB drive, we must make sure that the USB drive is plugged in. For that purpose, we can use lsblk:
$ lsblk
NAME   MAJ:MIN RM   SIZE RO TYPE MOUNTPOINTS
...
loop6    7:6    0  53.2M  1 loop /snap/snapd/18933
loop7    7:7    0   452K  1 loop /snap/snapd-desktop-integration/83
sda      8:0    0    32G  0 disk
├─sda1   8:1    0     1G  0 part /boot/efi
├─sda2   8:2    0  30.9G  0 part /
sdb      8:16   1  14.8G  0 disk
├─sdb1   8:17   1  14.8G  0 part /media/baeldung/OPENCORE
sr0     11:0    1  1024M  0 rom
In the output, sdb is the device we will write our ISO image to. So, first, let’s make sure that all the sdb drives are unmounted:
$ sudo umount /dev/sdb?It’s a nifty little trick to put the “?” wildcard at the end of the disk name while unmounting. It matches all the sdb partitions like /dev/sdb1, /dev/sdb2, and so on.
Now, we’re ready to create a bootable USB disk. For that purpose, we’ll use dd to write the contents of our ISO file to the USB disk:
$ sudo dd if=~/Downloads/archlinux-2023.07.01-x86_64.iso of=/dev/sdb bs=4M status=progressLet’s break this down:
Generally, the output file should refer to a whole disk and not a partition. It’s because using a partition instead of a disk can result in data loss.
One more thing we should be cautious about is to double-check the disk we’re writing to – the dd operation can be dangerous because it can result in irreversible data loss.
Moreover, using a large block size can improve performance. However, for the most part, 4 MB will suffice.
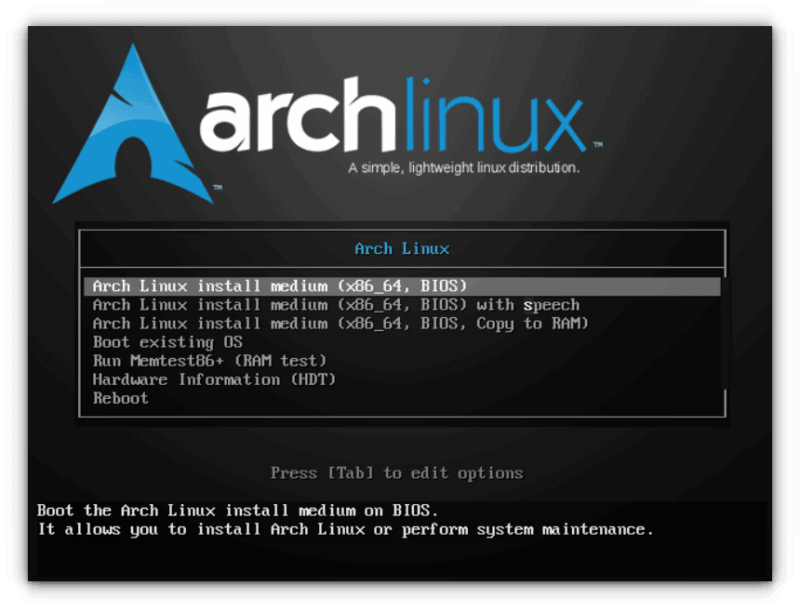
Once the operation is complete, we now have a bootable device that we can use to boot from. So, we can restart our machine to test it out:
Ventoy is a utility that provides a flexible and efficient way to create a multi-boot USB drive by simply copying ISO files onto it. So, it removes the need for formatting and extraction.
Therefore, we can boot multiple operating systems effortlessly from a single USB drive.
We can download the latest Linux executable from its GitHub’s releases page:
$ curl -LO "https://github.com/ventoy/Ventoy/releases/download/v1.0.94/ventoy-1.0.94-linux.tar.gz"Once downloaded, let’s extract the contents to the /opt directory:
$ sudo tar -xf ventoy-1.0.94-linux.tar.gz -C /optNow, we’re ready to create a multi-boot USB drive.
Ventoy comes with a GUI, WebUI, and a CLI front-end. For our use case, we’ll stick with the CLI version. So, let’s install Ventoy to our USB disk first:
$ /opt/ventoy-1.0.94/Ventoy2Disk.sh -g -L Ventoy -i /dev/sdb
Disk : /dev/sdb
Model:  USB DISK 2.0 (scsi)
Size : 14 GB
Style: GPT

Attention:
You will install Ventoy to /dev/sdb.
All the data on the disk /dev/sdb will be lost!!!

Continue? (y/n) y

All the data on the disk /dev/sdb will be lost!!!
Double-check. Continue? (y/n) y

Create partitions on /dev/sdb by parted in GPT style ...
Done
Wait for partitions ...
partition exist OK
create efi fat fs /dev/sdb2 ...
mkfs.fat 4.2 (2021-01-31)
success
Wait for partitions ...
/dev/sdb1 exist OK
/dev/sdb2 exist OK
partition exist OK
Format partition 1 /dev/sdb1 ...
mkexfatfs 1.3.0
Creating... done.
Flushing... done.
File system created successfully.
mkexfatfs success
writing data to disk ...
sync data ...
esp partition processing ...

Install Ventoy to /dev/sdb successfully finished.
Let’s break this down:
During the installation, Ventoy reminds us that the data will be lost. So, we must make sure to back up the drive before installing Ventoy on it.
Once Ventoy is successfully installed, our USB disk will contain two partitions:
$ lsblk /dev/sdb
NAME   MAJ:MIN RM  SIZE RO TYPE MOUNTPOINTS
sdb      8:16   1 14.8G  0 disk
├─sdb1   8:17   1 14.8G  0 part
└─sdb2   8:18   1   32M  0 part
The /dev/sdb1 partition is our data partition that will contain the ISO files. On the other hand, /dev/sdb2 is the Ventoy boot partition that contains the boot configuration and the bootloader itself.
Therefore, when we boot from the Ventoy disk, it presents a bootloader that lists all the ISO files found on the data partition — /dev/sdb1. From there, we can select an installation ISO file to boot into the installer.
Moreover, one benefit of using Ventoy is that if we have a huge disk, we are free to copy other files onto it without any issues. Therefore, we can organize the data partition to contain both our data and the ISO files in separate directories.
Now, let’s mount /dev/sdb1:
$ sudo mount /dev/sdb1 /mntLet’s copy the installation ISO to it:
$ cp ~/Downloads/archlinux-2023.07.01-x86_64.iso /mntOnce the ISO is copied, we’re done at this point. Ventoy takes care of it during the boot process. In addition, we can copy as many ISO files as we need.
We’re now ready to test our bootable USB drive. So, let’s restart the machine and boot from the Ventoy disk:
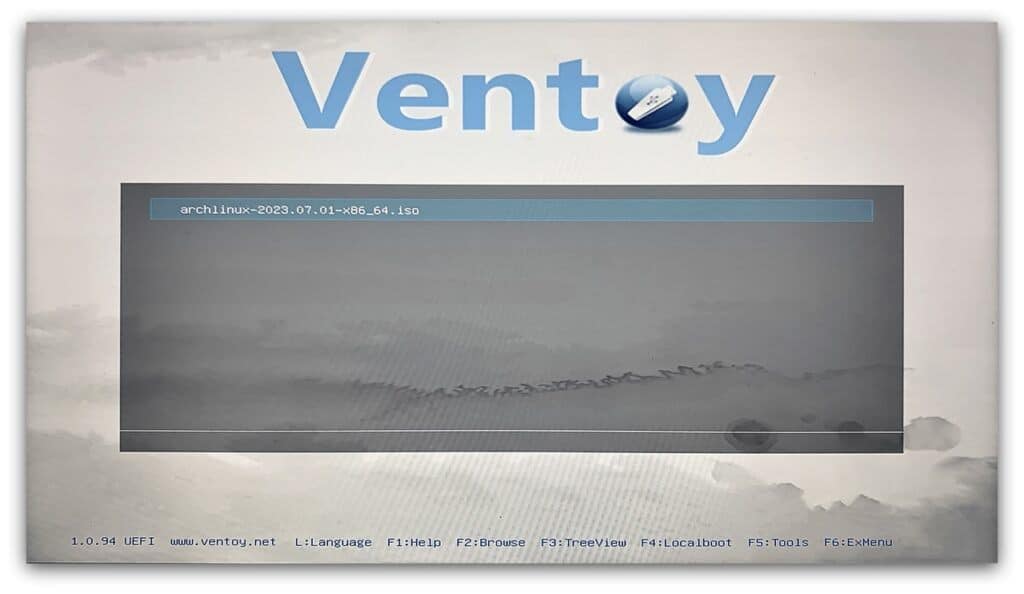
Ventoy finds all the ISO files on the data disk and presents them here in the list, as illustrated in the image.
In this article, we learned how to create a bootable USB disk in Linux. For that purpose, we used the dd utility to create a bootable USB drive in a single command.
As an alternative, we also discussed the Ventoy program to create a multi-boot USB drive.