

Learn through the super-clean Baeldung Pro experience:
>> Membership and Baeldung Pro.
No ads, dark-mode and 6 months free of IntelliJ Idea Ultimate to start with.
Last updated: June 13, 2025
Learn through the super-clean Baeldung Pro experience:
>> Membership and Baeldung Pro.
No ads, dark-mode and 6 months free of IntelliJ Idea Ultimate to start with.
All of us today have great expectations of data-storage reliability. That’s why many users do not even consider the possibility of losing data due to hardware damage. But hard drive failures are a well-documented issue. In this tutorial, we will see how to check the health of our disks in Linux.
We will not address how to recover information from damaged disks, which is a different topic. Instead, we are interested in whether it is time to change our hard drives because they are in a pre-fail state or some malfunction has already occurred.
Everything is a file in Unix and its derivatives, such as Linux. All our hardware components correspond to device files, and the system communicates with them using these files.
Most device files are part of a virtual file system traditionally mounted on /dev. For instance, /dev/sda is usually the first disk in most Linux installations.
Device files can also match specific resources of devices, such as disk partitions. So, if our disk is /dev/sda, its first partition is /dev/sda1.
In the rest of this tutorial, we need to know which device files identify our disks and their partitions. Let’s look at some examples: /dev/hd[a-z], /dev/sd[a-z], /dev/vd[a-z], /dev/nst*, /dev/sg*, /dev/twe[0-9], and so on.
There are several methods to find all storage devices. First, let’s identify the disks via lshw:
# lshw -class disk
  *-disk
       description: ATA Disk
       product: SanDisk SD8SN8U2
       [...]
       logical name: /dev/sda
       [...]
       size: 238GiB (256GB)
       [...]
  *-disk
       description: ATA Disk
       product: HGST HTS721010A9
       [...]
       logical name: /dev/sdb
       [...]
       size: 931GiB (1TB)
       [...]
  *-disk
       description: SCSI Disk
       product: 024 HN-M101M
       [...]
       logical name: /dev/sdc
       [...]
       size: 931GiB (1TB)
       [...]
In this case, we have three disks. The detailed information provided by lshw helps us not to be mistaken.
Then, for each disk, we can list its partitions with lsblk, for example:
$ lsblk /dev/sda -o NAME,KNAME,FSTYPE,MOUNTPOINT,SIZE
NAME                KNAME FSTYPE      MOUNTPOINT   SIZE
sda                 sda                          238,5G
├─sda1              sda1  vfat        /boot/efi    512M
├─sda2              sda2  ext4        /boot        732M
└─sda3              sda3  crypto_LUKS            237,3G
  └─sda3_crypt      dm-0  LVM2_member            237,2G
    ├─vgmint-root   dm-1  ext4        /          236,3G
    └─vgmint-swap_1 dm-2  swap        [SWAP]       976M
In this case, /dev/sda contains an LVM with encrypted partitions. This tree-like view of partitions is quite intuitive. The difference between NAME and KNAME is that the former indicates the device name, while the latter means the internal kernel device name.
Disk drive manufacturers have taken a giant step toward predicting reliability in disk drives through Self-Monitoring, Analysis and Reporting Technology (SMART), included in most modern ATA/SATA, SCSI/SAS, and NVMe disks.
Its primary function is to detect and report various indicators of drive reliability to anticipate imminent hardware failures. It also carries out different types of drive self-tests.
The smartmontools package contains two utility programs (smartctl and smartd) to control and monitor storage systems using the SMART.
We will focus on smartctl, which is meant for interactive use, while smartd is a daemon to monitor SMART continuously.
gsmartcontrol is a graphical user interface for smartctl.
SMART technology includes a series of attributes or diagnostics chosen for each drive model. Attribute individualism is important because drive architectures vary from model to model.
Let’s see an example using the –all flag, which prints all SMART information about a physical disk. Looking for the same information on a virtual disk does not make sense, and it’s not possible.
Since smartctl is very verbose, we’ve filtered the following output to highlight the most relevant information:
# smartctl --all /dev/sdc
[...]

=== START OF INFORMATION SECTION ===
Model Family:     Seagate Samsung SpinPoint M8 (AF)
Device Model:     ST1000LM024 HN-M101MBB
Serial Number:    S31CJ9DF228176
LU WWN Device Id: 5 0004cf 20c9ecae7
Firmware Version: 2BA30001
User Capacity:    1.000.204.886.016 bytes [1,00 TB]
Sector Sizes:     512 bytes logical, 4096 bytes physical
Rotation Rate:    5400 rpm
Form Factor:      2.5 inches
Device is:        In smartctl database [for details use: -P show]
ATA Version is:   ATA8-ACS T13/1699-D revision 6
SATA Version is:  SATA 3.0, 6.0 Gb/s (current: 3.0 Gb/s)
Local Time is:    Thu May 19 12:15:17 2022 CEST
SMART support is: Available - device has SMART capability.
SMART support is: Enabled

=== START OF READ SMART DATA SECTION ===
[...]
SMART overall-health self-assessment test result: PASSED
[...]

Auto Offline Data Collection: Disabled.
[...]
Short self-test routine
recommended polling time: 	 (   2) minutes.
Extended self-test routine
recommended polling time: 	 ( 215) minutes.
[...]

SMART Attributes Data Structure revision number: 16
Vendor Specific SMART Attributes with Thresholds:
ID# ATTRIBUTE_NAME          FLAG     VALUE WORST THRESH TYPE      UPDATED  WHEN_FAILED RAW_VALUE
  1 Raw_Read_Error_Rate     0x002f   100   100   051    Pre-fail  Always       -       46
  2 Throughput_Performance  0x0026   252   252   000    Old_age   Always       -       0
  3 Spin_Up_Time            0x0023   090   090   025    Pre-fail  Always       -       3158
  4 Start_Stop_Count        0x0032   078   078   000    Old_age   Always       -       22556
  5 Reallocated_Sector_Ct   0x0033   252   252   010    Pre-fail  Always       -       0
[...]
First, the “start of information section” informs us that SMART support is available and enabled. That’s good.
After that, we read that the “SMART overall-health self-assessment test result” is “PASSED”. That’s fine, it means that the disk is still usable.
“Auto Offline Data Collection” periodically updates specific SMART attributes, but it could impact performance. It’s disabled, and we can leave it that way. However, if we want to enable it, we can run “smartctl -s on -o on -S on /dev/sdc”.
Further on, we see the estimated times for performing the self-tests: 2 minutes for the short one and nearly 4 hours (215 minutes) for the extended one.
In the continuation of this tutorial, we will do a short test. We should proceed with caution with the extended tests because their duration may impact disk wear. On larger disks, they can take up to ten hours or more.
The “Vendor Specific SMART Attributes with Thresholds” table brings us back to a fact of reality: the disk is old and in a pre-fail state.
Let’s look at the first attribute, the “Raw_Read_Error_Rate.” It appears only in the traditional hard drives since it doesn’t affect the modern flash storage drives. It indicates problems with the disk surface that can lead to permanent data loss.
We can consult the “Known ATA SMART attributes” chart for more information.
The “Vendor Specific SMART Attributes with Thresholds“ table reported by smartctl in the previous section relies on the Smartmontools’ database for ATA/SATA drives. Instead, SCSI/SAS and NVMe drives do not provide ATA/SATA-like SMART Attributes, so the database doesn’t contain any entries for these drives.
The -P show option displays if the drive is in the database, and if so, its presets, then exits:
# smartctl -P show /dev/sdc
smartctl 7.1 2019-12-30 r5022 [x86_64-linux-5.4.0-110-generic] (local build)
Copyright (C) 2002-19, Bruce Allen, Christian Franke, www.smartmontools.org

Drive found in smartmontools Database.  Drive identity strings:
MODEL:              ST1000LM024 HN-M101MBB
FIRMWARE:           2BA30001
match smartmontools Drive Database entry:
MODEL REGEXP:       ST(250|320|500|640|750|1000)LM0[012][124] HN-M[0-9]*MBB|APPLE HDD ST500LM012
FIRMWARE REGEXP:    .*
MODEL FAMILY:       Seagate Samsung SpinPoint M8 (AF)
ATTRIBUTE OPTIONS:  None preset; no -v options are required.
However, let’s suppose our ATA/SATA drive is not in the database. In that case, the attributes’ names displayed in the ATTRIBUTE_NAME column and the format of the raw attributes shown in the RAW_VALUE column may be incorrect. This issue is primarily cosmetic.
Luckily, the essential drive health monitoring/testing functionality of Smartmontools does not depend upon the database.
Let’s do a short self-test. Unfortunately, there’s no way to check progress, so we have to keep the command running until the results show up:
# smartctl -t short /dev/sdc
smartctl 7.1 2019-12-30 r5022 [x86_64-linux-5.4.0-110-generic] (local build)
Copyright (C) 2002-19, Bruce Allen, Christian Franke, www.smartmontools.org

=== START OF OFFLINE IMMEDIATE AND SELF-TEST SECTION ===
Sending command: "Execute SMART Short self-test routine immediately in off-line mode".
Drive command "Execute SMART Short self-test routine immediately in off-line mode" successful.
Testing has begun.
Please wait 2 minutes for test to complete.
Test will complete after Thu May 19 12:42:54 2022 CEST
Use smartctl -X to abort test.
After about two minutes, we get the test results. Two results will appear because we had previously performed the same test:
# smartctl -l selftest /dev/sdc
smartctl 7.1 2019-12-30 r5022 [x86_64-linux-5.4.0-110-generic] (local build)
Copyright (C) 2002-19, Bruce Allen, Christian Franke, www.smartmontools.org

=== START OF READ SMART DATA SECTION ===
SMART Self-test log structure revision number 1
Num  Test_Description    Status                  Remaining  LifeTime(hours)  LBA_of_first_error
# 1  Short offline       Completed without error       00%      2575         -
# 2  Short offline       Completed without error       00%      2533         -
The good news is the error-free completion status, but let’s remember that the disk is in a pre-fail state.
We will not delve into the use of gsmartcontrol because it provides us with the same information and functionalities as smartctl. It’s just more convenient to use because it has a graphical interface. However, we should remember to run it with root permissions.
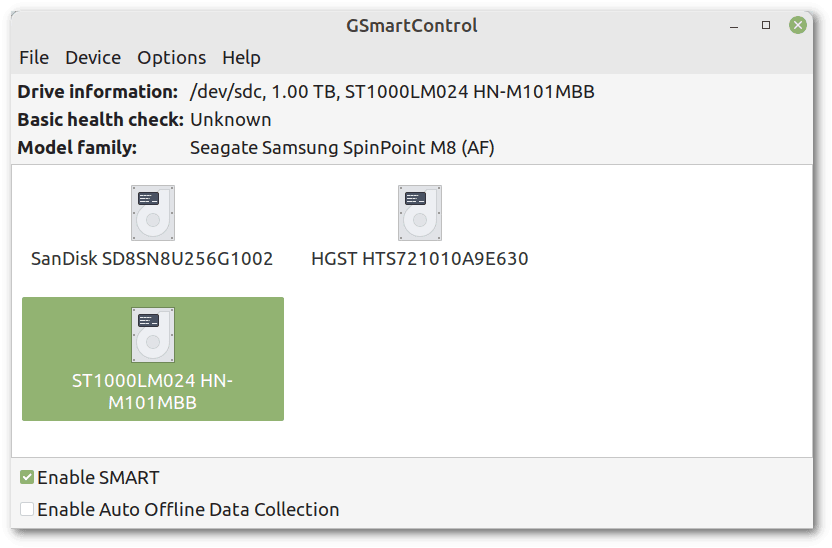
When we open gsmartcontrol, we can choose which disks to analyze. We have the essential information to recognize the disk and the ability to enable or disable SMART and Auto Offline Data Collection.
In this example, we choose the same disk we saw earlier:
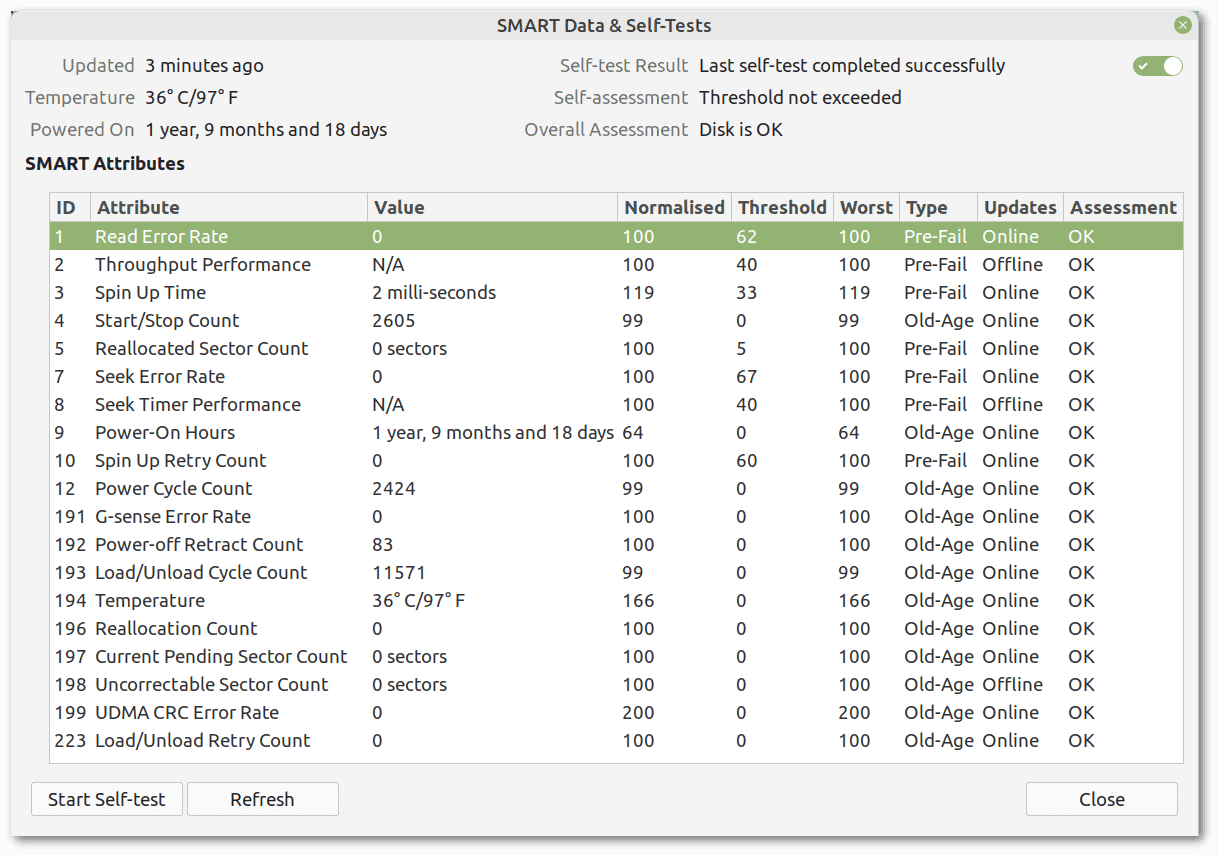
 Then let’s see all the basic SMART information:
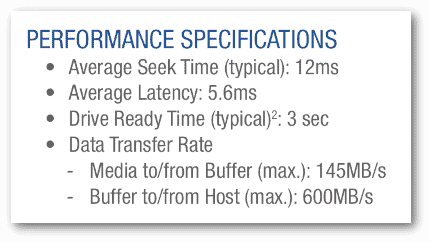
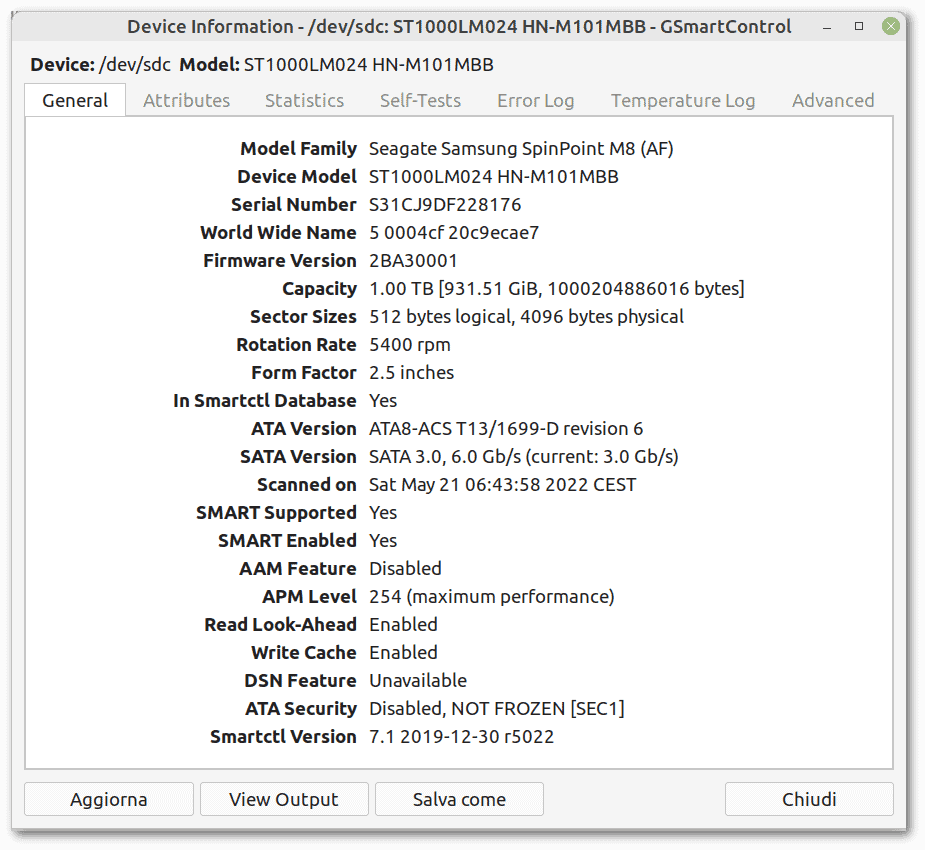 We can note that the speed of the SATA interface is lower than the expected one, as reported in the row “SATA Version is: SATA 3.0, 6.0 Gb/s (current: 3.0 Gb/s)”. This is a fairly common problem and is discussed in various forums and articles. However, it is not a problem, in this case, considering the maximum “Media to/from Buffer” speed of 145MB/s, as stated in the datasheet provided by the manufacturer:
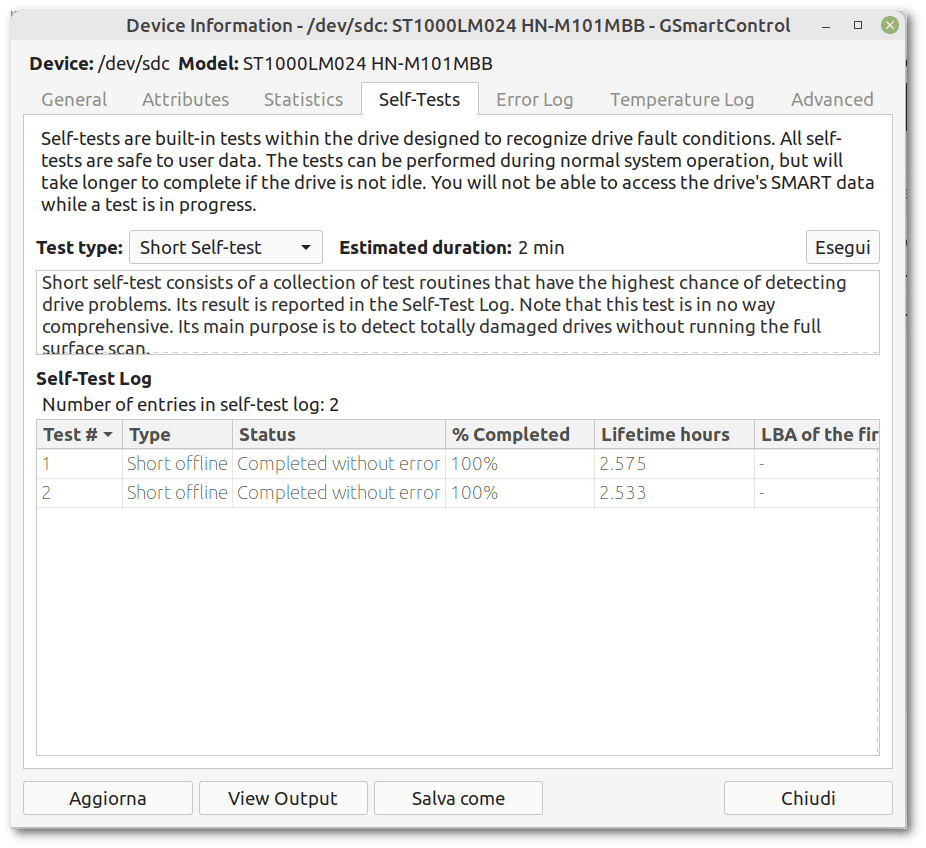
 Moreover, we can easily run short and extended tests:
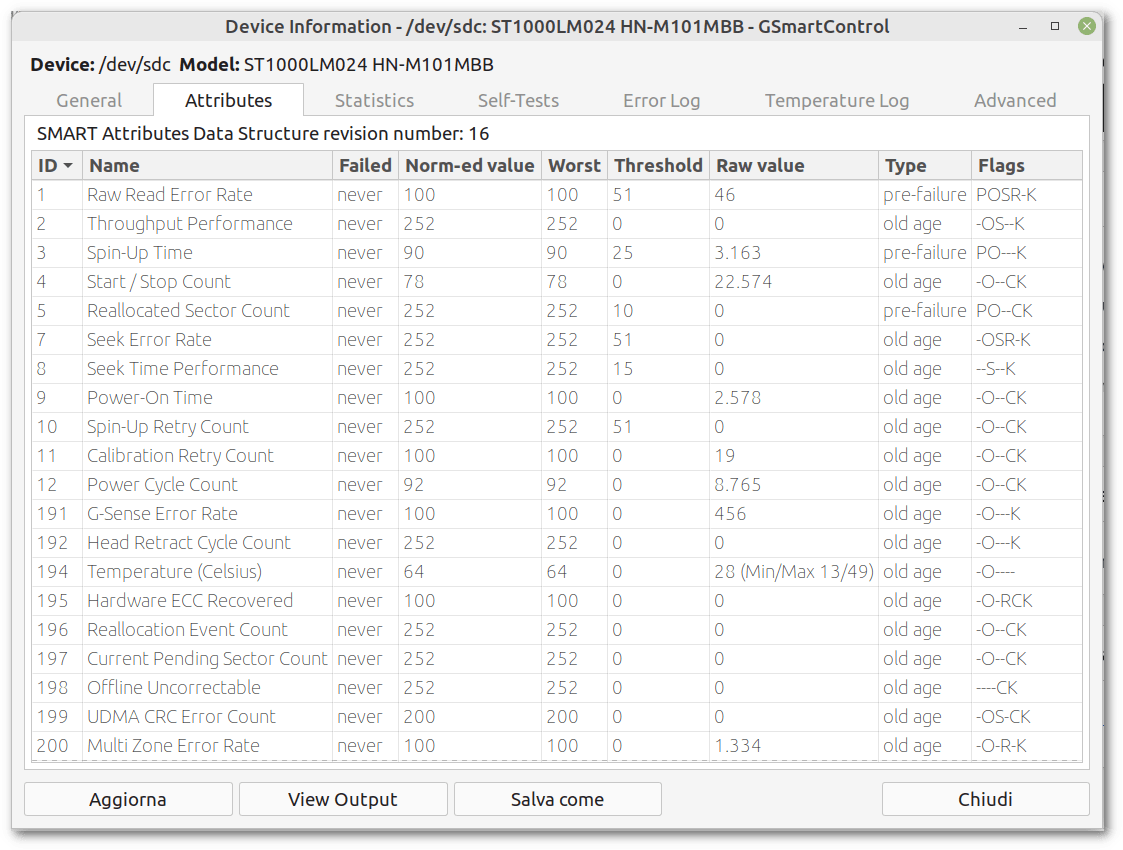
 SMART attributes are also easy to consult:
 As we saw in the previous screenshots, the best benefit of gsmartcontrol is that it guards us against having to specify smartctl options. In many cases, it will be fine. However, gsmartcontrol provides the ability to specify custom options to smartctl, as reported on the troubleshooting page.
We can install and run Gnome Disk Utility in desktop environments other than Gnome, such as XFCE, Cinnamon, etc. So, despite its name, using Gnome is not mandatory. Let’s remember to use root permissions.
It has a lot of functionality. However, what we are interested in is its health status. Let’s select the disk we want to check from the list of storage devices on the left. Gnome Disk Utility will show the disk’s information, partitions, and status. Then, “SMART Data & Self-Tests” is available in the three-dot menu button. Hopefully, the “Overall Assessment” should report that “Disk is OK.” In this window, we can start a self-test:
 We will not elaborate further on this tool because what we previously told about SMART applies.
SMART information is not available on all commonly used devices. For example, USB flash drives do not have it.
In such cases, the first thing to consider is that inexpensive devices such as USB sticks are not suitable for the permanent storage of our data. More likely, they help temporary exchange data from one computer to another without claiming to be durable devices. In fact, compared to hard drives, they tend to break more easily. There are high chances of their internal components failing before NAND memories reach their max read and write limit.
When there is no SMART information, we can do a device health check with badblocks. It is part of the e2fsprogs project and part of e2fsck when passing the option -c to scan for bad blocks and prevent data from being stored on them.
When run as a standalone program, badblocks gives a list of blocks with problems, if any. It might take a long time to complete.
We should remember to execute badblocks only on a partition that is not mounted. Root permissions are required, the -s flag shows the progress, and the -v flag outputs the detected bad sectors:
# badblocks -sv /dev/sdd1
Checking blocks 0 to 15247359
Checking for bad blocks (read-only test):   0.00% done, 0:00 elapsed. (0/0/0 err  0.53% done, 0:04 ela    0.81% done, 0:  1.08% done, 0:08 elapse  1.22% done, 0:09 done
Pass completed, 0 bad blocks found. (0/0/0 errors)
In this example, /dev/sdd1 is the only partition on the tested USB stick. This check was read-only. We can consult this documentation to perform a read-write test that could be destructive or non-destructive.
In this article, we saw how to check the health of our disks. Our best friends are SMART or, when not available, badblocks.
We should never think of our devices as eternally reliable memories. Instead, our suggestion for not losing data is to perform regular backups on multiple media.