

Learn through the super-clean Baeldung Pro experience:
>> Membership and Baeldung Pro.
No ads, dark-mode and 6 months free of IntelliJ Idea Ultimate to start with.
Learn through the super-clean Baeldung Pro experience:
>> Membership and Baeldung Pro.
No ads, dark-mode and 6 months free of IntelliJ Idea Ultimate to start with.
In this tutorial, we’ll consider some of the actively maintained open-source partitioning tools currently available on Linux. We’ll compare them using the same initial and target partitioning.
Although not always strictly necessary, let’s proceed to resize partitions from a live distribution, ensuring that all partitions are unmounted, and that swap is disabled. Before starting the live system, let’s shut down the machine without suspending or hibernating.
For extra safety, let’s check the integrity of all file systems with fsck and make sure that we have a full backup.
If we have a server, not all VPS providers allow us to start a live distribution and use its GUI via VNC. Choosing a provider with these capabilities will significantly help us when we need to resize partitions or perform backups for disaster recovery. In this regard, Clonezilla is convenient in a server environment because it can use remote target folders for our backups via ssh.
Optionally, we can also look at the disks’ health.
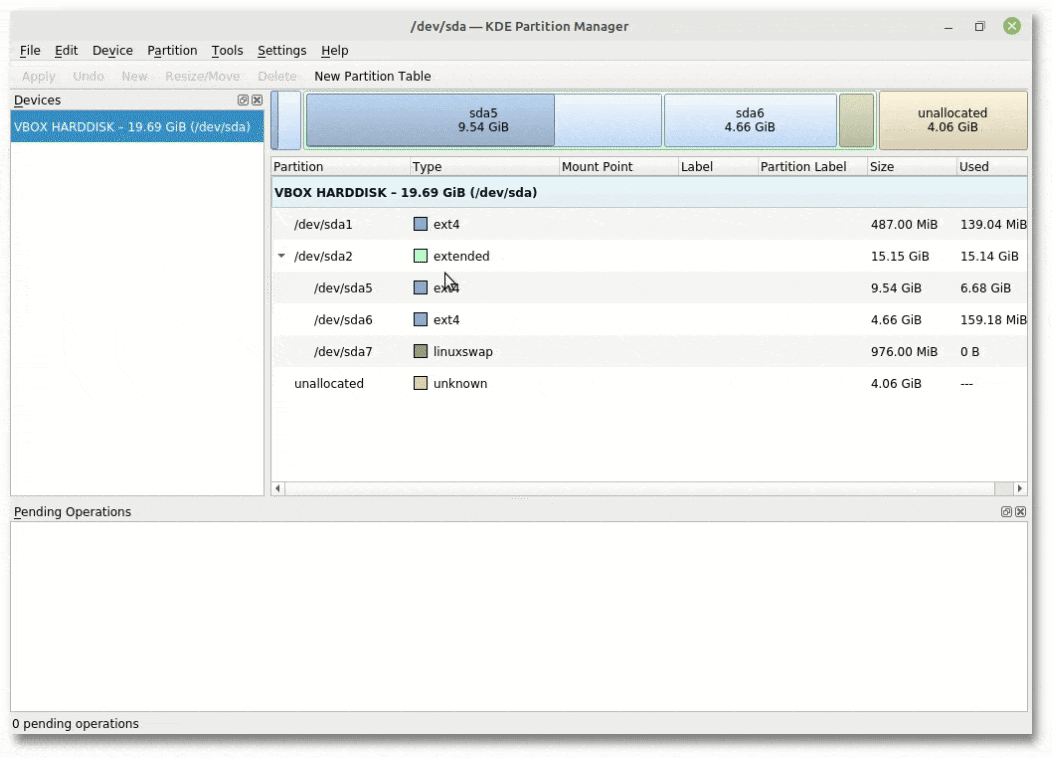
Our test configuration is an installation of Linux Mint 20.3 on a 20GB VirtualBox disk. In this case, the partition table is MBR type, and UEFI is not used. During the installation, we chose this partitioning:
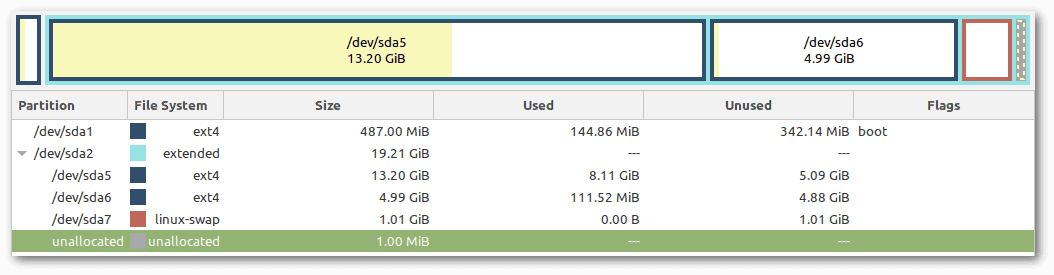
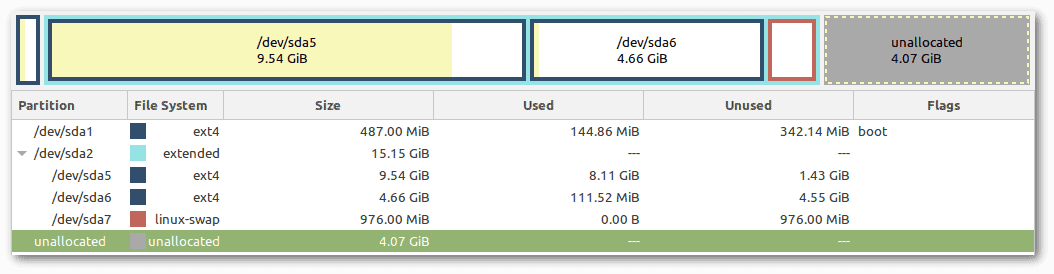 Our goal is to enlarge /dev/sda5 by about 3.7 GiB (4.0 GB) and, as a side effect, to move /dev/sda6 and /dev/sda7 to the right. We maintain a certain tolerance in partition sizes, which means that slight variations of a few hundred MB don’t matter:
 The partitions’ UUIDs must remain the same for our Linux installation to continue booting. Or, as a workaround in case of UUID changes, we can manually update /etc/fstab. If in doubt, we can see the list of all UUIDs with blkid.
Before trying the following partition tools, these are the preparatory commands to be executed from a live distribution in our test machine to disable swap and check file systems integrity:
# swapoff -a # disables swapping on all known swap devices
# partitions="sda1 sda5 sda6" # we exclude sda2 (extended part) and sda7 (swap part)
# for part in $partitions; do umount /dev/$part; fsck /dev/$part; done
umount: /dev/sda1: not mounted.
fsck from util-linux 2.34
e2fsck 1.45.5 (07-Jan-2020)
/dev/sda1: clean, 311/124672 files, 35593/124672 blocks
umount: /dev/sda5: not mounted.
fsck from util-linux 2.34
e2fsck 1.45.5 (07-Jan-2020)
/dev/sda5: clean, 290856/625856 files, 1751000/2499840 blocks
umount: /dev/sda6: not mounted.
fsck from util-linux 2.34
e2fsck 1.45.5 (07-Jan-2020)
/dev/sda6: clean, 240/305216 files, 40749/1220352 blocksWe strongly suggest the following GUI tools because they help us avoid mistakes. In addition, they hide the complexity of resizing and moving partitions.
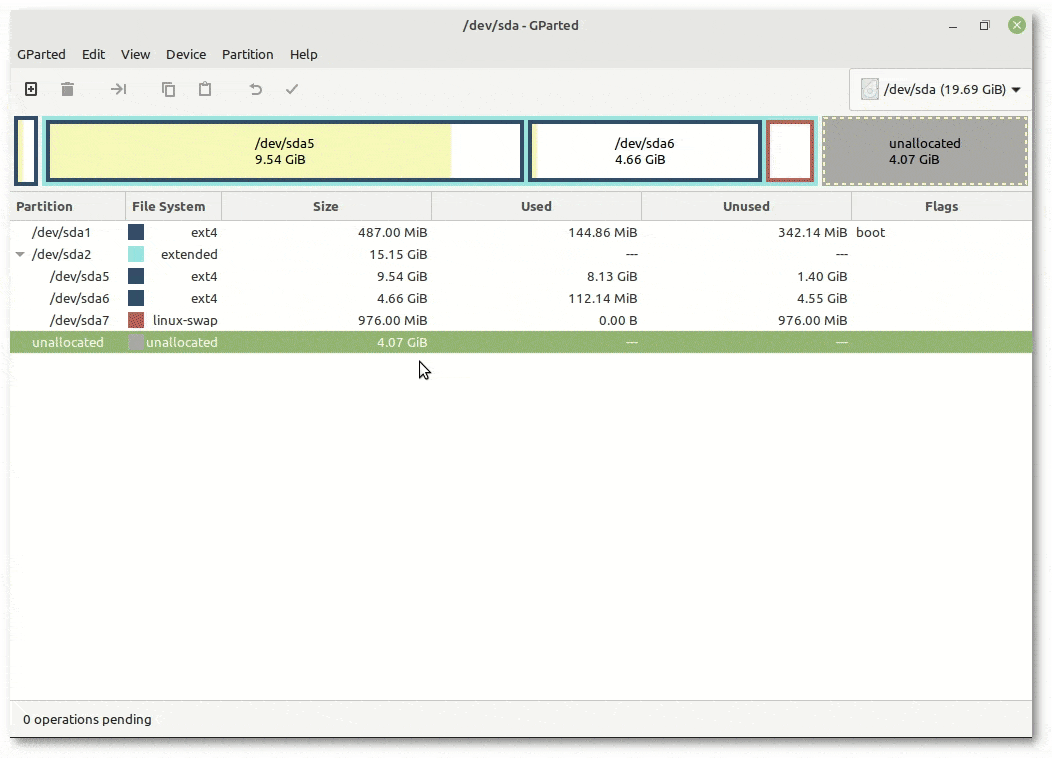
GParted is one of the most popular and well-known tools for resizing and moving partitions. It offers an intuitive and convenient GUI. The important thing is the correct order of operations:
When we apply the requested changes, GParted performs them in a fully automated manner:
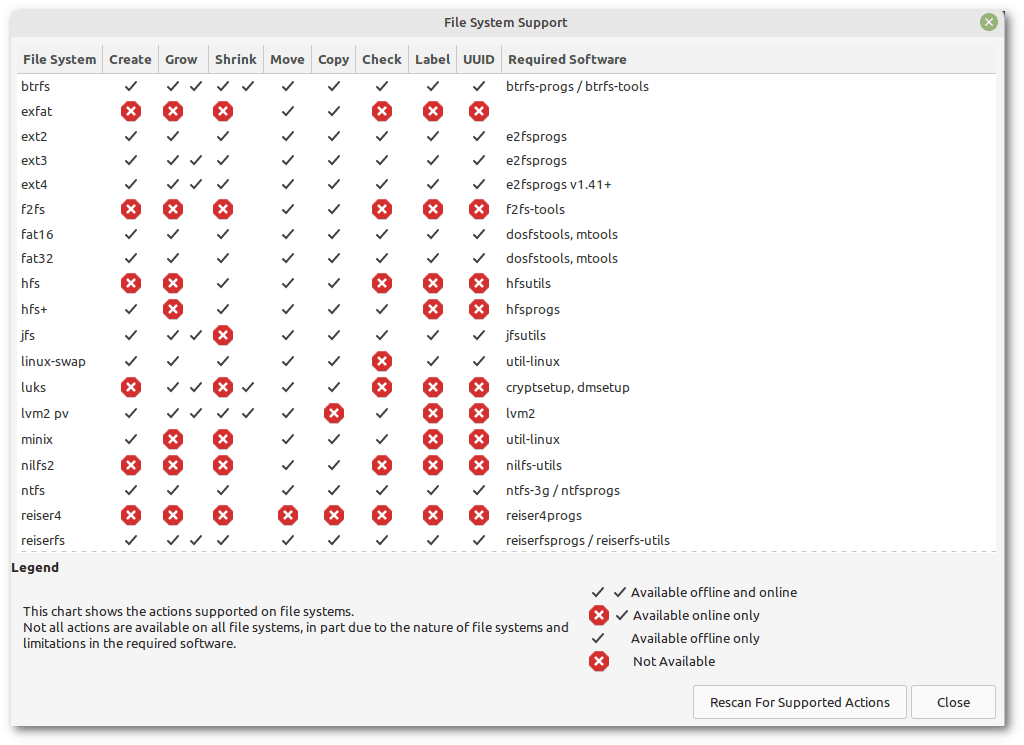
 To get a clear idea of what actions are possible for each type of file system, we can also consult the “File System Support” table. Its legend distinguishes between online operations on mounted or otherwise active partitions and offline on unmounted or inactive ones. We note that for ext3/4, it is possible to enlarge a partition online, but moving it is only possible offline:
 GParted can also show device and partitions information. It allows us to check the integrity of a file system and format it. Moreover, the menu that appears by right-clicking on a partition provides an option to change the UUID.
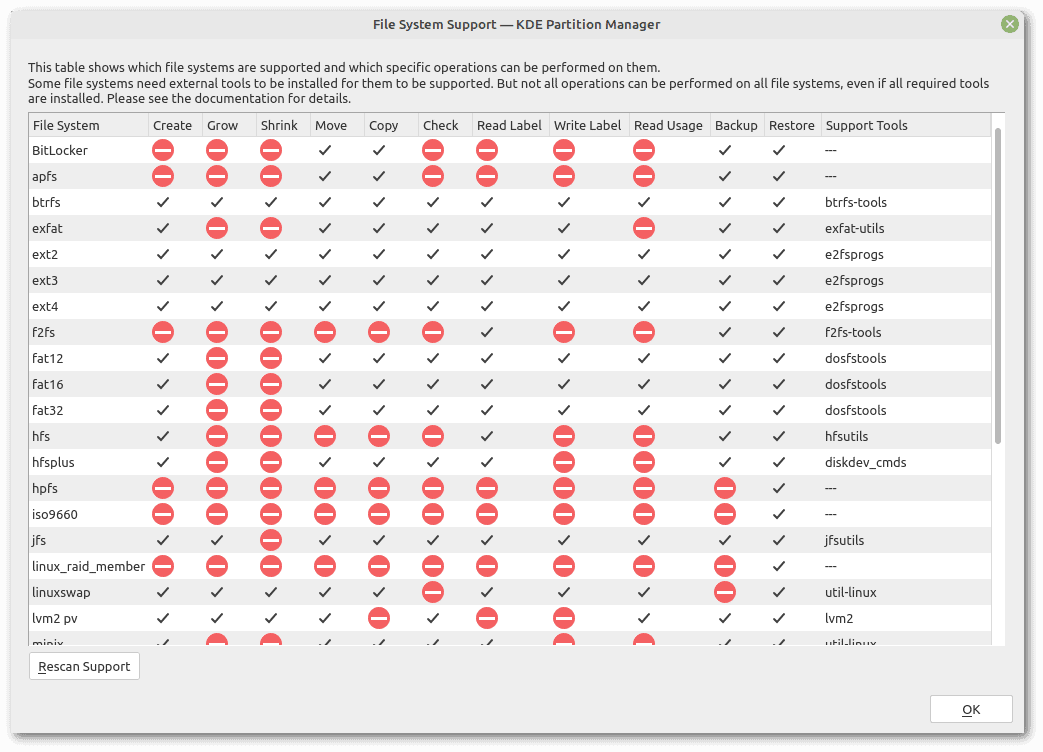
KDE Partition Manager is as intuitive as GParted. In addition, it has a partition backup and restoring feature. Let’s see it at work, doing the same operations we performed with GParted:
 Similar to GParted, it can show a table indicating the type of support for each file system. Let’s note that this support slightly differs from that of GParted. For example, while GParted allows us to grow and shrink FAT32 partitions, KDE Partition Manager does not:
 Finally, it has a shredding feature to overwrite a partition with random data or zeros. In this regard, we suggest looking at various solutions to remove confidential data from a disk’s free space.
GParted and KDE Partition Manager use libparted for some tasks but implement much other stuff themselves. Moreover, they use other command-line tools under the hood, listed in their previously seen “File System Support” tables. That’s why there isn’t an easy-to-use and comprehensive command-line equivalent of GParted or KDE Partition Manager.
Several well-known tools, such as parted, fdisk, cfdisk, and sfdisk, aren’t intuitive or straightforward. Moreover, these essential command-line tools often need to be used together with other dangerous utilities like dd or resize2fs.
So, resizing and moving partitions from the command line is difficult and error-prone. Let’s be cautious and do it only if it’s strictly necessary.
Let’s remember to disable swap with swapoff -a. Then, let’s see below how to do step-by-step the same tasks done with the graphical tools. We’ll show how to perform them without explaining each command’s option, for which we refer to the manual pages. Also, since the output is particularly verbose, we’ll report only the essential information.
Let’s check the initial state of the partitions. We’ll run sfdisk several times with the -V option because it verifies the integrity of the partitions:
# sfdisk -Vl /dev/sda
Disk /dev/sda: 19.71 GiB, 21142175744 bytes, 41293312 sectors
[...]
Device     Boot    Start      End  Sectors  Size Id Type
/dev/sda1  *        2048   999423   997376  487M 83 Linux
/dev/sda2        1001470 32765951 31764482 15.2G  5 Extended
/dev/sda5        1001472 21000191 19998720  9.5G 83 Linux
/dev/sda6       21002240 30765055  9762816  4.7G 83 Linux
/dev/sda7       30767104 32765951  1998848  976M 82 Linux swap / Solaris
Remaining 8533501 unallocated 512-byte sectors.
In particular, we must pay attention to the size of the partitions. We will re-run the same command at the end for comparison.
The UUIDs of the partitions must remain the same to keep the system bootable:
# blkid /dev/sda*
/dev/sda: PTUUID="015d4fac" PTTYPE="dos"
/dev/sda1: UUID="8d24bfcf-e4e5-44a9-8d5b-5ffb69f94900" TYPE="ext4" PARTUUID="015d4fac-01"
/dev/sda2: PTTYPE="dos" PARTUUID="015d4fac-02"
/dev/sda5: UUID="dae073ff-1825-4a92-94f0-2b00bbf3b101" TYPE="ext4" PARTUUID="015d4fac-05"
/dev/sda6: UUID="37b42f4f-6aac-43a0-955d-3929a86388ec" TYPE="ext4" PARTUUID="015d4fac-06"
/dev/sda7: UUID="463c1ec2-b3bf-4d7f-b173-12def5a0d8d3" TYPE="swap" PARTUUID="015d4fac-07"
In the end, we will re-execute the same command for comparison.
When we need to move a swap partition, the most reasonable action is to delete it, then recreate it in the new location:
# fdisk /dev/sda
[...]
Command (m for help): d
Partition number (1,2,5-7, default 7): 7

Partition 7 has been deleted.

Command (m for help): w
The partition table has been altered.
[...]
# sfdisk -V /dev/sda
The last command is for a partition integrity check. It’s a good practice to do this check after every change in the partition table.
growpart is used to extend a partition (usually the last) to fill the available space:
# growpart /dev/sda 2
CHANGED: partition=2 start=1001470 old: size=31764482 end=32765952 new: size=40291809 end=41293279
# sfdisk -V /dev/sda
In this case, we made sure to enlarge the extended partition by occupying the free 4GiB. Free space at the end of the disk typically occurs when we enlarge a virtual disk.
It’s a good idea to check the file system integrity before and after the move. Let’s pay attention to the sfdisk options because, in this case, they serve to move a partition without changing its size:
# e2fsck -f -y -v /dev/sda6
[...]
         231 files
# echo '+4G,' | sfdisk --move-data /dev/sda -N 6
# e2fsck -f -y -v /dev/sda6
[...]
         231 files
# sfdisk -Vl /dev/sda
[...]
Device     Boot    Start      End  Sectors  Size Id Type
/dev/sda1  *        2048   999423   997376  487M 83 Linux
/dev/sda2        1001470 41293278 40291809 19.2G  5 Extended
/dev/sda5        1001472 21000191 19998720  9.5G 83 Linux
/dev/sda6       29390848 39153663  9762816  4.7G 83 Linux
Compared to the beginning, we can see that sda2 is larger, while sda6 has the same size but a different starting point.
We should pay attention to sfdisk‘s options, which in this case are different from those previously used. This time we use sfdisk to enlarge a partition without changing its starting point:
# e2fsck -f -y -v /dev/sda5
[...]
      290850 files
# echo ',+4G' | sfdisk /dev/sda -N 5
[...]
New situation:
[...]
/dev/sda5        1001472 29388799 28387328 13.5G 83 Linux
[...]
# e2fsck -f -y -v /dev/sda5
[...]
      290850 files
# resize2fs /dev/sda5
[...]
Resizing the filesystem on /dev/sda5 to 3548416 (4k) blocks.
[...]
# e2fsck -f -y -v /dev/sda5
[...]
      290850 files
# sfdisk -Vl /dev/sda
[...]
Device     Boot    Start      End  Sectors  Size Id Type
/dev/sda1  *        2048   999423   997376  487M 83 Linux
/dev/sda2        1001470 41293278 40291809 19.2G  5 Extended
/dev/sda5        1001472 29388799 28387328 13.5G 83 Linux
/dev/sda6       29390848 39153663  9762816  4.7G 83 Linux
Remaining 2143742 unallocated 512-byte sectors.
We performed various checks with e2fsck and sfdisk, as in previous cases. The only new entry is resize2fs, which serves to resize an ext2/3/4 file system to fit the new partition size.
Now it’s time to recreate the swap partition we deleted at the beginning, taking care to assign it the same UUID:
# fdisk /dev/sda
[...]
Command (m for help): n
All space for primary partitions is in use.
Adding logical partition 7
First sector (39155712-41293278, default 39155712):
Last sector, +/-sectors or +/-size{K,M,G,T,P} (39155712-41293278, default 41293278):

Created a new partition 7 of type 'Linux' and of size 1 GiB.

Command (m for help): w
The partition table has been altered.
[...]
# mkswap --uuid "463c1ec2-b3bf-4d7f-b173-12def5a0d8d3" /dev/sda7
Setting up swapspace version 1, size = 1 GiB (1094426624 bytes)
no label, UUID=463c1ec2-b3bf-4d7f-b173-12def5a0d8d3
We needed mkswap to set up the Linux swap area in the just-created partition.
Let’s repeat the command used at the beginning and compare the new partition size:
# sfdisk -Vl /dev/sda
[...]
Device     Boot    Start      End  Sectors  Size Id Type
/dev/sda1  *        2048   999423   997376  487M 83 Linux
/dev/sda2        1001470 41293278 40291809 19.2G  5 Extended
/dev/sda5        1001472 29388799 28387328 13.5G 83 Linux
/dev/sda6       29390848 39153663  9762816  4.7G 83 Linux
/dev/sda7       39155712 41293278  2137567    1G 83 Linux
Remaining 6174 unallocated 512-byte sectors.
Everything is exactly as we wanted.
Let’s verify that the UUIDs have not changed:
# blkid /dev/sda*
/dev/sda: PTUUID="015d4fac" PTTYPE="dos"
/dev/sda1: UUID="8d24bfcf-e4e5-44a9-8d5b-5ffb69f94900" TYPE="ext4" PARTUUID="015d4fac-01"
/dev/sda2: PTTYPE="dos" PARTUUID="015d4fac-02"
/dev/sda5: UUID="dae073ff-1825-4a92-94f0-2b00bbf3b101" TYPE="ext4" PARTUUID="015d4fac-05"
/dev/sda6: UUID="37b42f4f-6aac-43a0-955d-3929a86388ec" TYPE="ext4" PARTUUID="015d4fac-06"
/dev/sda7: UUID="463c1ec2-b3bf-4d7f-b173-12def5a0d8d3" TYPE="swap" PARTUUID="015d4fac-07"
Finally, we reboot the system to verify that all the partitions and the swap are working correctly.
In this article, we saw that the easiest way to resize and move partitions is to use GParted or KDE Partition Manager from a live distribution.
However, GUI is not always available. We then explored how to perform the same operations using only command-line tools.
In any case, the probability of making a small mistake that can make our disk unusable is very high when we use the terminal. For this reason, it’s always essential to have a complete backup to make possible disaster recovery. For instance, just moving a comma in the sfdisk‘s parameters is enough to get two completely different results.