

Yes, we're now running our only Summer Sale. All Courses are 30% off until 20th July, 2026:
Learn through the super-clean Baeldung Pro experience:
>> Membership and Baeldung Pro.
No ads, dark-mode and 6 months free of IntelliJ Idea Ultimate to start with.
1. Introduction
The LAMP (Linux, Apache, MySQL, and PHP) stack is a popular development setup for Linux machines. It’s a group of open-source applications installed together mainly to host web applications and dynamic websites.
In this tutorial, we’ll learn how to configure LAMP on Linux. Here, we’ll use the Ubuntu distribution. First, we’ll ensure our system is up-to-date. After that, we’ll install Apache and update the firewall rules. The next step involves installing and configuring the MySQL database server. Lastly, we’ll install PHP and run a sample file in the web browser.
2. Update the System
Before we install any new packages, we’ll check that the apt package manager has the latest package information by using the apt update command with sudo privileges:
$ sudo apt update
[sudo] password for sidrah:
To validate permissions, we’ll enter the user’s password. After that, we’ll wait for the update to complete.
Using sudo as a security practice enables us to execute specific commands that require the root account. In addition, this approach enhances the security of the system as we get the permissions necessary to perform the task without directly using root.
3. Install Apache
Once we’ve updated the apt package, we’ll install the Apache web server:
$ sudo apt install apache2Once we execute this command, we get details of storage usage and a list of packages to be installed. We’ll press Y and hit the Return key to continue the installation process.
We’ll wait for the installation to complete. The next step is to start the Apache service using systemctl:
$ sudo systemctl start apache2The last step involves enabling the Apache service to start on boot:
$ sudo systemctl enable apache2Now, Apache starts whenever we boot the Linux machine, and we don’t have to start this service manually.
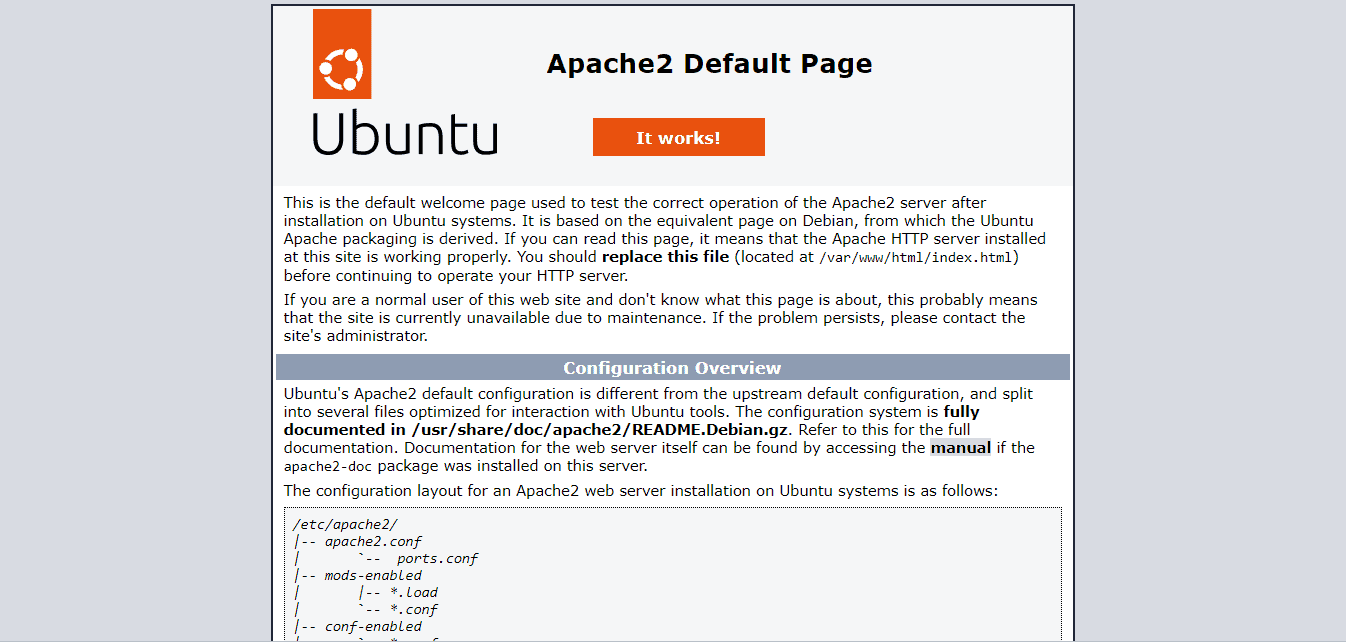
Lastly, we’ll check if we’ve configured the web server correctly by visiting localhost:
However, if we want to access the Apache web server remotely, we can access it using a local or remote IP address.
In our case, we’ll access the server using the machine’s LAN IP address. If we aren’t sure about the IP address, we can view it using the ip addr show command:
$ ip addr show eth0 | awk '/inet/ { sub(/\/.*$/,""); print $2; }In the above command, we used ip addr show to retrieve detailed information about the eth0 interface. Next, we used the awk command to match the lines containing the pattern inet. After that, the sub(/\/.*$/,””) portion of the command removes the subnet portion of the IPv4 addresses. Lastly, we only print the second field of each line.
The IP address of the machine will be printed on the terminal. After that, we’ll type the same IP address in the browser. Finally, we’re able to see the default Apache web page.
4. Configure the Uncomplicated Firewall (ufw)
The next step is to configure ufw to allow HTTP and HTTPS traffic. For this process, we’ll first check the ufw application list:
$ sudo ufw app listAvailable applications: Apache Apache Full Apache Secure
Next, we’ll expand the Apache Full details to check the ports. This step is important as we want to determine to which port ufw will enable traffic:
$ sudo ufw app info "Apache Full"
Profile: Apache Full
Title: Web Server (HTTP,HTTPS)
Description: Apache v2 is the next generation of the omnipresent Apache web
server.
Ports:
80,443/tcp
We can see that we’d enable traffic to ports 80 and 443, the ports for HTTP and HTTPS respectively. Let’s apply this application profile via allow:
$ sudo ufw allow "Apache Full"
Rules updated
Rules updated (v6)
Thus, we’ve configured ufw to allow incoming web server traffic.
5. Install MySQL
After we configured the Apache web server, we can now install a database management system. The LAMP stack consists of a MySQL database management system that enables us to store, edit, retrieve, and delete data for dynamic web applications.
We’ll install MySQL as a part of this stack via the mysql-server package:
$ sudo apt install mysql-server
done!
Setting up mysql-server-8.0 (8.0.33-0ubuntu0.22.04.4) ...
mysqld will log errors to /var/log/mysql/error.log
mysqld is running as pid 4542
The next step is to start the mysql service:
$ sudo systemctl start mysqlSimilar to the Apache service, we’ll also configure this service to start on boot:
$ sudo systemctl enable mysqlLastly, we can access the mysql terminal to verify the installation:
$ sudo mysqlThis opens the mysql terminal:
$ sudo mysql
Welcome to the MySQL monitor.  Commands end with ; or \g.
Your MySQL connection id is 8
Server version: 8.0.33-0ubuntu0.22.04.4 (Ubuntu)

Copyright (c) 2000, 2023, Oracle and/or its affiliates.

Oracle is a registered trademark of Oracle Corporation and/or its
affiliates. Other names may be trademarks of their respective
owners.

Type 'help;' or '\h' for help. Type '\c' to clear the current input statement.
mysql> exit
Bye
We’ll type exit to return to the Linux terminal.
6. Install PHP
The last step in configuring the LAMP stack is to install PHP. The PHP component of the LAMP stack displays dynamic content. We can use it to run scripts, connect to databases and communicate with web servers to display information.
To configure PHP, we’ll not only install the default PHP package but also the libapache2-mod-php package to integrate PHP into the Apache web server. In addition, we’ll also install php-mysql to enable the connection between PHP and MySQL.
To summarize, we’ll install all three packages together:
$ sudo apt install php libapache2-mod-php php-mysqlAfter that, we’ll restart the apache2 web service to apply the changes:
$ sudo systemctl restart apache2To test PHP, we’ll create an info.php file:
$ cat /var/www/html/info.php<?php phpinfo(); ?>
Here, cat shows us we just request the PHP information via this sample script.
Lastly, we’ll access the file using http://127.0.0.1/info.php:
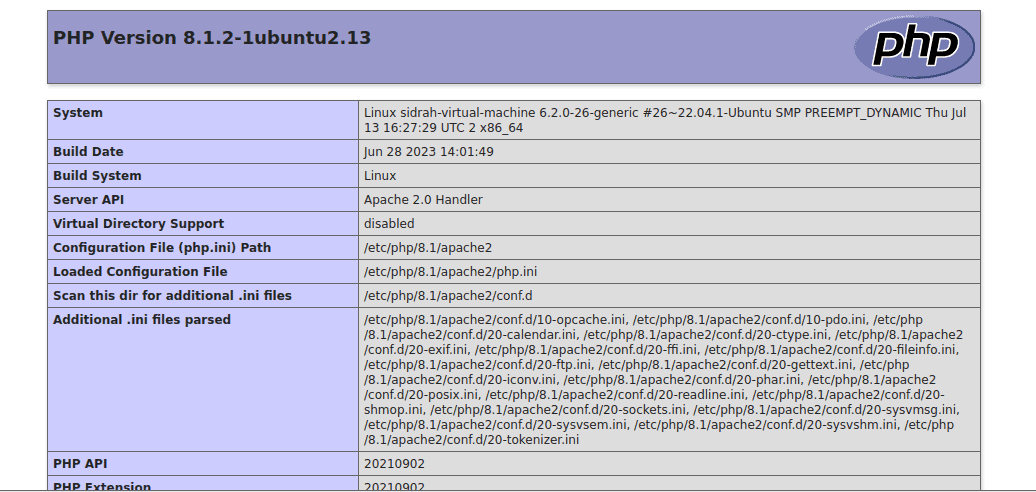
Here, we see detailed information about the current PHP configuration on our web server, confirming everything should be working fine
7. Conclusion
In this article, we discussed how to configure LAMP on Linux. We looked at a general overview of installing Apache. After that, we discussed installing the MySQL DBMS. Lastly, we learned how to install PHP and access the PHP files via the Apache web server.
It’s crucial to note that depending on the Linux distributions, the directory paths may vary. In addition, there might be configuration discrepancies for Apache, MySQL, and PHP components. Therefore, it’s important to refer to official documentation while setting up the LAMP stack.