

Mocking is an essential part of unit testing, and the Mockito library makes it easy to write clean and intuitive unit tests for your Java code.
Get started with mocking and improve your application tests using our Mockito guide:
Handling concurrency in an application can be a tricky process with many potential pitfalls. A solid grasp of the fundamentals will go a long way to help minimize these issues.
Get started with understanding multi-threaded applications with our Java Concurrency guide:
Spring 5 added support for reactive programming with the Spring WebFlux module, which has been improved upon ever since. Get started with the Reactor project basics and reactive programming in Spring Boot:
Since its introduction in Java 8, the Stream API has become a staple of Java development. The basic operations like iterating, filtering, mapping sequences of elements are deceptively simple to use.
But these can also be overused and fall into some common pitfalls.
To get a better understanding on how Streams work and how to combine them with other language features, check out our guide to Java Streams:
Explore Spring Boot 3 and Spring 6 in-depth through building a full REST API with the framework:
Yes, Spring Security can be complex, from the more advanced functionality within the Core to the deep OAuth support in the framework.
I built the security material as two full courses - Core and OAuth, to get practical with these more complex scenarios. We explore when and how to use each feature and code through it on the backing project.
You can explore the course here:
All Access is finally out, with all of my Spring courses. Learn JUnit is out as well, and Learn Maven is coming fast. And, of course, quite a bit more affordable. Finally.
>> GET THE COURSESpring Data JPA is a great way to handle the complexity of JPA with the powerful simplicity of Spring Boot.
Get started with Spring Data JPA through the guided reference course:
Refactor Java code safely — and automatically — with OpenRewrite.
Refactoring big codebases by hand is slow, risky, and easy to put off. That’s where OpenRewrite comes in. The open-source framework for large-scale, automated code transformations helps teams modernize safely and consistently.
Each month, the creators and maintainers of OpenRewrite at Moderne run live, hands-on training sessions — one for newcomers and one for experienced users. You’ll see how recipes work, how to apply them across projects, and how to modernize code with confidence.
Join the next session, bring your questions, and learn how to automate the kind of work that usually eats your sprint time.
1. Overview
Anthropic recently released a publication about how to build Effective AI Agents. In this document, they present some agentic patterns that software developers can follow as good practices. They also claim that we can use them as an alternative to complex frameworks. However, the reality is that in the Java Ecosystem, we do use large frameworks everywhere, such as Spring.
Although Spring is a big and complex framework, it provides tools that simplify the creation of effective agents using Spring AI.
In this article, we’ll review the patterns presented in the publication, along with some key definitions used, to ensure clarity. Then, we’ll implement these patterns using Spring AI. Since the focus is on implementing the patterns, we won’t focus on integrating with real model hosts.
2. Building Effective Agents with Spring AI
After working with dozens of teams building LLM agents across industries, Anthropic has proposed some simple and composable patterns. But first, let’s clear up two concepts they use in the publication:
- Agents are systems where LLMs dynamically direct their own processes and tool usage, maintaining control over how they accomplish tasks
- Workflows are systems where LLMs and tools are orchestrated through predefined code paths
Having this in mind, the patterns presented are:
- The Prompt Chaining Workflow breaks down complex tasks into a sequence of steps, with the output of each LLM prompt serving as input to the subsequent LLM prompt
- The Parallelization Workflow enables concurrent processing of multiple LLM operations, with their outputs aggregated programmatically
- The Routing Workflow drives intelligent routing of inputs to specialized handlers based on content classification
- The Orchestrator-Workers Workflow, where a central LLM decomposes tasks, delegates them to worker LLMs, and combines their results into a final response
- The Evaluator-Optimizer Workflow, where one LLM generates a result while another provides evaluation and feedback, in a loop
3. Dependencies
We’ll keep things simple by using the minimum dependencies we need. This means we won’t include any implementation like spring-ai-ollama-spring-boot-starter. Our solution will be based on interfaces instead of using any Model implementation:
<dependency>
    <groupId>org.springframework.ai</groupId>
    <artifactId>spring-ai-model</artifactId>
    <version>1.0.2</version>
</dependency>
<dependency>
    <groupId>org.springframework.ai</groupId>
    <artifactId>spring-ai-client-chat</artifactId>
    <version>1.0.2</version>
</dependency>
These two are sufficient to build agents with Spring AI, as we can utilize the Model interface and its extension, ChatModel. Additionally, the ChatClient is widely used nowadays, as we’ll see in the examples later in this tutorial.
4. Chain Workflow Agents with Spring AI
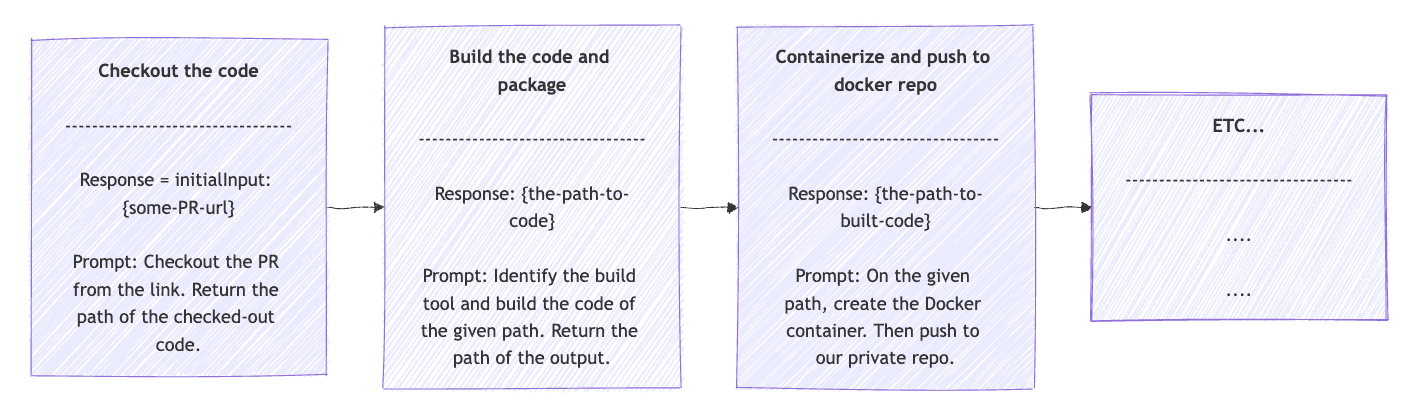
The Chain Workflow is a good fit in cases where a task can be broken down into sequential subtasks. The outcome of each subtask will be passed to the next one. We also get the opportunity to add some coding in between, for decisions or changes.
A good example to use in our CI/CD is a build pipeline. We can decompose the build pipeline into concrete, sequential steps:
- Checkout from VCS
- Build the code and package
- Containerize and push to Docker repo
- Deploy the Docker image to the test environment
- Run integration tests
Let’s start by assuming we have an OpsClient interface that extends ChatClient and also an implementation to interact with a DevOps Model. The effective agent with Spring AI will look like this:
public String opsPipeline(String userInput) {
    String response = userInput;

    for (String prompt : OpsClientPrompts.DEV_PIPELINE_STEPS) {
        String request = String.format("{%s}\n {%s}", prompt, response);

        ChatClient.ChatClientRequestSpec requestSpec = opsClient.prompt(request);
        ChatClient.CallResponseSpec responseSpec = requestSpec.call();
        response = responseSpec.content();

        if (response.startsWith("ERROR:")) {
            break;
        }
    }

    return response;
}
First, we use the OpsClientPrompts.DEV_PIPELINE_STEPS in a for loop. These steps will be more descriptive than the steps mentioned earlier. For example, for checking out from VCS, it would be something like “Checkout the code from the given URL. Return the path of the checked-out code or else the error occurred”.
In the Chain Pattern, each response feeds into the input of the subsequent step. So the request field does exactly that. Given the next step prompt and the previous response, create the request that will be the parameter of the prompt() method, which will be executed using the call() method. The outcome is stored in response to be used in the next step. The initial response value will be the user input. Finally, between steps, we add an if clause that breaks the loop in case of errors. The Chain Workflow should look like:
5. Parallelization Workflow Agents with Spring AI
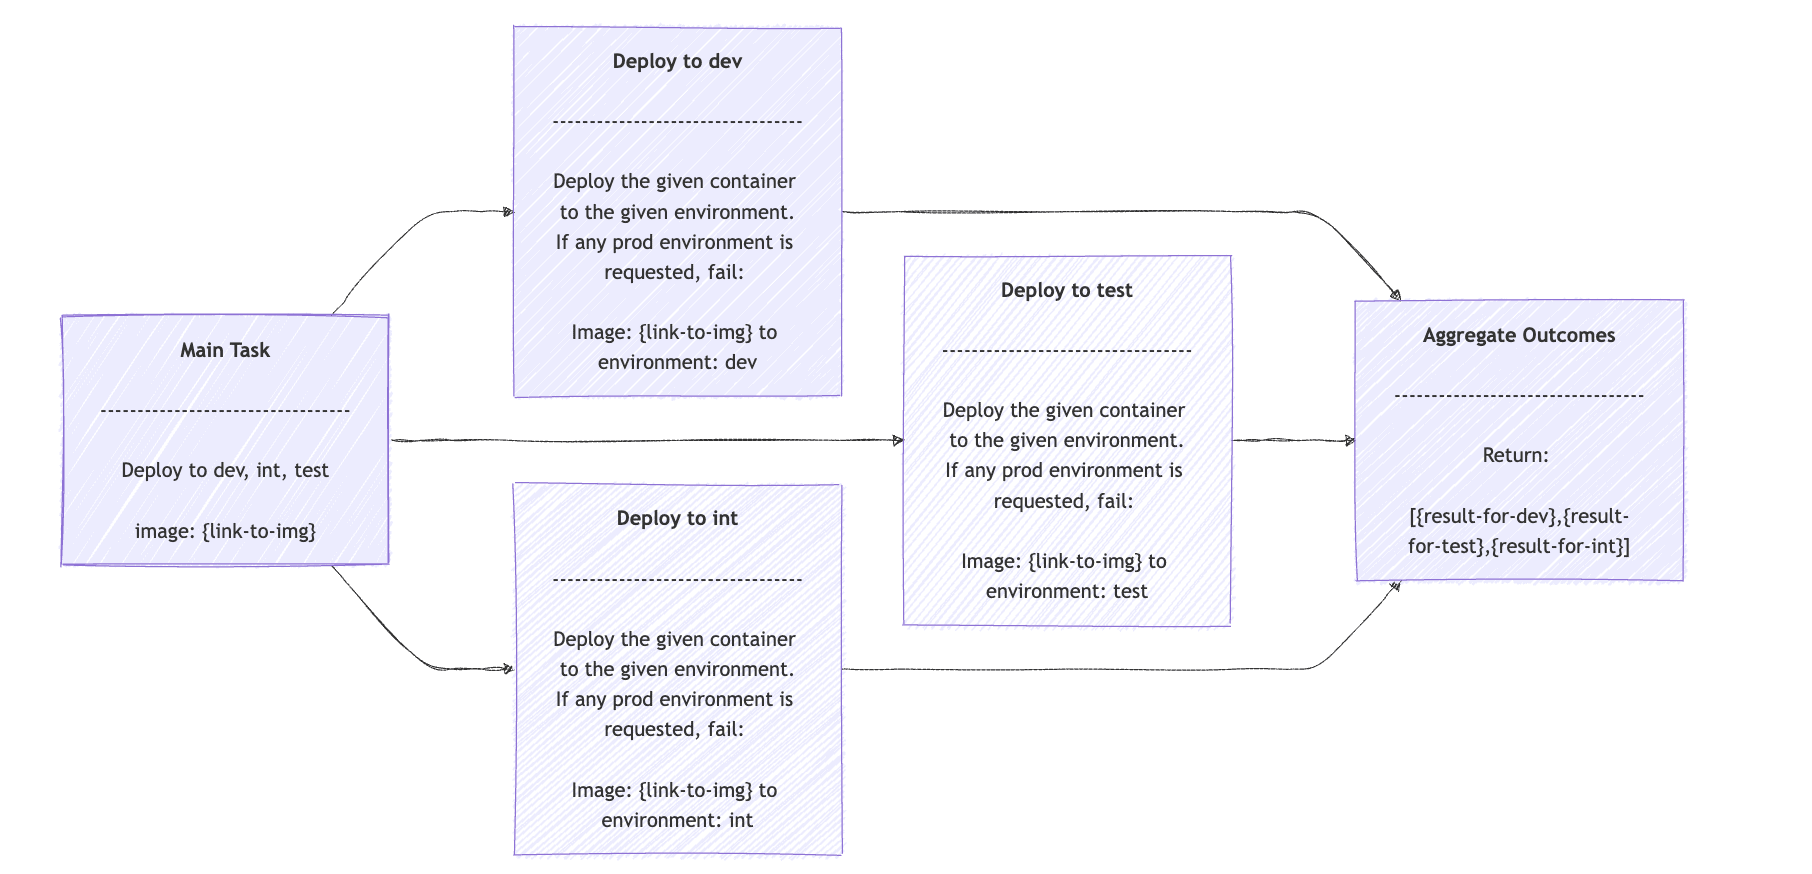
The Parallelization Workflow is a good fit in cases where a task can be broken into independent subtasks that can be worked on in parallel. The outcomes are aggregated programmatically into a single result.
A practical example, adhering to the same DevOps Model concept, is the task of deploying a new version of our code into multiple environments, such as test, dev, integration, etc. Since this involves an AI agent, we expect that more happens behind the scenes, such as checking the department guidelines to validate that this image can be deployed to each environment, etc. The effective agents with Spring AI will make use of the ExecutorService and CompletableFuture:
public List<String> opsDeployments(String containerLink, List<String> environments, int maxConcurentWorkers) {
    try (ExecutorService executor = Executors.newFixedThreadPool(maxConcurentWorkers)) {
        List<CompletableFuture<String>> futures = environments.stream()
          .map(env -> CompletableFuture.supplyAsync(() -> {
              try {
                  String request = OpsClientPrompts.NON_PROD_DEPLOYMENT_PROMPT + "\n Image:" + containerLink + " to environment: " + env;

                  ChatClient.ChatClientRequestSpec requestSpec = opsClient.prompt(request);
                  ChatClient.CallResponseSpec responseSpec = requestSpec.call();
                  return responseSpec.content();
              } catch (Exception e) { ... }
          }, executor))
          .toList();

        CompletableFuture<Void> allFutures = CompletableFuture.allOf(futures.toArray(CompletableFuture[]::new));
        allFutures.join();

        return futures.stream()
          .map(CompletableFuture::join)
          .collect(Collectors.toList());
    }
}
The opsDeployments() method accepts the link to the container with the image to deploy, the environments we target, and the maximum concurrent workers to use. Then, we use streams to break down the task into one deployment task per given environment.
Each request field is the prompt for the deployment, in our case, OpsClientPrompts.NON_PROD_DEPLOYMENT_PROMPT, the containerLink, and the specific environment. The result is just an array of each outcome. The Parallelization Workflow should look like:
6. Routing Workflow Agents with Spring AI
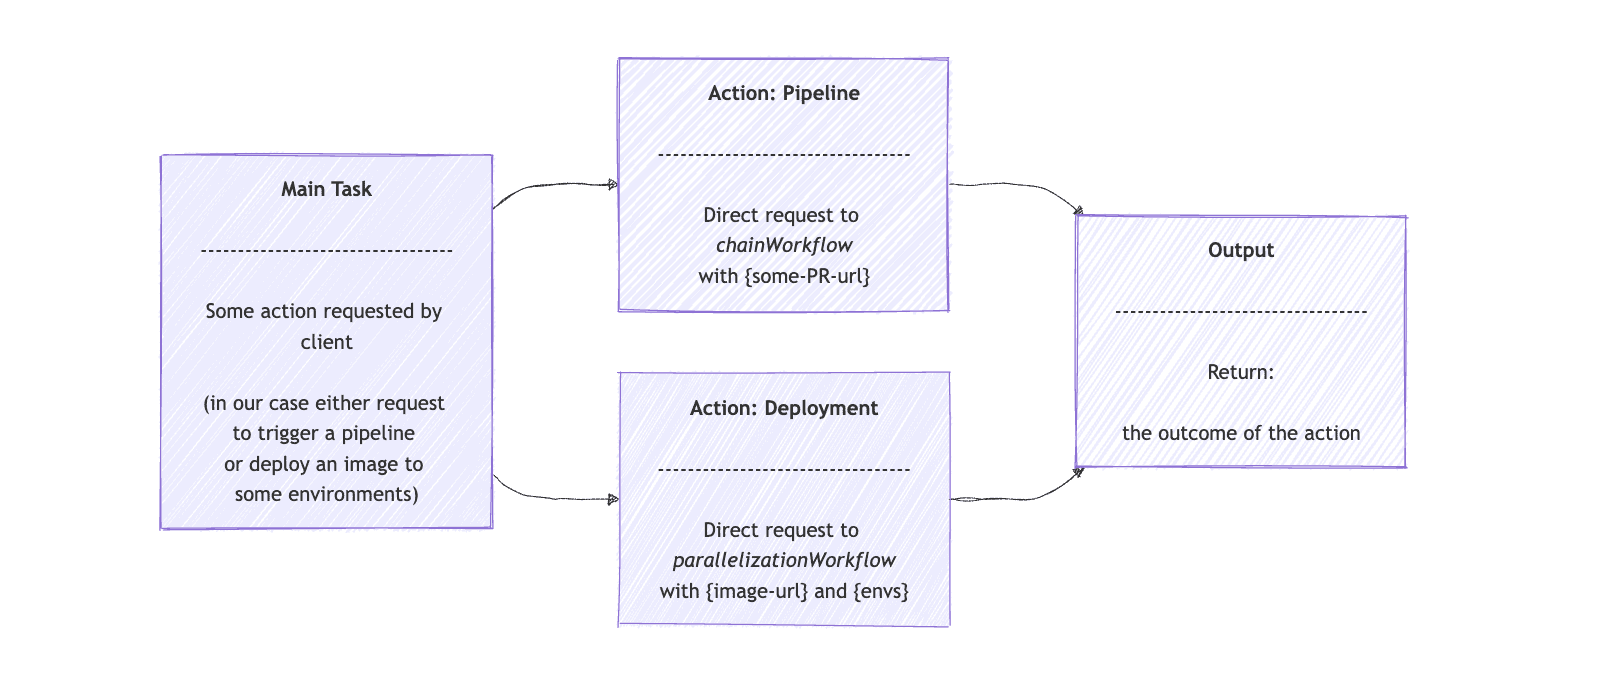
The Routing Workflow fits well for cases when we want to distribute a task to a more specialized AI model. A good example is an LLM that acts as a customer service support, receives customer input, and then redirects the task to the technical support model, account service model, etc. The customer doesn’t need to know there are more than one model. Rather, use the general-purpose one, which acts as a Routing Workflow.
In continuation of our DevOps Model example, we can have a general-purpose DevOps Agent that accepts any request for building a pull request (PR) pipeline or deploying a PR to some environment. Then, the Routing Workflow will be used to direct the request to the effective agents with Spring AI, from the previous examples.
Let’s start by using the opsRoutingClient interface that extends ChatClient. We provide the routing options and user input to the client. Then, we ask it to route the request to either the ChainWorkflow or ParallelizationWorkflow, as implemented earlier in this article:
public class RoutingWorkflow {
    private final OpsRouterClient opsRouterClient;
    private final ChainWorkflow chainWorkflow;
    private final ParallelizationWorkflow parallelizationWorkflow;

    // constructor omitted
    public String route(String input) {
        String[] route = determineRoute(input, OPS_ROUTING_OPTIONS);
        String opsOperation = route[0];
        List<String> requestValues = route[1].lines()
          .toList();

        return switch (opsOperation) {
            case "pipeline" -> chainWorkflow.opsPipeline(requestValues.getFirst());
            case "deployment" -> executeDeployment(requestValues);
            default -> throw new IllegalStateException("Unexpected value: " + opsOperation);
        };
    }

    private String[] determineRoute(String input, Map<String, String> availableRoutes) {
        String request = String.format("""
          Given this map that provides the ops operation as key and the description for you to build the operation value, as value: %s.
          Analyze the input and select the most appropriate operation.
          Return an array of two strings. First string is the operations decided and second is the value you built based on the operation.

          Input: %s""", availableRoutes, input);

        ChatClient.ChatClientRequestSpec requestSpec = opsRouterClient.prompt(request);
        ChatClient.CallResponseSpec responseSpec = requestSpec.call();
        String[] routingResponse = responseSpec.entity(String[].class);
        System.out.printf("Routing Decision: Operation is: %s\n, Operation value: %s%n", routingResponse[0], routingResponse[1]);

        return routingResponse;
    }

    private String executeDeployment(List<String> requestValues) {
        String containerLink = requestValues.getFirst();
        List<String> environments = Arrays.asList(requestValues.get(1)
          .split(","));
        int maxWorkers = Integer.parseInt(requestValues.getLast());

        List<String> results = parallelizationWorkflow.opsDeployments(containerLink, environments, maxWorkers);

        return String.join(", ", results);
    }
}
The route() method first determines the specialized task to use, either pipeline or deployment. The route array will contain the action and the prompt that the opsRouterClient returned. Then, it sends the request straight to chainWorkflow if the action is “pipeline“. In the case of “deployment“, the executeDeployment() method prepares the request and sends it to the parallelizationWorkflow agent.
A graphical representation of effective agents with Spring AI, for the Routing Workflow Pattern, will look like:
7. Orchestrator Workers Agents with Spring AI
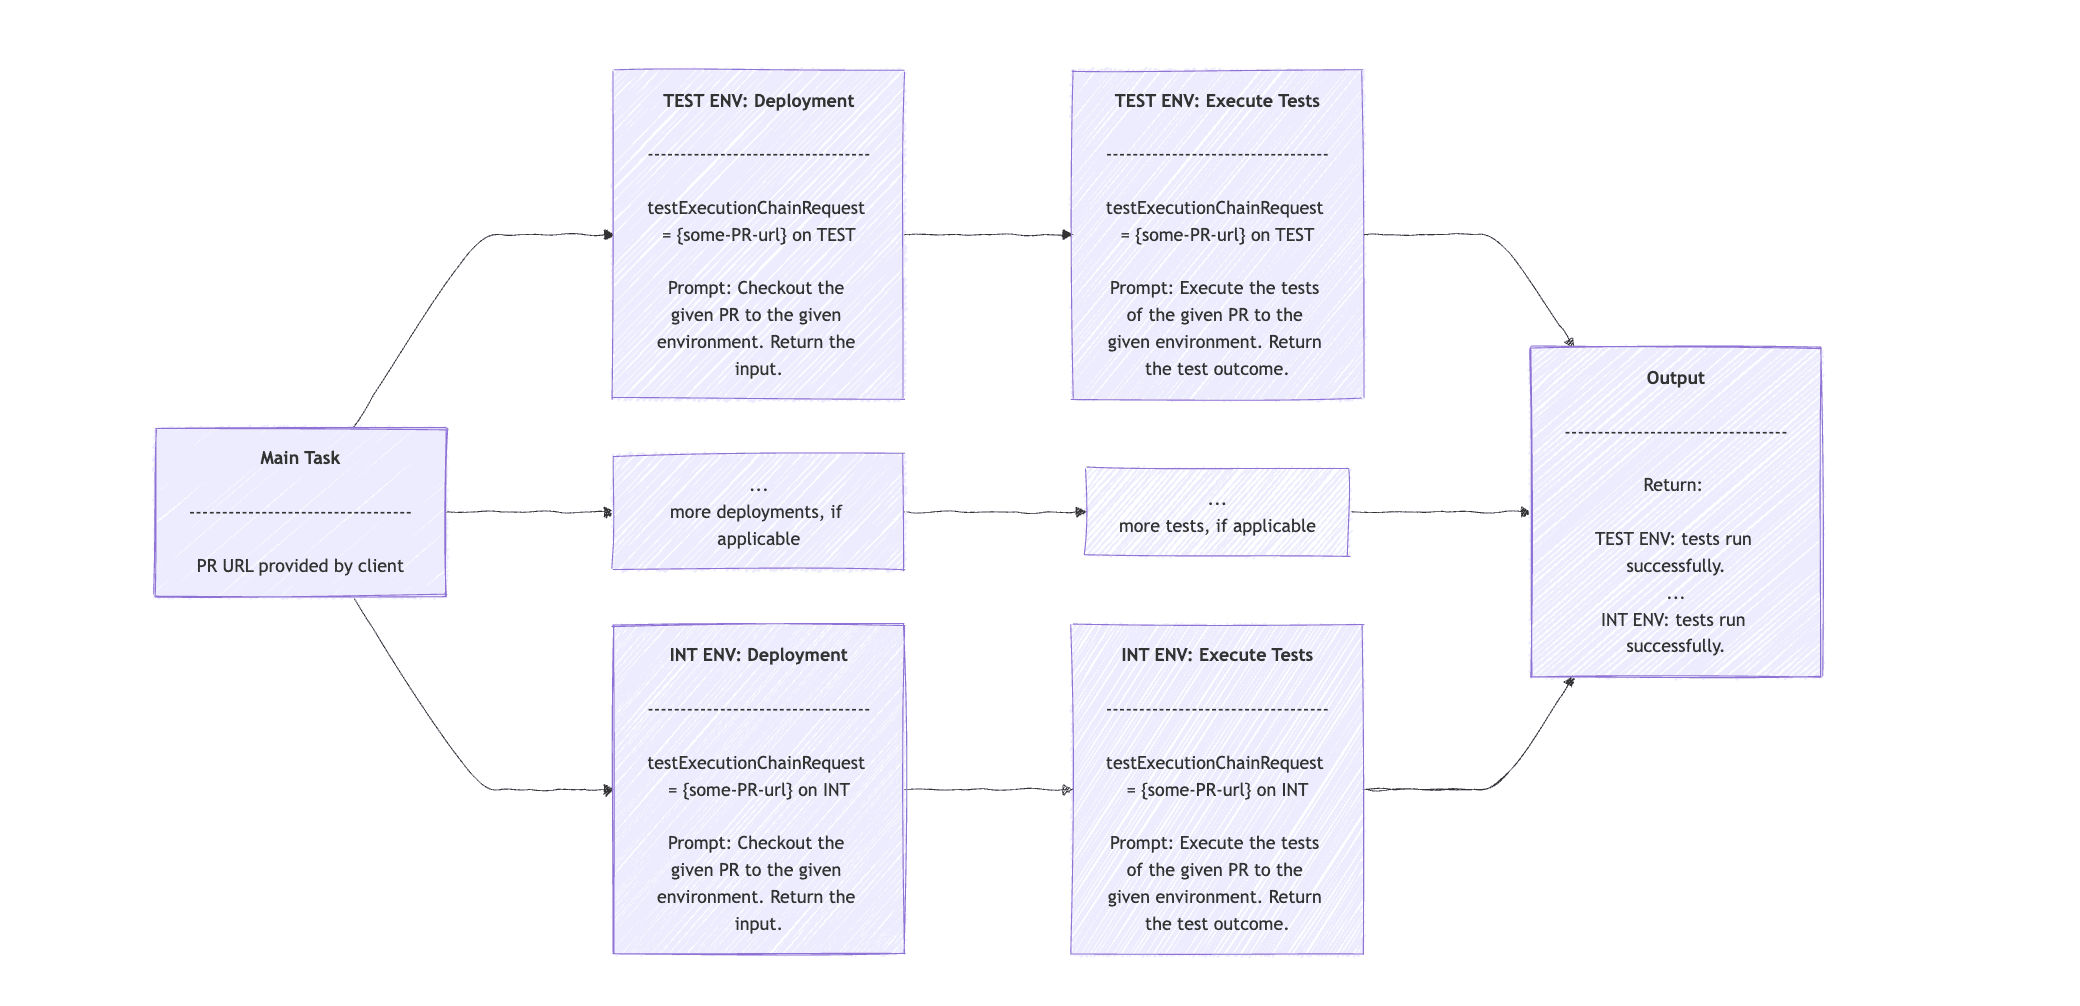
The Orchestrator Workers Workflow is best fit when we have a complex task that can be broken down into simpler subtasks, but we can’t predict up-front which ones they are. The Orchestrator Agent then delegates the subtasks to Worker Agents. Finally, it collects the results and composes an outcome for the initial task.
In our DevOps model example, we can have an Orchestrator that accepts a PR URL, analyzes the changes, and determines which environments require testing. For example, a minor input validation update can just be tested on our test environment. In contrast, a change that affects an external system integration would also require testing in the integration environments.
Assuming we have an OpsOrchestratorClient class that extends the ChatClient. We can provide a prompt that describes this case and the PR link, and ask it to return the environments in which we need to run tests. Then feed that to our OpsClient to execute the deployment and run tests:
public String remoteTestingExecution(String userInput) {
    String orchestratorRequest = REMOTE_TESTING_ORCHESTRATION_PROMPT + userInput;

    ChatClient.ChatClientRequestSpec orchestratorRequestSpec = opsOrchestratorClient.prompt(orchestratorRequest);
    ChatClient.CallResponseSpec orchestratorResponseSpec = orchestratorRequestSpec.call();
    String[] orchestratorResponse = orchestratorResponseSpec.entity(String[].class);
    String prLink = orchestratorResponse[0];
    StringBuilder response = new StringBuilder();

    for (int i = 1; i < orchestratorResponse.length; i++) {
        String testExecutionChainInput = prLink + " on " + orchestratorResponse[i];

        for (String prompt : OpsClientPrompts.EXECUTE_TEST_ON_DEPLOYED_ENV_STEPS) {
            String testExecutionChainRequest =
              String.format("%s\n PR: [%s] environment", prompt, testExecutionChainInput);

            ChatClient.ChatClientRequestSpec requestSpec = opsClient.prompt(testExecutionChainRequest);
            ChatClient.CallResponseSpec responseSpec = requestSpec.call();
            testExecutionChainInput = responseSpec.content();
            System.out.printf("OUTCOME: %s\n", testExecutionChainInput);
        }
        response.append(testExecutionChainInput).append("\n");
    }

    return response.toString();
}
The orchestratorRequest String will contain the prompt for analyzing the PR changes and return a list of environments. We get the list of environments in the orchestratorResponse array. For each environment, we perform the subtask in two steps: first, the deployment, and second, the test execution.
Hopefully, you have noticed that we use the Chain Workflow in the second for loop. We start with the prompt to deploy, and as input, a sentence of the PR URL and the current environment. The response contains an input sentence. This is then fed into the second prompt, which executes the tests relevant to the current environment based on the information from the PR link.
The output contains a sentence with the outcome of the test execution for each environment.
Note that we’ve kept the example simple by avoiding parallel or asynchronous executions of the subtasks. However, using such techniques would be the most efficient way to implement the Orchestrator- Workers Workflow pattern. The visual sequence of the pattern should be something like:
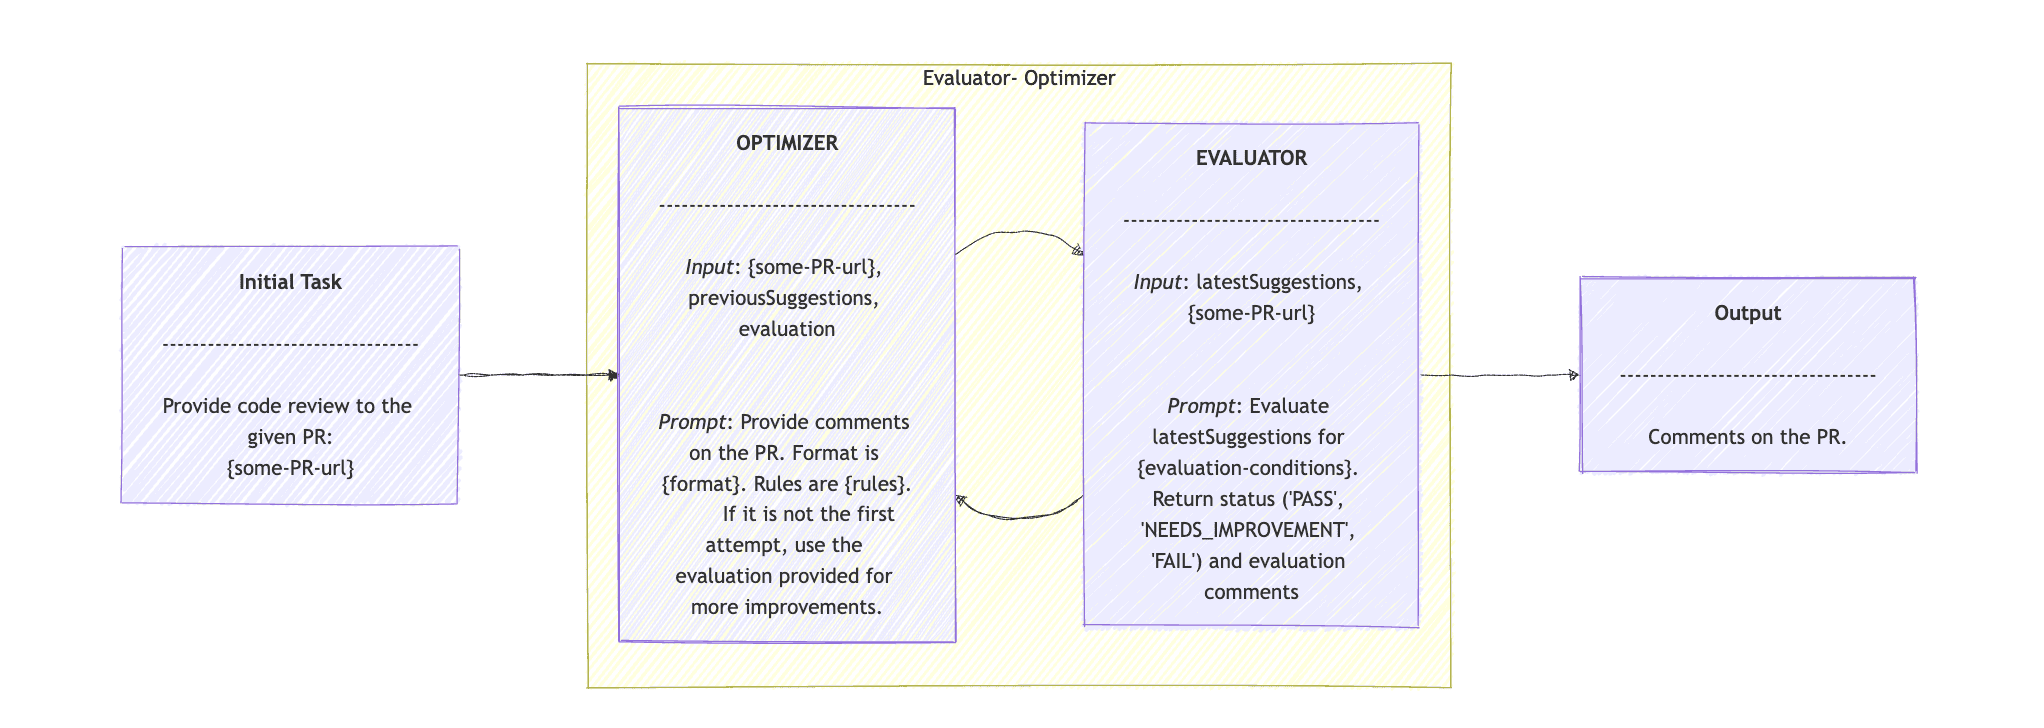
8. Evaluator Optimizer Agents with Spring AI
The final pattern proposed by the Anthropic publication is the Evaluator Optimizer. The Evaluator- Optimizer Workflow pattern, as the name suggests, is well-suited for tasks that involve generating suggestions. The Optimizer proposes an initial solution or improvement. The Evaluator then provides feedback on the suggestion and may call the Optimizer again to refine the results or produce more accurate outcomes.
We expand our DevOps example, and we offer one more feature around PRs: we’ll provide PR review comments using the Evaluator- Optimizer Workflow. Assuming a CodeReviewClient interface that extends ChatClient, we create the Agent with Spring AI, with one simple evaluate() method:
public class EvaluatorOptimizerWorkflow {
    private final CodeReviewClient codeReviewClient;
    static final ParameterizedTypeReference<Map<String, String>> mapClass = new ParameterizedTypeReference<>() {};

    // constructor omitted

    public Map<String, String> evaluate(String task) {
        return loop(task, new HashMap<>(), "");
    }

    private Map<String, String> loop(String task, Map<String, String> latestSuggestions, String evaluation) {
        latestSuggestions = generate(task, latestSuggestions, evaluation);
        Map<String, String> evaluationResponse = evaluate(latestSuggestions, task);
        String outcome = evaluationResponse.keySet().iterator().next();
        evaluation = evaluationResponse.values().iterator().next();

        if ("PASS".equals(outcome)) {
            return latestSuggestions;
        }

        return loop(task, latestSuggestions, evaluation);
    }

    // we'll see the generate() and evaluate() methods later
}
The Evaluator Optimizer pattern begins with the evaluate() method that accepts a task. In our example, the input is just the PR link. We send this task to the loop() method. This method accepts three parameters: the task, the previous suggestions, and an evaluation. In the first loop, we provide only the task.
The loop() method calls generate(), which we’ll see later. The outcome is the latest suggestions, which we pass to the evaluate() method, along with the task. Moving on, we read the outcome from the evaluationResponse, and if it is “PASS”, we return the latest suggestions. If not, then we invoke the loop() method again with the new latestSuggestions and evaluation.
We use the CodeReviewClient agent for the generate() and evaluate() methods:
private Map<String, String> generate(String task, Map<String, String> previousSuggestions, String evaluation) {
    String request = CODE_REVIEW_PROMPT +
      "\n PR: " + task +
      "\n previous suggestions: " + previousSuggestions +
      "\n evaluation on previous suggestions: " + evaluation;

    ChatClient.ChatClientRequestSpec requestSpec = codeReviewClient.prompt(request);
    ChatClient.CallResponseSpec responseSpec = requestSpec.call();
    Map<String, String> response = responseSpec.entity(mapClass);

    return response;
}

private Map<String, String> evaluate(Map<String, String> latestSuggestions, String task) {
    String request = EVALUATE_PROPOSED_IMPROVEMENTS_PROMPT +
      "\n PR: " + task +
      "\n proposed suggestions: " + latestSuggestions;

    ChatClient.ChatClientRequestSpec requestSpec = codeReviewClient.prompt(request);
    ChatClient.CallResponseSpec responseSpec = requestSpec.call();
    Map<String, String> response = responseSpec.entity(mapClass);

    return response;
}
In generate(), we provide the prompt, the task, the previousSuggestions, and the evaluation to the codeReviewClient agent. The prompt is to provide code review on the PR, based on the latest suggestions and the latest evaluation. The suggestions should follow the given rules and follow a specific format.
In evaluation(), the prompt is to “Evaluate the suggested code improvements for correctness, time complexity, and best practices“, provided the given task and the latest suggestions. Then return the evaluation, “PASS”, “NEEDS_IMPROVEMENT”, “FAIL”, along with the feedback.
The sequence diagram of the Optimizer- Evaluator Workflow pattern is:
9. Conclusion
In this tutorial, we walked through Antropic’s publication on Effective AI Agents. We presented all the patterns, provided brief definitions, and gave examples of real-life use cases. Then, we demonstrated an implementation of each pattern using agents with Spring AI. Finally, we included a sequence diagram for each one to help visualize how the pattern works in action.


