Introduction to Spark Graph Processing with GraphFrames
Last updated: May 20, 2025


Mocking is an essential part of unit testing, and the Mockito library makes it easy to write clean and intuitive unit tests for your Java code.
Get started with mocking and improve your application tests using our Mockito guide:
Handling concurrency in an application can be a tricky process with many potential pitfalls. A solid grasp of the fundamentals will go a long way to help minimize these issues.
Get started with understanding multi-threaded applications with our Java Concurrency guide:
Spring 5 added support for reactive programming with the Spring WebFlux module, which has been improved upon ever since. Get started with the Reactor project basics and reactive programming in Spring Boot:
Since its introduction in Java 8, the Stream API has become a staple of Java development. The basic operations like iterating, filtering, mapping sequences of elements are deceptively simple to use.
But these can also be overused and fall into some common pitfalls.
To get a better understanding on how Streams work and how to combine them with other language features, check out our guide to Java Streams:
Explore Spring Boot 3 and Spring 6 in-depth through building a full REST API with the framework:
Yes, Spring Security can be complex, from the more advanced functionality within the Core to the deep OAuth support in the framework.
I built the security material as two full courses - Core and OAuth, to get practical with these more complex scenarios. We explore when and how to use each feature and code through it on the backing project.
You can explore the course here:
Spring Data JPA is a great way to handle the complexity of JPA with the powerful simplicity of Spring Boot.
Get started with Spring Data JPA through the guided reference course:
Refactor Java code safely — and automatically — with OpenRewrite.
Refactoring big codebases by hand is slow, risky, and easy to put off. That’s where OpenRewrite comes in. The open-source framework for large-scale, automated code transformations helps teams modernize safely and consistently.
Each month, the creators and maintainers of OpenRewrite at Moderne run live, hands-on training sessions — one for newcomers and one for experienced users. You’ll see how recipes work, how to apply them across projects, and how to modernize code with confidence.
Join the next session, bring your questions, and learn how to automate the kind of work that usually eats your sprint time.
Yes, we're now running our only Summer Sale. All Courses are 30% off until 20th July, 2026:
Yes, we're now running our only Summer Sale. All Courses are 30% off until 20th July, 2026:
1. Introduction
Graph processing is useful for many applications from social networks to advertisements. Inside a big data scenario, we need a tool to distribute that processing load.
In this tutorial, we’ll load and explore graph possibilities using Apache Spark in Java. To avoid complex structures, we’ll be using an easy and high-level Apache Spark graph API: the GraphFrames API.
2. Graphs
First of all, let’s define a graph and its components. A graph is a data structure having edges and vertices. The edges carry information that represents relationships between the vertices.
The vertices are points in an n-dimensional space, and edges connect the vertices according to their relationships:
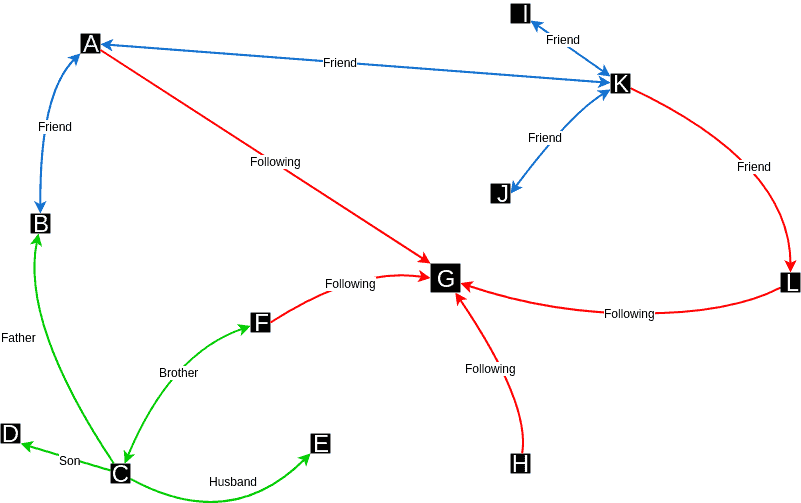
In the image above, we have a social network example. We can see the vertices represented by letters and the edges carrying which kind of relationship is between the vertices.
3. Maven Setup
Now, let’s start the project by setting up the Maven configuration.
Let’s add spark-graphx 2.11, graphframes, and spark-sql 2.11:
<dependency>
    <groupId>org.apache.spark</groupId>
    <artifactId>spark-graphx_2.11</artifactId>
    <version>2.4.4</version>
</dependency>
<dependency>
   <groupId>graphframes</groupId>
   <artifactId>graphframes</artifactId>
   <version>0.7.0-spark2.4-s_2.11</version>
</dependency>
<dependency>
   <groupId>org.apache.spark</groupId>
   <artifactId>spark-sql_2.11</artifactId>
   <version>2.4.4</version>
</dependency>
These artifact versions support Scala 2.11.
Also, it so happens that GraphFrames is not in Maven Central. So, let’s add the needed Maven repository, too:
<repositories>
     <repository>
          <id>SparkPackagesRepo</id>
          <url>http://dl.bintray.com/spark-packages/maven</url>
     </repository>
</repositories>
4. Spark Configuration
In order to work with GraphFrames, we’ll need to download Hadoop and define the HADOOP_HOME environment variable.
In the case of Windows as the operating system, we’ll also download the appropriate winutils.exe to the HADOOP_HOME/bin folder.
Next, let’s begin our code by creating the basic configuration:
SparkConf sparkConf = new SparkConf()
  .setAppName("SparkGraphFrames")
  .setMaster("local[*]");
JavaSparkContext javaSparkContext = new JavaSparkContext(sparkConf);
We’ll also need to create a SparkSession:
SparkSession session = SparkSession.builder()
  .appName("SparkGraphFrameSample")
  .config("spark.sql.warehouse.dir", "/file:C:/temp")
  .sparkContext(javaSparkContext.sc())
  .master("local[*]")
  .getOrCreate();
5. Graph Construction
Now, we’re all set to start with our main code. So, let’s define the entities for our vertices and edges, and create the GraphFrame instance.
We’ll work on the relationships between users from a hypothetical social network.
5.1. Data
First, for this example, let’s define both entities as User and Relationship:
public class User {
    private Long id;
    private String name;
    // constructor, getters and setters
}

public class Relationship implements Serializable {
    private String type;
    private String src;
    private String dst;
    private UUID id;

    public Relationship(String type, String src, String dst) {
        this.type = type;
        this.src = src;
        this.dst = dst;
        this.id = UUID.randomUUID();
    }
    // getters and setters
}
Next, let’s define some User and Relationship instances:
List<User> users = new ArrayList<>();
users.add(new User(1L, "John"));
users.add(new User(2L, "Martin"));
users.add(new User(3L, "Peter"));
users.add(new User(4L, "Alicia"));

List<Relationship> relationships = new ArrayList<>();
relationships.add(new Relationship("Friend", "1", "2"));
relationships.add(new Relationship("Following", "1", "4"));
relationships.add(new Relationship("Friend", "2", "4"));
relationships.add(new Relationship("Relative", "3", "1"));
relationships.add(new Relationship("Relative", "3", "4"));
5.2. GraphFrame Instance
Now, in order to create and manipulate our graph of relationships, we’ll create an instance of GraphFrame. The GraphFrame constructor expects two Dataset<Row> instances, the first representing the vertices and the second, the edges:
Dataset<Row> userDataset = session.createDataFrame(users, User.class);
Dataset<Row> relationshipDataset = session.createDataFrame(relationships, Relation.class);

GraphFrame graph = new GraphFrame(userDataframe, relationshipDataframe);
At last, we’ll log our vertices and edges in the console to see how it looks:
graph.vertices().show();
graph.edges().show();
+---+------+
| id| name|
+---+------+
| 1| John|
| 2|Martin|
| 3| Peter|
| 4|Alicia|
+---+------+
+---+--------------------+---+---------+
|dst| id|src| type|
+---+--------------------+---+---------+
| 2|622da83f-fb18-484...| 1| Friend|
| 4|c6dde409-c89d-490...| 1|Following|
| 4|360d06e1-4e9b-4ec...| 2| Friend|
| 1|de5e738e-c958-4e0...| 3| Relative|
| 4|d96b045a-6320-4a6...| 3| Relative|
+---+--------------------+---+---------+6. Graph Operators
Now that we have a GraphFrame instance, let’s see what we can do with it.
6.1. Filter
GraphFrames allows us to filter edges and vertices by a query.
Next, then, let’s filter the vertices by the name property on User:
graph.vertices().filter("name = 'Martin'").show();At the console, we can see the result:
+---+------+
| id|  name|
+---+------+
|  2|Martin|
+---+------+
Also, we can directly filter on the graph by calling filterEdges or filterVertices:
graph.filterEdges("type = 'Friend'")
  .dropIsolatedVertices().vertices().show();
Now, since we filtered the edges, we might still have some isolated vertices. So, we’ll call dropIsolatedVertices().
As a result, we have a subgraph, still a GraphFrame instance, with just the relationships that have “Friend” status:
+---+------+
| id|  name|
+---+------+
|  1|  John|
|  2|Martin|
|  4|Alicia|
+---+------+
6.2. Degrees
Another interesting feature set is the degrees set of operations. These operations return the number of edges incident on each vertex.
The degrees operation just returns the count of all edges of each vertex. On the other hand, inDegrees counts only incoming edges, and outDegrees counts only outgoing edges.
Let’s count the incoming degrees of all vertices in our graph:
graph.inDegrees().show();As a result, we have a GraphFrame that shows the number of incoming edges to each vertex, excluding those with none:
+---+--------+
| id|inDegree|
+---+--------+
|  1|       1|
|  4|       3|
|  2|       1|
+---+--------+
7. Graph Algorithms
GraphFrames also provides popular algorithms ready to use — let’s take a look at some of them.
7.1. Page Rank
The Page Rank algorithm weighs the incoming edges to a vertex and transforms it into a score.
The idea is that each incoming edge represents an endorsement and makes the vertex more relevant in the given graph.
For example, in a social network, if a person is followed by various people, he or she will be ranked highly.
Running the page rank algorithm is quite straightforward:
graph.pageRank()
  .maxIter(20)
  .resetProbability(0.15)
  .run()
  .vertices()
  .show();
To configure this algorithm, we just need to provide:
- maxIter – the number of iterations of page rank to run – 20 is recommended, too few will decrease the quality, and too many will degrade the performance
- resetProbability – the random reset probability (alpha) – the lower it is, the bigger the score spread between the winners and losers will be – valid ranges are from 0 to 1. Usually, 0.15 is a good score
The response is a similar GraphFrame, though this time we see an additional column giving the page rank of each vertex:
+---+------+------------------+
| id|  name|          pagerank|
+---+------+------------------+
|  4|Alicia|1.9393230468864597|
|  3| Peter|0.4848822786454427|
|  1|  John|0.7272991738542318|
|  2|Martin| 0.848495500613866|
+---+------+------------------+
In our graph, Alicia is the most relevant vertex, followed by Martin and John.
7.2. Connected Components
The connected components algorithm finds isolated clusters or isolated sub-graphs. These clusters are sets of connected vertices in a graph where each vertex is reachable from any other vertex in the same set.
We can call the algorithm without any parameters via the connectedComponents() method:
graph.connectedComponents().run().show();The algorithm returns a GraphFrame containing each vertex and the component to which each is connected:
+---+------+------------+
| id|  name|   component|
+---+------+------------+
|  1|  John|154618822656|
|  2|Martin|154618822656|
|  3| Peter|154618822656|
|  4|Alicia|154618822656|
+---+------+------------+
Our graph has only one component — this means that we do not have isolated sub-graphs. The component has an auto-generated id, which is 154618822656, in our case.
Although we have one more column here – the component id – our graph is still the same.
7.3. Triangle Counting
Triangle counting is commonly used as community detection and counting in a social network graph. A triangle is a set of three vertices, where each vertex has a relationship to the other two vertices in the triangle.
In a social network community, it’s easy to find a considerable number of triangles connected to each other.
We can easily perform a triangle counting directly from our GraphFrame instance:
graph.triangleCount().run().show();The algorithm also returns a GraphFrame with the number of triangles passing through each vertex.
+-----+---+------+
|count| id|  name|
+-----+---+------+
|    1|  3| Peter|
|    2|  1|  John|
|    2|  4|Alicia|
|    1|  2|Martin|
+-----+---+------+
8. Conclusion
Apache Spark is a great tool for computing a relevant amount of data in an optimized and distributed way. And, the GraphFrames library allows us to easily distribute graph operations over Spark.


