

Yes, we're now running our only Summer Sale. All Courses are 30% off until 20th July, 2026:
Learn through the super-clean Baeldung Pro experience:
>> Membership and Baeldung Pro.
No ads, dark-mode and 6 months free of IntelliJ Idea Ultimate to start with.
1. Overview
VirtualBox provides several networking adapters out-of-the-box, such as NAT, Bridged, and USB network adapters. In this tutorial, we’ll explore a few methods of using wireless devices for VirtualBox virtual machines to connect to the outside network.
All commands and methods in this guide have been tested on Debian 12 (Bookworm) running VirtualBox 6.1.46 with Ubuntu 22.04 LTS virtual machine.
2. Detecting the Wireless Devices on the Host
Before we connect a wireless connection on the host side to a virtual machine, let’s detect the wireless devices we have connected to our host system.
We can use many commands to detect wireless devices on our system, such as iwconfig, iwlist, inxi, lshw, lspci, and many more.
2.1. Using ip
Let’s use the ip command to quickly list all network interfaces:
$ ip link show
...
3: wlp1s0: <BROADCAST,MULTICAST,UP,LOWER_UP> mtu 1500 qdisc noqueue state UP mode DORMANT group default qlen 1000
link/ether b8:8a:60:bb:26:eb brd ff:ff:ff:ff:ff:ff
...
12: wlx14cc20108ec3: <NO-CARRIER,BROADCAST,MULTICAST,UP> mtu 1500 qdisc noqueue state DOWN mode DORMANT group default qlen 1000
link/ether a2:1c:ac:74:3c:98 brd ff:ff:ff:ff:ff:ff permaddr 14:cc:20:10:8e:c3
...
Wireless interfaces typically have names starting with wl*, such as wlan, or wlp. Nevertheless, in our case, we have wlp1s0 and wlx14cc20108ec3 that indicate the wireless devices.
wlp1s0 is the built-in Intel wireless network card, with its status UP as it’s connected to a WiFi network. Meanwhile, wlx14cc20108ec3 is the Ralink MT7610U USB WiFi adapter, and its status is DOWN as it’s not connected to any WiFi network.
2.2. Using lsusb
Additionally, we can detect all USB WiFi adapters that connect to our host system by using the lsusb command:
$ lsusb
...
Bus 001 Device 009: ID 148f:761a Ralink Technology, Corp. MT7610U ("Archer T2U" 2.4G+5G WLAN Adapter
...
As we can see from the output, lsusb shows that there’s a Ralink USB WiFi adapter currently connected to our system.
2.3. Using hwinfo
Furthermore, we can get more information about each wireless network device using hwinfo:
$ sudo hwinfo --netcard
14: PCI 100.0: 0282 WLAN controller
Hardware Class: network
Model: "Intel Wireless 8260"
Vendor: pci 0x8086 "Intel Corporation"
Device: pci 0x24f3 "Wireless 8260"
Device File: wlp1s0
Features: WLAN
...
30: USB 00.0: 0282 WLAN controller
Hardware Class: network
Model: "Ralink MT7610U ("Archer T2U" 2.4G+5G WLAN Adapter"
Hotplug: USB
Vendor: usb 0x148f "Ralink Technology, Corp."
Driver: "mt76x0u"
Device File: wlx14cc20108ec3
Features: WLAN
...
The hwinfo command, when used with the –netcard option, lists all the information about network cards in our system.
2.4. Selecting Wireless Network Interface
If our system has more than one wireless card, we can select which wireless interface we want to use by using the Settings program:
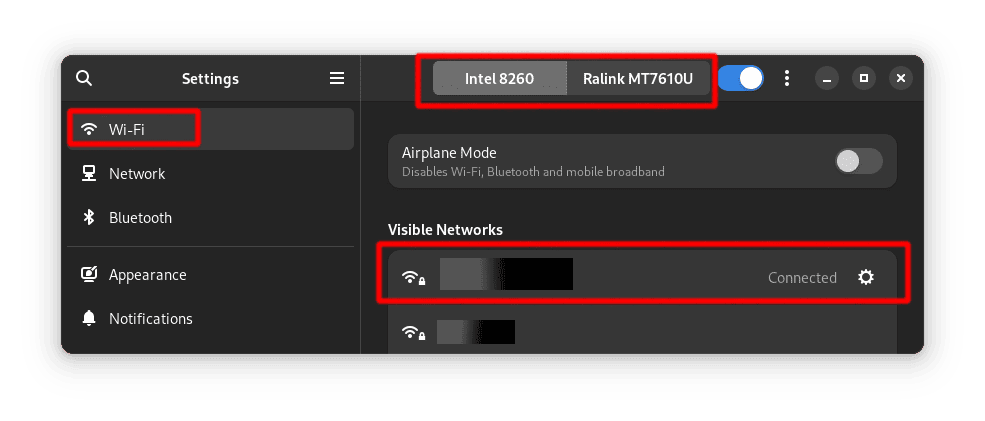
In Settings, we select the WiFi menu from the sidebar menu, then select the wireless interface at the top, and finally select the WiFi network we want to connect to.
3. Configuring Wireless Networking Modes for VirtualBox VMs
Now that we know the name of the wireless network interfaces in our system (wlp1s0 and wlx14cc20108ec3), let’s connect them to a virtual machine.
3.1. VirtualBox Networking Modes
VirtualBox provides many networking modes. However, we’ll focus on Network Address Translation (NAT) and Bridged networking.
3.2. Network Address Translation (NAT)
NAT is the simplest way of accessing external networks from a virtual machine, making it the default networking mode in VirtualBox. However, it has some limitations, such as it being invisible and unreachable from the outside Internet unless we setup the port forwarding.
Let’s create a Ubuntu 22.04 LTS virtual machine and setup the NAT networking mode:
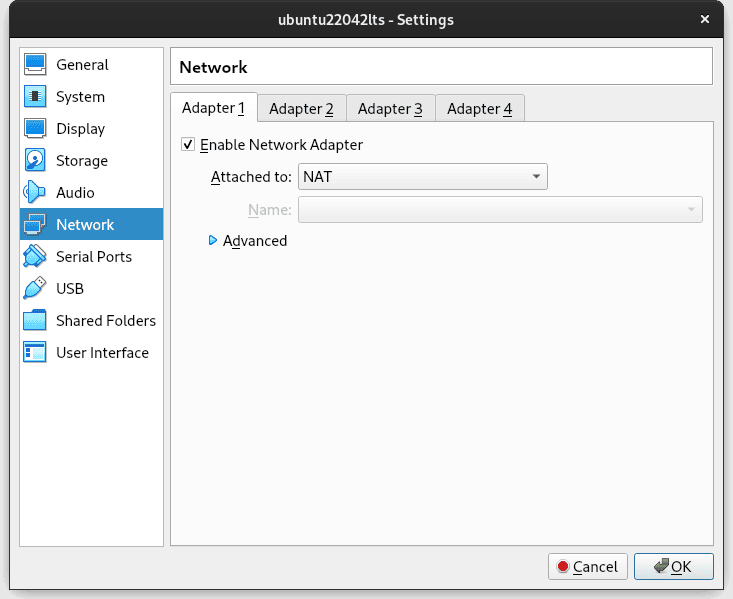
In the VirtualBox VM Settings, we open Settings > Network > Enable Network Adapter > Attached to: NAT.
Afterward, we boot the VM.
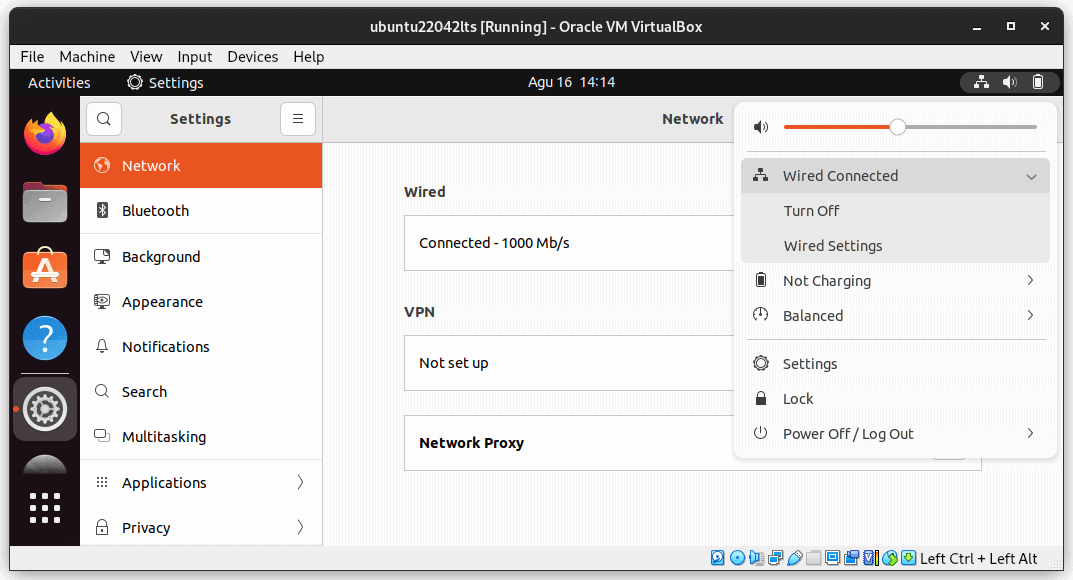
However, once the VM is running, it says that it’s connected to a Wired connection instead of a Wireless connection:
Moreover, if we look at the VM’s IP address using the ip command:
$ ip address
...
2: enp0s3: <BROADCAST,MULTICAST,UP,LOWER_UP> mtu 1500 qdisc fq_codel state UP group default qlen 1000
link/ether 08:00:27:07:74:33 brd ff:ff:ff:ff:ff:ff
inet 10.0.2.15/24 brd 10.0.2.255 scope global dynamic noprefixroute enp0s3
...
The VM has a different network subnet (10.0.2.x), separate from the host network (192.168.1.x):
$ ip address
...
3: wlp1s0: <BROADCAST,MULTICAST,UP,LOWER_UP> mtu 1500 qdisc noqueue state UP group default qlen 1000
link/ether b8:8a:60:bb:26:eb brd ff:ff:ff:ff:ff:ff
inet 192.168.1.113/24 brd 192.168.1.255 scope global dynamic noprefixroute wlp1s0
...
The reason why the VM says it’s connected to the Wired Connection is because virtualization technology, like VirtualBox, abstracts the guest VM from the physical hardware and network infrastructure of the host.
In NAT mode, VirtualBox’s networking layer acts as a router between the guest VMs and the external network. Consequently, the guest VMs have their own private IP subnet that’s managed by VirtualBox’s NAT engine.
3.3. Bridged Networking
With bridged networking, VirtualBox uses our host system’s device driver to capture data from the physical network and add data into it. Consequently, this networking mode creates a new network interface in the VM, making it appear as if the guest OS were connected to the interface with a wired connection.
Let’s configure the networking mode:
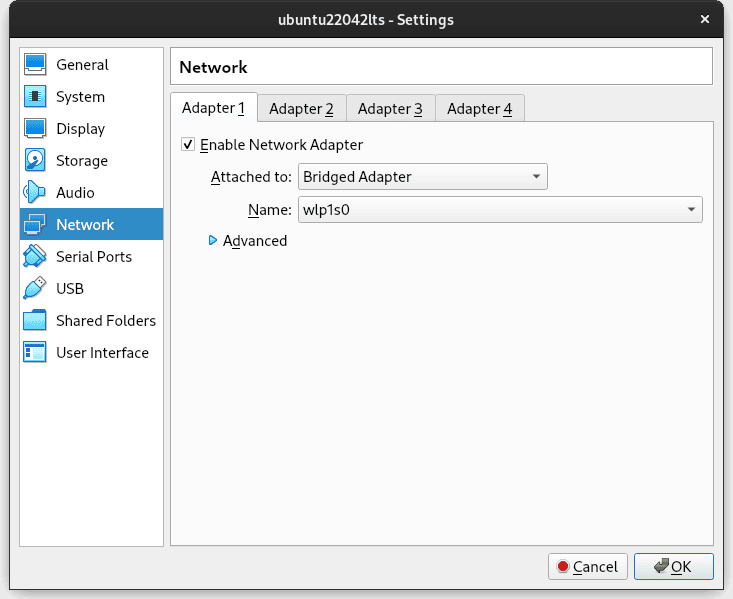
In the VirtualBox VM Settings, we open Settings > Network > Enable Network Adapter > Attached to: Bridged Adapter > Name > wlp1s0 (our built-in Intel wireless network card).
After we boot the VM, we can see that it’s also connected to a Wired Connection, similar to when the VM used the NAT mode. However, if we check the IP address:
$ ip address
...
2: enp0s3: <BROADCAST,MULTICAST,UP,LOWER_UP> mtu 1500 qdisc fq_codel state UP group default qlen 1000
link/ether 08:00:27:07:74:33 brd ff:ff:ff:ff:ff:ff
inet 192.168.1.105/24 brd 192.168.1.255 scope global dynamic noprefixroute enp0s3
...
The VM now shares the same network subnet as the host, which is 192.168.1.x.
This also means that the VM is accessible from the host, and vice versa, which we can demonstrate by sending a ping command from the host to the guest:
$ ping 192.168.1.105
PING 192.168.1.105 (192.168.1.105) 56(84) bytes of data.
64 bytes from 192.168.1.105: icmp_seq=1 ttl=64 time=3.30 ms
64 bytes from 192.168.1.105: icmp_seq=2 ttl=64 time=0.936 ms
^C
--- 192.168.1.105 ping statistics ---
2 packets transmitted, 2 received, 0% packet loss, time 1001ms
rtt min/avg/max/mdev = 0.936/2.118/3.300/1.182 ms
Or from the guest to the host:
$ ping 192.168.1.113
PING 192.168.1.113 (192.168.1.113) 56(84) bytes of data.
64 bytes from 192.168.1.113: icmp_seq=1 ttl=64 time=0.369 ms
64 bytes from 192.168.1.113: icmp_seq=2 ttl=64 time=1.00 ms
^C
--- 192.168.1.113 ping statistics ---
2 packets transmitted, 2 received, 0% packet loss, time 1070ms
rtt min/avg/max/mdev = 0.369/0.684/1.000/0.315 ms
And that concludes how to use a wireless connection in VirtualBox virtual machines using the bridged networking mode.
4. Using a USB WiFi Adapter in VirtualBox VMs
When we configured the VM to use bridged mode, we saw a list of network interfaces in the dropdown menu:

One of them is wlx14cc20108ec3, which is the Ralink MT7610U USB WiFi adapter.
Now, we can use that wireless network interface in the bridged mode. However, as we learned in the previous section, bridged mode actually means that the VM uses a device driver on our host system to intercept data from the physical network and inject data into it, creating a new network interface in software.
If we want our VM to connect to the physical network adapter directly – for example, to do a wireless penetration test – we may need to configure the VM to access the USB device directly. This implies that as soon as the guest system starts using a USB device, it will appear as unavailable on the host.
4.1. Configuring USB Device Filter
Let’s add a new USB device filter for our VM:
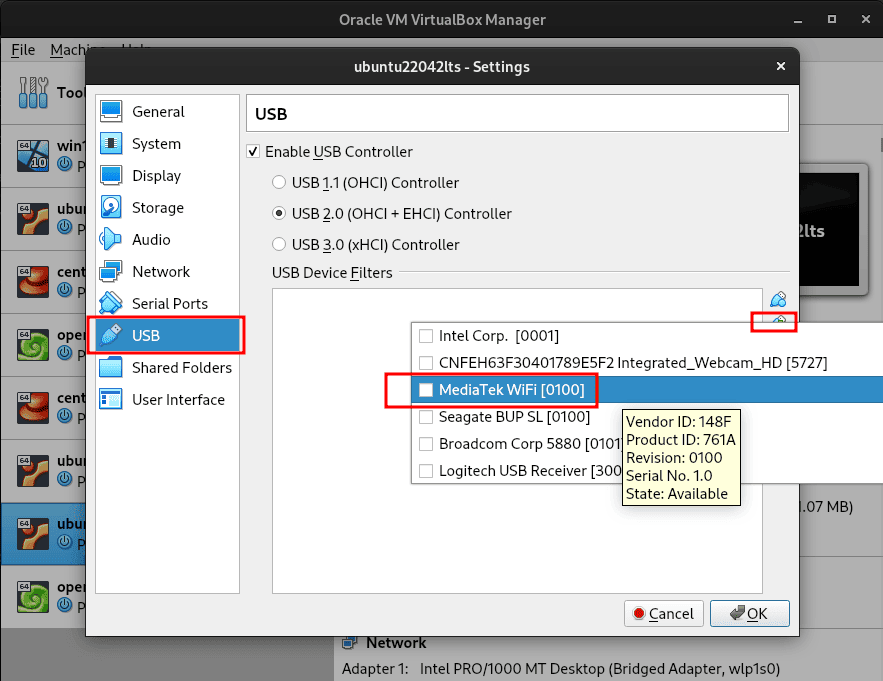
After we’ve added the USB device filter, we can boot the VM.
4.2. Connecting to a Wireless Network
After the VM boots, we can configure the VM to connect to a wireless network using the USB WiFi adapter. The VM will detect the USB WiFi adapter as a wireless connection.
Let’s open the Settings program in the VM:
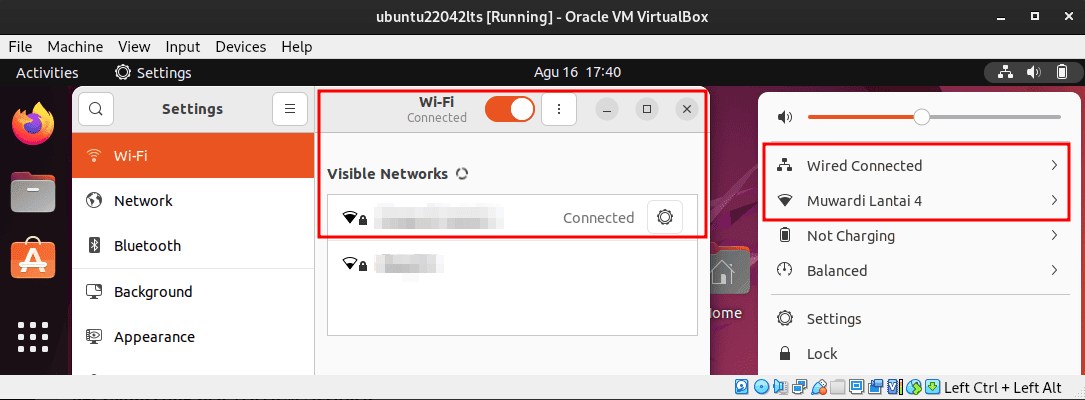
As we can see from the image above, the VM recognizes the USB WiFi adapter as a wireless connection. In addition, it also uses the NAT networking mode as a wired connection.
Depending on the guest OS and the USB WiFi adapter type, we might need to install the driver for the USB WiFi adapter in the virtual machine.
5. Conclusion
In this article, we learned how to use a wireless connection in VirtualBox VMs in NAT and bridged modes. VirtualBox abstracts the guest VM from the host’s physical hardware and network infrastructure. As a result, the VM isn’t aware of the host’s underlying wireless connectivity. Subsequently, it connects to a virtualized networking environment created by VirtualBox using a wired connection.
We also learned about using a USB WiFi adapter in virtual machines. This method offers a direct connection between the VM and physical hardware.