

Learn through the super-clean Baeldung Pro experience:
>> Membership and Baeldung Pro.
No ads, dark-mode and 6 months free of IntelliJ Idea Ultimate to start with.
Last updated: March 18, 2024
Learn through the super-clean Baeldung Pro experience:
>> Membership and Baeldung Pro.
No ads, dark-mode and 6 months free of IntelliJ Idea Ultimate to start with.
In this tutorial, we’ll explore various ways to migrate a physical Linux installation to VirtualBox.
What we’ll see is theoretically applicable to any operating system. In practice, actual limitations are imposed by the supported host and guest systems, the hardware of the host, and the compatibility of the tools we’ll use with the file systems of the physical machine.
Physical-to-Virtual (P2V) means migrating operating systems, applications, and data from physical machines to virtual ones. Basically, it involves cloning the contents of physical hard disks into the corresponding virtual disks. We can achieve P2V by hot or cold migration.
Hot migration means the source system is running. So it’s okay only if active processes use the disk very little or not at all. However, it can result in unforeseen effects. For example, it’s unsuitable for an active database or mail server.
In contrast, cold migration means that the source system isn’t running. This is the safest condition, where access to the physical machine is usually via a live distro from a DVD or USB stick.
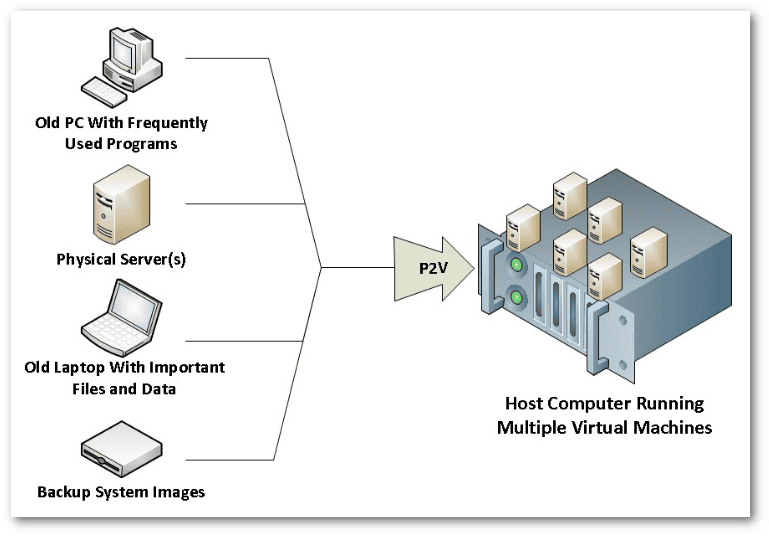
P2V has multiple use cases (image taken from clonezilla.org):
 The less error-prone scenario is the use of a backup system image. In fact, converting a backup to a virtual disk prevents us from making mistakes on the physical machine.
As for forensic investigations, usually, P2V isn’t valuable. The underlying problem is that a virtual disk will almost certainly be different from the bit-by-bit content of its source physical disk. So, analyzing a raw image obtained with dd or ddrescue makes more sense.
Generally speaking, it’s a prerequisite for P2V that the source machine (physical side) has the virtual machine drivers installed. Luckily, Linux already has the necessary drivers. So, in almost all cases, it’ll boot as it is inside VirtualBox. Later, we can install the Guest Additions for Linux if needed.
Some Linux distributions, especially very old ones (with 2.4 or 2.6 kernels), may require particular VirtualBox settings, as shown in the Guest OSes table. However, VirtualBox fully supports Linux 3.x and later.
Our physical test machine has two disks. The first is an SSD with Linux Mint 20.3:
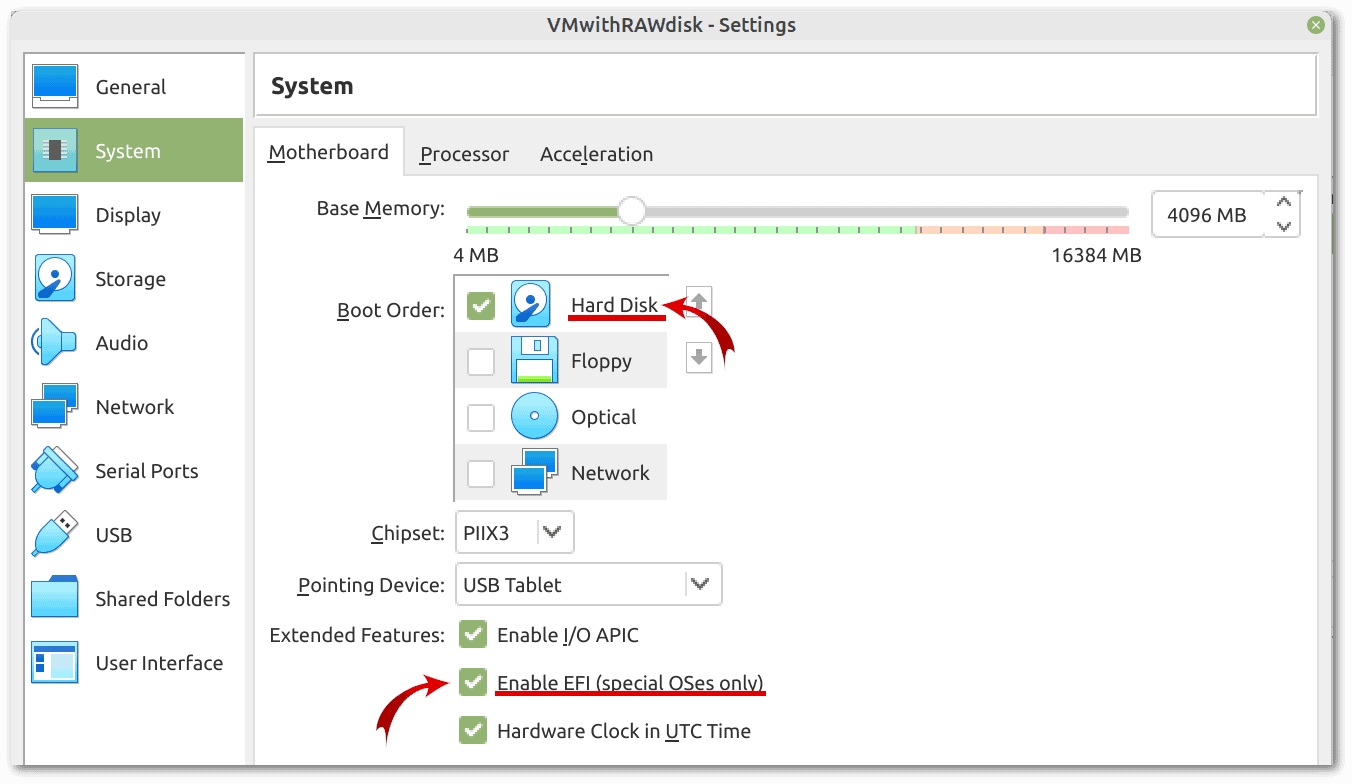
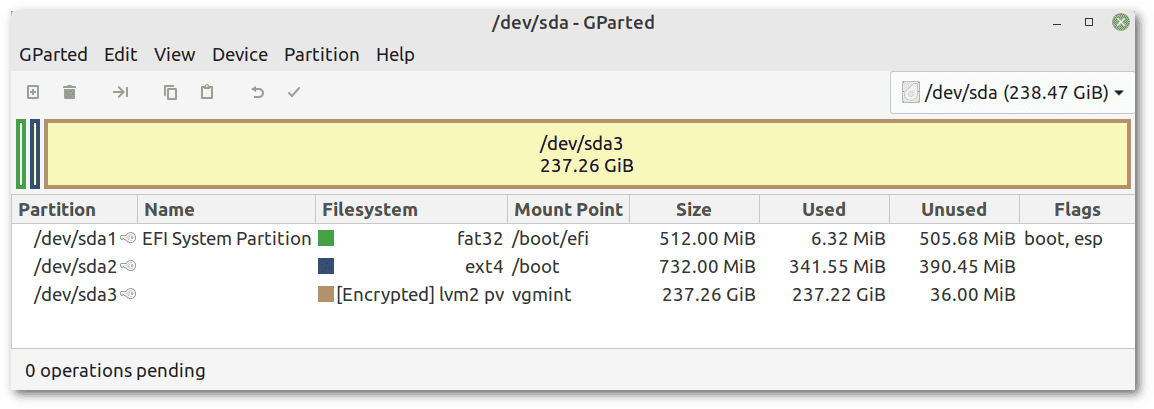 The presence of the EFI partition tells us that booting is via UEFI, support for which is disabled by default in VirtualBox. We’ll therefore have to enable it.
The second disk is an empty magnetic disk with enough space to make a full backup of the first disk and to perform the conversion operations:
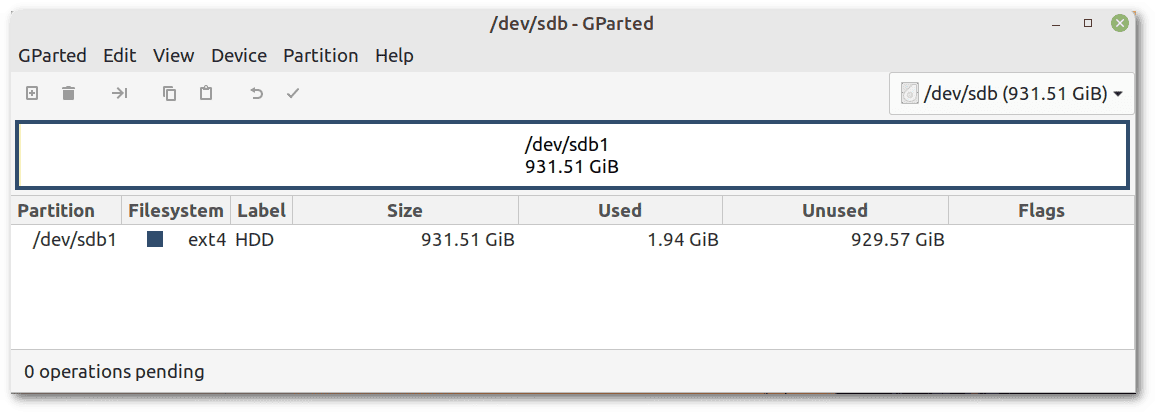 So, let’s fully back up the first disk to the second disk.
Clonezilla only works for cold migration. Anyway, it provides us with a comprehensive disaster recovery solution helpful in both hot and cold migration. It also allows saving or restoring the backup from a remote disk.
As seen in our tutorial, we can run Clonezilla live from its official live distribution, or another live system. We’ll be asked to set all the parameters before performing the actual backup. In this case, our target is to save the backup of /dev/sda in the AsusRog-2022-08-15-12-img folder, placed in the root of /dev/sdb1.
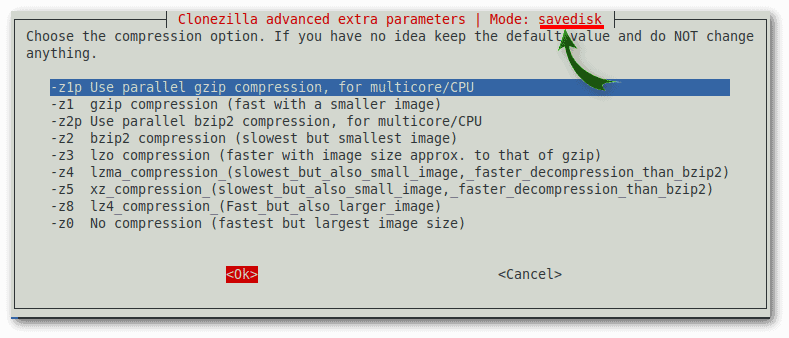
To facilitate the later conversion from Clonezilla to VirtualBox, let’s save the entire disk /dev/sda (and not a single partition). On more than one screen, it must show that we’re using savedisk mode:
 If everything’s okay, before starting the backup, Clonezilla shows a confirmation message:
*****************************************************.
The following step is to save the hard disk/partition(s) on this machine as an image:
*****************************************************.
Machine: GL703VD
sda (256GB_SanDisk_SD8SN8U2_SanDisk_SD8SN8U256G1002_170941802111)
sda1 (512M_vfat_NO_NAME(In_SanDisk_SD8SN8U2)_SanDisk_SD8SN8U256G1002_170941802111)
sda2 (732M_ext4(In_SanDisk_SD8SN8U2)_SanDisk_SD8SN8U256G1002_170941802111)
sda3 (237.3G_crypto_LUKS(In_SanDisk_SD8SN8U2)_SanDisk_SD8SN8U256G1002_170941802111)
*****************************************************.
-> "/home/partimag/AsusRog-2022-08-15-12-img".
Are you sure you want to continue? (y/n)
Let’s note that /home/partimag mounts the target partition, in this case,/dev/sdb1.
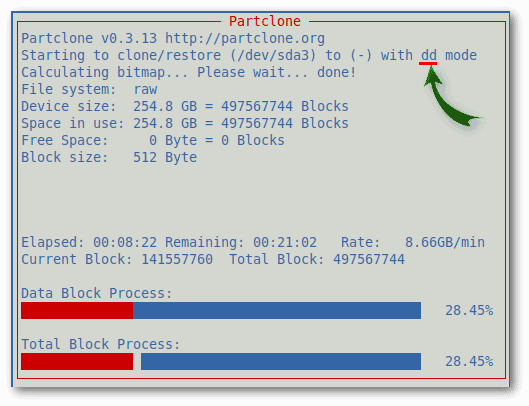
In most cases, Clonezilla does a file-by-file copy, skipping unused sectors. But, if a file system is encrypted, corrupted, or not supported, it does a sector-by-sector copy with dd. In this case, /dev/sda3 is encrypted. However, dd will make the backup slower and heavier, but there won’t be additional inconveniences:
 In the end, the AsusRog-2022-08-15-12-img folder contains 24 files, totaling 142.6 GiB.
Clonezilla’s complete log is in the text file clonezilla-img (it’s a confusing filename because it might suggest a raw image file, but it’s not).
We’ll explore some possibilities for cold migration, that is, with the source system not running.
Let’s start by directly using the physical disk as if it were a virtual disk. Then, let’s proceed to convert our Clonezilla backup to a VDI file, the VirtualBox container format for virtual hard disks. Finally, we’ll see how to convert a physical disk to a VDI file directly.
We’ll run all the upcoming examples from Linux Mint 20.3 live on a USB stick so that the source system is not running. However, any live distribution compatible with our hardware and VirtualBox would be fine.
Let’s start the live distribution. Within it, we need to download and install VirtualBox and its Extension Pack from the official download page. Our distribution name and version are necessary to download the correct VirtualBox package:
$ cat /etc/*-release
[...]
DISTRIB_DESCRIPTION="Linux Mint 20.3 Una"
[...]
UBUNTU_CODENAME=focal
[...]
In this case, we’re using an Ubuntu derivative. We can consult the release list to find out the Ubuntu version knowing its codename.
Let’s stop if we haven’t performed a full backup with Clonezilla! We must be cautious because improper usage of raw disk access can lead to total data loss on the physical disk. First, let’s check we haven’t mounted any partitions of the physical disk. Secondly, let’s make sure swap is disabled. In fact, in case a swap partition exists, the live system could use it without our knowledge:
$ sudo swapoff --allTo use /dev/sda as a raw disk in VirtualBox, we must add the current user to the disk group to avoid permission issues. Let’s also make sure that the current user is part of the vboxusers group if we want to be able to access USB ports:
$ sudo gpasswd -a $USER disk
Adding user mint to group disk
$ sudo gpasswd -a $USER vboxusers
Adding user mint to group vboxusers
To make the group inclusion effective, we must log out and log in again (being careful not to reboot and lose all the changes made within the live distribution).
Then we need to create a file with the .vmdk extension, which uses VMware’s open-source format. We’ll treat this file as if it were a regular virtual disk to be inserted into a VirtualBox machine. However, it will have the effect that reading and writing data will occur from the physical disk /dev/sda:
$ sudo VBoxManage internalcommands createrawvmdk \
    -filename myPhysicalDisk.vmdk \
    -rawdisk /dev/sda
RAW host disk access VMDK file myPhysicalDisk.vmdk created successfully.
We had to run the previous command with root permissions via sudo, but now let’s make the current user the owner of the file:
$ sudo chown $USER:$USER myPhysicalDisk.vmdkWe’re now ready to add the disk to VirtualBox’s Virtual Media Manager:
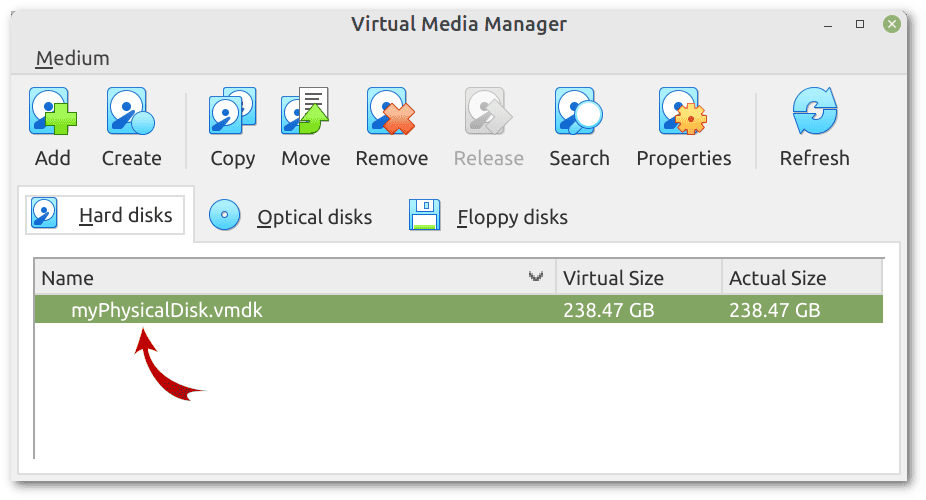 Starting now, we can connect our vmdk virtual disk to a virtual machine.
As a side note, raw access is possible also to individual partitions, not only to an entire disk. This may make sense in cases other than the cold migration we’re dealing with.
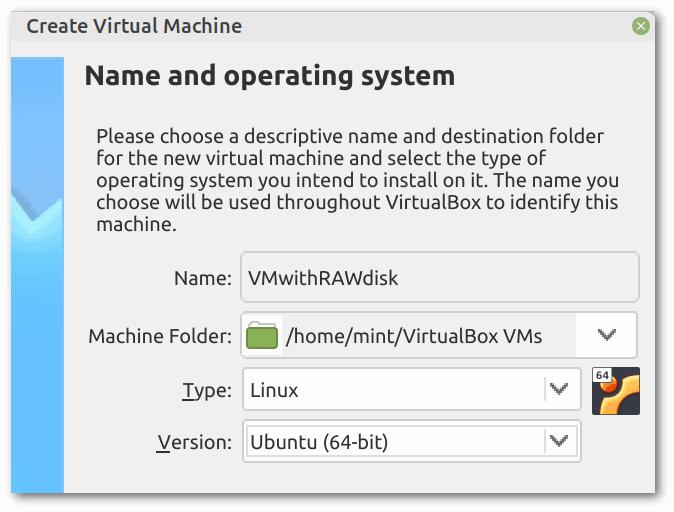
Let’s create a new virtual machine. As the guest operating system, we must choose the one installed on the physical disk. In this case, it’s Linux Mint, which is a derivative of “Ubuntu (64-bit)”:
 Let’s choose a sufficient amount of RAM for the virtual machine. As a rule of thumb, we should place the slider only inside the green part, which depends on the amount of RAM of the host machine:
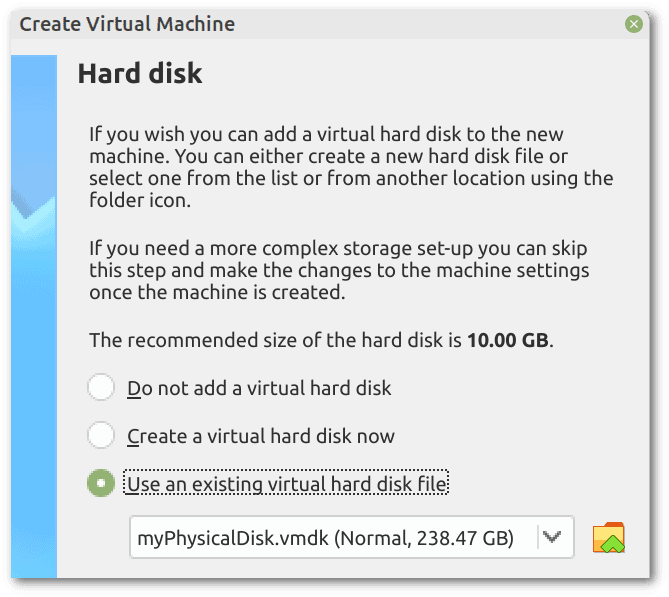
 Let’s connect our vmdk file:
 Previously, we saw that the physical disk has an EFI partition to boot the computer. So we need to enable EFI (which is disabled by default) and make sure that booting is from that disk:
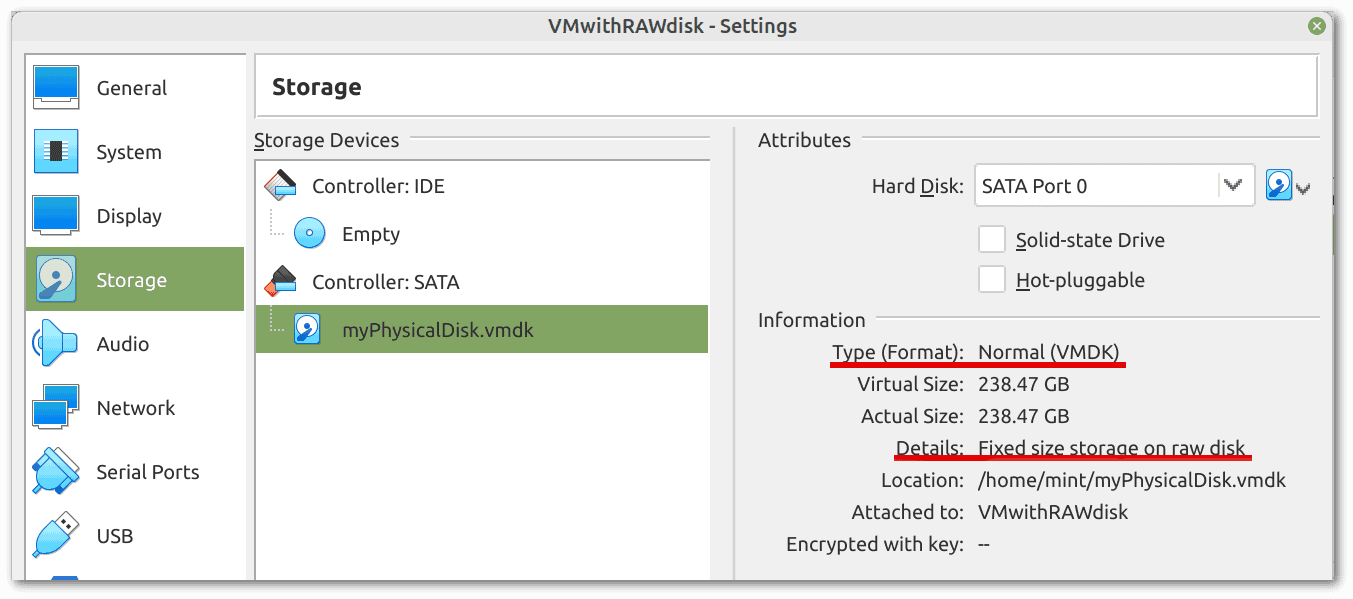
 Our virtual machine is ready for use. First, however, let’s make sure VirtualBox sees the disk correctly. The “normal” format type is the correct one. If it’s different, we can change it in the advanced options of the Virtual Media Manager:
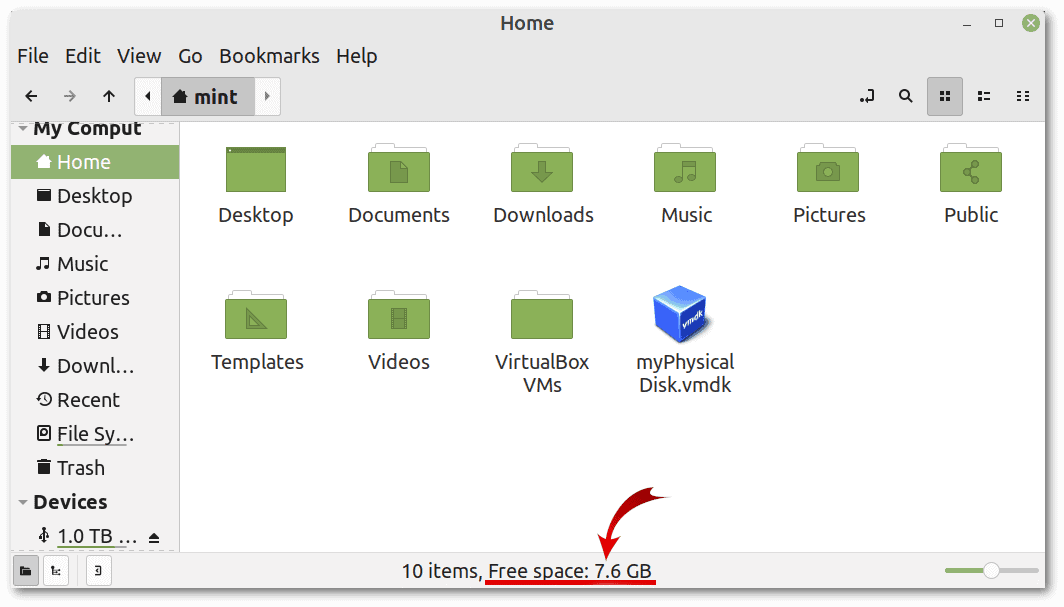
 If we want to boot the virtual machine without making any changes to the physical disk, we can make an initial snapshot before the first boot. However, let’s keep in mind that all snapshots will be stored in the /home/mint/VirtualBox VMs/VMwithRAWdisk/Snapshots folder that exists only in RAM (since we’re using a live distribution). If we have low RAM, there is no room for snapshots. So let’s check how much free space we have:
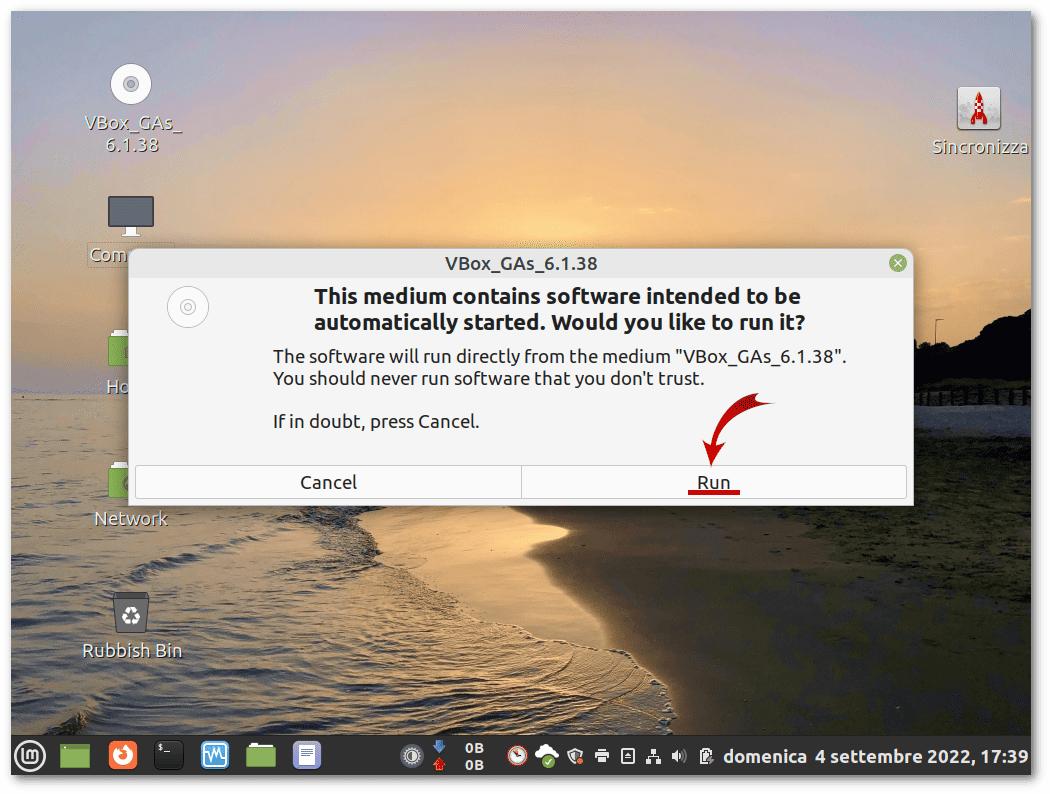
 After the first boot, via the “Insert Guest Additions CD Image” Devices menu option, we can install all the drivers we need for optimal VirtualBox support. It’s a virtual CD with an autorun feature:
 In the remainder of our tutorial, we’ll not repeat the steps to create a virtual machine, as they are always the same. The only difference will be in the connected virtual disk.
Previously we made a Clonezilla backup of /dev/sda in the AsusRog-2022-08-15-12-img folder of /dev/sdb1, which our Linux live mounts as /media/mint/HDD.
Let’s convert it to a virtual disk in VDI format. There are no special precautions except to have sufficient free space. We don’t need to run Clonezilla from inside a virtual machine. For the same reason, we also don’t need VirtualBox to access the disk containing the backup.
As a prerequisite, we need Clonezilla, which provides the ocs-sr command-line utility, and qemu-utils, which supplies qemu-nbd, the QEMU Disk Network Block Device Server. We need root permissions for all the following commands:
# apt install clonezilla qemu qemu-utilsThe first step is to create an empty VDI file with VBoxManage createmedium. We choose a fixed-size one because we’re restoring an encrypted disk backed up in dd mode, so there is no advantage in a dynamically allocated image:
# cd /media/mint/HDD
# IMAGE="AsusRog-2022-08-15-12-img" # Clonezilla backup
# SIZE=`blockdev --getsize64 /dev/sda` # alternatively, let's see sda-pt.parted.compact in the backup folder
# VBoxManage createmedium disk --filename MyVirtualBoxFixedDisk.vdi --sizebyte $SIZE --variant Fixed --format VDI
# chown mint:mint MyVirtualBoxFixedDisk.vdi
The last command ensures that the VDI file is accessible from VirtualBox run as a normal user. Now, let’s expose the entire VDI file as a disk named /dev/nbd0, thanks to the Linux kernel’s Network Block Device (nbd) module:
# rmmod nbd # removes the nbd module if already loaded
# modprobe nbd max_part=16
# qemu-nbd -c /dev/nbd0 MyVirtualBoxFixedDisk.vdi
Let’s check if Linux sees the disk:
# lsblk
NAME   MAJ:MIN RM   SIZE RO TYPE MOUNTPOINT
[...]
nbd0    43:0    0 238.5G  0 disk
It’s time to restore the backup to the /dev/nbd0 disk. ocs-sr will show some alerts before proceeding. If we need automation without warnings, we can use the -batch flag:
# /usr/sbin/ocs-sr -g auto -e1 auto -e2 -c -r -j2 -scr -p choose restoredisk AsusRog-2022-08-15-12-img nbd0
[...]
The following step is to restore an image to the hard disk/partition(s) on this machine: "/tmp/AsusRog-2022-08-15-12-img-tmp-cnvted" -> "nbd0 nbd0p1 nbd0p2 nbd0p3"
[...]
Upon completion, we can shutdown the qemu-nbd service:
# qemu-nbd -d /dev/nbd0The conversion from Clonezilla to VDI is complete. We can now attach the VDI file to a virtual machine and boot from it.
VBoxManage convertfromraw converts a raw disk image to a VDI file. Since it can also read from stdin, we can pipe the output of dd to the input of VBoxManage.
Before moving on, let’s ensure that no other process uses /dev/sda and that all its partitions are unmounted. We then proceed with the conversion from the physical disk to a virtual disk:
# cd /media/mint/HDD
# SIZE=`blockdev --getsize64 /dev/sda` # size in bytes of /dev/sda
# dd if=/dev/sda | VBoxManage convertfromraw stdin MyPhysicalDisk.vdi $SIZE --variant Fixed --format VDI
Converting from raw image file="stdin" to file="MyPhysicalDisk.vdi"...
Creating fixed image with size 256060514304 bytes (244199MB)...
Unfortunately, we won’t have any progress indicator or a time estimation. Upon completion, we’ll see:
256060514304 bytes (256 GB, 238 GiB) copied, 2092.03 s, 122 MB/sFinally, let’s give the correct permissions to the VDI file:
# chown mint:mint MyPhysicalDisk.vdiThe VDI file is now ready for use with a virtual machine.
In hot migration, we’ll perform the VDI creation from the source system while running. This is a strongly discouraged error-prone approach with possible side effects. It could make sense only if cold migration isn’t possible, maybe because we don’t have full access to the machine or we can’t stop it.
Let’s exit our Linux live and reboot the system installed on /dev/sda. Before going further, let’s ensure no process significantly uses the disk. It’s critical to close all programs not strictly necessary.
Let’s repeat the initial steps of the Clonezilla to VDI conversion so that Linux exposes the new VDI file as the /dev/nbd0 disk. We’ll place the VDI in /dev/sdb1, mounted as /media/francesco/HDD:
# cd /media/francesco/HDD/
# SIZE=`blockdev --getsize64 /dev/sda` # size in bytes of /dev/sda
# VBoxManage createmedium disk --filename MyHotMigration.vdi --sizebyte $SIZE --variant Fixed --format VDI
# chown francesco:francesco MyHotMigration.vdi
# apt install qemu qemu-utils
# rmmod nbd
# modprobe nbd max_part=16
# qemu-nbd -c /dev/nbd0 MyHotMigration.vdi
# lsblk
NAME MAJ:MIN RM SIZE RO TYPE MOUNTPOINT
[...]
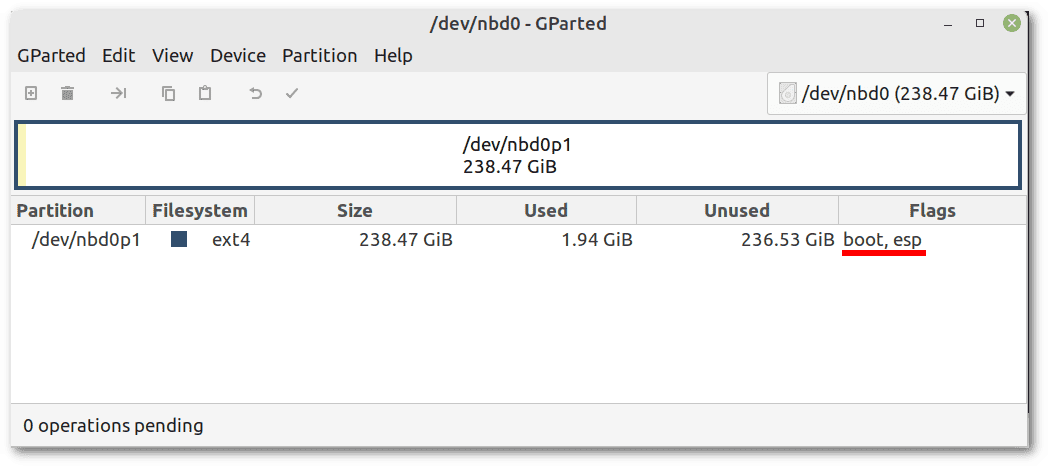
nbd0 43:0 0 238,5G 0 diskLet’s use GParted to create an MS-DOS/MBR partition table and a single ext4 partition with the “boot” and “esp” flags:
# gparted /dev/nbd0The expected result is as follows:
 This partitioning is different from that of the physical machine. Also, the physical disk is encrypted, while this virtual one is not. These differences aren’t a problem. Since we’ll be using rsync, we can choose the partitioning we prefer and whether or not to use LUKS.
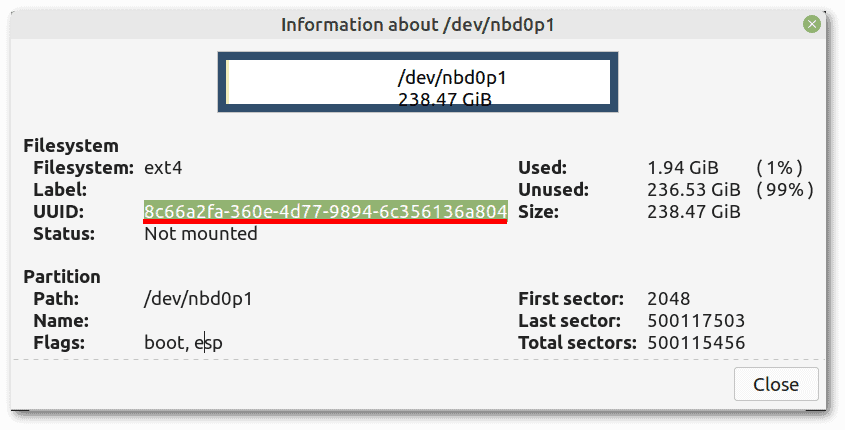
Let’s take note of the partition’s UUID, in this case 8c66a2fa-360e-4d77-9894-6c356136a804:
 The VDI is now partitioned and formatted. The next step will be to mount its one partition and copy the files.
We’re ready to clone the file system hierarchy with rsync. The bind mount ensures that we don’t copy the virtual file systems as /proc and special character devices like /dev/zero:
# mkdir /media/sda
# mkdir /media/destination
# mount --bind / /media/sda # source file system (bind mounting)
# mount /dev/nbd0p1 /media/destination # destination file system
# rsync -axHAWXS --numeric-ids --info=progress2 /media/sda/ /media/destination
# rsync -axHAWXS --numeric-ids --info=progress2 /boot/ /media/destination/boot
The second run of rsync is essential because, in the source disk, /boot is mounted on a different partition than /.
Upon completion, let’s update /media/destination/etc/fstab with the following new content. The UUID is the one we had previously copied from GParted:
UUID=8c66a2fa-360e-4d77-9894-6c356136a804 / ext4 errors=remount-ro 0 1Since we have only one partition, let’s comment all the other lines in fstab.
Now, we can unmount the source and target directories:
# umount -l /media/sda # the -l flag helps when we use "mount --bind"
# umount /media/destination
# rm -d /media/sda # the -d flag is to remove an empty dir
# rm -d /media/destination # the -d flag is to remove an empty dir
Before shutting down the qemu-nbd service, let’s perform a file system check:
# fsck -f /dev/nbd0p1 # -f flag forces the filesystem check
# qemu-nbd -d /dev/nbd0
Let’s attach our new VDI to a VirtualBox’s Linux virtual machine (with EFI disabled). Then, let’s boot the virtual machine from a virtual live DVD, including Boot Repair, such as Linux Mint. We can launch this utility from the applications menu in the “Administration” category. Let’s click on “Recommended Repair” as we don’t need to touch the advanced options:
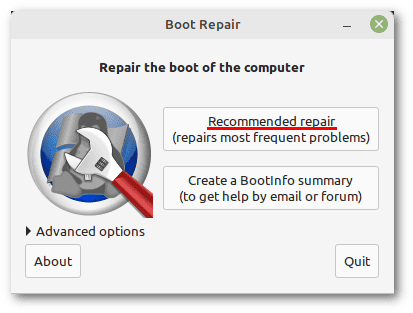 The program will completely remove Grub and reinstall it. It’ll also ask us to execute some commands requiring an active Internet connection. After that, our virtual machine will boot with a successful P2V.
As a side note, the message “waiting for encrypted source device” will appear for a while during the boot because our source physical disk was encrypted, but the virtual disk is not. We can fix it with these two commands inside the virtual machine:
# rm /etc/crypttab
# update-initramfs -u
Finally, let’s remember to install VirtualBox’s Guest Additions.
In this article, we looked at the most common approaches to creating a VirtualBox’s virtual machine from a physical Linux installation.
In most cases, we’ve used the QEMU Disk Network Block Device Server to expose a virtual VDI disk as if it were an actual physical disk. This has many advantages and allows operations that would otherwise require running from inside a virtual machine.
The possibilities for converting from a physical machine to a virtual one don’t end with the ones we’ve reviewed. With a bit of creativity, we can discover new methods.