

Yes, we're now running our only Summer Sale. All Courses are 30% off until 20th July, 2026:
Automatically Start VirtualBox Virtual Machines on Boot
Last updated: July 31, 2024
Learn through the super-clean Baeldung Pro experience:
>> Membership and Baeldung Pro.
No ads, dark-mode and 6 months free of IntelliJ Idea Ultimate to start with.
1. Overview
In this tutorial, we’ll look at how to configure VirtualBox guests to initiate on system boot. We’ll first look at VirtualBox briefly. Next, we’ll look at the vboxautostart-service and other required configuration files. Lastly, we’ll write a unit file that will autostart VirtualBox VMs during boot.
2. VirtualBox in Brief
VirtualBox is a versatile open-source virtualization software that allows users to run multiple operating systems on a single physical machine. When running VirtualBox on Debian, users can benefit from a seamless and efficient virtualization experience.
We can install VirtualBox from the terminal by running:
$ sudo apt install virtualboxAfter installation, VirtualBox can be initiated using the command virtualbox or by navigating to the Applications menu. However, for certain use cases, such as server environments or remote access, it’s often desirable to run VirtualBox in headless mode.
Apart from the headless mode, we also have the normal and detachable modes. Let’s see a quick summary of each mode:
| Mode | Functions |
|---|---|
| Normal mode | Starting a virtual machine in normal mode launches the VM with its graphical interface, providing users with a desktop environment or console, depending on the guest operating system (we can invoke it through VBoxManage startvm vm_username). |
| Headless mode | Headless mode starts the virtual machine without a graphical interface, making it suitable for server environments or scenarios where GUI interaction is unnecessary (to run headless, we use VBoxManage startvm vm_username –type headless). |
| Detachable mode | This mode starts the virtual machine with a separate process for the graphical user interface. The VM’s console window can be detached and run independently of the VirtualBox main window (to use this mode, we run VBoxManage startvm vm_username –type separate). |
To successfully automate a VirtualBox VM to start at boot time, we must ensure we’re running VirtualBox version 5 and above.
3. Configuring VirtualBox Autostart
The primary function of the vboxautostart service is to start a specified VirtualBox VM automatically when the host system boots up.
By default, after installing VirtualBox, the vboxautostart-service unit file should exist in the /etc/systemd/system/ directory.
Alternatively, for systems missing the vboxautostart service, we can create a custom systemd unit file that will contain our configurations to run VirtualBox on boot. systemd is a system and service manager for most Linux-based OSes.
4. Utilizing the vboxautostart-service
The vboxautostart-service unit file on Linux is associated with the VirtualBox Autostart Service. This service is responsible for automatically starting and stopping VirtualBox virtual machines (VMs) during system boot and shutdown.
For us to utilize the vboxautostart-service, we must edit the virtualbox default file and specify the allowed users in a ‘.cfg’ file.
Following, we must ensure that the vboxautostart-service unit exists:
$ ls /etc/systemd/system/vboxautostart-service.service
ls: cannot access '/etc/systemd/system/vboxautostart-service.service': No such file or directory.
If the unit file is missing, simply skip sections 4.1 and 4.2 and continue with section 5.
4.1. The vbox Directory and the vbox.cfg Config File
Let’s now edit the VirtualBox config file and create the vbox.cfg file. This file will contain users who are allowed to start a VM on boot.
First, let’s edit the default VirtualBox config file:
$ sudo vi /etc/default/virtualboxAnd let’s add two lines to the config file:
VBOXAUTOSTART_DB=/etc/vbox
VBOXAUTOSTART_CONFIG=/etc/vbox/vbox.cfg
Linux’s autostart service is enabled by configuring two variables in /etc/default/virtualbox file. The VBOXAUTOSTART_DB variable points to the autostart database directory that users can write to if they want to start VMs automatically.
Secondly, VBOXAUTOSTART_CONFIG variable directs the service vboxautostart-service to the autostart configuration file. The configuration file vbox.cfg is used during boot to determine whether to permit users to start a VM automatically and to control startup delays.
The vbox.cfg file is created by the user to define how VirtualBox should handle autostart settings, such as permissions, policies, and startup delays.
Let’s now create the vbox.cfg configuration file in /etc/vbox/:
$ sudo vi /etc/vbox/vbox.cfgNext, let’s add a line specifying the default_policy setting:
default_policy = denyThe configuration file is located in /etc/vbox and contains several options. Among them is default_policy, which determines whether the autostart service permits or denies starting a VM for users not on the exception list.
Following that, let’s configure the users who are allowed to start a VM on boot:
# Default policy is to deny starting a VM, the other option is "allow".
default_policy = deny

# We must create an entry for each user allowed to run autostart
user1[username] = {
allow = true
}

# user2 is allowed to start virtual machines but there's a 10 seconds delay
user2 = {
allow = true
startup_delay = 10
}
4.2. Required Permissions and Additional Configurations
Let’s now set the required permissions:
$ sudo chgrp vboxusers /etc/vbox
$ sudo chmod 1775 /etc/vbox
chgrp changes the group ownership of the /etc/vbox directory to vboxusers, which is the default group for VirtualBox users. Additionally, we use the chmod 1775 to give the group read, write, and execute permissions on the files in the directory.
The vbox directory should have the sticky bit set.
Let’s now add ourselves to the vboxusers group:
$ sudo usermod -a -G vboxusers $USER
For the user to reflect in the group, we must reboot our computer:
$ sudo rebootAfter the reboot is complete, let’s check if we’ve been added to the ‘vboxusers’ group successfully:
$ groups
gt2 adm dialout cdrom floppy sudo audio dip video plugdev netdev wireshark bluetooth scanner kaboxer vboxusers
In situations where reboot isn’t convenient, we can log out and then log in again.
Let’s now set the path to the autostart database directory:
$ VBoxManage setproperty autostartdbpath /etc/vboxFollowing that, let’s enable autostart for each virtual machine:
$ VBoxManage modifyvm --autostart-enabled on
$ sudo service vboxautostart-service restart
The –autostart-enabled flag is set to on, which enables the autostart feature for the specified virtual machine. Lastly, we restart the vboxautostart-service to apply the changes.
We can use this template to autostart multiple VMs on boot, though we’ll have to set different delays for each of the VMs we want running.
5. Creating a Custom systemd Unit File
In this section, we’ll create a reusable systemd unit file that we can use to initialize various guest machines without having to write multiple scripts.
First, let’s ensure we’re part of the vboxusers group:
$ groups
gt2 adm dialout cdrom floppy sudo audio dip video plugdev netdev wireshark bluetooth scanner kaboxer vboxusers
If not, let’s add ourselves:
$ sudo usermod -a -G vboxusers $USERNext, let’s now create the systemd template file:
$ sudo vi /etc/systemd/system/[email protected]Let’s add some basic configurations:
[Unit]
Description= Guest VM %I
After=network.target vboxdrv.service
Before=runlevel2.target shutdown.target

[Service]
User=host_username
Group=vboxusers
Type=forking
TimeoutSec=5min
IgnoreSIGPIPE=no
KillMode=process
GuessMainPID=no
RemainAfterExit=yes
ExecStart=/usr/bin/VBoxManage startvm %i --type headless
ExecStop=/usr/bin/VBoxManage controlvm %i acpipowerbutton

[Install]
WantedBy=multi-user.target
Once we’ve added these configurations, let’s save the file.
We now need to enable the unit file for our guest VM. But first, we’ll need to choose the VM we want to autostart. Let’s list the VMs on our system:
$ VBoxManage list vms
"Ubuntu" {c56a9b95-3f3e-48c6-951e-3c03ad699ca9}
"kali2" {5b261408-8d2f-44536-a643-d2fa68394d8e}
"userkali" {59f9cb1f-c439-409c-ad7e-tb7dc1d3h554}
For this example, we’ll use ‘userkali’.
Let’s enable the ‘userkali’ VM to run on startup. This will create a symlink:
$ sudo systemctl enable autostart_vm@userkali
Created symlink /etc/systemd/system/multi-user.target.wants/[email protected] → /etc/systemd/system/[email protected].
Now, let’s check the status of our unit:
$ sudo systemctl status autostart_vm@userkali
○ [email protected] - Guest VM userkali
     Loaded: loaded (/etc/systemd/system/[email protected]; enabled; preset>
     Active: inactive (dead)
To ensure that our configuration file is working right, let’s run the following commands:
$ sudo systemctl daemon-reload
$ sudo systemctl start autostart_vm@userkali
$ sudo systemctl status autostart_vm@userkali
We use the systemctl to manage systemd units. After making any changes in the unit file, we must reload the systemd manager configurations using the daemon-reload command.
Next, we use the start option to activate our unit file (autostart_vm@userkali). Lastly, we use the status option to check the current runtime state (including logs) of our unit file.
If we check the status, it should be active:
$ sudo systemctl status autostart_vm@userkali
● [email protected] - Guest VM userkali
     Loaded: loaded (/etc/systemd/system/[email protected]; enabled; preset>
     Active: active (exited) since Wed 2024-01-24 11:39:23 EAT; 3min 10s ago
    Process: 3927 ExecStart=/usr/bin/VBoxManage startvm userkali --type headles>
        CPU: 149ms
Let’s now reboot our computer and confirm if the ‘userkali’ guest VM is running after boot:
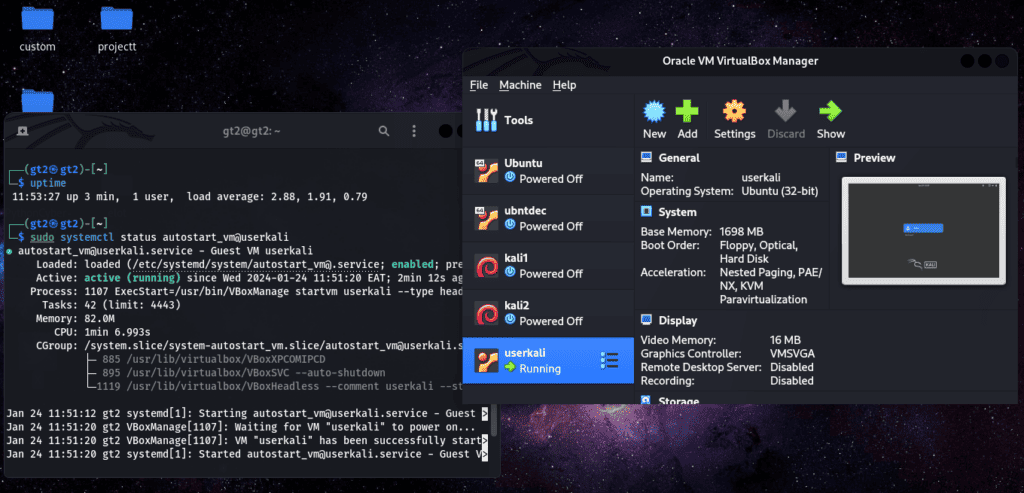
6. Conclusion
In this article, we’ve seen how we can configure our VirtualBox guest machines to initialize on boot. First, we used the vboxautostart-service to configure our VM to initialize on boot. Following this, we wrote a custom configuration script ([email protected]) and used it to create a template that we can use to initialize several VMs.