

Yes, we're now running our only Summer Sale. All Courses are 30% off until 20th July, 2026:
How to Resize VirtualBox Virtual Hard Disk
Last updated: March 18, 2024
Learn through the super-clean Baeldung Pro experience:
>> Membership and Baeldung Pro.
No ads, dark-mode and 6 months free of IntelliJ Idea Ultimate to start with.
1. Overview
VirtualBox offers several types of virtual disk image. Some types allow for dynamically allocated storage, while others only support fixed-allocated storage.
In this tutorial, we’ll learn how to resize VirtualBox’s default disk image format, VirtualBox Disk Image (VDI), which supports both fixed and dynamic storage allocation.
The resizing method and Linux commands mentioned in this guide have been tested on Debian 12 (Bookworm), running VirtualBox 7.0.10, with openSUSE Tumbleweed and Ubuntu 22.04 LTS virtual machines.
2. Create a Virtual Machine Sample
Let’s create an openSUSE Tumbleweed virtual machine. We’ll set the virtual hard disk size to 8 GB and its type to VDI:
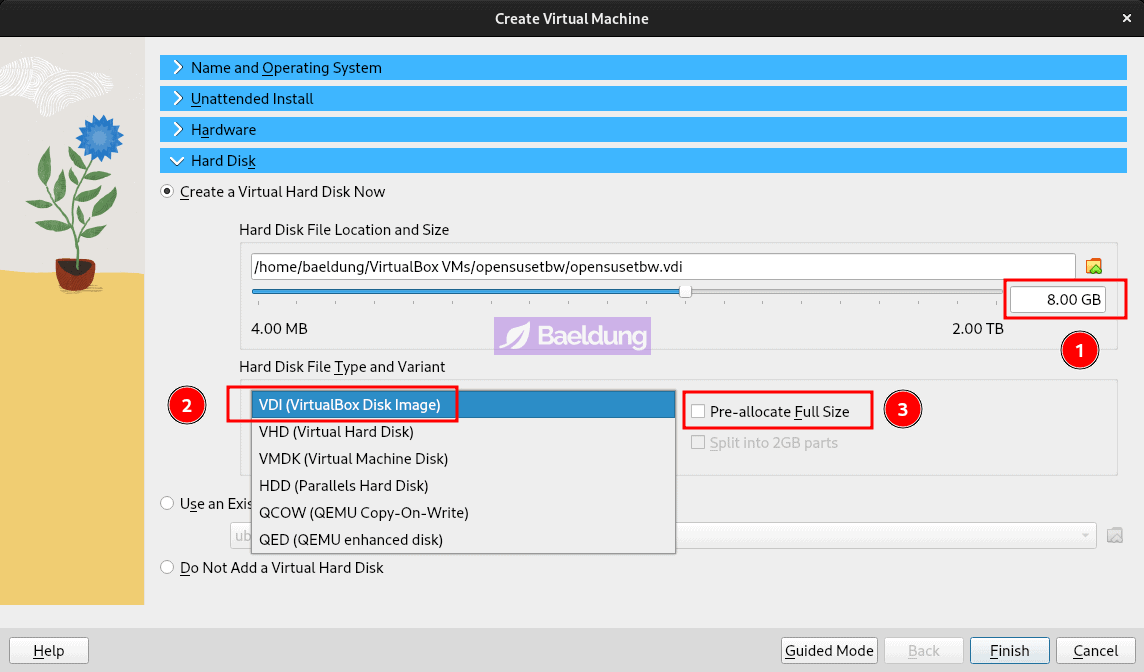
There’s an option to create the virtual disk image with its full size during VM creation time (see the Pre-allocate Full Size checkbox highlighted in the above image). However, we’ll leave it unchecked because dynamically allocating the storage is more space-efficient.
Once the VM has been created, let’s boot it, and check its disk using the df command:
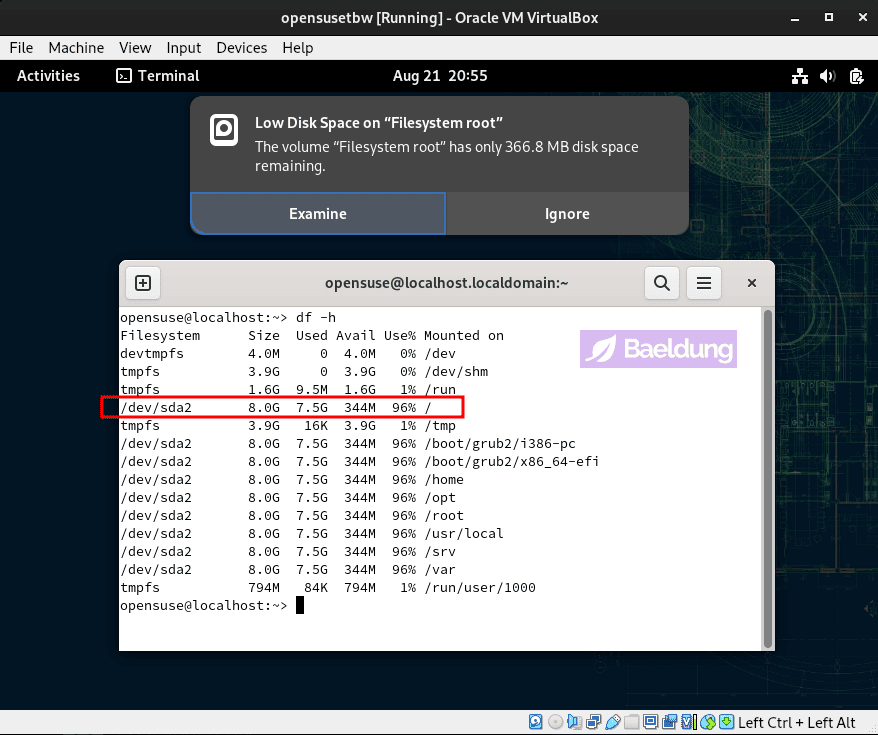
Notice that the storage is almost full (96% used, or 344 MB left). Let’s increase the storage.
3. Resize the Virtual Hard Disk
Resizing the virtual hard disk requires two steps: resizing the disk file, and resizing the partition in the virtual machine.
Decreasing the disk size is possibly more dangerous than increasing it. Nevertheless, we may want to back up our .vdi file before we resize the disk by simply copying it:
$ cp opensusetbw.vdi opensusetbw.vdi.bakIf something goes wrong during the resize operation, we can simply delete the opensusetbw.vdi file, and rename opensusetbw.vdi.bak to opensusetbw.vdi.
3.1. Resize the Virtual Hard Disk File
VirtualBox provides a tool called VirtualBox Media Manager that we can use to resize the disk file:
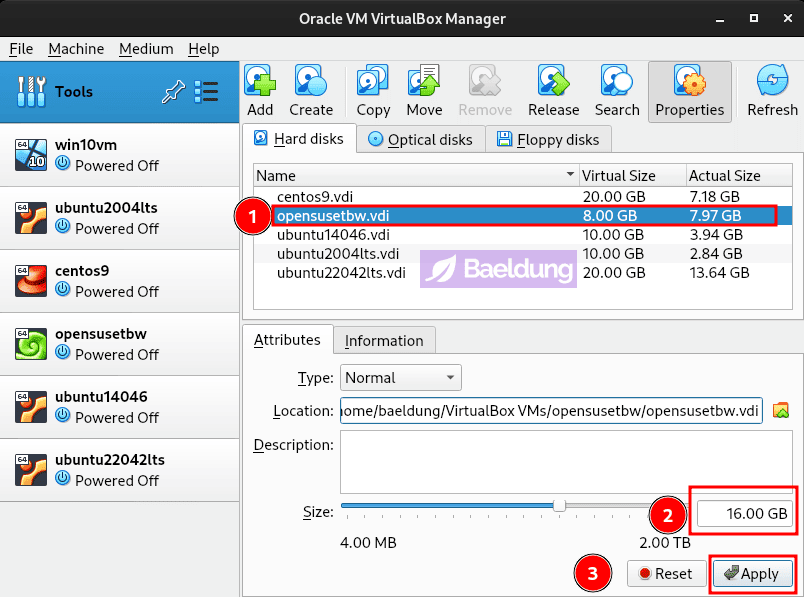
We open the VirtualBox Media Manager by clicking the Tools menu on the left sidebar menu.
Then we just need to: (1) select the hard disk file, (2) set the new Size value that we want, and (3) click Apply.
3.2. Resize the Virtual Hard Disk Partition
Now that we’ve resized the disk file, we need to resize the virtual hard disk partition of the VM.
Resizing the disk partition can be done in two ways: using a combination of command-line tools or using GUI tools.
Since the command-line approach can be error-prone, it’s safer for us to use GUI tools, such as GParted or KDE Partition Manager. So let’s use GParted.
First, we’ll boot the VM, and install GParted:
$ sudo zypper in gpartedIf our VM is running Debian or its derivatives:
$ sudo apt install gpartedOnce we’ve installed GParted, we’ll open it and resize the partition:
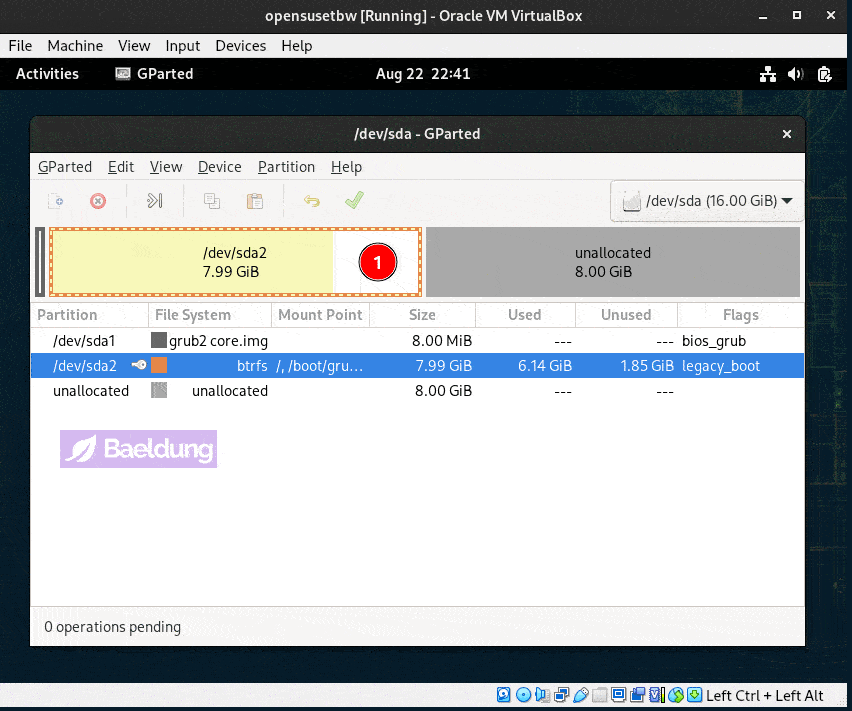
The steps needed to resize the partition are highlighted in the above GIF animation: (1) select the partition to resize; (2, 3) click Partition > Resize/Move menu; (4, 5, 6) drag the partition, or enter the new size, and click Resize; and finally, (7, 8) click Edit > Apply All Operations.
Once the resizing operation is finished, which should only take several seconds, we can check the partition size again using df.
The df command should report that the partition size is now 16 GB, as shown in the image above.
4. Troubleshooting
When the virtual machine fails to boot, and displays error messages similar to these:
...
Starting GNOME Display Manager...
...
[FAILED] Failed to start GNOME Display Manager.
...
Starting Terminate Plymouth Boot Screen...
This could mean that the VM’s virtual hard disk is full.
4.1. VM Cannot Boot – “Starting Terminate Plymouth Boot Screen” Error
When the VM’s virtual hard disk is full, we may not be able to boot the VM. During boot, the VM will display log messages that end with “Starting Terminate Plymouth Boot Screen.”
We can verify if this is the case by comparing the VM’s Actual Size to the Virtual Size in VirtualBox Media Manager:
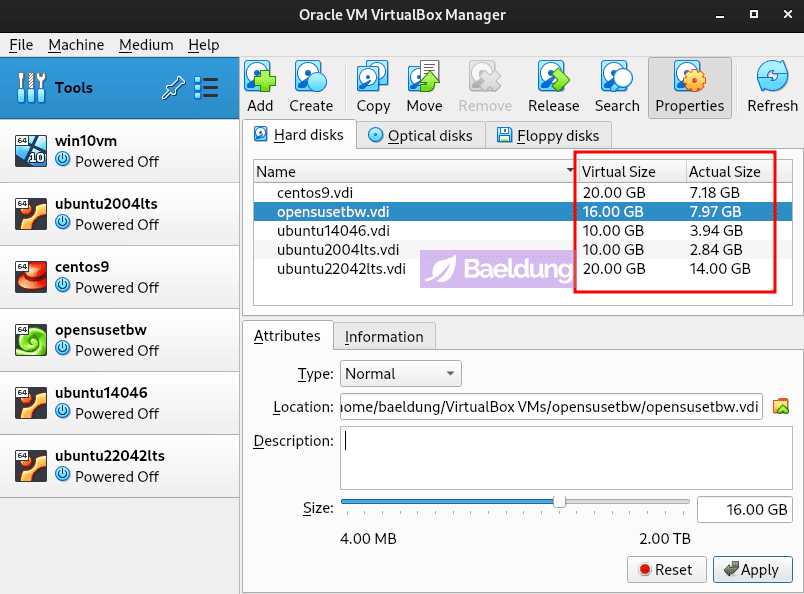
If the Actual Size is very close to, or quite similar to the Virtual Size, then the VM might not have enough space to boot.
To fix this, we can follow the same steps as in the previous sections. First, we resize the virtual hard disk file using the VirtualBox Media Manager.
Next, since we can’t enter the VM to run GParted, we need to boot from a live CD:
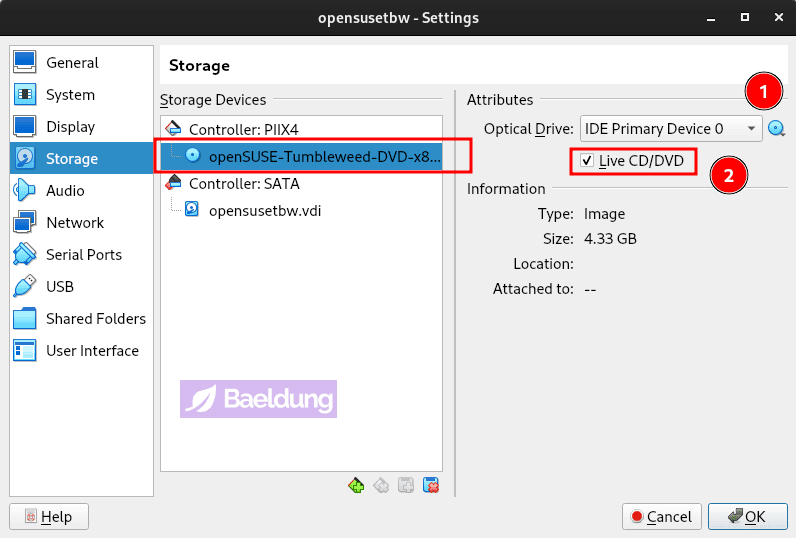
We select the live CD image, in this case openSUSE Tumbleweed, then check the Live CD/DVD checkbox. Afterward, we boot the VM, which will boot from the live CD.
The next step is to resize the virtual hard disk partition using GParted, which is identical to what we did in the previous section. Once the disk partition resizing operations are finished, we shut down the VM, remove the live CD, and finally, boot the VM.
The VM partition should now have a new size, which we can verify using the df command.
5. Conclusion
This article taught us how to resize the VirtualBox virtual hard disk. The process involves two important steps: resizing the disk file using the VirtualBox Media Manager, and then resizing the disk partition using GParted from inside the virtual machine.
Additionally, we learned how to troubleshoot a problem where the VM won’t boot due to the VM’s hard disk being full.