Learn through the super-clean Baeldung Pro experience:
>> Membership and Baeldung Pro.
No ads, dark-mode and 6 months free of IntelliJ Idea Ultimate to start with.
Last updated: January 30, 2024

Learn through the super-clean Baeldung Pro experience:
>> Membership and Baeldung Pro.
No ads, dark-mode and 6 months free of IntelliJ Idea Ultimate to start with.
VirtualBox supports a variety of network adapters for virtualizing networking hardware. Additionally, we can configure these adapters to operate in specific networking modes.
In this tutorial, we’ll look at the networking modes we can use to send ping messages from one guest machine to another.
All examples in this guide have been tested on Debian 12 running VirtualBox 7.0.12.
Let’s begin with exploring the supported virtual networking hardware adapters and modes in VirtualBox:
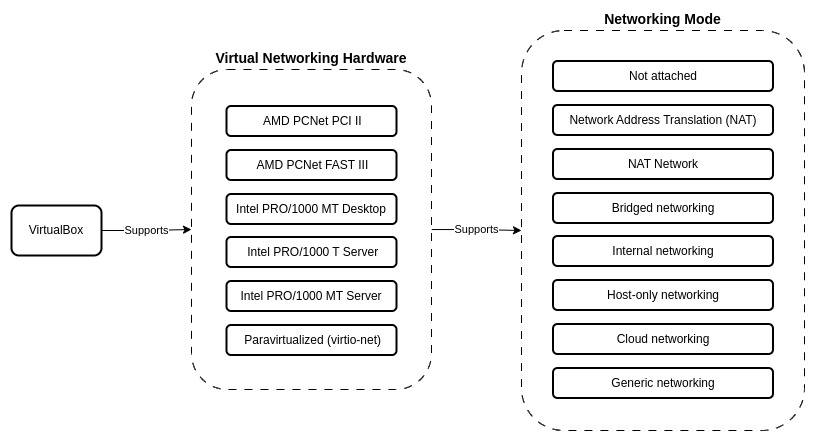
VirtualBox has six virtual networking hardware adapters. Whenever we create a new guest machine or a virtual machine (VM), the VM will default to use the AMD PCNet FAST III network adapter. We don’t necessarily need to modify this setting, as VirtualBox will automatically configure it based on our guest operating system.
In addition, VirtualBox provides seven networking modes that we can choose from for each network adapter.
Each networking mode has its characteristics. However, when it comes to network communication capabilities between the host, guest machine, and external networks, these modes have different levels of interaction and access:
| Mode | VM => Host | VM <= Host | VM1 <=> VM2 | VM => Net/LAN | VM <= Net/LAN |
|---|---|---|---|---|---|
| Not attached | No | No | No | No | No |
| Host-only | Yes | Yes | Yes | No | No |
| Internal | No | No | Yes | No | No |
| Bridged | Yes | Yes | Yes | Yes | Yes |
| NAT | Yes | Port forward | No | Yes | Port forward |
| NAT Network | Yes | Port forward | Yes | Yes | Port forward |
Referring to the table above, to communicate or ping between the guest machines, we must set the VM’s networking mode to either Host-only, Internal, Bridged, or NAT Network.
Let’s try a couple of them: Bridged and NAT Network modes.
First, let’s create two guest machines, one with openSUSE Tumbleweed and the other with Ubuntu 22.04 LTS.
In the Network menu, we set the networking mode to Bridged for both VMs:
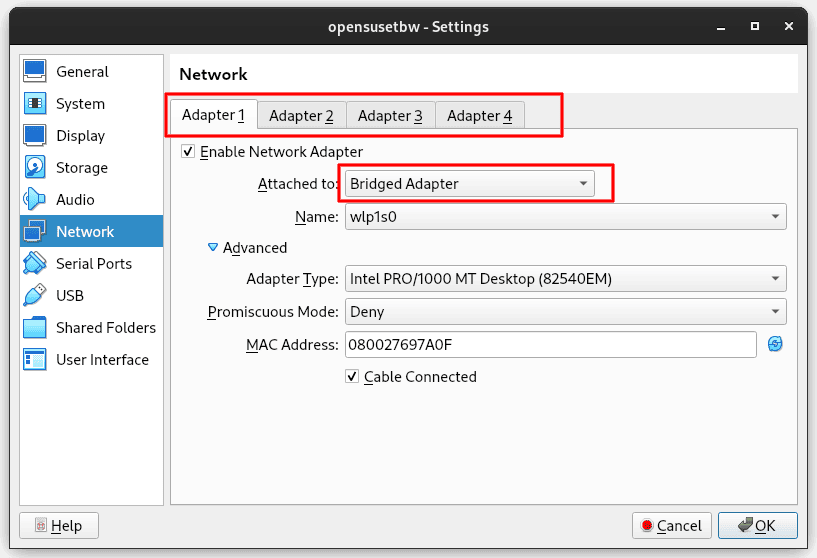
The Network menu interface only provides four tabs to configure four network adapters. However, we can use up to eight network adapters for each VM by using the VBoxManage modifyvm command:
$ VBoxManage list vms
...
"opensusetbw" {22cbfd19-3658-403d-a0e4-3f9e7b2aac98}
...
$ VBoxManage showvminfo opensusetbw --machinereadable | grep "nic"
nic1="bridged"
nictype1="82540EM"
nicspeed1="0"
nic2="none"
...
nic8="none"
$ VBoxManage modifyvm opensusetbw --nic2 intnet
$ VBoxManage showvminfo opensusetbw --machinereadable | grep "nic"
nic1="bridged"
nictype1="82540EM"
nicspeed1="0"
...
nic8="intnet"
nictype8="82540EM"
nicspeed8="0"
In the commands above, we started by listing all VMs that we have (VBoxManage list vms). Then, we showed all network adapters for the openSUSE VM (VBoxManage showvminfo opensusetbw –machinereadable | grep “nic”).
Afterward, we enabled the eighth adapter and configured it to Internal Network mode (VBoxManage modifyvm opensusetbw –nic8 intnet).
Finally, we confirmed that the openSUSE VM now has two network adapters attached: one configured for Bridged mode and the other for Internal Network (VBoxManage showvminfo opensusetbw –machinereadable | grep “nic”).
After we’ve created both VMs successfully, we can run them to test if we can send ping messages from one VM to another.
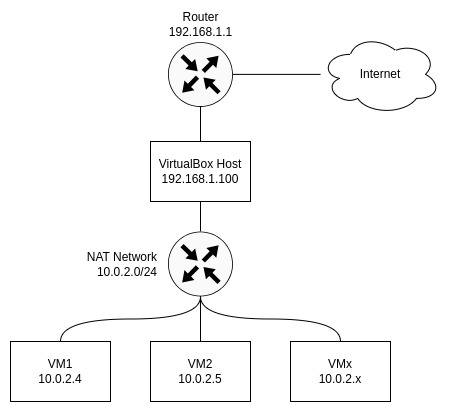
The Bridged mode network diagram:

The VirtualBox Host gets the IP address 192.168.1.100 from the Router. In Bridged mode, all VMs also obtain an IP address within the same address range – 192.168.1.x.
First, we need to get the IP addresses of both VMs.
openSUSE VM:
opensuse@localhost:~> ip address
...
2: enp0s3: <BROADCAST,MULTICAST,UP,LOWER_UP> ...
...
    inet 192.168.1.101/24 brd 192.168.1.255 ...
...
Ubuntu VM:
ubuntu@ubuntuvm:~$ ip address
...
2: enp0s3: <BROADCAST,MULTICAST,UP,LOWER_UP> ...
...
    inet 192.168.1.102/24 brd 192.168.1.255 ...
...
Additionally, the host IP address:
$ ip address
...
3: wlp1s0: <BROADCAST,MULTICAST,UP,LOWER_UP> ...
...
inet 192.168.1.100/24 brd 192.168.1.255 ...
...
Both the VMs and the host are assigned to the same IP address network (192.168.1.x) by the Router. If the host is not connected to a router or offline, then the Bridged mode may be unable to assign an IP address to the VM through DHCP. As an alternative, we can use Host-only mode because this mode doesn’t require an external network or DHCP server to function.
Next, let’s ping from the openSUSE VM to the Ubuntu VM:
opensuse@localhost:~> ping 192.168.1.102
PING 192.168.1.102 (192.168.1.102) 56(84) bytes of data.
64 bytes from 192.168.1.102: icmp_seq=1 ttl=64 time=0.775 ms
...
The ping command was successful.
Afterward, we ping from the Ubuntu VM to the openSUSE VM:
ubuntu@ubuntuvm:~$ ping 192.168.1.101
PING 192.168.1.101 (192.168.1.101) 56(84) bytes of data.
64 bytes from 192.168.1.101: icmp_seq=1 ttl=64 time=0.470 ms
...
It was also successful.
We’ve verified that we can ping from one VM to another with Bridged mode.
Let’s try another mode, the NAT Network:
If we’ve never configured a NAT Network, we must create one by clicking Tools > Create. VirtualBox will automatically create a new NAT Network with default settings:
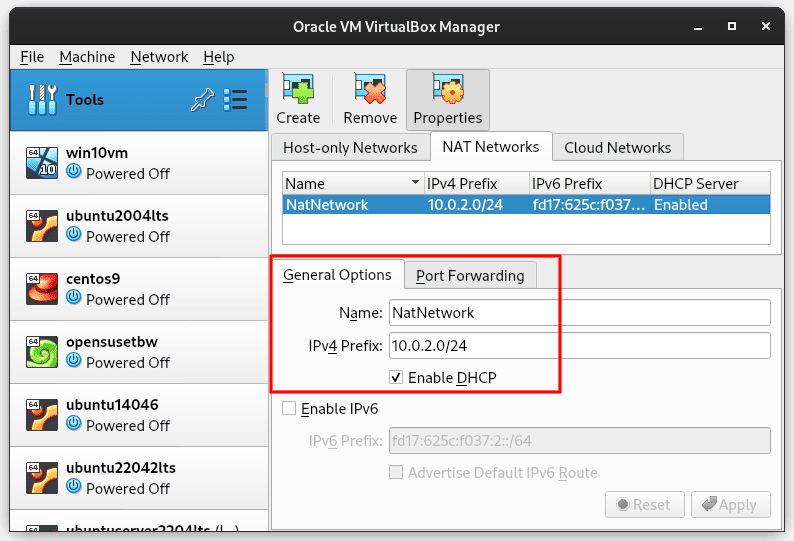
Next, let’s configure the Network settings for each VM to use NAT Network mode:
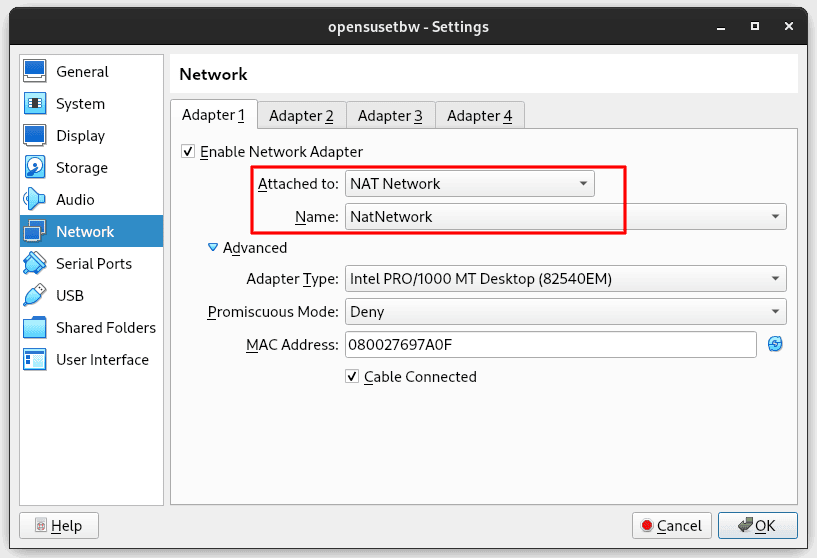
Notably, we need to select the name of the NAT Network, especially if we have multiple networks so that both VMs will have the IP addresses within the same network.
Let’s get the IP addresses of both VMs.
openSUSE VM:
opensuse@localhost:~> ip address
...
2: enp0s3: <BROADCAST,MULTICAST,UP,LOWER_UP> ...
...
    inet 10.0.2.4/24 brd 10.0.2.255 ...
...
Ubuntu VM:
ubuntu@ubuntuvm:~$ ip address
...
2: enp0s3: <BROADCAST,MULTICAST,UP,LOWER_UP> ...
...
    inet 10.0.2.5/24 brd 10.0.2.255 ...
...
The host IP address stays the same, which is 192.168.1.100.
Both VMs have been assigned IP addresses within the 10.0.2.x range because previously, we configured the NAT Network to use that specific range.
In NAT Network mode, the VMs can send messages to the host, but for the host to send messages to the VMs, we need to set up a port forwarding.
Next, let’s ping from the openSUSE VM to the Ubuntu VM:
opensuse@localhost:~> ping 10.0.2.5
PING 10.0.2.5 (10.0.2.5) 56(84) bytes of data.
64 bytes from 10.0.2.5: icmp_seq=1 ttl=64 time=0.713 ms
...
The ping command was successful.
Afterward, we ping from the Ubuntu VM to the openSUSE VM:
ubuntu@ubuntuvm:~$ ping 10.0.2.4
PING 10.0.2.4 (10.0.2.4) 56(84) bytes of data.
64 bytes from 10.0.2.4: icmp_seq=1 ttl=64 time=0.487 ms
...
It was also successful.
We’ve successfully sent ping messages between VMs with NAT Network mode.
In this article, we learned how to send ping messages between VirtualBox VMs. We explored the network adapters and modes supported by VirtualBox and verified that network modes such as Bridged or NAT Networks can serve this purpose.