

Learn through the super-clean Baeldung Pro experience:
>> Membership and Baeldung Pro.
No ads, dark-mode and 6 months free of IntelliJ Idea Ultimate to start with.
Last updated: March 18, 2024
Learn through the super-clean Baeldung Pro experience:
>> Membership and Baeldung Pro.
No ads, dark-mode and 6 months free of IntelliJ Idea Ultimate to start with.
VirtualBox is an open-source and cross-platform virtualization software from Oracle. Its UI interface is quite user-friendly and covers many functionalities. However, one common issue we almost always face after creating a virtual machine is the guest screen resolution problem.
The guest screen resolution is usually set to a minimum, with no higher options available in the Display Settings. Additionally, the screen doesn’t fill up the monitor when the resolution is lower than that of the host system, and it extends beyond the visible screen area when the resolution is higher than that of the host system.
In this article, we’ll learn how to increase or adjust the screen resolution of various guest operating systems, such as CentOS Stream 9, Ubuntu 22.04.2 LTS, and openSUSE Tumbleweed.
All methods and commands in this guide have been tested on Debian 12 (Bookworm) running VirtualBox 6.1.46.
Let’s begin with creating a new virtual machine of 64-bit CentOS Stream 9, and then open the display settings (right-click on Desktop > Display Settings) to view all the available resolution options:
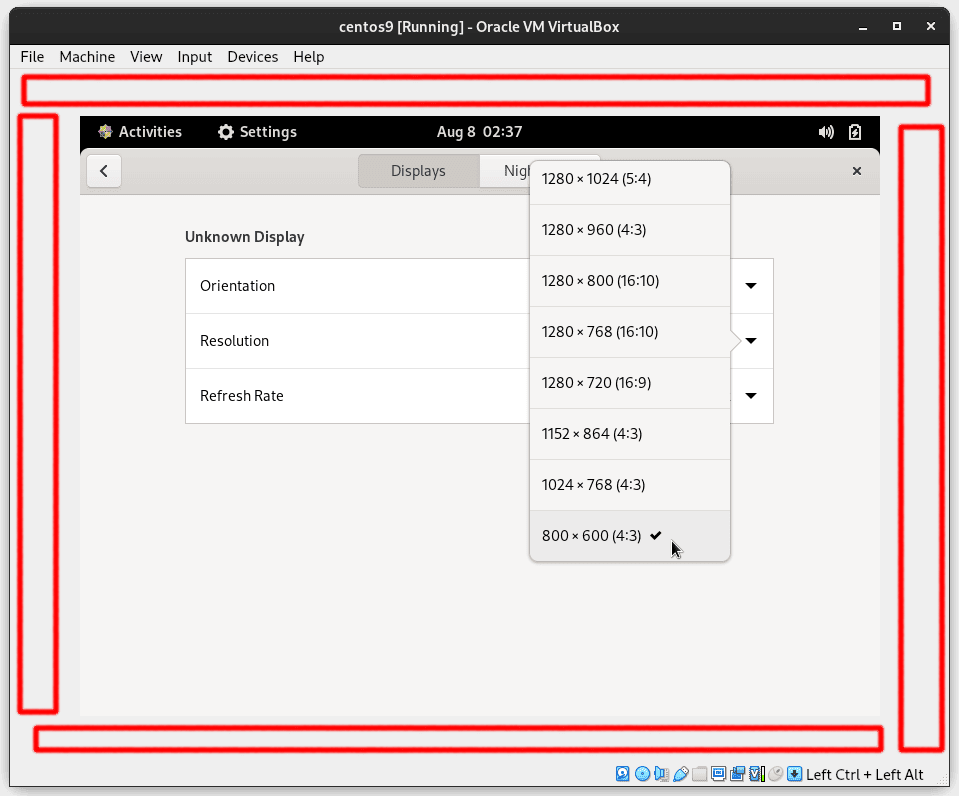 Image 1: VBox CentOS VM – Display Settings (800 x 600) |
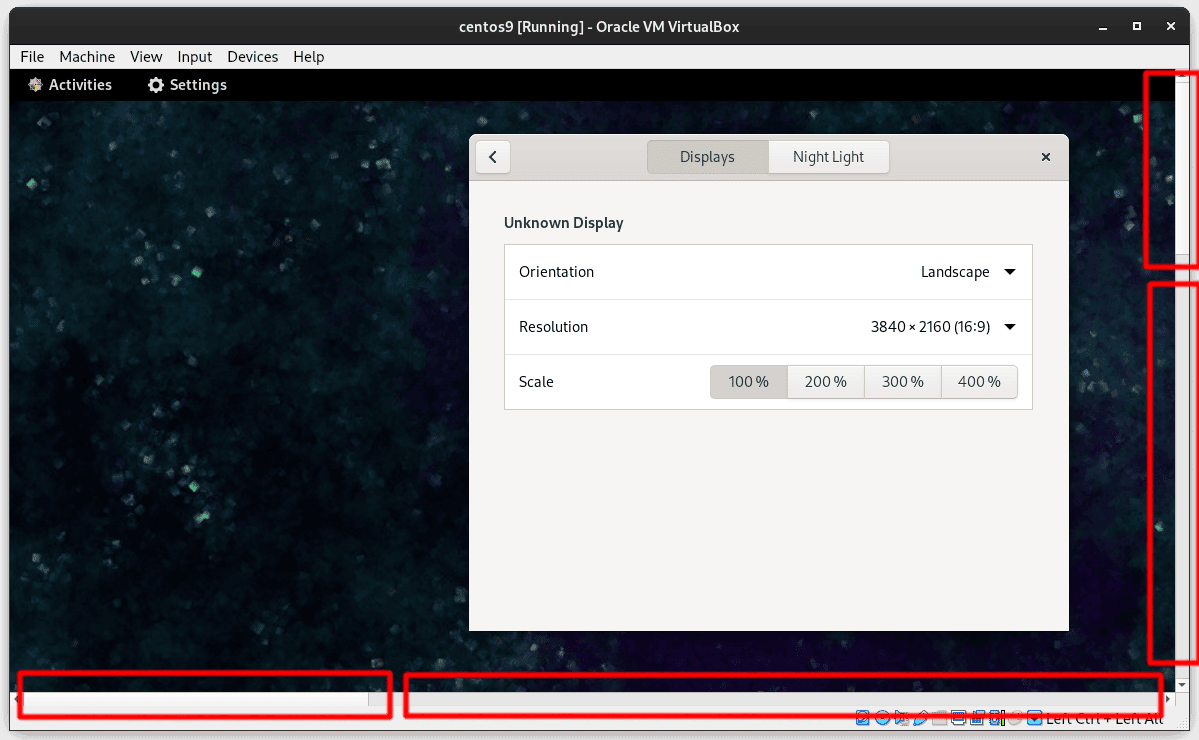 Image 2: VBox CentOS VM – Display Settings (3840 x 2160) |
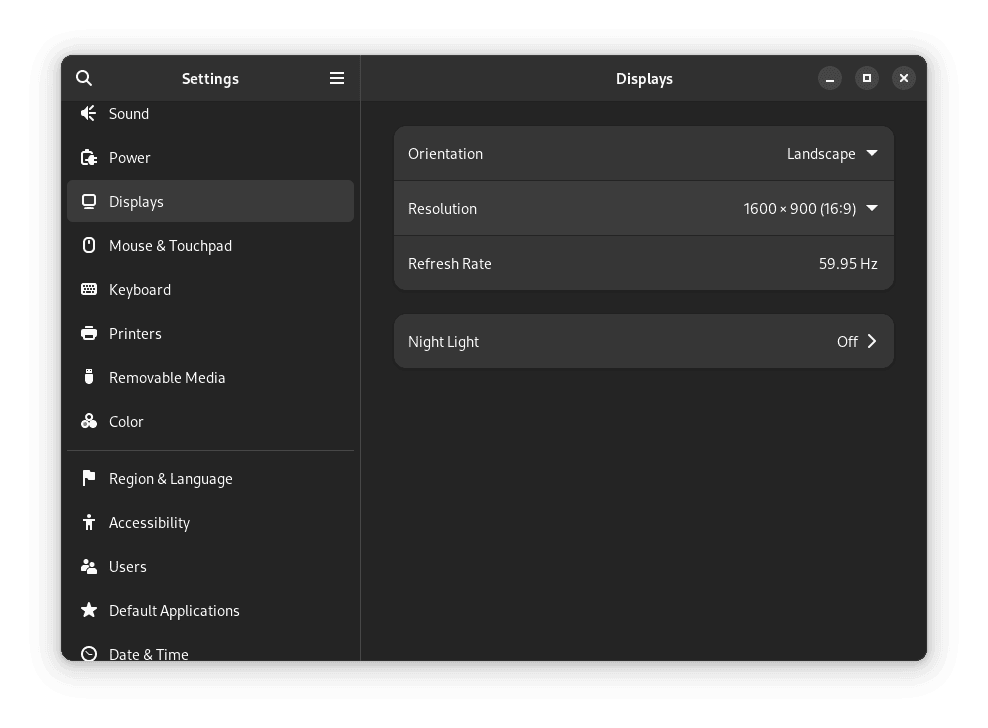 Image 3: Host Display Settings (1900 x 1600) |
The default VM screen resolution is 800 x 600, and the display content doesn’t fully utilize the monitor screen (Image 1), even when in full-screen mode (View > Full-screen Mode). Furthermore, if we set the resolution higher than the host’s, the display extends beyond the visible screen area (Image 2), even when in full-screen mode.
The maximum physical screen resolution of the host system (Debian 12) is 1366 x 768 (Image 3). Nevertheless, we can set the virtual screen resolution of the host or guest system to whatever we want as long as our host system or VirtualBox graphics adapter supports it. In this case, the host screen resolution is 1600 x 900.
However, increasing the screen resolution higher than our maximum physical screen resolution may impact the system performance, as the OS has to render a larger number of pixels. Another aspect to consider is the size of the UI elements, as higher resolution might make UI elements like icons, text, and windows appear smaller than usual, making them harder to read or interact with.
Recent releases of CentOS now include virtual screen resolution options that may be higher than our system’s physical screen resolution. Therefore, we need to select the best resolution that suits our needs.
However, in case we want to add a specific resolution, or if we’re running the older OS version with limited resolution options, we can add the virtual screen resolution by using the xrandr command in the X11 environment. If our system is running Wayland, Wayland has different methods of changing screen resolution depending on the compositor used. The two most popular methods in Wayland are kscreen-doctor (KDE Plasma) and gnome-randr (GNOME).
An easier way to adjust the VM resolution is by installing VirtualBox Guest Additions. VirtualBox Guest Additions offers many features, such as better video support, seamless windows, shared directories, shared clipboard, and many more.
Installing Guest Additions will also fix the problem where the virtual display content doesn’t fill up the screen when the resolution is lower than that of the host system (Image 1), as well as when the virtual display content extends the visible screen area when the resolution is higher than that of the host system (Image 2).
While the xrandr or other similar commands may provide more flexible ways to add new screen resolutions, for this article, let’s use Guest Additions.
VirtualBox Guest Additions is a package in an ISO image that consists of device drivers and system applications and supports many guest OSes. It optimizes the guest operating system for better performance and usability, and in our case, it helps adjust/increase our guest screen resolution.
For brevity and to avoid classification by search engines as keyword stuffing in this article, we’ll shorten VirtualBox Guest Additions to GA.
The GA comes with the installation package, so we don’t need to download it separately. After we’ve installed VirtualBox, the GA image file is usually located in the installation directory, such as /usr/share/virtualbox/VBoxGuestAdditions.iso.
VirtualBox supports auto-update, which includes checking for GA updates. The auto-update will check for updates once per day by default. However, we can change the checking frequency in the File > Preferences > Update menu.
Before we install VirtualBox GA, let’s update our CentOS VM packages first, as this step is essential prior to installing the GA:
$ sudo dnf updateFollowed by installing Extra Packages for Enterprise Linux (or EPEL) for CentOS Stream 9:
$ sudo dnf config-manager --set-enabled crb
$ sudo dnf install epel-release epel-next-release
EPEL packages are maintained by Fedora Special Interest Groups (SIGs).
And finally, installing DKMS (Dynamic Kernel Module Support):
$ sudo dnf install dkmsDKMS serves as a framework for creating Linux kernel modules from sources that might not be in the Linux kernel source tree. Furthermore, when we install a new kernel, it’ll rebuild the kernel device drivers automatically.
Once it’s all done, we can continue with the GA installation.
The VirtualBox GA must be installed inside the guest operating system. So, what we’re going to do is register the GA ISO file as a virtual CD on the host OS, boot the guest OS, insert the virtual CD into the guest OS, install the package, and restart the VM.
Let’s start with registering the ISO file as a virtual CD on the host OS (File > Virtual Media Manager…):

Image 4: VirtualBox Virtual Media Manager
Next, boot the guest OS. Then, insert the virtual CD to the guest OS (Devices > Insert Guest Additions CD Image…), and run/install the software:
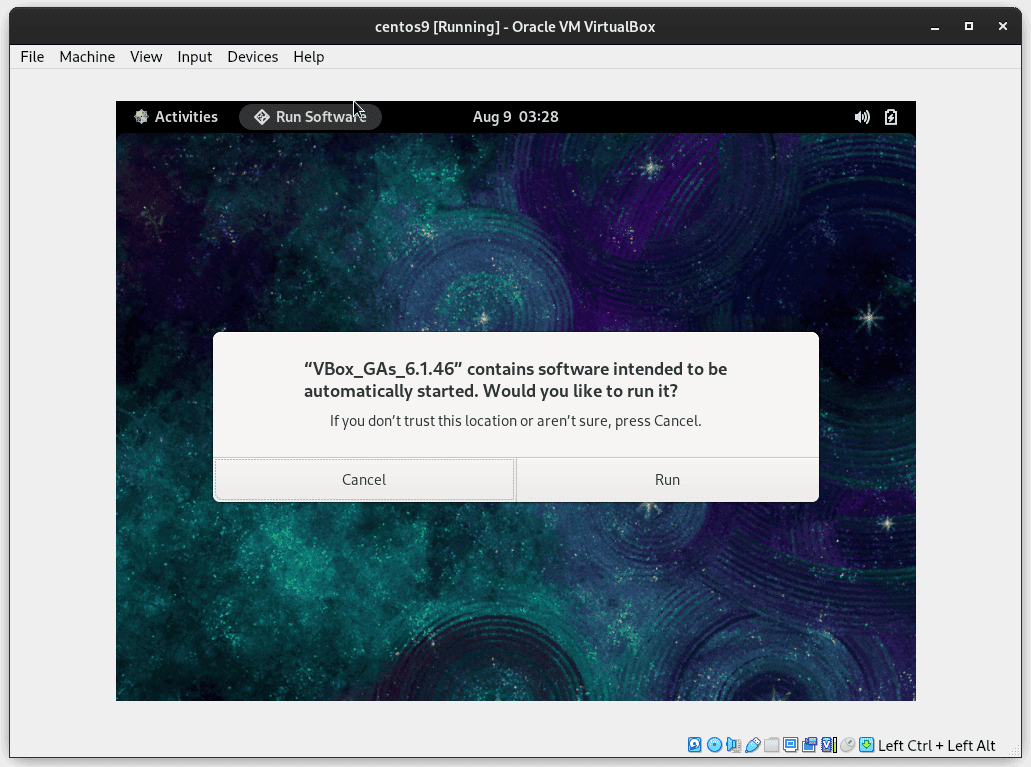
Image 5: VirtualBox CentOS VM – GA Installation
The CD image has an auto-run feature. Otherwise, we can run autorun.sh that’s located in the root directory of the CD, or click the Run Software button at the top right corner of the Files program, as shown in the image below:
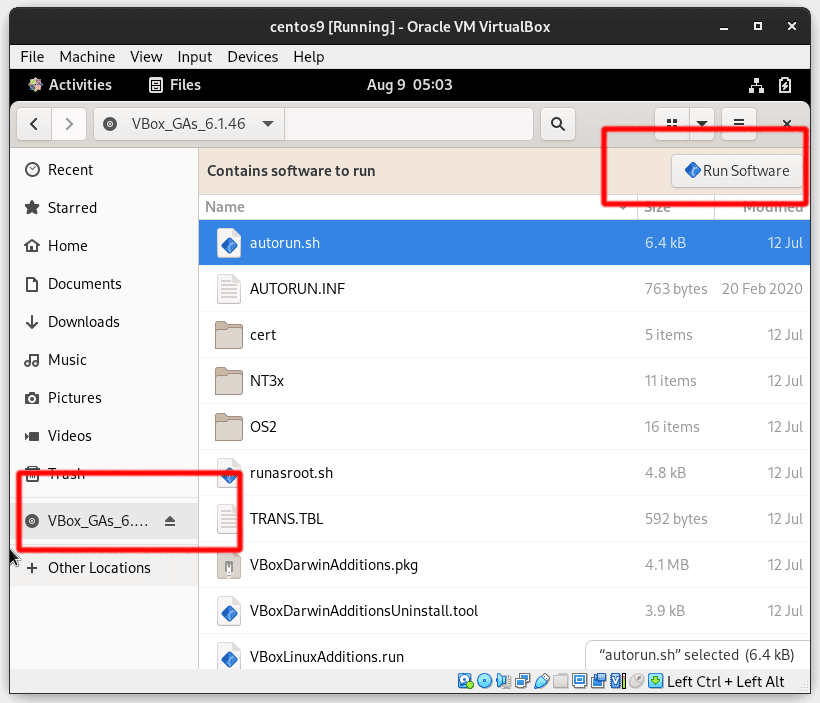
Image 6: VirtualBox CentOS VM – Files – GA Installation
After the installation is finished, we restart the VM.
Once we’ve updated our VM with the latest software packages, installed the GA, and restarted the VM, we can adjust the VM screen resolution. We’ll also have the option to view it in full-screen mode, where the VM will occupy the entire screen and adjust the content display if the guest resolution is lower or higher than that of the host.
The solution to increase Ubuntu VM screen resolution is similar to what we did for the CentOS VM in the previous section. The same solution will also offer the option to view the VM in full-screen mode.
The difference is the commands to update Ubuntu VM software packages before installing the GA.
Let’s increase the Ubuntu VM screen resolution.
First, we start with creating a new virtual machine of 64-bit Ubuntu Desktop 22.04.2 LTS. Afterward, we open the display settings (right-click on Desktop > Display Settings) to view all the available resolution options:
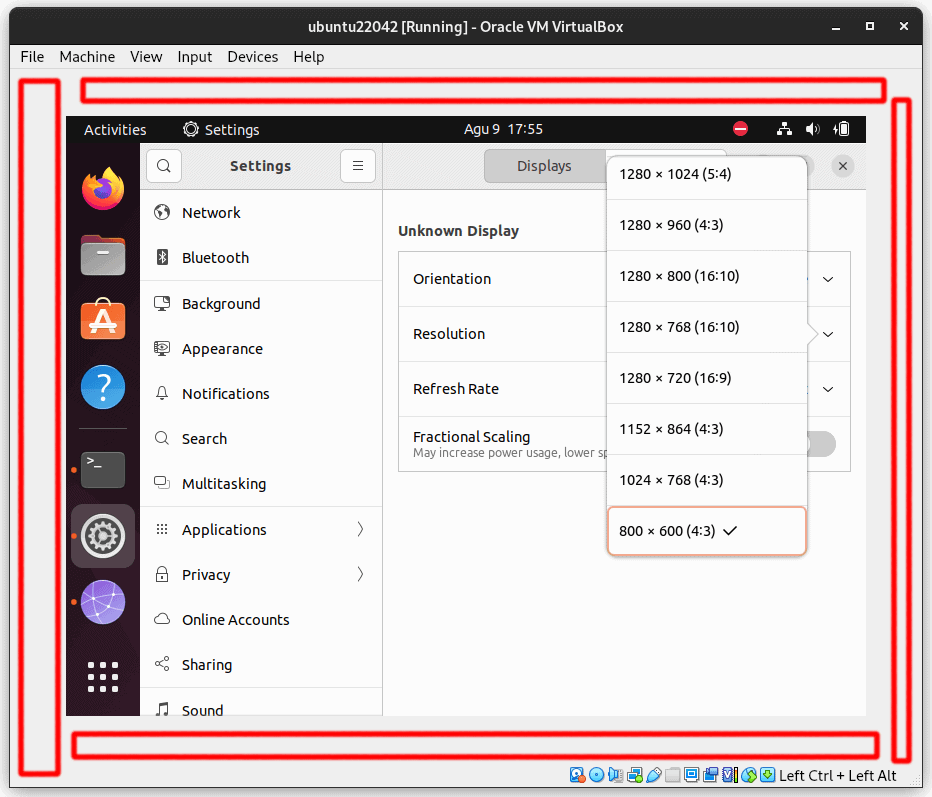
Image 7: VirtualBox Ubuntu VM – Display Settings (800 x 60)
The default Ubuntu VM screen resolution is 800 x 600, identical to the CentOS VM. Here, we can see it has a similar problem with CentOS VM. The displayed content doesn’t fully utilize the monitor screen, even when in full-screen mode (View > Full-screen Mode).
Furthermore, if we set the resolution higher than that of the host, the display will extend beyond the visible screen area, even when in full-screen mode.
Next, let’s update Ubuntu VM software packages before installing GA:
$ sudo apt update
$ sudo apt upgrade
This is followed by installing the dbus-x11 package, which is an interprocess messaging system for applications to communicate with each other:
$ sudo apt install dbus-x11And finally, install VirtualBox DKMS (Dynamic Kernel Module Support). DKMS is a framework to generate Linux kernel modules whose sources do not generally reside in the Linux kernel source tree. DKMS enables kernel device drivers to be automatically rebuilt when a new kernel is installed:
$ sudo apt install virtualbox-dkmsOnce it’s finished, let’s install GA.
This step is similar to what we did for CentOS VM. The VirtualBox GA must be installed inside the guest operating system. If we’ve registered the CD image as a virtual CD, then we just need to insert the CD into the VM and install it.
The CD image has an auto-run feature. Otherwise, we can run autorun.sh that’s located in the root directory of the CD. Another option is to open the Files program and navigate to the mounted CD, then click the Run Software button (Image 6).
Once we’ve updated our VM with the latest software packages, installed the GA, and restarted the VM, we can adjust the VM screen resolution. We’ll also have the option to view it in full-screen mode, where the VM will occupy the entire screen. Furthermore, the VM will adjust the content display if the guest resolution exceeds the host’s.
openSUSE Tumbleweed VM installs VirtualBox GA out-of-the-box. As a result, we can increase or adjust the screen resolution. As well as view the VM in full-screen mode right away.
By using lsmod, here we can see that the VM has installed and properly loaded the GA kernel module:
$ lsmod | grep vboxguest
vboxguest 495616 6
Furthermore, we can view the GA version:
$ /usr/sbin/VBoxService --version
7.0.10_SUSEr158379
Another way to view the VM’s detailed information is by opening the VirtualBox Session Information (Machine > Session Information… > Runtime Information tab):
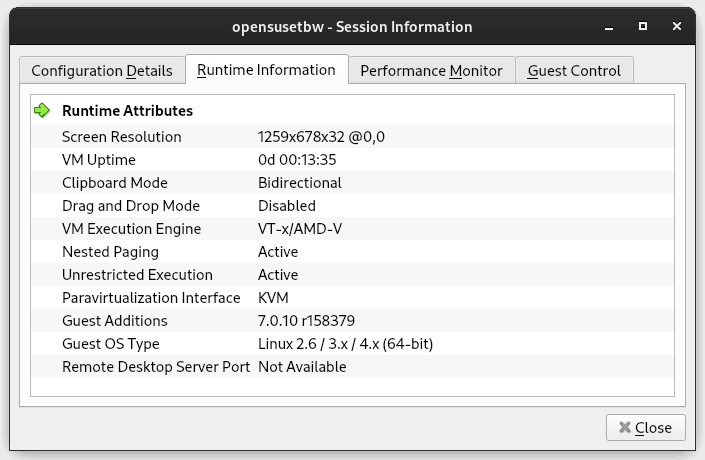
Image 8: VirtualBox openSUSE VM – Session Information
There, we can see that the GA package has been installed, as it shows its version. Otherwise, it would say Not Detected. In addition, the Shared Clipboard (or Clipboard Mode) is also active in Bidirectional mode.
VirtualBox is a virtualization software that allows us to create and run virtual machines on our computers.
In this article, we explored a common issue when creating a virtual machine: the VM screen resolution. We learned the methods for manually increasing or adjusting the guest screen resolution using xrandr. Additionally, we explored installing VirtualBox Guest Additions to enable full-screen mode.
After that, we applied the solution of installing the Guest Additions to CentOS, Ubuntu, and openSUSE VMs.