

Learn through the super-clean Baeldung Pro experience:
>> Membership and Baeldung Pro.
No ads, dark-mode and 6 months free of IntelliJ Idea Ultimate to start with.
Learn through the super-clean Baeldung Pro experience:
>> Membership and Baeldung Pro.
No ads, dark-mode and 6 months free of IntelliJ Idea Ultimate to start with.
Virtual Machines (VMs) are a flexible and cost-effective solution to replace physical servers. Running VMs on our host enables us to run environments for testing and development with multiple operating systems.
In this tutorial, we are going to check how to access our local VM via SSH, a network communication protocol. For that reason, we’ll focus on how virtual networking works and how the VM communicates with the physical interfaces of our computers.
After we create a local Linux VM, we obtain access through the console. However, when we enable SSH, we can manage our VM from our host using the command line.
For that reason, it’s essential to understand virtual networking. To demonstrate, we use two local RHEL-based guest machines running within Oracle VirtualBox. Then, we focus on setting up virtual networking and virtual interfaces for one of the guest machines.
In the next section, let’s discuss the virtual networking modes.
In general, we have three basic virtual networking modes.
In the bridged networking mode, the virtual interface on the guest machine connects directly to the host’s physical interface. Moreover, the VM appears as another physical host on the external network. That is to say, it has an IP address that belongs to the physical network segment. As a result, the VM can access any service on the outside network as well as the host.
Unlike the bridged networking mode, the guest VM doesn’t have its IP address visible on the external network.
For example, Internet routers often use Network Address Translation (NAT) to prevent the outside from directly initiating a connection to its internal network.
Similarly, VMs within a private network can directly interact with each other. However, the VMs initiate communication with the external network through a NAT device. This virtualized adapter acts as a gateway to the outside:
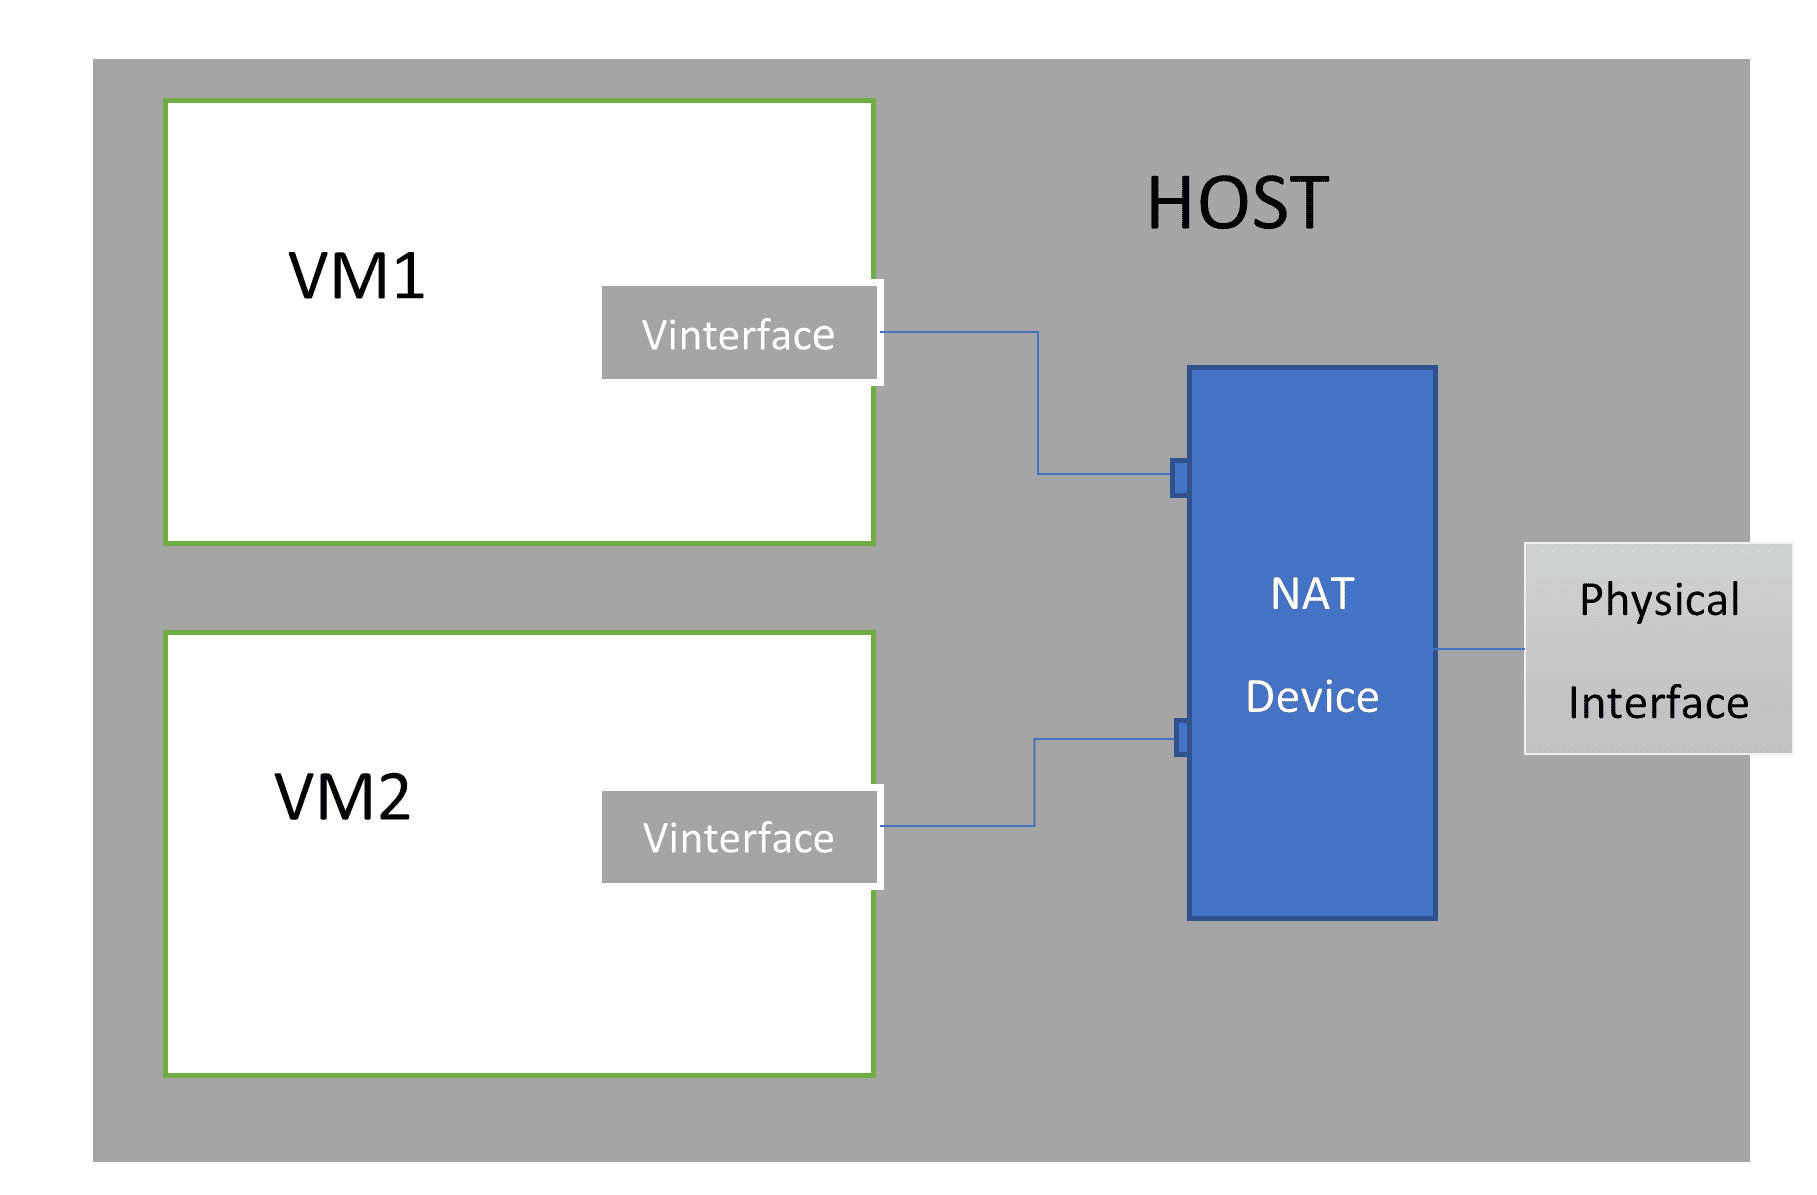
In particular, the NAT device replaces the VM IP with the physical host address before forwarding the outgoing packets from the VM. On the other hand, incoming data requires the reverse translation – from physical address to internal VM address.
With this mode, we configure an isolated VM on the host. In other words, only VMs within the same internal network can communicate only with each other and with the host machine. Communication between the VM and the external network is not allowed.
To run our virtual environment independently from the physical network where our host resides, we need to assign our VM a local IP. This allows us to restrict access to our VM from our host only.
On the other hand, we also need to ensure that our VM communicates with the services running on the outside network. Therefore, we limit our choice to NAT and host-only networking.
Next, we dive into the NAT configuration with VirtualBox.
When we create a VM, VirtualBox assigns it the NAT option by default. This selection creates a separate NAT network composed of the host and the corresponding VM. So instead, we will use the NAT networking mode.
In contrast, the NAT networking mode preserves the internal communication between multiple VMs.
Firstly, let’s create a NAT network using the command VBoxManage natnetwork:
$ VBoxManage natnetwork add --netname NatNetwork --network "10.0.2.0/24" --enableWith the –netname flag, we specify our NAT network name. Next, we use –network to define the corresponding network address and mask.
By default, the NAT adapter supports DHCP. However, since we will assign a static IP to our VM, let’s modify the previously created NatNetwork to remove the attached DHCP server :
$ VBoxManage natnetwork modify --netname NatNetwork --dhcp offThen, let’s list the NAT network configuration:
$ VBoxManage list natnetworks
NetworkName: NatNetwork
IP: 10.0.2.1
Network: 10.0.2.0/24
...
DHCP Enabled: No
Enabled: Yes
...
From the above, we see that we have successfully disabled the DHCP of NatNetwork.
We previously saw that our VM sits behind a NAT device. In this case, the services running on our VM like SSH aren’t exposed to the outside world. Also, our host can’t access the VM. Therefore we need to set up port forwarding to allow SSH login to our VM from the host. Let’s enable SSH access to the VM from our host, continuing from the last step above:
$ VBoxManage natnetwork modify --netname NatNetwork --port-forward-4 "ssh_linuxvm1:tcp:[127.0.0.1]:2222:[10.0.2.5]:22"Here, we name our port forwarding rule ssh_linuxvm1, keeping Protocol to its default tcp value. Also, to make sure that remote access isn’t possible from outside our host, we configure VirtualBox to listen on the localhost address 127.0.0.1 only.
Additionally, we define port 2222 on the host to point to port 22 on 10.0.2.5, linuxvm1.
Similarly, we can add a port forwarding rule for our second VM. However, we need to define a different port on the host and add the corresponding Linux guest IP.
Lastly, let’s assign NatNetwork to our guest machine linuxvm1 with the command VBoxManage modifyvm:
$ VBoxManage modifyvm linuxvm1 --nic1 NatNetworkWith the –nic1 option, we attach NatNetwork to the first virtual adapter on the VM.
To verify, let’s display the linuxvm1 configuration with the command VBoxManage showvminfo:
$ VBoxManage showvminfo linuxvm1
...
NIC 1:                       MAC: 0800272B9BA9, Attachment: NAT Network 'NatNetwork', Cable connected: on, Trace: off (file: none), Type: 82540EM, Reported speed: 0 Mbps, Boot priority: 0, Promisc Policy: allow-vms, Bandwidth group: none
...
Next, let’s check how to configure the virtual network interface on our VM.
We launch linuxvm1 and then log in from the console. In this case, we use nmcli, a NetworkManager tool, to configure the virtual interface. Firstly, let’s list the available devices using the command nmcli device:
$ nmcli device
DEVICE          TYPE      STATE                   CONNECTION
enp0s3          ethernet  disconnected            --
lo              loopback  unmanaged               --
We see that interface enp0s3 isn’t connected.
Next, we modify the connection enp0s3 to define the static IP address 10.0.2.5 and the gateway IP 10.0.2.1:
# nmcli connection modify enp0s3 ipv4.addresses 10.0.2.5/24 gw4 10.0.2.1With the gw4 property, we add the NAT network gateway IP address, which enables our VM to route its outgoing traffic.
Also, let’s switch the interface IP assignment to manual (default is DHCP) and enable the connection activation on boot:
# nmcli connection modify enp0s3 ipv4.method manual connection.autoconnect yesAfter that, we manually activate our connection:
# nmcli connection up enp0s3
Connection successfully activated (D-Bus active path: /org/freedesktop/NetworkManager/ActiveConnection/3)
Finally, to validate that enp0s3 is up, let’s run the ip command with the options address show and specify our interface name as an argument:
$ ip address show enp0s3
2: enp0s3: <BROADCAST,MULTICAST,UP,LOWER_UP> mtu 1500 qdisc fq_codel state UP group default qlen 1000
    link/ether 08:00:27:2b:9b:a9 brd ff:ff:ff:ff:ff:ff
    inet 10.0.2.5/24 brd 10.0.2.255 scope global noprefixroute enp0s3
       valid_lft forever preferred_lft forever
The configuration looks correct. Finally, let’s check access to linuxvm1 via ssh.
By default, the sshd service is running on our VM. We can verify with systemctl:
$ systemctl status sshd
  Loaded: loaded (/usr/lib/systemd/system/sshd.service; enabled; vendor preset: enabled)
   Active: active (running) since Wed 2022-06-29 13:57:06 EDT; 50min ago
...
Further, from the VM, we confirm that port 22 is not blocked with the firewall-cmd command:
# firewall-cmd --list-services
cockpit dhcpv6-client ssh
From the above output, we see that the SSH protocol is allowed.
Lastly, let’s access linuxvm1 via PuTTY. Instead of specifying our VM IP address and SSH port 22, we use 127.0.0.1 (localhost) and the destination port 2222 we set up earlier:
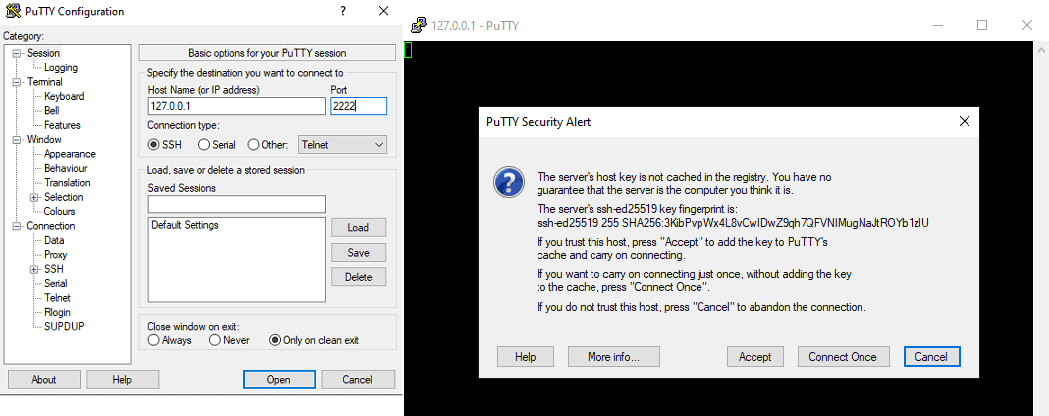
Once we accept the key, we can log in to linuxvm1.
Next, let’s add a host-only adapter to our VM. This allows us to SSH directly into our VM using its IP without configuring any port forwarding.
With host-only networking, VirtualBox creates a device that appears as a physical interface from the host. However, similar to a loopback interface, the host-only adapter is virtual, which means it doesn’t connect to a physical network. But it allows the VMs and host to talk to each other.
First, we check the available host-only adapter configuration:
$ VBoxManage list hostonlyifs
Name:            vboxnet0
...
IPAddress:       192.168.56.1
NetworkMask:     255.255.255.0
...
VBoxNetworkName: HostInterfaceNetworking-vboxnet0
Next, let’s disable the DHCP server of the host-only interface:
$ VBoxManage dhcpserver modify --interface="vboxnet0" --disableNow, we assign the host-only network to a second linuxvm1 virtual interface after turning off the VM:
$ VBoxManage modifyvm linuxvm1 --nic2 hostonlyAfter that, we can configure the corresponding virtual interface on linuxvm1.
From linuxvm1, let’s check the new device name by running the nmcli device command:
$ nmcli device
DEVICE  TYPE      STATE         CONNECTION
...
enp0s8  ethernet  disconnected  --
...
Next, as a superuser, we configure a static ethernet connection for device enp0s8:
# nmcli connection add type ethernet con-name enp0s8 ifname enp0s8 ip4 192.168.56.5/24
Connection 'enp0s8' (4cbb2ca8-0530-4ab9-948d-acad8078879b) successfully added.
With the above, we set a static IP address 192.168.56.5 for our interface. Also, we use con-name to create a connection name that is relevant to the device name enp0s8 while we refer to the device name with ifname.
Let’s login using PuTTY. Here, we enter the VM address 192.168.56.5 in the IP address field and the SSH port 22 in the Port field:
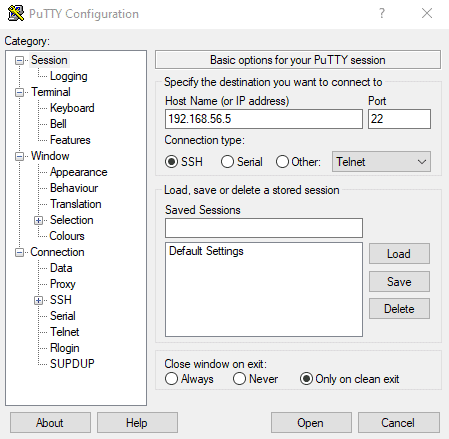
Now that we have two interfaces, we can use the host-only interface for SSH access from both the host and the other VM while we leave the NAT Network interface for external communication.
In this article, we talked about SSH access to a local VM. Using VirtualBox, we explored different virtual networking modes, highlighting their pros and cons.
After that, we saw that SSH access to a local VM requires enabling port forwarding on our host with a NAT Network. However, with the host-only mode, we can directly access our VM via SSH without extra configuration.