

Yes, we're now running our only Summer Sale. All Courses are 30% off until 20th July, 2026:
How to Check the Health of SSD in Linux
Last updated: February 18, 2026
Learn through the super-clean Baeldung Pro experience:
>> Membership and Baeldung Pro.
No ads, dark-mode and 6 months free of IntelliJ Idea Ultimate to start with.
1. Overview
Sudden failure of SSD devices can lead to data loss and system instability. Hence, checking the health of SSD devices at regular intervals is a good practice to boost performance and safeguard against operational failures.
In this tutorial, we’ll discuss three methods to test and monitor the health of SSD devices in Linux.
2. Listing All Storage Devices in a System
Before we check the SSD’s health, viewing all the storage devices attached to the Linux system is important.
Let’s list all the disks available in the system using the lsblk command:
$ lsblk
NAME        MAJ:MIN RM   SIZE RO TYPE MOUNTPOINTS
loop0         7:0    0     4K  1 loop /snap/bare/5
loop1         7:1    0    73M  1 loop /snap/core22/607
loop2         7:2    0 242.2M  1 loop /snap/firefox/2517
loop3         7:3    0 460.6M  1 loop /snap/gnome-42-2204/87
loop4         7:4    0  91.7M  1 loop /snap/gtk-common-themes/1535
loop5         7:5    0  12.3M  1 loop /snap/snap-store/959
loop6         7:6    0  53.2M  1 loop /snap/snapd/18933
loop7         7:7    0   452K  1 loop /snap/snapd-desktop-integration/83
sr0          11:0    1  1024M  0 rom
nvme0n1     259:0    0 238.5G  0 disk
├─nvme0n1p1 259:1    0   260M  0 part /boot/efi
├─nvme0n1p2 259:2    0    16M  0 part
├─nvme0n1p3 259:3    0 207.2G  0 part
├─nvme0n1p4 259:4    0     3G  0 part
├─nvme0n1p5 259:5    0   980M  0 part
└─nvme0n1p6 259:6    0    27G  0 part /var/snap/firefox/common/host-hunspell
The output provides information such as the name of the blocks, major as well as minor device numbers, removable flag, size of the blocks, read-only flag, type of the blocks, and mount points associated with each block.
Here, we can see that the Linux system contains an SSD device named nvme0n1 with a total size of 238.5GB. The name nvme0n1 clearly indicates that it’s an SSD device, as Non-Volatile Memory Express (NVMe) is a data transfer protocol specifically designed for SSDs. Furthermore, the SSD device has six partitions.
An alternative way to view the disk information is to use the fdisk command:
$ sudo fdisk -l
Disk /dev/loop0: 4 KiB, 4096 bytes, 8 sectors
Units: sectors of 1 * 512 = 512 bytes
Sector size (logical/physical): 512 bytes / 512 bytes
I/O size (minimum/optimal): 512 bytes / 512 bytes
[...]
Device             Start       End   Sectors   Size Type
/dev/nvme0n1p1      2048    534527    532480   260M EFI System
/dev/nvme0n1p2    534528    567295     32768    16M Microsoft reserved
/dev/nvme0n1p3    567296 435183615 434616320 207.2G Microsoft basic data
/dev/nvme0n1p4 435183616 441440255   6256640     3G Microsoft basic data
/dev/nvme0n1p5 498098176 500105215   2007040   980M Windows recovery environment
/dev/nvme0n1p6 441440256 498098175  56657920    27G Linux filesystem
Here, the output provides the name, starting as well as ending index, size, and type of each disk partition.
Our aim is to extract relevant disk information that can help us measure the health of the SSD device.
3. Using smartctl
smartctl is a command-line tool in Linux. We can use it to monitor, analyze, and generate reports on the reliability of data storage devices. Hence, we can use it to extract crucial information for SSD devices to measure their health.
The smartctl is a part of the smartmontools package. We can install the smartmontools package from the terminal using the apt command:
$ sudo apt install smartmontoolsAlternatively, we can install it from another package manager as well. Now, let’s confirm we have successfully installed the smartctl tool in the system:
$ sudo smartctl --version
smartctl 7.3 2022-02-28 r5338 [x86_64-linux-6.2.0-20-generic] (local build)
Copyright (C) 2002-22, Bruce Allen, Christian Franke, www.smartmontools.org
Furthermore, we check the overall health of the SSD using the -H option in the smartctl tool:
$ sudo smartctl -H /dev/nvme0n1
smartctl 7.3 2022-02-28 r5338 [x86_64-linux-6.2.0-20-generic] (local build)
Copyright (C) 2002-22, Bruce Allen, Christian Franke, www.smartmontools.org
=== START OF SMART DATA SECTION ===
SMART overall-health self-assessment test result: PASSED
Here, nvme0n1 is the name of the SSD device. The assessment checks several parameters to determine the overall system health, including error information, warnings, power consumption, temperature, and unsafe shutdowns.
To display all the parameters involved in the overall health self-assessment test, we use -a option:
$ sudo smartctl -a /dev/nvme0n1
smartctl 7.3 2022-02-28 r5338 [x86_64-linux-6.2.0-20-generic] (local build)
Copyright (C) 2002-22, Bruce Allen, Christian Franke, www.smartmontools.org
=== START OF SMART DATA SECTION ===
SMART overall-health self-assessment test result: PASSED
SMART/Health Information (NVMe Log 0x02)
Critical Warning:                   0x00
Temperature:                        41 Celsius
Available Spare:                    100%
Available Spare Threshold:          10%
Percentage Used:                    35%
Data Units Read:                    71,678,063 [36.6 TB]
Data Units Written:                 51,509,543 [26.3 TB]
Host Read Commands:                 1,050,039,483
Host Write Commands:                807,364,329
Controller Busy Time:               13,655
Power Cycles:                       7,010
Power On Hours:                     8,842
Unsafe Shutdowns:                   127
Media and Data Integrity Errors:    0
Error Information Log Entries:      10,420
Warning  Comp. Temperature Time:    8
Critical Comp. Temperature Time:    0
Temperature Sensor 1:               41 Celsius
Thermal Temp. 1 Transition Count:   10967
Thermal Temp. 2 Transition Count:   8415
Thermal Temp. 1 Total Time:         93334
Thermal Temp. 2 Total Time:         14808
We can also extract useful information for diagnosing SSD devices using the -x and -C options.
4. Using nvme
Similarly to the smartctl tool, we can use the nvme tool to check and analyze the SSD device’s health. Furthermore, it’s readily accessible in most Linux distributions as part of the nvme-cli package.
Still, if it’s not available on our system, we can install it directly from the terminal using the apt command:
$ sudo apt-get install nvme-cliNow let’s check the overall health of the SSD device in the system using the smart-log option within the nvme command:
$ sudo nvme smart-log /dev/nvme0n1
Smart Log for NVME device:nvme0n1 namespace-id:ffffffff
critical_warning			: 0
temperature				: 43°C (316 Kelvin)
available_spare				: 100%
available_spare_threshold		: 10%
percentage_used				: 35%
endurance group critical warning summary: 0
Data Units Read				: 71,681,030 (36.70 TB)
Data Units Written			: 51,513,788 (26.38 TB)
host_read_commands			: 1,050,075,196
host_write_commands			: 807,455,351
controller_busy_time			: 13,658
power_cycles				: 7,011
power_on_hours				: 8,845
unsafe_shutdowns			: 127
media_errors				: 0
num_err_log_entries			: 10,422
Warning Temperature Time		: 8
Critical Composite Temperature Time	: 0
Temperature Sensor 1           : 43°C (316 Kelvin)
Thermal Management T1 Trans Count	: 10967
Thermal Management T2 Trans Count	: 8415
Thermal Management T1 Total Time	: 93334
Thermal Management T2 Total Time	: 14808
In this output, the most crucial is the critical_warning field. It depicts the overall health of the SSD device. If the number of warnings is 0, the SSD is in good condition. On the other hand, if the number of warnings is more than one, the SSD device isn’t in good condition and has potential issues that need to be fixed.
5. Using KDE Partition Manager
KDE Partition Manager is a disk partitioning and management tool that provides useful information regarding the health of storage devices, including SSD devices. We can download it using the package manager:
$ sudo apt install partitionmanagerAs soon as the installation is completed, we launch it from the application menu.
The KDE Partition Manager tool automatically detects and lists all the storage devices:

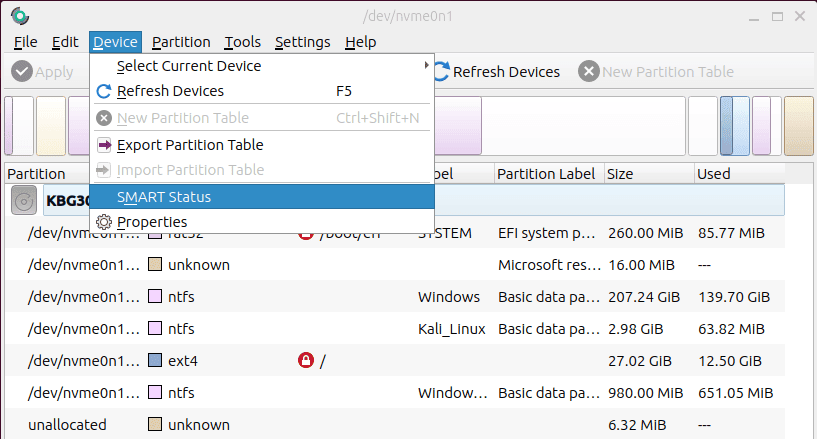
We can see all the SSD partitions here. Now, if we go to the Device option, we see the SMART Status option:
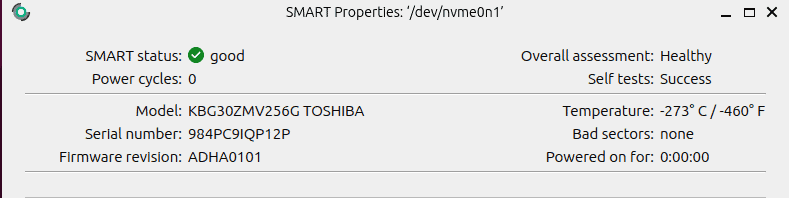
The SMART Status option conducts a test on the SSD device based on several factors and displays the output:
Furthermore, the KDE Partition Manager tool allows us to initiate self-tests on our SSD to assess its health further.
6. Conclusion
In this article, we discussed three methods to check the health of SSD devices in Linux.
The first method provides comprehensive details of the SSD device and allows us to perform various tests on the SSD device.
The second method is ideal when we don’t want to install additional packages.
Finally, the third method can be performed without complexity, providing a user-friendly interface to check the health of SSD devices.