

Learn through the super-clean Baeldung Pro experience:
>> Membership and Baeldung Pro.
No ads, dark-mode and 6 months free of IntelliJ Idea Ultimate to start with.
Last updated: July 31, 2024
Learn through the super-clean Baeldung Pro experience:
>> Membership and Baeldung Pro.
No ads, dark-mode and 6 months free of IntelliJ Idea Ultimate to start with.
The Linux operating system provides a variety of tools for sharing files and directories. Each tool has its own efficiency and security, and some work better than others.
In this tutorial, we’ll look at the various ways to share files and folders in Linux. Some of the tools we’ll look at are samba, ftp, sftp, ssh, web-based file sharing, and rsync.
samba file server enables sharing between different operating systems over a network. It lets us share files and directories from our computer to any other Linux computer in the network.
Firstly, let’s install samba using apt:
$ sudo apt update
$ sudo apt install samba
Next, let’s confirm if the installation succeeded:
$ whereis samba
samba: /usr/sbin/samba /usr/lib/x86_64-linux-gnu/samba /etc/samba /usr/share/samba /usr/share/man/man7/samba.7.gz /usr/share/man/man8/samba.8.gz
Now, let’s edit samba‘s configuration file to add the path to the directory we intend to share. For this example, we’ll use sambashare which contains a child directory named doc1.
Let’s add the following lines at the bottom of the file:
$ sudo vi /etc/samba/smb.conf
[sambashare]
comment = Samba on Ubuntu
path = /home/username/sambashare
read only = no
browsable = yes
Let’s understand the configuration file:
Following, let’s save the configuration file and restart samba for the changes to take effect:
$ sudo service smbd restartNext, we must update the firewall rules to allow samba traffic:
$ sudo ufw allow SambaSubsequently, we must create a samba user account for each user who accesses the shared directory. We’ll use the smbpasswd command to set the samba password for each user:
$ sudo smbpasswd -a usernameThe samba password we’ve set up is for our user account since samba doesn’t use the system account password. However, the password and username we’ve set must be the same as that of the system.
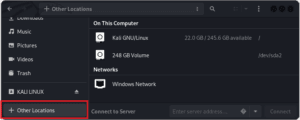
Let’s open the file manager on the client Linux machine to access the shared folder. At the bottom left, let’s click Other Locations:
On the bottom of the window opened, let’s enter the following on the address bar labeled “Connect to Server” smb://192.168.0.103/:

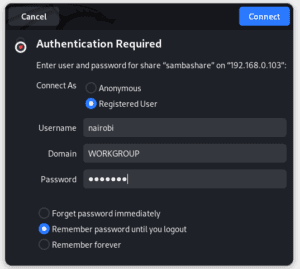
Next, we’re prompted to enter the samba username and password. The credentials must be of valid samba users:
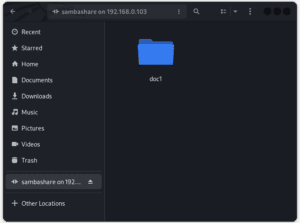
Finally, we should be able to access the directory we shared:
ftp is a network protocol for transferring files between a client and a server. We can use the ftp command-line client to connect to an ftp server and perform file transfers over the internet.
Firstly, before we install the vsftpd package, we need to update our packages:
$ sudo apt-get update
$ sudo apt-get install vsftpd
Next, to allow the ftp server to communicate via the internet, let’s allow the following ports:
$ sudo ufw allow 20/tcp
$ sudo ufw allow 21/tcp
Thirdly, to connect to a remote computer, we use the following syntax:
$ ftp [ip address or domain name]Following, we’ll be prompted for a username and password:
$ ftp 192.168.9.103
Connected to localhost.
220 (vsFTPd 3.0.3)
Name (localhost:nairobi):
331 Please specify the password.
Password:
ftp>
To get files from the remote computer, we use get or mget:
ftp> get file.py
local: file.pdf remote: file.py
150 Opening BINARY mode data connection for file.py (180103 bytes).
226 Transfer complete.
180103 bytes received in 0.00 secs (109.0537 MB/s)
ftp>
To transfer files to the remote computer, we can use put or mput:
ftp> put error.txt
200 PORT command successful
226-File successfully transferred
226 0.849 seconds (measured here), 111.48 Kbytes per second
96936 bytes sent in 0.322 seconds (225 kbytes/s)
ftp>
Although ftp implements user-based password authentication, traffic passing through it isn’t encrypted, making it insecure.
Apart from ftp, we can use sftp to transfer files securely. sftp uses the ssh protocol to authenticate and establish a secure connection. With sftp, we can set up the ssh key to ease our authentication process.
To connect to the remote machine, we run:
$ sftp [email protected]
[email protected]'s password:
Connected to 192.168.0.103.
sftp>
We can use get or mget to transfer files from our remote location to our computer:
sftp> get files.txt
Fetching /home/nairobi/files.txt to files.txt
files.txt 100% 332 9.2KB/s 00:00
sftp>
If we want to transfer files from our computer to the remote machine, we can use either put or mput:
sftp> put listdir.conf
Uploading listdir.conf to /home/nairobi/listdir.conf
listdir.conf 100% 118 3.5KB/s 00:00
sftp>In Linux, we can share files between computers using scp. scp utilizes ssh to securely transfer files. We use the following syntax to copy files from the source machine to the destination machine:
$ scp /path/to/local/file username@destination:/path/to/destinationAlso, we can copy directories recursively by adding the -r option to the scp command:
$ scp -r Python [email protected]:/home/nairobi
[email protected]'s password:
classes.py                                    100%    0     0.0KB/s   00:00
known_hosts                                   100%    0     50.0KB/s   00:00
host.txt                                      100%   19    58.0KB/s   00:00
On the other hand, we can copy files from the remote machine to our local machine by reversing the source and destination paths in the scp command:
$ scp [email protected]:/home/nairobi/sambashare ~/
[email protected]'s password:
If we frequently share files between the same machines, setting up ssh key-based authentication is better. This allows us to connect without entering a password each time.
To use web-based file sharing, we need to set up a web server and configure it to serve files from a specific directory. In Linux, we can configure Apache2 to server files. In this section, we’ll create and share a directory named doc1. This directory resides in the /var/www/html/ directory.
Firstly, let’s install Apache2 :
$ sudo apt-get install apache2Next, let’s start the apache2 service:
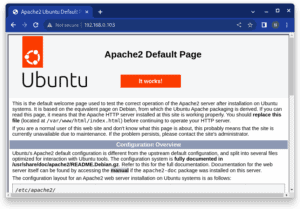
$ sudo service apache2 startLet’s confirm if it’s running by accessing the webpage (we can use the IP address of the machine or localhost):
Now, let’s edit the Apache2 configuration file. We’ll add the path to the directory we want to share to the directory block. Additionally, to enable directory listing in Apache2, we must add “Options FollowSymLinks Indexes” within the directory directive block:
$ sudo vi /etc/apache2/apache.conf
<Directory /var/www/html/doc1>
	Options FollowSymLinks Indexes
	AllowOverride None
	Order allow,deny
	allow from all
</Directory>
This directive specifies the path to the folder we intend to share.
Next, we must enable the “mod_autoindex” module in Apache2 to allow directory listing:
$ sudo a2enmod autoindexLet’s save the configuration file and restart Apache2 for the changes to take effect:
$ sudo service apache2 restartNow, we can access the shared files through our web browser by entering the URL http://remote-ip/doc1.
Lastly, we can configure authentication or other access controls in Apache2 to restrict access to the shared files/directories.
rysnc is a local and remote file-copying tool included with most Linux distros. When we use this tool, we can quickly transfer and sync files to or from remote locations. Files and directories copied with rysnc retain their links, devices, owners, groups, and permissions.
The first time, the program copies the entire content of a file or directory from source to destination. However, it only copies the changed blocks and bytes from the next instance.
rsync uses a remote-update protocol that transfers only the differences between the files transferred. This makes it faster than scp. While sending and receiving data, rsync uses compression and decompression methods that consume less bandwidth.
For distributions that lack rsync, we can easily install it:
$ sudo apt-get install rsyncSome of the most commonly used flags are:
In the following example, let’s look at how to transfer files from a local computer to a remote one:
$ rsync -avzh ~/etc_hosts_file.txt [email protected]:/home/nairobi
[email protected]'s password:
sending incremental file list
etc_hosts_file.txt
sent 791 bytes received 95 bytes 196.89 bytes/sec
total size is 7.78K speedup is 8.78
Next, let’s look at how we copy a remote directory or file to our active computer using rsync:
$ rsync -avzh [email protected]:/home/nairobi/sambashare ~/
[email protected]'s password:
receiving incremental file list
sambashare/doc1/
sambashare/doc1/ip.text
sambashare/doc1/runtest.py
sent 131 bytes  received 408 bytes  30.80 bytes/sec
total size is 0  speedup is 0.00
Lastly, we should note that if we experience an ssh connection problem when using rsync, then we need to reinstall it.
In this article, we looked at the common ways to share files and folders between Linux computers. Most importantly, these tools work differently and can be used under different circumstances.
In some instances, one tool may be preferred over another due to factors like speed and security.