

Learn through the super-clean Baeldung Pro experience:
>> Membership and Baeldung Pro.
No ads, dark-mode and 6 months free of IntelliJ Idea Ultimate to start with.
Last updated: November 17, 2025
Learn through the super-clean Baeldung Pro experience:
>> Membership and Baeldung Pro.
No ads, dark-mode and 6 months free of IntelliJ Idea Ultimate to start with.
The original purpose of screensavers is, as the name implies, screen preservation. In the age of displays with a cathode ray tube (CRT) or crystals, phosphorus, and other elements could literally get burnt in on the screen after a long time of showing the same image. Although this is for the most part an artifact of the past, organic light-emitting diode (OLED) displays are susceptible to the same issues. In any case, the term and general idea of screensavers have remained mostly for enjoyment.
In this tutorial, we check out different options for running a screensaver from and within the terminal. First, we look at triggering the graphical screensaver from the command line interface (CLI). Next, we check how to set up a terminal screensaver to run when the user is idle. After that, we explore one of the main terminal user interface (TUI) graphics libraries. Finally, we go through specific text-based screensaver implementations.
In all cases, we use apt as the package manager.
We tested the code in this tutorial on Debian 12 (Bookworm) with GNU Bash 5.2.15. It should work in most POSIX-compliant environments unless otherwise specified.
Indeed, we can save, turn off, and lock our screen from the terminal in different ways.
To begin with, we can use the basic xset:
$ xset dpms force offIn particular, we force the display power management signaling (DPMS) to turn off the screen.
Alternatively, we can use xrandr:
$ xrandr --output DVI1 --offIn this case, we turn –off the –output named <NAME>.
Both of these options rely on DPMS and are part of the Xorg server.
If using X11, we can employ xscreensaver to trigger the screensaver:
$ apt-get install xscreensaverAfter installing the xscreensaver package, we run xscreensaver-command:
$ xscreensaver-command -lock -activateIn particular, we -activate the -lock screen. Although X is at the core of many desktop environments, this isn’t a universal solution.
Next, we check gnome-screensaver for GNOME:
$ apt-get install gnome-screensaverAfter installing the package, we use the command of the same name:
$ gnome-screensaverAt this point, if we run the classic GNOME interface, we should see the current screensaver and lock screen.
Finally, let’s see a native alternative for KDE:
$ qdbus org.freedesktop.ScreenSaver /ScreenSaver LockIn this case, we use the QT control command qdbus.
Similarly, we can use xdg-screensaver in many modern settings:
$ apt-get install xdg-screensaverNow, we employ xdg-screensaver with activate:
$ xdg-screensaver activateSince XDG is a widely adopted standard, this option runs on a very low level and should apply to many desktop environments.
Naturally, CLI-based screensavers are usually a more exotic and rare breed. Because of this and the mostly text-based Linux experience, here, we mainly focus on such screensavers.
In practice, we can set up text-based screensavers to start automatically. One of the best, simplest, and most flexible ways to do so is with the use of terminal multiplexers, but we can use more native tools as well.
To begin with, we can come up with a basic timeout-like background script in Bash that finds all open shells and runs a screensaver command in each:
$ cat screensaver.sh
#!/usr/bin/env bash

# get current shells
shells=$(cat /etc/shells | grep '^/' | grep -v tmux)

# shell processes array
shellpids=()

# for each shell, add PID to shell processes
for shell in $shells; do
  shellpids+=($(pidof $shell))
done

# leave only unique values
shellpids=($(for shellpid in "${shellpids[@]}"; do echo "${shellpid}"; done | sort -u))

# run the screensaver for each shell
for shellpid in "${shellpids[@]}"; do
  gdb -p $shellpid -batch-silent -ex 'p system("/path/to/screensaver")' 2>/dev/null
done
Here, we get all current shells from /etc/shells via cat, ensuring we only have uncommented lines with full paths and exclude any terminal multiplexer shells. After that, we use pidof on each shell and store the results in the shellpids array. Next, we ensure the shellpids array only contains [-u]nique values via the sort command. Finally, we use gdb for each [-p]rocess ID (PID), thus silently running our screensaver for each shell.
Of course, we replace /path/to/screensaver with our desired command. Naturally, running the script automatically should be done via a scheduler like cron. This can become tedious and dangerous.
Instead, let’s employ environments that can have scripts running in the background.
Another example of running a script automatically is the screen multiplexer command, which has screensaver capabilities built-in.
First, we modify our $HOME/.screenrc file:
$ cat $HOME/.screenrc
blankerprg /path/to/screensaver
idle 60 blanker
In this case, we first define our screensaver command via the blankerprg command. After that, we set the idle time before activating it to 60 seconds.
At this point, screen sessions that idle for a minute run /path/to/screensaver.
Of course, the ubiquitous tmux, due to its ability to run background commands, also supports different ways to activate a screensaver. To work with them, we modify the $HOME/.tmux.conf file.
First, we can just ensure the monitor turns off after a given time:
$ cat $HOME/.tmux.conf
set -g monitor-silence 60
set -g silence-action current
set -g visual-silence off
set -g alert-silence clock
Initially, we start monitoring for 60 seconds of silence with monitor-silence. Next, silence-action sets only the current window as the target of the silence monitoring. After that, we prevent any visual-silence notifications. lastly, we configure the built-in clock to run after the set amount of silence.
Since clock might not be the best way to save a screen, let’s use our own instead:
$ cat $HOME/.tmux.conf
set -g lock-command "/path/to/screensaver"
set -g lock-after-time 60
set -g visual-bell off
Similar to screen, we first set the lock-command and then the idle time before a lock event. Importantly, we might need to turn off the visual-bell, as it can prevent the screensaver from running.
Now, let’s see a common library that facilitates text-based screensavers.
The ubiquitous ncurses library and application programming interface (API) enables terminal user interface (TUI) creation in a fairly platform-independent manner. It handles several aspects of the interface build in different ways:
The name Ncurses means new curses as this is the next iteration of another, similar, project called curses mainly available on BSD platforms.
Importantly, although ncurses is part of GNU, it has another license, which sometimes renders it incompatible with projects.
On Debian-based platforms, we can install Ncurses via its apt packages:
$ apt-get install libncurses5-dev libncursesw5-devAlternatively, we use yum or dnf with the ncurses-devel release on RPM Linux distributions:
$ dnf install ncurses-develAt this point, we should have the library available for use:
$ ldconfig -p | grep ncurses
        libncursesw.so.6 (libc6,x86-64) => /lib/x86_64-linux-gnu/libncursesw.so.6
        libncurses.so.6 (libc6,x86-64) => /lib/x86_64-linux-gnu/libncurses.so.6
Here, we use ldconfig to verify the library installation and see if it’s available.
To begin with, let’s see a basic custom function:
$ cat ncurses-center.c
#include <ncurses.h>
#include <string.h>
#include <stdlib.h>

void print_at_center(WINDOW *win, char *string)
{
  int length, x, y;
  int height, width;
  float xmiddle, ymiddle;

  // if no win was passed, use the standard screen
  if(win == NULL) { win = stdscr; }

  // get screen dimensions
  getmaxyx(win, height, width);

  // get text length (effectively width)
  length = strlen(string);

  // calculate middle based on text length and number of lines (1)
  xmiddle = (width - length) / 2;
  ymiddle = (height - 1) / 2;

  // use calculated values as coordinates
  x = (int)xmiddle;
  y = (int)ymiddle;
  mvwprintw(win, y, x, "%s", string);

  // apply changes
  refresh();
}
[...]
In this first part of ncurses-center.c, we see our custom function print_at_center(), which takes an Ncurses window handle and a string as arguments. Then, it gets the screen dimensions and calculates where the text should be based on its length.
Of course, to use these functions, we should initialize Ncurses.
The second part of ncurses-center.c is a main() function, which initializes Ncurses and colorizes any future text output:
$ cat ncurses-center.c
[...]
int main(int argc, char *argv[])
{
  // initialize ncurses mode
  initscr();

  // check for color support
  if(has_colors() == FALSE) {
    endwin();
    printf("No color support in terminal.\n");
    exit(1);
  }

  // start color mode
  start_color();
  // set color pair 1 to red and black
  init_pair(1, COLOR_RED, COLOR_BLACK);
  // set current color pair to 1
  attron(COLOR_PAIR(1));
  // print at the center of the [st]an[d]ard [scr]een
  print_at_center(stdscr, "Colorful text at the center.");
  // unset current color pair
  attroff(COLOR_PAIR(1));

  // allow time to view the results by expecting a single [ch]ar
  getch();

  // destroy ncurses window
  endwin();
}
Finally, main() disables colorization, awaits confirmation of the output and uninitializes Ncurses.
In this self-explanatory code snippet, we use the ncurses.h file to have access to the Ncurses interface.
Let’s clarify some of the Ncurses-specific code:
In essence, we perform several steps:
This example shows the basics of ncurses usage.
To confirm, we can build and link code with gcc:
$ gcc ncurses-center.c -o ncurses-center -lncursesNow, we can run it:
$ ./ncurses-centerFinally, let’s see the result:

The simple output is a red string at the center of the terminal.
At this point, we can go over some examples of text-only screensavers for the CLI environment.
The classic cmatrix program is a screensaver that imitates the visuals of a terminal from a famous movie: falling letters in green.
On the one hand, we can use make to compile cmatrix from source after cloning or downloading the official repository:
$ git clone https://github.com/abishekvashok/cmatrix.git
$ cd cmatrix
$ ./configure && make && make install
This should work as long as we have ncurses installed since that’s the main dependency.
However, cmatrix also comes as a package available for different platforms:
$ apt-get install cmatrixEither way, at this point, we should be able to try out the screensaver: 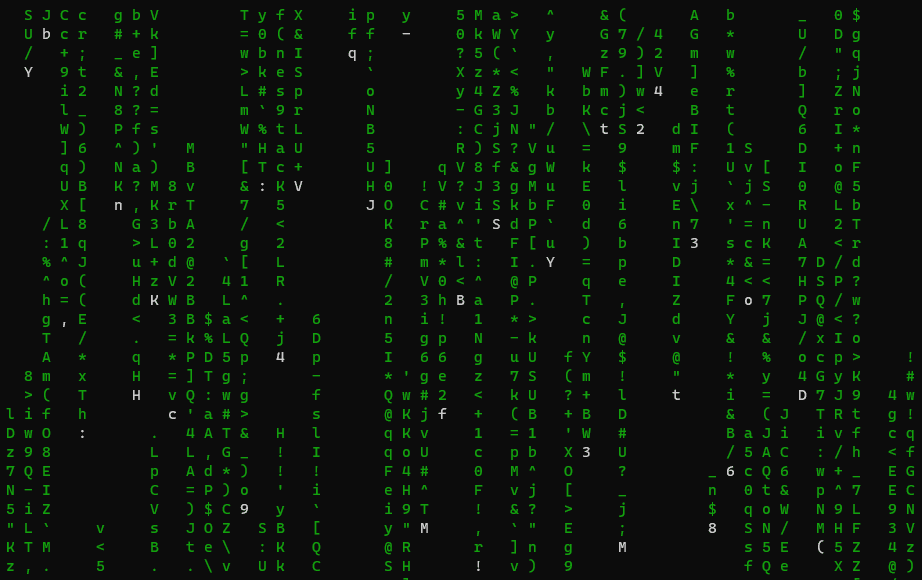
Visibly, the result looks like the movie it attempts to emulate. Moreover, we can augment the screensaver behavior with many options such as [-a]synchronous scrolling, [-b]old characters, specia[-l] fonts, and others.
The final result is also interactive, so we can toggle some of these options at runtime.
Another classic screensaver is the 2D pipes.sh animation, which shows snake-like lines in different colors going around the screen.
The pipes.sh script only depends on Bash and terminal formatting via ncurses.
So, let’s download it via wget and make sure it’s executable via chmod:
$ wget https://raw.githubusercontent.com/pipeseroni/pipes.sh/master/pipes.sh
$ chmod +x pipes.sh
Of course, we can clone the repository via git and install the script as well:
$ git clone https://github.com/pipeseroni/pipes.sh.git
$ cd pipes.sh
$ make install
Either way, at this point, we should be able to run the script:
$ ./pipes.shLet’s see the result:
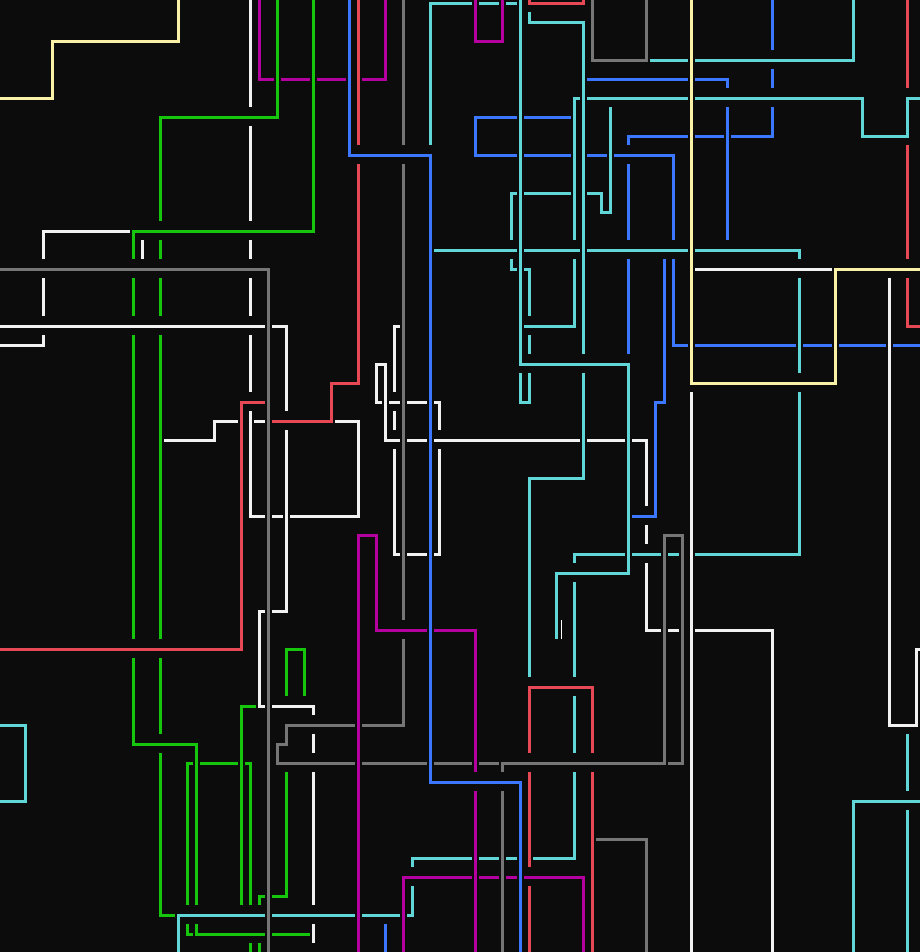
Again, we can set options such as the pipe [-t]ype, [-f]ramerate, [-r]eset count, and [-s]traight line probability
The Termsaver package includes many different animations and utilities as screensavers in the terminal:
Since it’s based on Python, the termsaver package can be installed via pip:
$ pip install termsaverAlternatively, we can download, compile, and install:
$ tar -zxvf termsaver-{version}.tar.gz
$ cd termsaver-*
$ python -m build
$ cd dist/
$ pip install termsaver-*-py3-none-any.whl
At this point, we should be able to now see how termsaver matrix holds up against cmatrix, as well as use termsaver-specific implementations.
One big star of termsaver is the starwars movie:
$ termsaver starwars
[...]

        ..........       @@@@@    @@@@@   ..........
         .........      @     @  @     @   .........
         .........         @@@   @     @    ........
          .......        @@      @     @     .......
           .....        @@@@@@@   @@@@@  th   .......
           .....      -----------------------  ......
            ...         C  E  N  T  U  R  Y      .....
            ..        -----------------------     ....
            ..        @@@@@ @@@@@ @   @ @@@@@       ...
            ==          @   @      @ @    @          ==
          __||__        @   @@@@    @     @        __||__
         |      |       @   @      @ @    @       |      |
_________|______|_____  @   @@@@@ @   @   @  _____|______|_________
Let’s also check the sysmon utility that shows resource usage:
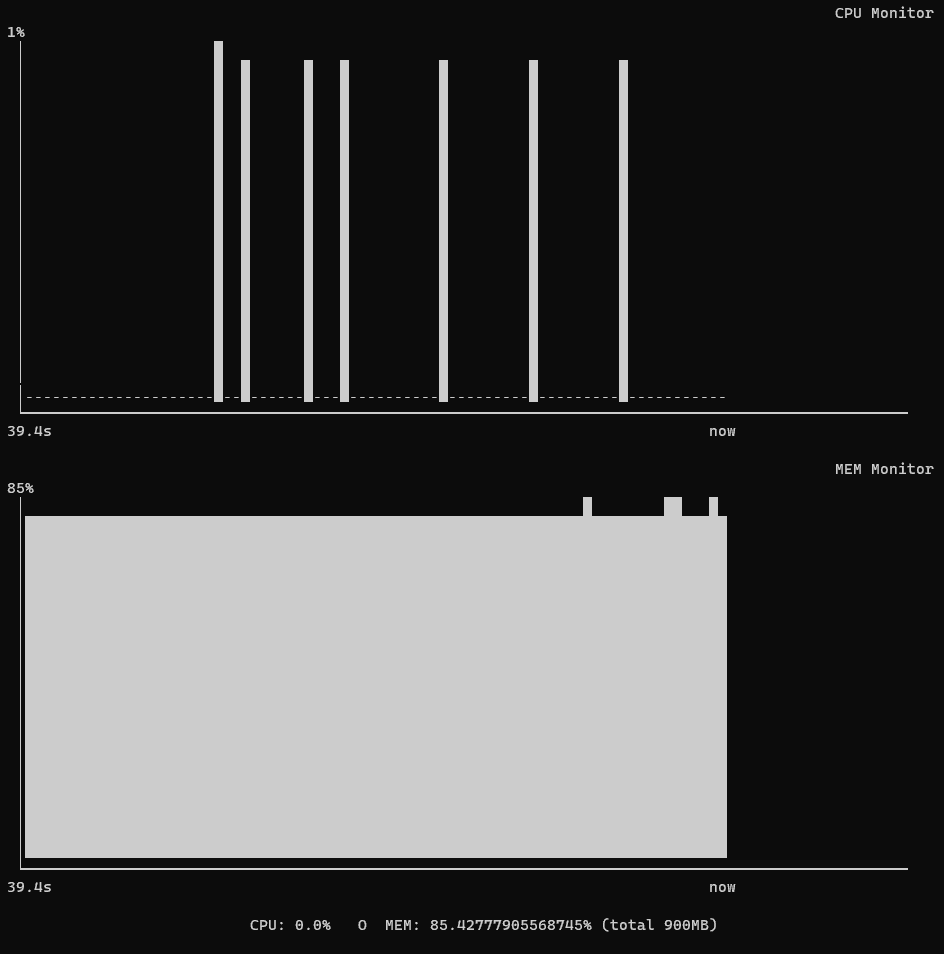
Unlike other screensavers, diversity comes from the choices instead of the configuration options.
A fairly old but very impressive terminal screensaver is the asciiquarium by RoboBunny, a fish-and-water-themed animation.
First, we install the dependencies, which require Perl and cpan:
$ cpan install Curses && cpan install Term::AnimationOnce done, we can download the ASCIIquarium package and install it:
$ wget http://www.robobunny.com/projects/asciiquarium/asciiquarium.tar.gz
$ tar -zxvf asciiquarium.tar.gz
$ cd asciiquarium*
$ cp asciiquarium /usr/local/bin
$ chmod 0755 /usr/local/bin/asciiquarium
At this point, we can check the graphics:
$ asciiquariumLet’s see the result:

With a lot of randomly generated elements, colors, and objects, this is one of the most diverse screensavers on our list.
The ASCII Saver is a screensaver picker based on a flexible Python VT100 animation player, which can reproduce any .vt file. In short, VT100 is a format for storing text-based animations.
To install, we clone the repository and use make:
$ git clone https://gitlab.com/mezantrop/ascsaver.git
$ cd ascsaver
$ make && make install clean
At this point, we can run ascsaver with a given [-f]ile:
$ ascsaver -f /usr/local/share/ascsaver.art/globe.vt -p 0Let’s see the result:
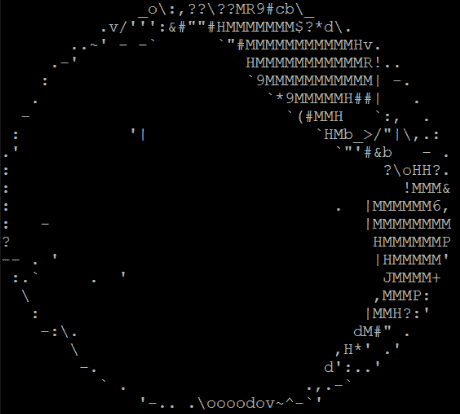
Finally, we can choose from a vast array of VT100 animation files to use with ascsaver.
In this article, we talked about screensaver control and play in the terminal.
In conclusion, although screensavers are usually associated with graphics, the Linux CLI doesn’t give way with its diverse choices.