Learn through the super-clean Baeldung Pro experience:
>> Membership and Baeldung Pro.
No ads, dark-mode and 6 months free of IntelliJ Idea Ultimate to start with.
Last updated: January 30, 2024

Learn through the super-clean Baeldung Pro experience:
>> Membership and Baeldung Pro.
No ads, dark-mode and 6 months free of IntelliJ Idea Ultimate to start with.
In this tutorial, we’ll learn about the ngrok reverse proxy service in depth. Additionally, we’ll demonstrate the steps for setting up an SSH server using the ngrok command.
ngrok is a reverse proxy service that makes it easy for us to tunnel our locally running service to the public network. There are two components to the ngrok service, the ngrok agent and the ngrok edge.
The idea is that the ngrok edge has a publicly accessible domain and IP address that can receive requests from the public network. Then, to expose a locally running service to the internet, we’ll run the ngrok agent in the same host as our service.
On start-up, the agent will connect with one of the many globally distributed ngrok edges. Once the connection is established, the ngrok edge will forward all the received requests to the ngrok agent. The ngrok agent in turn forwards the traffic to the designated local process that’s listening to a specific port.
Therefore, by sending the requests to the ngrok edge, we’ll be able to reach the service as the traffic will be forwarded to the ngrok edge, then the agent, and eventually to the service.
One important appeal of the ngrok service is that it simplifies the process of exposing a local process to an external network’s connection. This is convenient for cases when we want to expose our services to external requests for testing purposes.
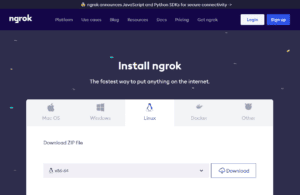
To get started, we’ll need to install the ngrok command on our system. We can head to the ngrok official download page. Then, in the Linux section, we can select the CPU instruction set of our system and press download.
For example, for a system with x86-64 instruction set, we can download the x86-64’s binary and save it as ngrok-v3-stable-linux-amd64.tgz:
Then, we untar the binary into /usr/local/bin using the tar command:
$ sudo tar xvzf ~/Downloads/ngrok-v3-stable-linux-amd64.tgz -C /usr/local/binFinally, we verify that our installation is successful by checking the ngrok‘s version using the –version option:
$ ngrok --version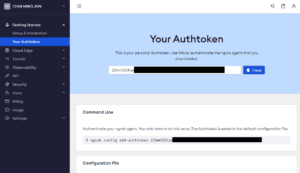
ngrok version 3.5.0Before we can start using the ngrok command for creating tunnels, we’ll need to first obtain the Authtoken. The Authtoken is a way for the ngrok service to authenticate us. We can obtain the Authtoken from an active ngrok account. To register for a new account, head to the ngrok‘s official sign-up page. Then, follow the instructions to register and verify the account.
Once we’ve activated the account, we can obtain the Authtoken by clicking on Your Authtoken option at the sidebar on the dashboard:
Then, we can add the Authtoken to our ngrok command using the add-authtoken subcommand:
$ ngrok config add-authtoken 2ZbmCC81qx.......
Authtoken saved to configuration file: /home/bob/.config/ngrok/ngrok.yml
Now, we’re ready to set up some tunnels using the ngrok command.
Secure shell (SSH) is a networking protocol that allows us to remotely access our system. However, setting up SSH to allow remote connection from a public network can be tedious. Particularly, we’ll have to set up a publicly accessible IP on our system. Furthermore, for a system that is behind NAT, we’ll need to do proper port forwarding to make sure the traffic is routed correctly.
With ngrok, there’s no need to go through the hassles we’ve discussed. Instead, we can create a tunnel that forwards traffic to port 22 using the ngrok command-line interface. Then, we’ll be able to SSH into the system through the ngrok‘s edge IP address. Let’s look at the example.
To demonstrate the idea, we’ll set up two different hosts that live on different networks. The first host, ssh-server, will run the sshd process to accept SSH connection. Additionally, we’ll ensure that the ssh-server contains a user bob that the SSH client can use to log in to the ssh-server.
On the other hand, we’ll use the second host, ssh-client, to SSH into the ssh-server. Finally, both servers are connected to the internet to allow the ngrok tunneling to work.
To begin the demonstration, we’ll first start the sshd process on the ssh-server host. We can start the process using the systemctl start command:
$ sudo systemctl start sshdThen, we can check the status of the sshd process using the systemctl status:
$ systemctl status sshd
● ssh.service - OpenBSD Secure Shell server
     Loaded: loaded (/lib/systemd/system/ssh.service; enabled; vendor preset: enabled)
     Active: active (running) since Sat 2023-12-16 03:57:12 CET; 1h 25min ago
       ...
The systemctl status command prints the current status of the service. From the output above, we confirm that the sshd service is currently running as its status is active.
With the sshd process listening to port 22, we can now create a ngrok tunnel to forward traffic to the sshd process. Specifically, we’ll need to create a TCP endpoint that forwards the incoming traffic to the local port 22:
$ ngrok tcp 22
ngrok                                                                         (Ctrl+C to quit)

Build better APIs with ngrok. Early access: ngrok.com/early-access

Session Status                online
Account                       CHIN MING JUN (Plan: Free)
Version                       3.5.0
Region                        Asia Pacific (ap)
Latency                       -
Web Interface                 http://127.0.0.1:4040
Forwarding                    tcp://0.tcp.ap.ngrok.io:19915 -> localhost:22

Connections                   ttl     opn     rt1     rt5     p50     p90
                              0       0       0.00    0.00    0.00    0.00
After executing the command, we’ll see an interactive output that displays various information. Importantly, the Forwarding line shows that all the TCP traffic that goes to host 0.tcp.ap.ngrok.io at port 19915 will be forwarded to localhost port 22. In other words, anyone on the public network can send TCP traffic to 0.tcp.ap.ngrok.io:19915, and ngrok will forward the traffic to port 22 of localhost.
To test out the connection, we can now hop onto the ssh-client host. Then, we can initiate an SSH connection from ssh-client to 0.tcp.ap.ngrok at port 19915 using the ssh command:
$ ssh [email protected] -p 19915
[email protected]'s password:
bob@ssh-server:~$
From the output, we can see that our SSH connection has succeeded as we’ve logged in as the user bob on the ssh-server. Furthermore, we can look back at the server’s ngrok interactive output and see that there’s one open connection:
ngrok                                                                         (Ctrl+C to quit)

...
Forwarding                    tcp://0.tcp.ap.ngrok.io:19915 -> localhost:22

Connections                   ttl     opn     rt1     rt5     p50     p90
                              0       1       0.00    0.00    0.00    0.00
In the Connections row, the opn column indicates the number of currently open connections. Since we’ve opened the connection to ssh-server using ssh-client, we can see that it reports the number of open connections as one.
In this tutorial, we’ve learned about the ngrok reverse proxy service. Specifically, we’ve learned how to install the ngrok command-line interface and set up the authenticating token. Furthermore, we’ve demonstrated a simple SSH setup that uses ngrok to set up a tunnel that forwards public TCP traffic to our local sshd process.
Specifically, the demonstration shows that with ngrok, it’s convenient to set up a publicly accessible SSH server that would otherwise require tedious network configuration on the SSH server.