

Learn through the super-clean Baeldung Pro experience:
>> Membership and Baeldung Pro.
No ads, dark-mode and 6 months free of IntelliJ Idea Ultimate to start with.
Learn through the super-clean Baeldung Pro experience:
>> Membership and Baeldung Pro.
No ads, dark-mode and 6 months free of IntelliJ Idea Ultimate to start with.
Network File System (NFS) enables remote access to filesystems over a shared network. Hence, it’s suitable for scenarios wherein multiple Docker containers require access to common files, such as containerized microservices having identical configuration files.
This tutorial demonstrates different ways to mount NFS shares inside a Docker container. We’ll connect to a pre-configured NFS server through the Docker host, which acts as an NFS client.
The commands in this tutorial were run on CentOS 7 in Bash after installing nfs-utils, or nfs-common in some distros, and Docker Engine.
Docker container files don’t persist after removing the container. Nonetheless, we can mount external filesystems onto a container.
A container supports three types of storage mounts: bind mounts, volumes, and tmpfs. However, tmpfs is a volatile memory storage. Hence, it isn’t viable for persistent external filesystems like NFS. On the other hand, we can mount such filesystems via both bind mounts and volumes. Furthermore, we can directly mount a filesystem through a running container’s terminal under certain conditions.
The image below highlights the mounting methods covered in upcoming sections:
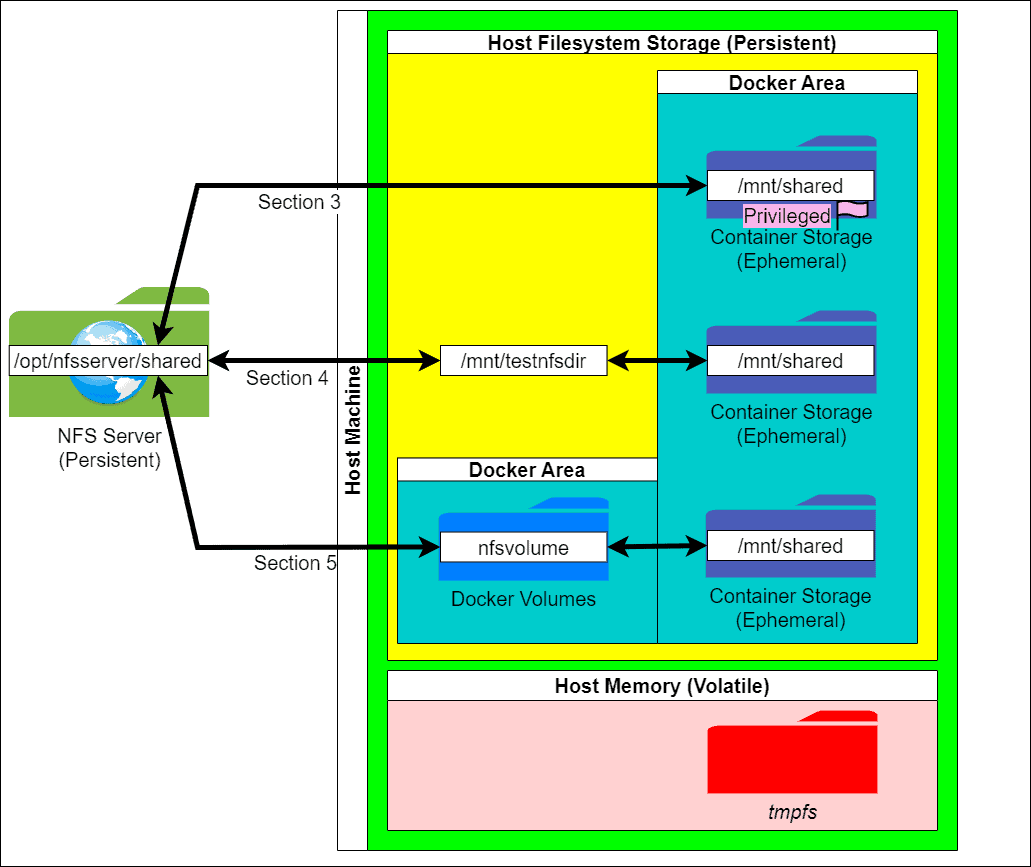
This image also shows the hierarchy of Docker storage in the host machine.
A container connects to the NFS server through its host machine’s IP address. Therefore, the host’s IP address must be included in the NFS exports. Also, the server firewall might require additional configuration to permit this NFS client.
The NFS server for this tutorial has the IP address 32.55.178.8. It’s important to replace this address with the actual server address when using this tutorial’s scripts.
The server’s /etc/exports file exposes the file share path /opt/nfsserver/shared to the host having the IP address 32.93.10.15:
/opt/nfsserver/shared 32.93.10.15(no_root_squash,rw,sync)Let’s create a directory named /mnt/testnfsdir on the host machine. Then, we’ll check the NFS connection by mounting the file share using the mount command:
$ sudo mkdir /mnt/testnfsdir
$ sudo mount -t nfs -o nfsvers=4 32.55.178.8:/opt/nfsserver/shared /mnt/testnfsdir
Here, the absence of an error output indicates success. In the case of NFS version 3, we can change nfsvers=4 to nfsvers=3.
Let’s now create a file named b0.txt inside that directory using touch, and then run ls:
$ sudo touch /mnt/testnfsdir/b0.txt
$ ls /mnt/testnfsdir
b0.txt
We’ve now validated that the host can access the file share.
Docker doesn’t support running mount within a container’s terminal unless we assign some additional privileges — for example, by supplying the –privileged flag.
Let’s start an Alpine Linux image container named priv with an interactive terminal by passing the options –interactive (-i) and –tty (-t) to the docker run command:
$ sudo docker run -it --privileged --name priv alpine:latest
/ #
Now, we can create a directory named /mnt/shared and run the mount command:
/ # mkdir /mnt/shared
/ # mount -t nfs -o nfsvers=4 32.55.178.8:/opt/nfsserver/shared /mnt/shared
Next, we can test whether we’re able to read from and write to the NFS files. Let’s create a file named b1.txt inside /mnt/shared in the container:
/ # ls /mnt/shared
b0.txt
/ # touch /mnt/shared/b1.txt
/ # ls /mnt/shared
b0.txt b1.txt
/ # exit
We successfully mounted the file share directly inside the container. However, this isn’t the best practice, as it requires running a privileged container and is less configurable. In fact, without the –privileged flag, the mount command prints an error:
$ sudo docker run -it --name unpriv alpine:latest
/ # mkdir /mnt/shared
/ # mount -t nfs -o nfsvers=4 32.55.178.8:/opt/nfsserver/shared /mnt/shared
mount: permission denied (are you root?)
/ # whoami
root
/ # exit
Despite running the command as the root user, we got a permission-denied error.
A bind mount represents a path from the host filesystem mapped to a path in the container’s filesystem. We can mount the NFS share onto the host and then connect it as a bind mount. This method shifts the responsibility of managing the bind mount point from Docker to a host machine user.
Let’s reuse /mnt/testnfsdir, the directory we created above when testing the NFS mount from our host:
$ ls /mnt/testnfsdir
b0.txt b1.txt
Here, we can see the files created in the previous sections.
docker run is convenient for running a single container with fewer configuration options. Let’s pass the source path as /mnt/testnfsdir. Then, we can provide the target path as /mnt/shared inside the container where the bind mount gets mapped.
Let’s run a container named bindmount1 and verify the setup:
$ sudo docker run -it --name bindmount1 \
  --mount type=bind,source=/mnt/testnfsdir,target=/mnt/shared \
  alpine:latest
/ # touch /mnt/shared/b2.txt
/ # ls /mnt/shared
b0.txt b1.txt b2.txt
/ # exit
As shown here, we successfully created b2.txt in the file share.
Let’s create a file named docker-compose.yml and specify the bind mount under volumes:
version: "3.8"
services:
    bindmount2:
        image: alpine:latest
        container_name: bindmount2
        volumes:
            - "/mnt/testnfsdir:/mnt/shared:rw"
        tty: true
Let’s bring up the service using docker compose up with the –detach (-d) flag:
$ sudo docker compose up -d
[+] Running 2/2
 ✔ Network baeldung_default    Created    0.2s
 ✔ Container bindmount2    Started    0.0s
Here, we can replace docker compose with docker-compose for devices using Docker Compose V1.
Let’s now open this container’s terminal by passing the -it parameters along with sh to docker exec. Then, let’s create a new file named b3.txt:
$ sudo docker exec -it bindmount2 sh
/ # touch /mnt/shared/b3.txt
/ # ls /mnt/shared
b0.txt b1.txt b2.txt b3.txt
/ # exit
Having successfully created the file, we can now bring down the service using docker compose down:
$ sudo docker compose down
[+] Running 2/2
✔ Container bindmount2    Removed    10.2s
✔ Network baeldung_default    Removed    0.2s
Thus, we’ve shown that we can mount file shares as bind mounts. However, this creates a dependency on the host filesystem setup. The bind mount source directory should be connected to the file share before we create any container.
Docker manages volumes in isolation from other files on the host. Therefore, volumes are preferable over bind mounts. Docker volume support for NFS shares is available starting with docker v17.06.
First, let’s create a Docker volume by providing the NFS details to the docker volume create command. The volume connects to NFS only when mounted to a container. Let’s name the volume nfsvolume1:
$ sudo docker volume create --driver local \
  -o type=nfs \
  -o o=addr="32.55.178.8,rw,nfsvers=4" \
  -o device=:/opt/nfsserver/shared \
  nfsvolume1
nfsvolume1
We can inspect the volume using docker volume inspect:
$ sudo docker volume inspect nfsvolume1
[
    {
        "CreatedAt": "2023-10-14T00:01:19Z",
        "Driver": "local",
        "Labels": null,
        "Mountpoint": "/var/lib/docker/volumes/nfsvolume1/_data",
        "Name": "nfsvolume1",
        "Options": {
            "device": ":/opt/nfsserver/shared",
            "o": "addr=32.55.178.8,rw,nfsvers=4",
            "type": "nfs"
        },
        "Scope": "local"
    }
]
As shown above, the volume has the local driver and the NFS mount options.
Let’s spin up a new container named volumecont1 using docker run and specify the volume as a source to the –mount parameter:
$ sudo docker run -it --name volumecont1 \
  --mount type=volume,source=nfsvolume1,target=/mnt/shared \
  alpine:latest
/ # ls /mnt/shared
b0.txt b1.txt b2.txt b3.txt
/ # touch /mnt/shared/b4.txt
/ # ls /mnt/shared
b0.txt b1.txt b2.txt b3.txt b4.txt
/ # exit
The file creation operation was successful.
We can let Docker create the volume automatically by providing a new name along with the necessary volume options as volume-opt to the –mount parameter:
$ sudo docker run -it --name volumecont2 \
  --mount 'type=volume,source=nfsvolume2,target=/mnt/shared,volume-driver=local,volume-opt=type=nfs,"volume-opt=o=addr=32.55.178.8,rw,nfsvers=4",volume-opt=device=:/opt/nfsserver/shared' \
  alpine:latest
/ #
We can repeat the steps from the previous section to create a file named b5.txt.
Docker recognizes an external volume by the external: true flag.
Let’s create a new file named docker-compose-volume-ext.yml:
version: "3.8"
services:
    volumecont3:
        image: alpine:latest
        container_name: volumecont3
        volumes:
            - nfsvolume1:/mnt/shared:rw
        tty: true
volumes:
    nfsvolume1:
        external: true
Docker will use the previously created nfsvolume1 volume when it creates this container. Moreover, multiple containers across many Compose files on the same host can reuse this volume.
Let’s bring up the service and repeat the steps from the previous sections for a new file:
$ sudo docker compose -f docker-compose-volume-ext.yml up -d
[+] Running 2/2
 ✔ Network baeldung_default    Created    0.2s
 ✔ Container volumecont3    Started    0.2s
$ sudo docker exec -it volumecont3 sh
/ # touch /mnt/shared/b6.txt
/ # ls /mnt/shared
b0.txt b1.txt b2.txt b3.txt b4.txt b5.txt b6.txt
/ # exit
$ sudo docker compose -f docker-compose-volume-ext.yml down
[+] Running 2/2
 ✔ Container volumecont3    Removed    10.2s
 ✔ Network baeldung_default    Removed    0.2s
As seen above, we created a file named b6.txt in the file share.
We can let Docker create the volume if it doesn’t exist by specifying options in the Compose file. Let’s name this file docker-compose-volume-auto.yml:
version: "3.8"
services:
    volumecont4:
        image: alpine:latest
        container_name: volumecont4
        volumes:
            - nfsvolume3:/mnt/shared:rw
        tty: true
volumes:
    nfsvolume3:
        driver: local
        driver_opts:
            type: "nfs"
            o: "addr=32.55.178.8,rw,nfsvers=4"
            device: ":/opt/nfsserver/shared"
We can repeat the steps from the previous section by replacing docker-compose-volume-ext.yml with docker-compose-volume-auto.yml.
This is the most configurable approach because no setup is required on the host except for putting this file there.
In this article, we saw multiple ways to mount NFS shares inside a Docker container. First, we mounted a share directly within a privileged container through its interactive terminal. Then, we used a bind mount through a mounted directory on the host filesystem. Lastly, we used Docker volumes to connect the file share to a container. We also learned how to use bind mounts and volumes with docker run and docker compose commands.