

Learn through the super-clean Baeldung Pro experience:
>> Membership and Baeldung Pro.
No ads, dark-mode and 6 months free of IntelliJ Idea Ultimate to start with.
Learn through the super-clean Baeldung Pro experience:
>> Membership and Baeldung Pro.
No ads, dark-mode and 6 months free of IntelliJ Idea Ultimate to start with.
Containers are isolated environments within the context of a Linux system that can allocate predefined amounts of specific resources. Most often, Docker containers are used to run applications in isolation. By default, all the changes inside the container are lost when the container stops. If we want to keep data between runs, Docker volumes and bind mounts can help.
In this tutorial, we’ll learn about Docker volumes, and how to manage and connect them to containers.
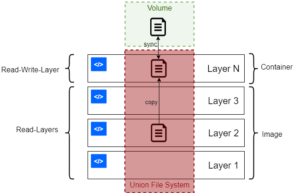
Docker containers run the software stack defined within an Docker image. Images are made of a set of read-only layers that work on a filesystem called the Union Filesystem. When we start a new container, Docker adds a read-write layer on top of the image layers enabling the container to run as if it’s on a standard Linux filesystem.
So, any file change inside the container creates a working copy in the read-write layer. However, when the container is stopped or deleted, that read-write layer is lost:
We can verify this by running a command that writes and then reads a file:
$ docker run bash:latest \
  bash -c "echo hello > file.txt && cat file.txt"
The result is:
helloHowever, if we run the same image with just the command to output the contents of the same file, we get an error:
$ docker run bash:latest bash -c "cat file.txt"
cat: can't open 'file.txt': No such file or directory
The second run of the container again starts with a clean filesystem, so the file isn’t found. To preserve files between container runs, we can leverage volumes.
Since both bind mounts and Docker volumes are available as a means to have persistent storage.
Still, many implementations offer bind mounts:
They have the same function in each case: bind mounts mount a file or directory within another directory. Effectively, the result can be seen as a so-called directory junction. However, mounts use a different mechanism, which works with remote locations and different protocols as well. When it comes to containers, a bind mount exposes a host file or directory to a container.
On the other hand, a Docker volume uses a special storage directory within the Docker directory tree on the host. Each volume is a subdirectory that Docker manages. Essentially, internal implementations are crucial to this procedure.
Many advantages of volumes over bind mounts stem from this fact:
In general, bind mounts are usually much more performant and easier to set up but rely on specific OS features.
In Docker, volumes are ways to permanently store data between container restarts. They can be native implementations or simple binds.
A Docker bind mount is a high-performance connection from the container to a directory on the host machine. It enables the host to share its filesystem with the container, which can be made read-only or read-write.
This enables us to use a container to run tools that we don’t want to install on host, and yet still work with the host’s files. For example, if we wanted to use a custom version of bash for a particular script, we might execute that script within a bash container, mounted to the current working directory:
$ docker run -v $(pwd):/var/opt/project bash:latest \
  bash -c "echo Hello > /var/opt/project/file.txt"
The –v option is the same for all mount forms. In this instance, the bind specifies the source as the host working directory from the output of $(pwd), and the target mount point as /var/opt/project within the container.
After running this command, we should find file.txt in the working directory of the host machine, since the container creates it. This is a simple way to provide persistent files between invocations of a Docker container. Still, it’s often most useful for when the container is doing work on behalf of the host.
One good use case for this would be executing various versions of a language’s build tools in Docker to avoid having conflicting installations on a developer machine.
A bind mount uses the host filesystem, but Docker volumes are native to Docker. The data is kept somewhere on storage attached to the host, most often the local filesystem. The volume itself has a lifecycle that’s longer than the container’s, enabling it to persist until no longer needed. Volumes can be shared between containers.
In some cases, the volume is in a form that isn’t usable by the host directly.
Docker enables us to manage volumes via the docker volume command set. For example, we can give a volume an explicit name resulting in named volumes, or tell Docker to generate a random one for anonymous volumes.
To begin with, we create a volume by using the create subcommand and passing a name as an argument:
$ docker volume create data_volume
data_volume
If a name isn’t specified, Docker generates a random one as a hash identifier:
$ docker volume create
d7fb659f9b2f6c6fd7b2c796a47441fa77c8580a080e50fb0b1582c8f602ae2f
Notably, this is different from the internal identification of the volume.
The ls subcommand shows all the volumes known to Docker:
$ docker volume ls
DRIVER 	VOLUME NAME
local 	data_volume
local   d7fb659f9b2f6c6fd7b2c796a47441fa77c8580a080e50fb0b1582c8f602ae2f
Further, we can filter using the -f or –filter option and passing key=value parameters for more precision:
$ docker volume ls -f name=data
DRIVER 	VOLUME NAME
local 	data_volume
Thus, we get only the volumes that have the name data.
To display detailed information about one or more volumes, we use the inspect subcommand:
$ docker volume inspect ca808e6fd82590dd0858f8f2486d3fa5bdf7523ac61d525319742e892ef56f59
[
  {
    "CreatedAt": "2020-11-13T17:04:17Z",
    "Driver": "local",
    "Labels": null,
    "Mountpoint": "/var/lib/docker/volumes/ca808e6fd82590dd0858f8f2486d3fa5bdf7523ac61d525319742e892ef56f59/_data",
    "Name": "ca808e6fd82590dd0858f8f2486d3fa5bdf7523ac61d525319742e892ef56f59",
    "Options": null,
    "Scope": "local"
  }
]
Notably, the Driver of the volume describes how the Docker host locates the volume. Volumes can be on remote storage via NFS, for example. In this instance, the volume is on the local storage.
To remove one or more volumes individually, we can use the rm subcommand:
$ docker volume rm data_volume
data_volume
This is similar to the way we manage whole containers.
Of course, we remove all the unused volumes with the prune subcommand:
$ docker volume prune
WARNING! This will remove all local volumes not used by at least one container.
Are you sure you want to continue? [y/N] y
Deleted Volumes:
data_volume
As expected, a prompt confirms the action.
To create and start a container with a volume, we use the -v option with appropriate values.
The -v option contains three components, separated by colons:
As we saw with the earlier example, we can start a container with a bind mount via the -v option:
$ docker run -v $(pwd):/var/opt/project bash:latest \
  bash -c "ls /var/opt/project"
This syntax also supports mounting a native Docker volume:
$ docker run -v data-volume:/var/opt/project bash:latest \
  bash -c "ls /var/opt/project"
As this particular volume is empty, the command doesn’t show any output.
However, we can write a file to the volume during one invocation of the container:
$ docker run -v data-volume:/var/opt/project bash:latest \
  bash -c "echo Baeldung > /var/opt/project/Baeldung.txt"
Then, subsequent commands to access this same file should succeeed:
$ docker run -v data-volume:/var/opt/project bash -c "ls /var/opt/project"
Baeldung.txt
Thus, we access the same data between container restarts.
Other times, we might prefer to use the more self-explanatory –mount option to specify the volume we wish to mount:
$ docker run --mount \
  'type=volume,src=data-volume,\
  dst=/var/opt/project,volume-driver=local,\
  readonly' \
  bash -c "ls /var/opt/project"
The values for –mount comprise a string of key-value pairs, separated by commas.
Let’s see what we set:
Notably, the above command also creates the respective volume if it doesn’t already exist.
Critically, attaching a volume to a container creates a long-term connection between the container and that volume. Even when the container has exited, the relationship still exists.
Because of this, we can use an exited container as a template for mounting the same set of volumes to a new one.
Let’s say we run a simple script in a container with the data-volume mount. Later on, we list all containers we’ve used:
$ docker ps -a
CONTAINER ID   IMAGE             COMMAND                  CREATED              STATUS                          PORTS      NAMES
4920602f8048   bash              "docker-entrypoint.s…"   7 minutes ago        Exited (0) 7 minutes ago                   exciting_payne
After that, we can run the next container by copying the volumes used by the currently existing one:
$ docker run --volumes-from 4920 \
  bash:latest \
  bash -c "ls /var/opt/project"
Baeldung.txt
In practice –volumes-from usually links volumes between running containers. For instance, Jenkins uses this to share data between agents running as Docker containers.
In this article, we saw how Docker normally creates a container with a fresh filesystem, and how bind mounts and volumes enable long-term storage of data beyond the container’s lifecycle.
Further, we checked ways to list and manage Docker volumes, and how to connect volumes to a running container via the command line.
In general, knowing how to handle persistent storage in Docker is critical for many applications that require consistency.