Converting a Java Project/Module Into a Maven Project/Module in IntelliJ IDEA
Last updated: July 17, 2025


Mocking is an essential part of unit testing, and the Mockito library makes it easy to write clean and intuitive unit tests for your Java code.
Get started with mocking and improve your application tests using our Mockito guide:
Handling concurrency in an application can be a tricky process with many potential pitfalls. A solid grasp of the fundamentals will go a long way to help minimize these issues.
Get started with understanding multi-threaded applications with our Java Concurrency guide:
Spring 5 added support for reactive programming with the Spring WebFlux module, which has been improved upon ever since. Get started with the Reactor project basics and reactive programming in Spring Boot:
Since its introduction in Java 8, the Stream API has become a staple of Java development. The basic operations like iterating, filtering, mapping sequences of elements are deceptively simple to use.
But these can also be overused and fall into some common pitfalls.
To get a better understanding on how Streams work and how to combine them with other language features, check out our guide to Java Streams:
Explore Spring Boot 3 and Spring 6 in-depth through building a full REST API with the framework:
Yes, Spring Security can be complex, from the more advanced functionality within the Core to the deep OAuth support in the framework.
I built the security material as two full courses - Core and OAuth, to get practical with these more complex scenarios. We explore when and how to use each feature and code through it on the backing project.
You can explore the course here:
Spring Data JPA is a great way to handle the complexity of JPA with the powerful simplicity of Spring Boot.
Get started with Spring Data JPA through the guided reference course:
Refactor Java code safely — and automatically — with OpenRewrite.
Refactoring big codebases by hand is slow, risky, and easy to put off. That’s where OpenRewrite comes in. The open-source framework for large-scale, automated code transformations helps teams modernize safely and consistently.
Each month, the creators and maintainers of OpenRewrite at Moderne run live, hands-on training sessions — one for newcomers and one for experienced users. You’ll see how recipes work, how to apply them across projects, and how to modernize code with confidence.
Join the next session, bring your questions, and learn how to automate the kind of work that usually eats your sprint time.
Get up to speed with the core of Maven quickly, and then go beyond the foundations into the more powerful functionality of the build tool, such as profiles, scopes, multi-module projects and quite a bit more:
1. Overview
IntelliJ IDEA stands out as a robust integrated development environment (IDE). It provides robust features to streamline the development workflow. A common task a developer may encounter is converting a Java project or module into a Maven-based one. This conversion facilitates improved dependency management, build automation, and project structure organization.
In the following article, we’ll learn how to convert a Java project/module into a Maven project/module using IntelliJ IDEA.
2. Why Convert to Maven?
Before we delve into the conversion process, it’s crucial to understand Maven’s pivotal role in Java development. First and foremost, Maven is a powerful tool. It streamlines project management by enforcing standardized project structures and automates essential tasks like compilation, testing, and packaging.
At the heart of Maven lies the Project Object Model (POM), an XML file that serves as a blueprint for project configuration, dependencies, and build settings.
Moreover, Maven smoothly integrates with popular Integrated Development Environments (IDEs) such as IntelliJ IDEA, offering developers a cohesive development experience. This smooth integration empowers developers to harness Maven’s capabilities directly within their preferred IDE, simplifying project setup, dependency management, and build processes.
3. Converting a Java Project/Module Into a Maven Project/Module
Next, let’s explore the step-by-step process of converting a Java project into a Maven project.
3.1. Accessing Project Structure
To begin with, let’s open IntelliJ IDEA and verify that the IDE is appropriately configured with the required JDK (Java Development Kit). Then, let’s proceed and open our Java project, which we aim to convert into a Maven project.
This can be done by either selecting “Open” from the IntelliJ IDEA welcome screen or navigating to “File” > “Open” from the menu and selecting the project root directory:

3.2. Adding Maven Support
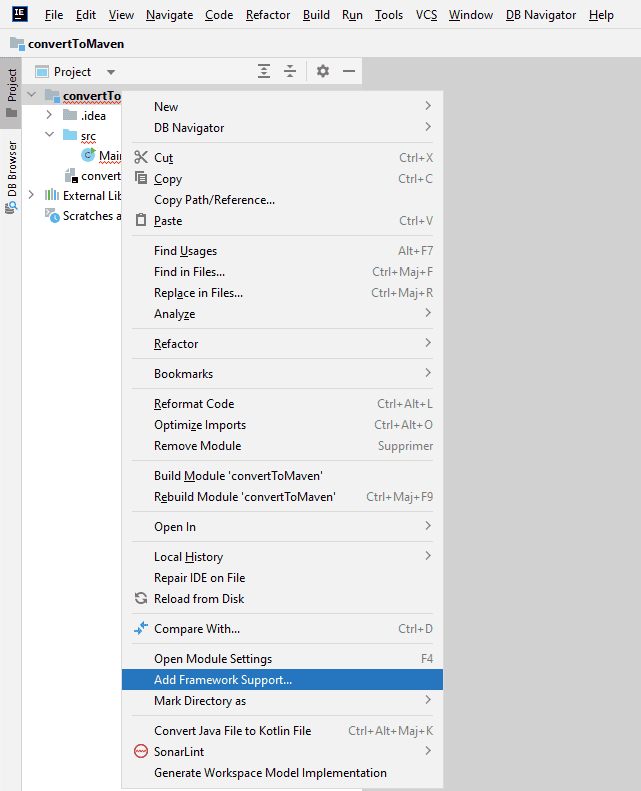
Once the project is successfully loaded, we can navigate to the project/module in the “Project Explorer” pane and right-click on it. Then, from the context menu, we can choose “Add Framework Support…”:
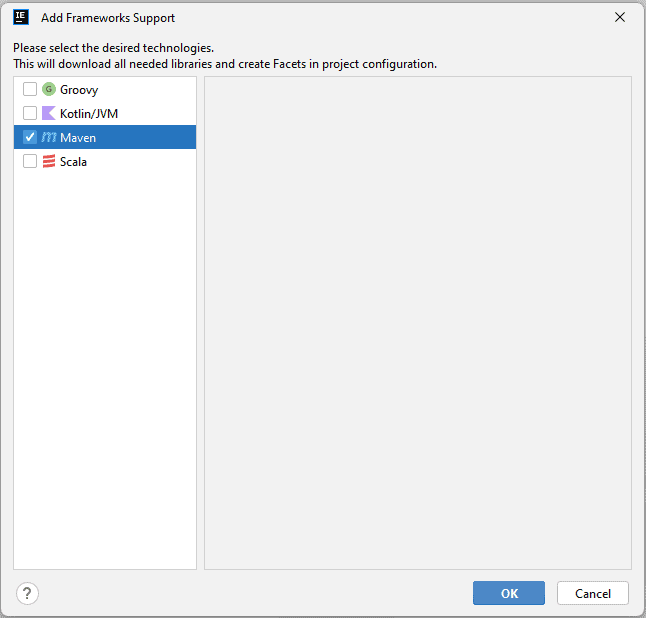
A dialog box will pop up, allowing us to choose the frameworks to add. Afterward, we need to check the box next to “Maven” and finally click “OK” to confirm our selection.
This action triggers IntelliJ IDEA to configure the project for Maven integration:
3.3. Configuring Maven Settings
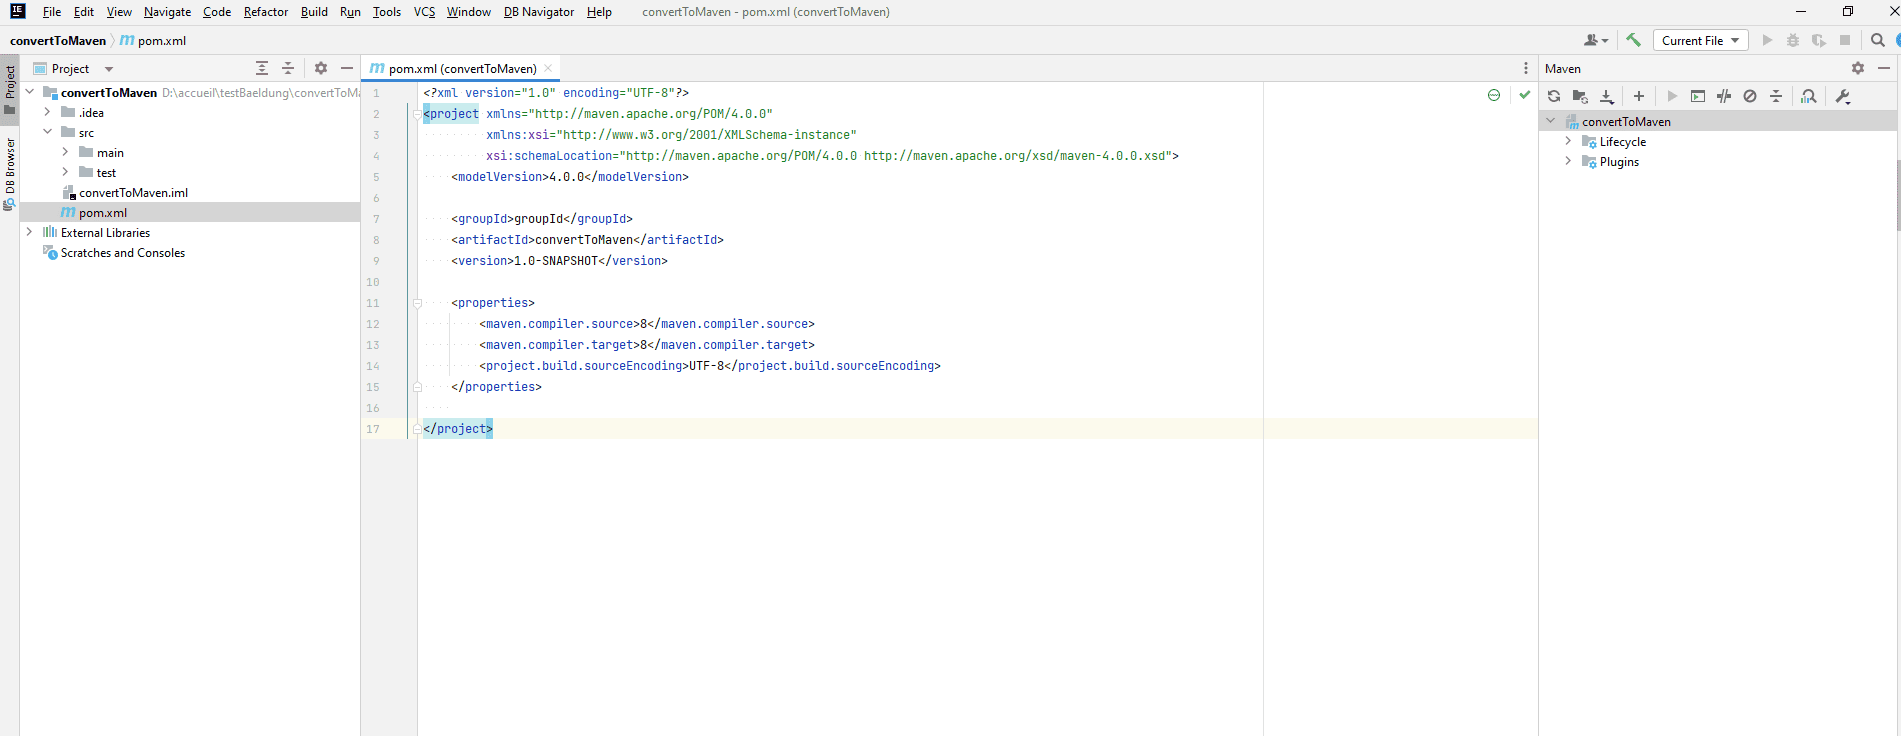
After adding the Maven support, IntelliJ IDEA automatically generates a pom.xml file in our project’s root directory. This file encapsulates project configuration information, including project coordinates, dependencies, plugins, and build settings.
Let’s open the pom.xml file and configure it according to our project’s requirements:
- Specify project metadata such as groupId, artifactId, and version.
- Define project dependencies within the <dependencies> section.
- Customize build settings and plugins as needed
3.4. Resolving Dependencies
IntelliJ IDEA’s Maven integration automatically handles project dependencies listed in the pom.xml file. When opening the pom.xml, IntelliJ IDEA identifies these dependencies and begins downloading and resolving them from the configured repositories.
Furthermore, if IntelliJ IDEA detects any missing or unresolved dependencies, a notification will be displayed within the IDE. This notification identifies the missing dependencies and offers an option to add them:
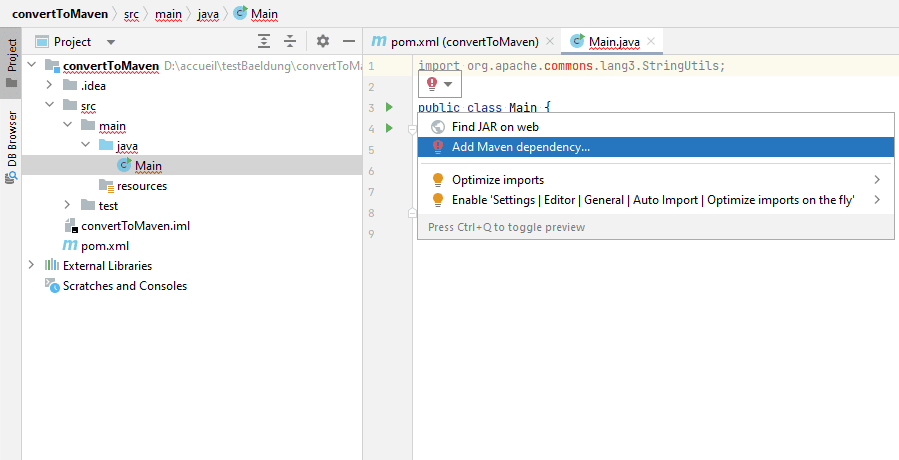
By clicking on the prompt, IntelliJ IDEA opens a dialog box where we can search for the required dependency and choose the appropriate version:
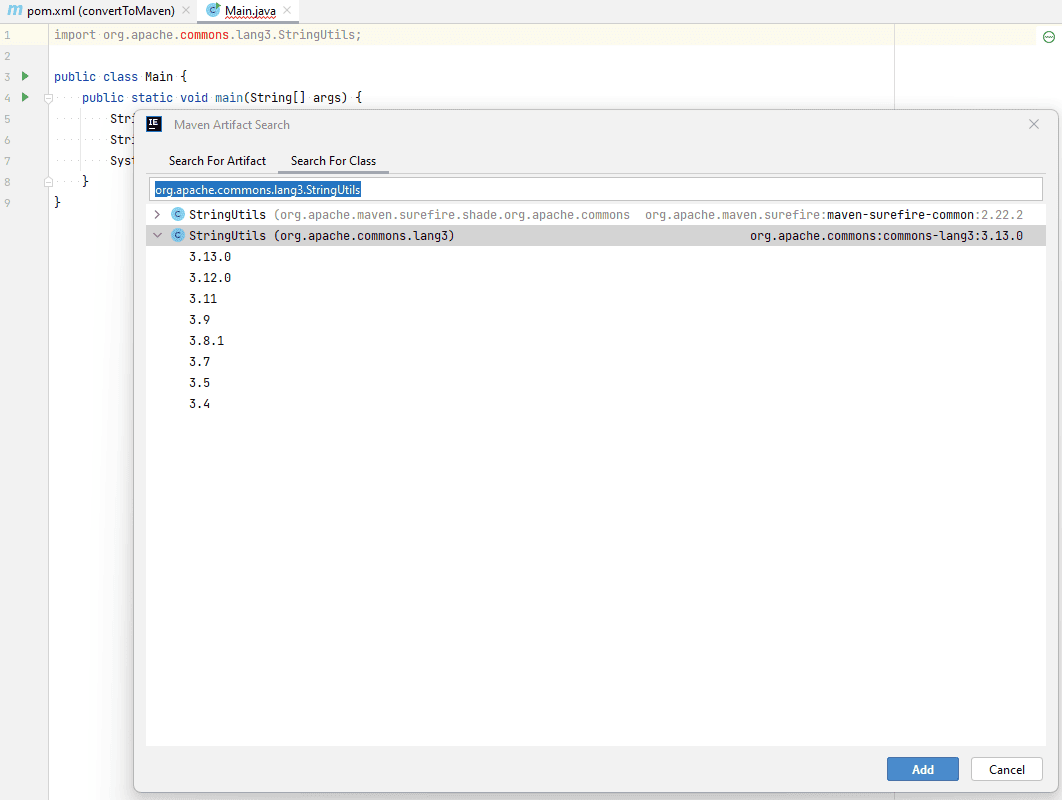
Once we select the dependency and its version, IntelliJ IDEA automatically adds the corresponding <dependency> entry to the pom.xml file and resolves the dependency seamlessly. This streamlined process ensures that all required dependencies are imported correctly and the project builds without errors:

3.5. Verifying Maven Project Conversion
As a crucial final step in the conversion process, it’s imperative to thoroughly verify that the project has transitioned successfully to a Maven project. This verification process serves as a quality assurance check, ensuring that the project is correctly configured and fully prepared for Maven-based development.
To begin, we need to confirm the presence of the pom.xml file in the project root directory, which acts as the cornerstone of the Maven project configuration.
Additionally, we must meticulously check that Maven has retrieved and integrated the necessary libraries and resources, ensuring that project dependencies are resolved without errors.
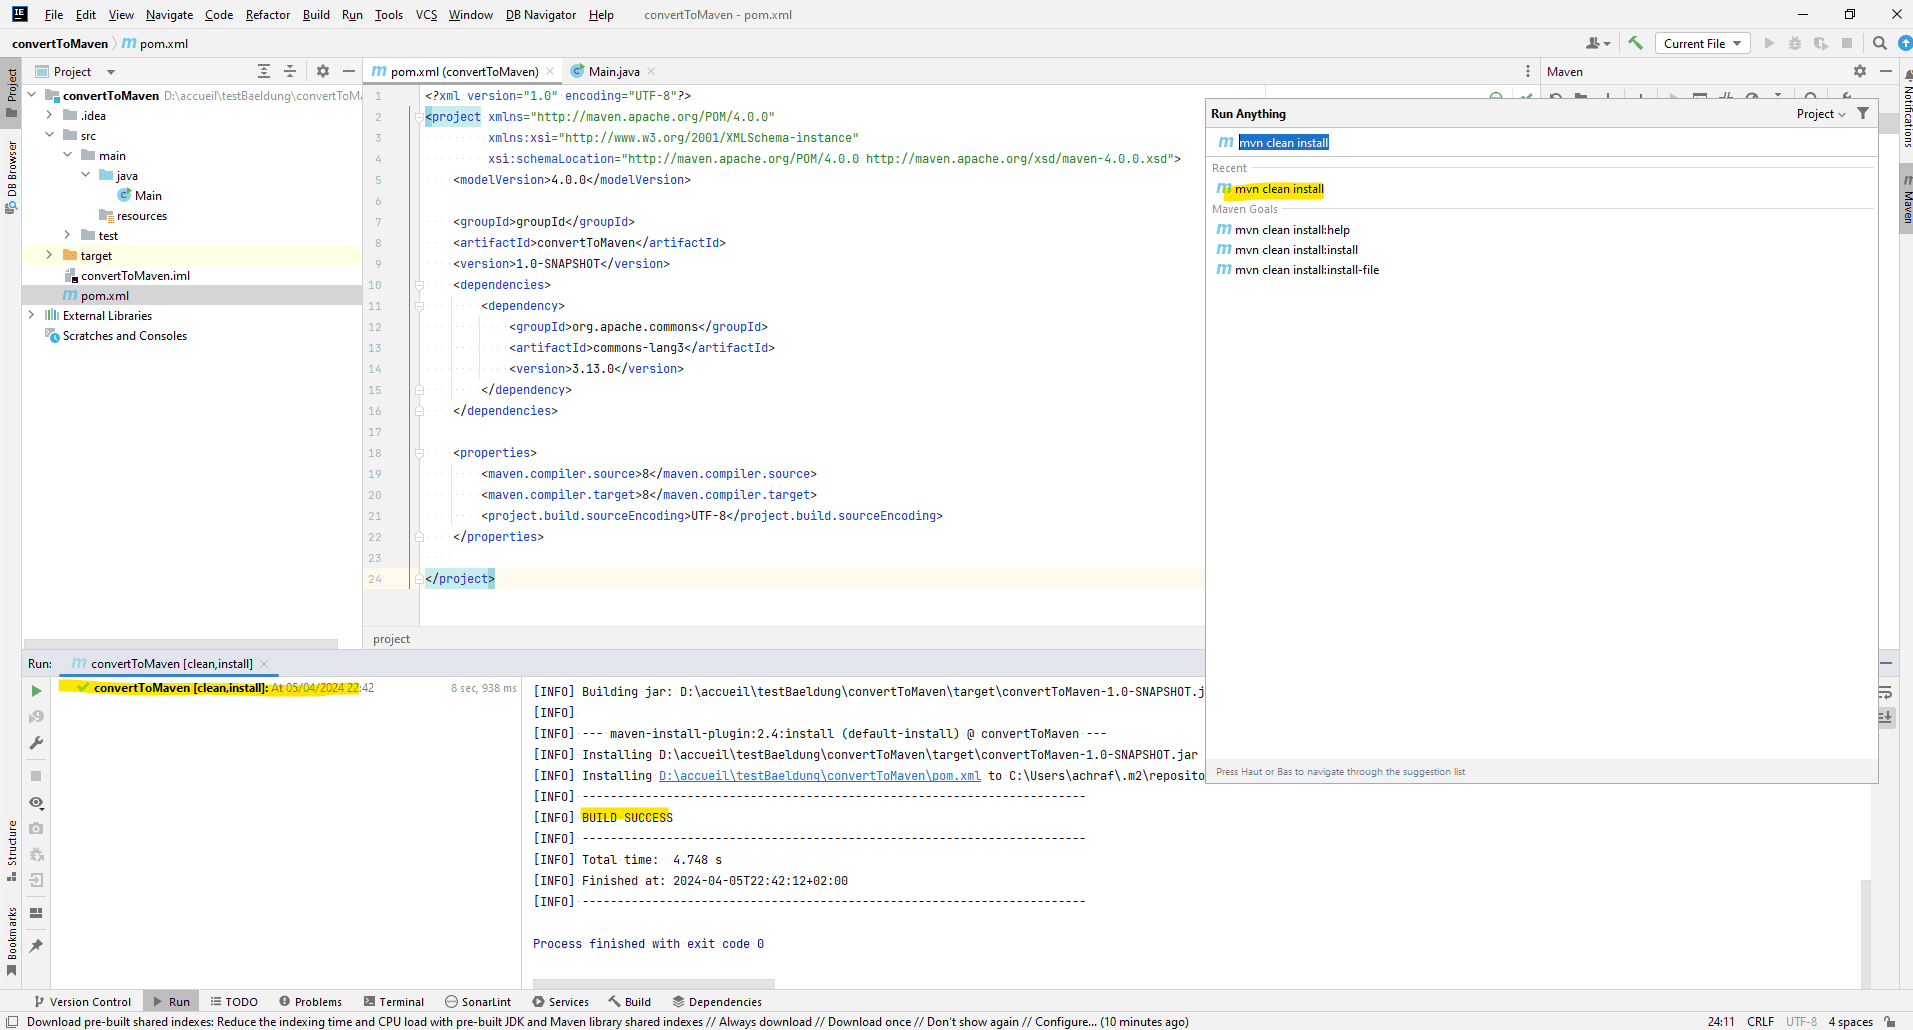
To ensure the conversion’s success, we suggest executing Maven commands either through the terminal or the Maven toolbar within IntelliJ IDEA. For instance, let’s use IntelliJ’s Maven terminal to execute the “mvn clean install” command. This command will clean the project, compile the source code, run any tests, package the compiled code into JARs or WARs, and install the packaged artifacts into the local Maven repository.
By executing this command, we can ensure that the project builds successfully and that all necessary steps in the Maven lifecycle are executed as expected:
4. Conclusion
Converting a Java project/module into a Maven project/module in IntelliJ IDEA is a straightforward process that enhances project manageability and scalability. By following the steps outlined in this article, we can seamlessly integrate Maven into our development workflow, enabling efficient dependency management and build automation.


