How to Change the Java Version in an IntelliJ Project
Last updated: June 20, 2025


Mocking is an essential part of unit testing, and the Mockito library makes it easy to write clean and intuitive unit tests for your Java code.
Get started with mocking and improve your application tests using our Mockito guide:
Handling concurrency in an application can be a tricky process with many potential pitfalls. A solid grasp of the fundamentals will go a long way to help minimize these issues.
Get started with understanding multi-threaded applications with our Java Concurrency guide:
Spring 5 added support for reactive programming with the Spring WebFlux module, which has been improved upon ever since. Get started with the Reactor project basics and reactive programming in Spring Boot:
Since its introduction in Java 8, the Stream API has become a staple of Java development. The basic operations like iterating, filtering, mapping sequences of elements are deceptively simple to use.
But these can also be overused and fall into some common pitfalls.
To get a better understanding on how Streams work and how to combine them with other language features, check out our guide to Java Streams:
Explore Spring Boot 3 and Spring 6 in-depth through building a full REST API with the framework:
Yes, Spring Security can be complex, from the more advanced functionality within the Core to the deep OAuth support in the framework.
I built the security material as two full courses - Core and OAuth, to get practical with these more complex scenarios. We explore when and how to use each feature and code through it on the backing project.
You can explore the course here:
Spring Data JPA is a great way to handle the complexity of JPA with the powerful simplicity of Spring Boot.
Get started with Spring Data JPA through the guided reference course:
Refactor Java code safely — and automatically — with OpenRewrite.
Refactoring big codebases by hand is slow, risky, and easy to put off. That’s where OpenRewrite comes in. The open-source framework for large-scale, automated code transformations helps teams modernize safely and consistently.
Each month, the creators and maintainers of OpenRewrite at Moderne run live, hands-on training sessions — one for newcomers and one for experienced users. You’ll see how recipes work, how to apply them across projects, and how to modernize code with confidence.
Join the next session, bring your questions, and learn how to automate the kind of work that usually eats your sprint time.
1. Overview
In this tutorial, we’ll learn how to change the JDK version in IntelliJ projects. This will work on both Community and Ultimate Editions of IntelliJ. Developers might change the JDK version to use new features or meet specific project requirements.
2. Project Structure Settings
IntelliJ stores the JDK version used by the project within its Project Structure. There are two ways to locate this:
- Via menu navigation:
- Navigating to File -> Project Structure
- Via keyboard shortcut:
- For macOS, we press ⌘ + ;
- For Windows, we press Ctrl + Shift + Alt + S
These are the default settings, but we need to make sure that these shortcuts match our operating system settings if needed.
If everything works well, we’ll see a popup dialog appear that looks similar to this:

Under the Project SDK section, we’ll be able to select a new JDK to use for the project via the combo box, and all installed SDKs will be shown as Detected SDKs:

After updating to a new version of Java, the project will begin reindexing its source files and libraries to ensure that autocompletion and other IDE features are synchronized. Please note that reindexing might temporarily slow down the IDE as it updates the project files.
Another option is to download the JDK directly via IntelliJ:

This will allow us to install and index the JDK version properly, not only for this project but also for future ones. Please remember that if we want the change to be permanent, we can set a global default JDK for all projects in IntelliJ through the IDE settings.
To do that, we should click “New Projects Setup” on the Welcome screen and then select “Structure for New Projects“. If a project is already open, we choose File → New Projects Setup → Structure that will lead us to:

3. Setting the Language Level
We should note that Language level is an important configuration setting in IntelliJ. When we don’t manually configure the target bytecode version for the compiler, which is typically done at Settings → Build, Execution, Deployment → Compiler → Java Compiler, the target bytecode version will be the same as the project Language level setting. Further, the Language level defines coding assistance features that we can use in the editor.
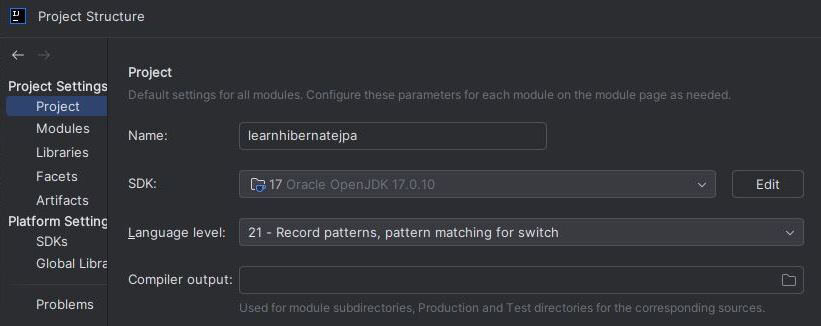
We should set the Language level to be the same or lower than the project SDK. If we don’t do this, we may get an error or warning message similar to: Java: Invalid Source Release: 17.
To demonstrate, let’s set the Java SDK version as 17 along with the Language level as 21:
When we build or compile the project, we’ll get an error or warning message similar to:

To fix this message, we should set the SDK to be the same or higher than the Language level. Alternatively, we can change the Language level to be the same or lower than the SDK. For the example in the discussion, let’s increase the SDK to 21:
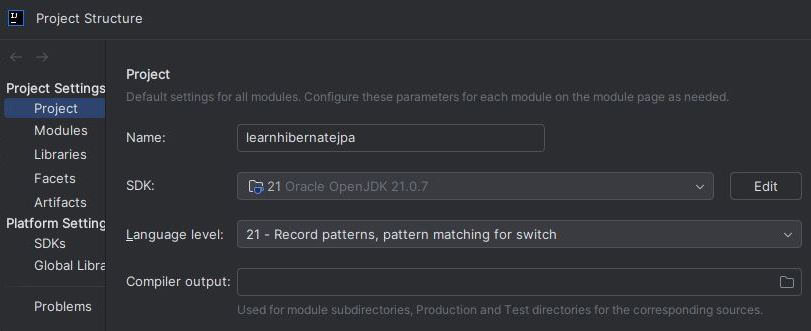
Now, when we rebuild or recompile the project, we won’t get that error or warning message regarding the source release. If needed, we can configure the language level for each module individually.
4. Common Gotchas
When changing the JDK, this only affects the JDK used by IntelliJ. Therefore, when running the Java project via the command line, it will still use the JDK specified in the JAVA_HOME environment variable.
Additionally, changing the Project SDK doesn’t change the JVM version of the build tools. So when using Maven or Gradle within IntelliJ, changing the Project SDK won’t change the JVM used for these build tools.
5. Conclusion
In this article, we illustrated two ways to change the Java version used within IntelliJ projects. We also highlighted the caveats we must be aware of when changing the Java version.
To learn more about IntelliJ’s Project Structure, visit the official documentation.


