

Mocking is an essential part of unit testing, and the Mockito library makes it easy to write clean and intuitive unit tests for your Java code.
Get started with mocking and improve your application tests using our Mockito guide:
Handling concurrency in an application can be a tricky process with many potential pitfalls. A solid grasp of the fundamentals will go a long way to help minimize these issues.
Get started with understanding multi-threaded applications with our Java Concurrency guide:
Spring 5 added support for reactive programming with the Spring WebFlux module, which has been improved upon ever since. Get started with the Reactor project basics and reactive programming in Spring Boot:
Since its introduction in Java 8, the Stream API has become a staple of Java development. The basic operations like iterating, filtering, mapping sequences of elements are deceptively simple to use.
But these can also be overused and fall into some common pitfalls.
To get a better understanding on how Streams work and how to combine them with other language features, check out our guide to Java Streams:
Explore Spring Boot 3 and Spring 6 in-depth through building a full REST API with the framework:
Yes, Spring Security can be complex, from the more advanced functionality within the Core to the deep OAuth support in the framework.
I built the security material as two full courses - Core and OAuth, to get practical with these more complex scenarios. We explore when and how to use each feature and code through it on the backing project.
You can explore the course here:
Spring Data JPA is a great way to handle the complexity of JPA with the powerful simplicity of Spring Boot.
Get started with Spring Data JPA through the guided reference course:
Refactor Java code safely — and automatically — with OpenRewrite.
Refactoring big codebases by hand is slow, risky, and easy to put off. That’s where OpenRewrite comes in. The open-source framework for large-scale, automated code transformations helps teams modernize safely and consistently.
Each month, the creators and maintainers of OpenRewrite at Moderne run live, hands-on training sessions — one for newcomers and one for experienced users. You’ll see how recipes work, how to apply them across projects, and how to modernize code with confidence.
Join the next session, bring your questions, and learn how to automate the kind of work that usually eats your sprint time.
1. Overview
A good IDE is important for developer productivity. IntelliJ is currently one of the leading IDEs and supports many programming languages.
In this tutorial, we’ll start with some of the basic configurations in IntelliJ, focusing on the Java programming language. We’ll also list the most common shortcuts in IntelliJ for boosting developer productivity.
2. Installing IntelliJ
First, we need to download and install IntelliJ for our platform. For the features that we are going to go over, IntelliJ IDEA with or without Ultimate Subscription will do great.
3. Basic Project Configuration in IntelliJ
3.1. Configuring JDK
IntelliJ is written in Java and comes with a packaged JRE for running the IDE.
However, we can configure IntelliJ IDEA to use a different JDK for our projects. It can be configured either globally or per project.
Let’s see how to configure a JDK from the File > Project Structure option:
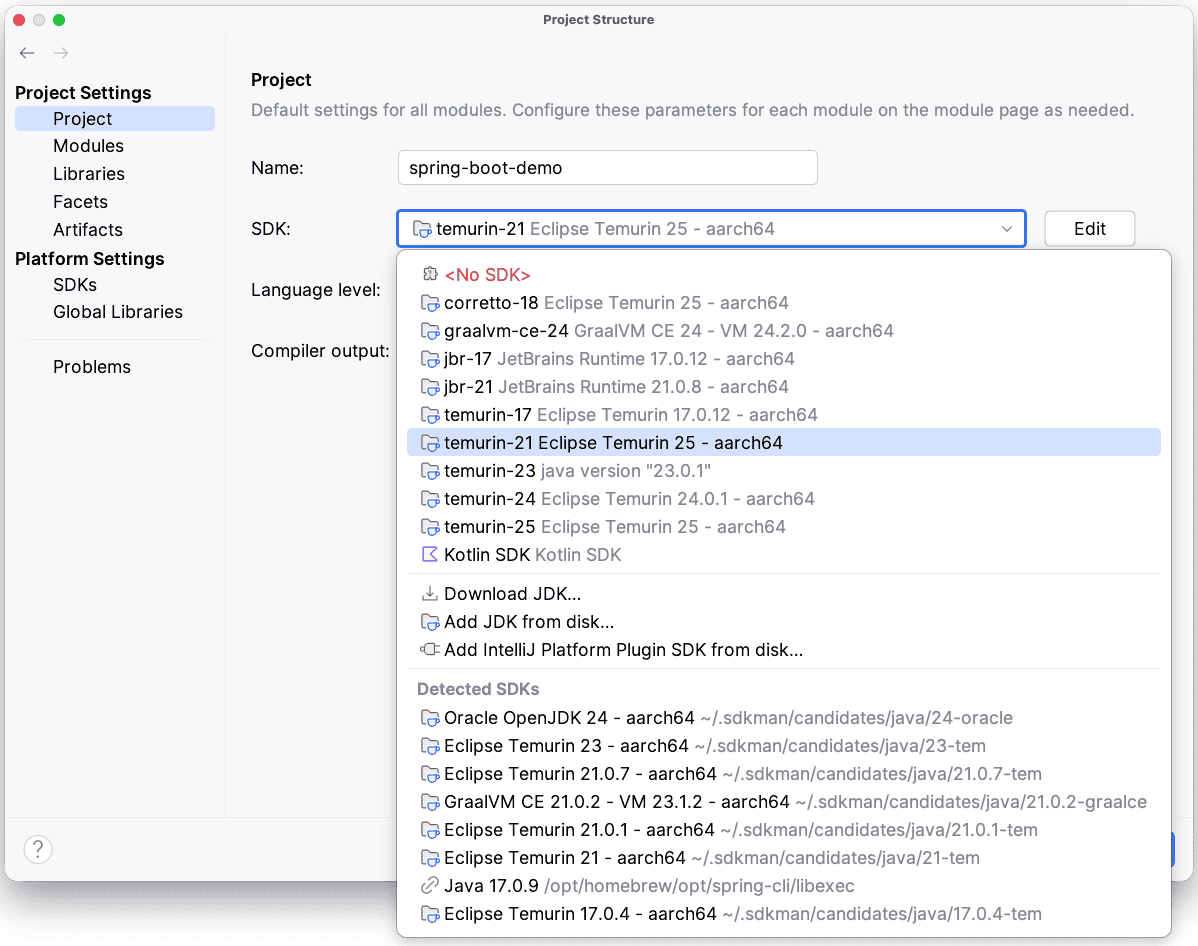
Usually, it will list every installed JDK and allow us to choose the desired one.
Next, we’ll create a new Java project.
3.2. Creating a Java Project
In order to create a new Java project, let’s bring up the New project wizard from File->New->Project:
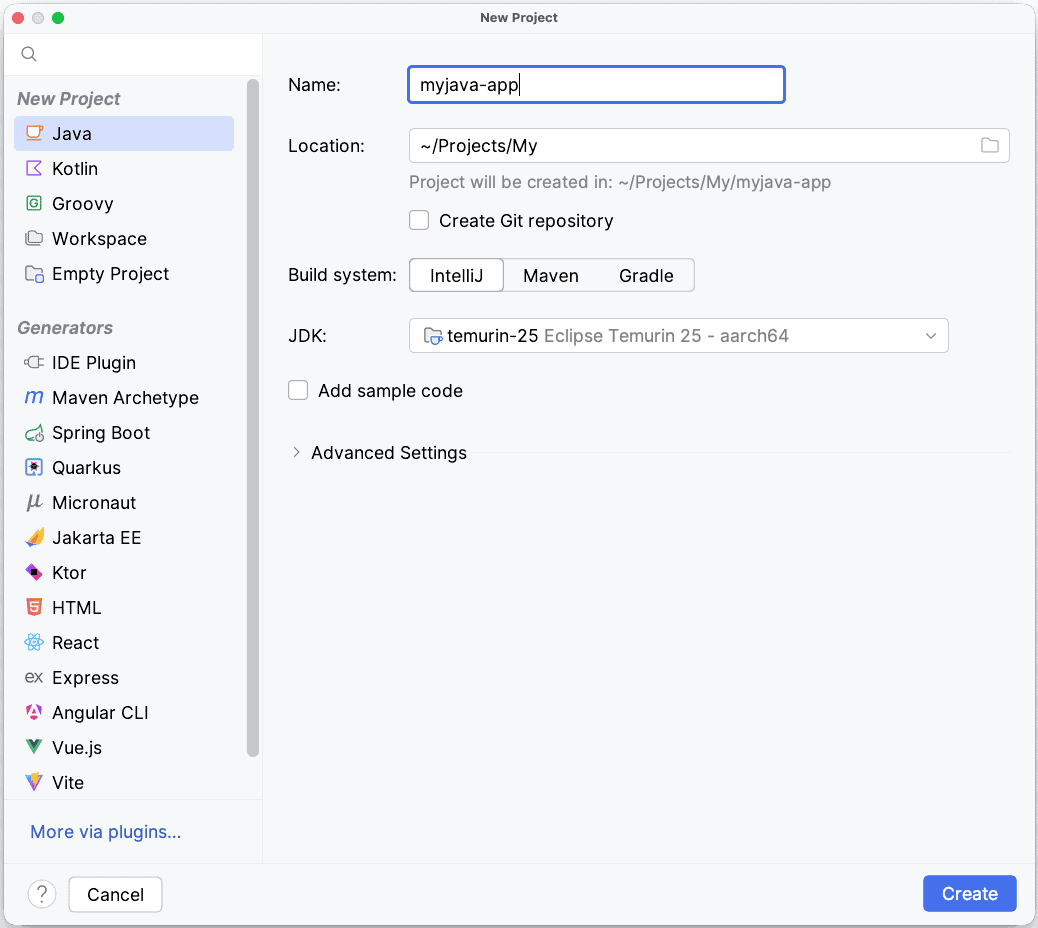
Next, we’ll select Java in order to create a simple Java project.
Additionally, this window allows us to configure a project-specific JDK if we want to.
Click Create button to create the project.
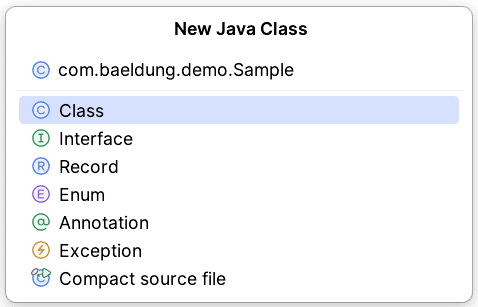
Now that we have a basic project structure, we can add a Java class by selecting the src folder and then either right-clicking or typing Alt+Insert. We’ll select Java Class from this menu and get a dialog where we can give it a name:
3.3. Configuring Libraries
A Java project usually depends on a lot of external or third-party libraries. And while Maven and Gradle are the typical go-tos for managing this, let’s take a look at how to do this natively in IntelliJ.
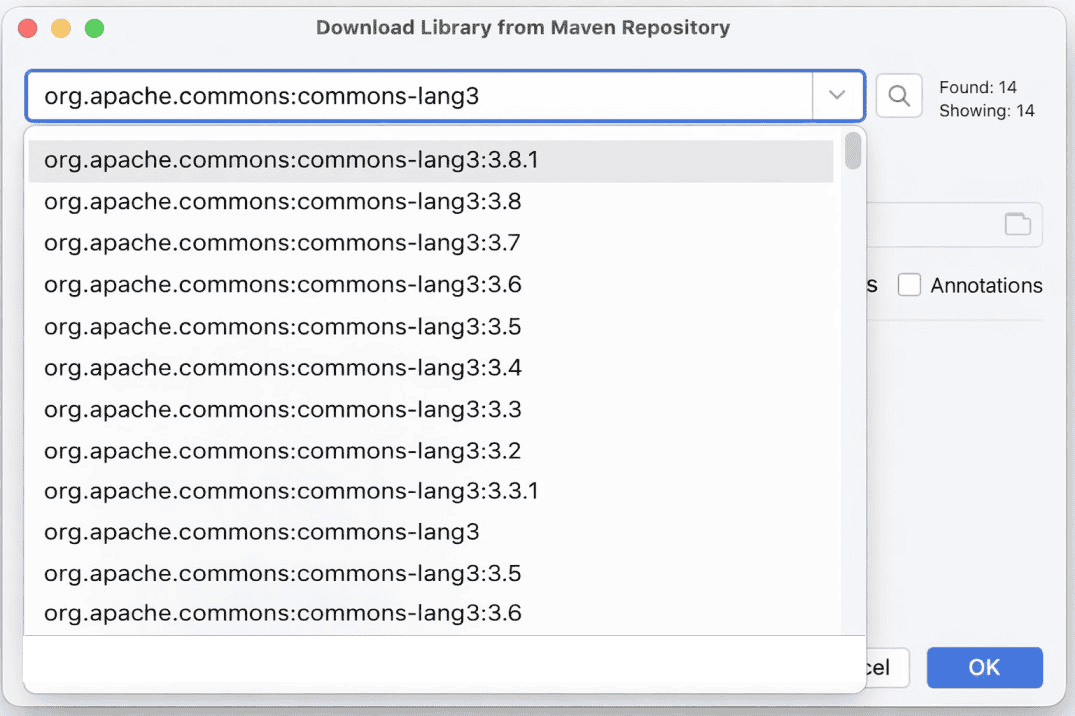
Let’s say we want to use the StringUtils API from the commons-lang3 library.
Like the JDK settings, we can also configure libraries at global and project level. Global libraries are shared by all projects. Both global and project specific libraries can be added by accessing the Project Structure dialog (File->Project Structure).
In order to add the library, we must download it first. Normally, the common source for any external library is the Maven Repository. Hence, IntelliJ allows us to download it directly from any pre-configured Maven repository. And of course, if no repository is configured, it will search the Maven Central:
IntelliJ will now download the commons-lang3.jar into a specified folder. Along with that, it also adds it to the project classpath.
Of course, remember that adding a library this way is IntelliJ-specific and not as portable as more robust options. It’s convenient, though, for simple projects.
In the next section, we’ll use this library and execute a simple Java program.
4. Running or Debugging an Application
4.1. Run/Debug Configurations
Before we run our Java program, let’s add some code to the class we added earlier. We’ll simply use the added library and call StringUtils.reverse() to reverse any text given as a program argument:
System.out.println(StringUtils.reverse(args[0]));Now, there are 2 approaches for running this main method in IntelliJ. Firstly, we can simply run Ctrl + Shift +F10 or Control + Shift + R/D from the main class. IntelliJ will then create a temporary Run configuration.
However, since we have to pass a String to our StringReversal application as a program argument (the args[0] part), a temporary run configuration won’t work.
So, we can create a permanent Run/Debug Configuration.
We’ll do that using the “Edit Configurations” window from the Run Navigation bar (Run->Edit Configurations):
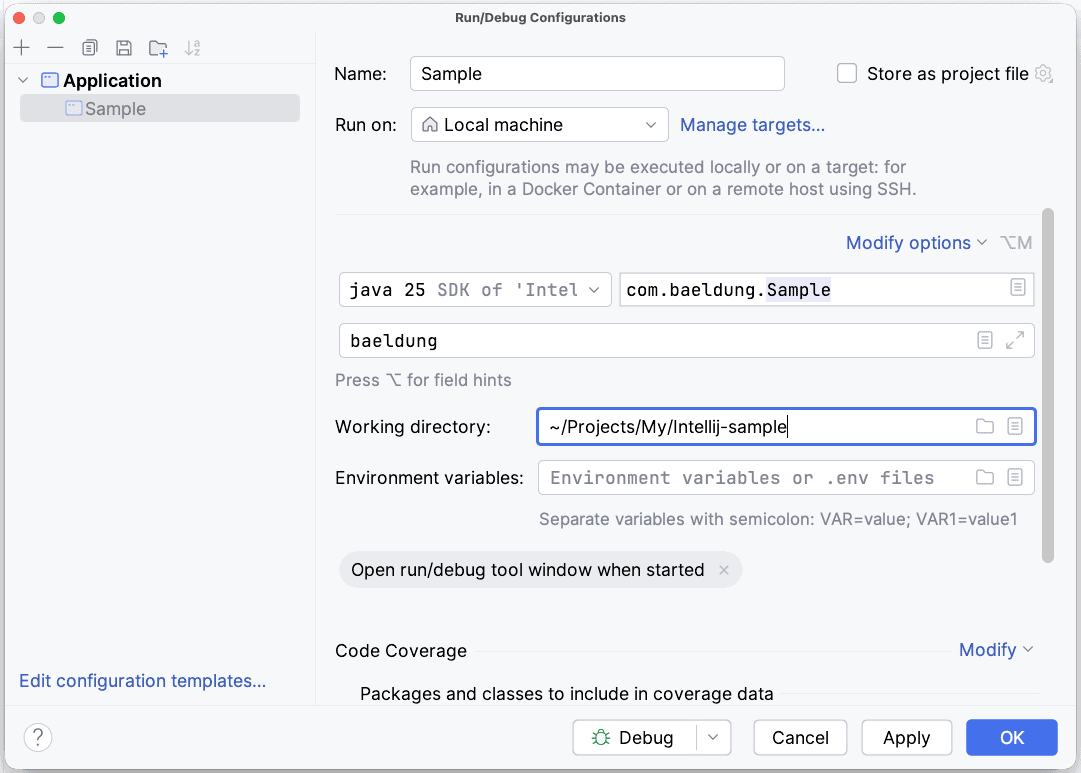
Here, we specify the name of our class to run in Main Class. It needs to have a main method for this to work.
We’ll also pass a String – “baeldung“, in this case – as a Program Argument to our application.
And, while we won’t demo this here, we can also configure JVM options and environment variables, too, for our application.
Contrary to temporary run configurations, IntelliJ saves this configuration and allows us to execute it any time with a click of a button.
4.2. Debugging a Java Application
IntelliJ has great support for debugging many languages. Let’s debug our String Reversal utility as an example.
As with most IDEs, we can add a breakpoint on any line of our class from the editor by clicking on the side panel:
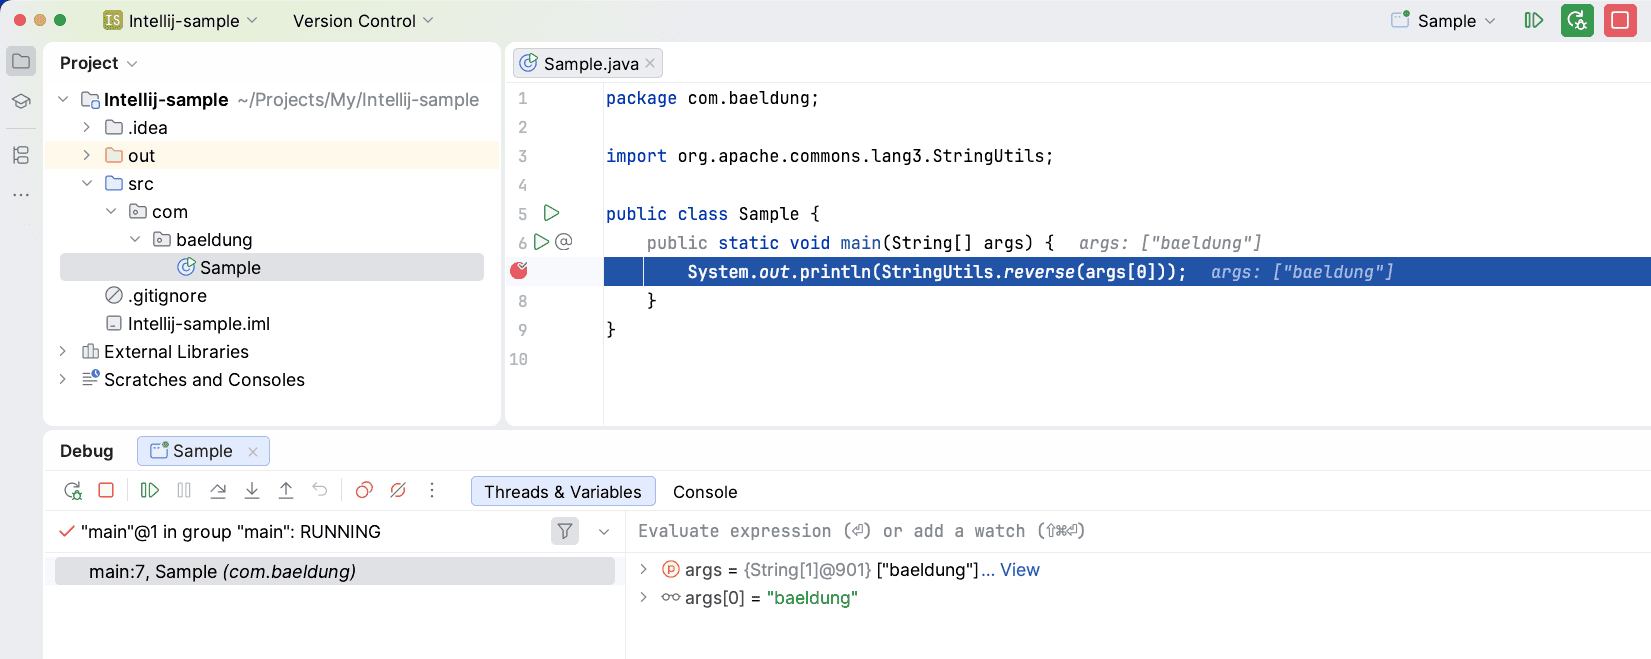
Now, we can debug the class by clicking on the debug icon from the Run/Debug configuration.
In this case, the program is suspended at line 7 as shown above, allowing us to inspect the thread stack, inspect variables or even evaluate expressions (Alt+F8 or Option/Alt + F8).
At this point, we can either Step Into (F7) the StringUtils.reverse() method, Step Over (F8) the line or Resume Program (F9), meaning run until either the next breakpoint or until the end of the application.
Usually, most IDEs allow the users to mark a line in a Java class as a breakpoint like we just used. In addition, IntelliJ allows us to configure more than just Line breakpoints. We can also do:
- Temporary Breakpoint – A line breakpoint which is executed only once
- Exception Breakpoint – A breakpoint on any exception class in Java. The debugger will pause when that exception is about to be thrown
- Method Breakpoint – One that executes when entering or exiting a method
- Field Breakpoint – And one that executes when a field is modified
A breakpoint can have conditional logic, too.
We can view and configure all the breakpoints in a project in the Breakpoints dialog Run->View Breakpoints (Ctrl+Shift+F8 or Cmd+Shift+F8).
4.3. Building Artifacts
Now that we’ve tested, debugged and fixed all the issues, we are ready to ship our application. Therefore, we need to create deployable binaries for our application.
We can create deployable .jar binaries in IntelliJ automatically.
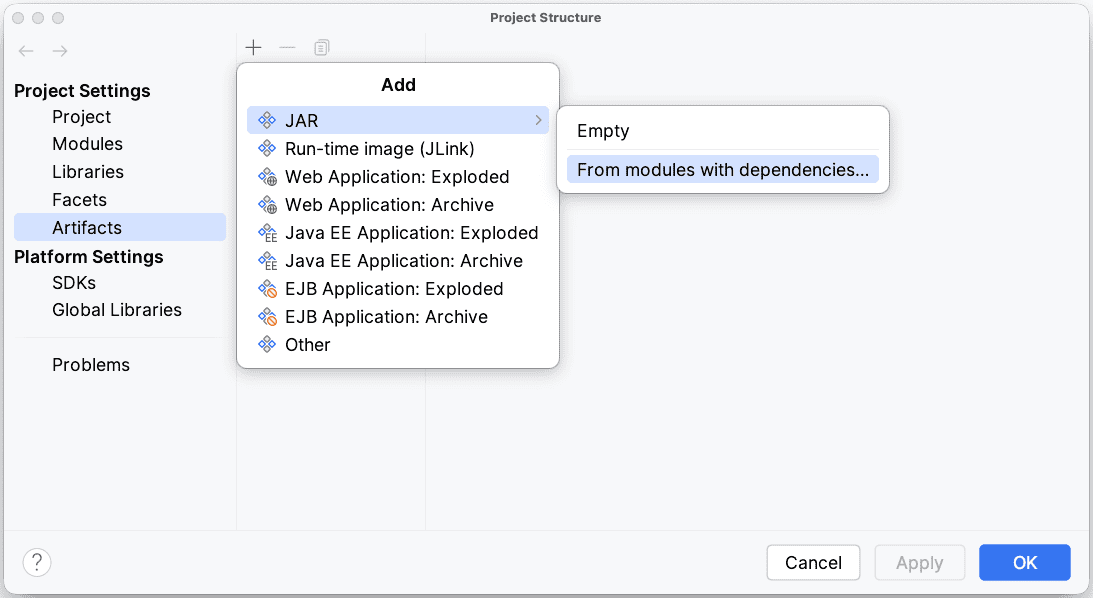
First, in the Project Structure (Ctrl+Alt+Shift+S or Cmd+;), we need to declare a new artifact.
We select “Artifacts” and then click the plus button.
Next, we select a JAR artifact and also add dependencies in the JAR:
Next, we’ll go back to our Run/Debug Configuration dialog.
There, we need to add a Build Artifact task in the Before Launch window. As a result, a new executable jar is created for our application every time we execute our Run/Debug configuration.
Again, building artifacts is not IDE-agnostic. This mechanism is specific to IntelliJ. A build management tool could be a better approach, similar to what we discussed for dependency management.
5. Common Shortcuts in IntelliJ
The shortcuts are really useful in boosting developers productivity. The following is a quick cheat sheet for the most common ones.
5.1. Navigation
- Search Class – Ctrl + N / Cmd + O
- Search All files – Double Shift
- Recent Files – Ctrl + E / Cmd + E
- Switch between files – Ctrl + Tab / Cmd + Tab
- Type Hierarchy – Ctrl + H / Control + H
- Call Hierarchy – Ctrl + Alt + H / Control + Alt+ H
- File structure popup – Ctrl + F12 / Cmd + F12 (lists all methods and fields)
- Go to declaration – Ctrl + B / Cmd + b
- Go to implementations – Ctrl + Alt + B / Cmd + Alt+ B
- Show Project Structure – Ctrl + Alt + Shift + S / Cmd + ;
5.2. Editor
- Code Completion – Ctrl + Space / Control + Space
- Method parameter info – Ctrl + P / Cmd + P
- Method/Class documentation info – Ctrl + Q / Control + J
- Reformat Code – Ctrl + Alt + L / Cmd + Alt + L
- Optimize imports – Ctrl + Alt + O / Control + Alt + O
- Duplicate line – Ctrl + D / Cmd + D
- Delete line – Ctrl + Y / Cmd + Delete
- Code selection – Ctrl + W / Alt + Up
- Show quick actions – Alt + Enter / Alt + Return
- System.out.println – sout + Ctrl + Enter / sout + Control + Space
- public static void main – psvm + Ctrl + Enter / psvm + Control + Space
- System.out.println for a method’s return value – methodName().sout [Enter]
- Assign method’s return value to local variable – methodName().var [Enter]
5.3. Refactoring
- Rename class/method – Shift + F6
- Extract Method – Ctrl + Alt + M / Cmd + Alt + M
- Extract variable – Ctrl + Alt + V / Cmd + Alt + V
- Extract field – Ctrl + Alt + F / Cmd + Alt + F
- Extract constant – Ctrl + Alt + C / Cmd + Alt + C
- Extract parameter – Ctrl + Alt + P / Cmd + Alt + P
6. Conclusion
In this article, we looked at some basic configurations in IntelliJ.
As an example, we created a Java project, added libraries, debugged it, and created an artifact, all in IntelliJ.
Lastly, we looked at shortcuts for some common actions.


