

Mocking is an essential part of unit testing, and the Mockito library makes it easy to write clean and intuitive unit tests for your Java code.
Get started with mocking and improve your application tests using our Mockito guide:
Handling concurrency in an application can be a tricky process with many potential pitfalls. A solid grasp of the fundamentals will go a long way to help minimize these issues.
Get started with understanding multi-threaded applications with our Java Concurrency guide:
Spring 5 added support for reactive programming with the Spring WebFlux module, which has been improved upon ever since. Get started with the Reactor project basics and reactive programming in Spring Boot:
Since its introduction in Java 8, the Stream API has become a staple of Java development. The basic operations like iterating, filtering, mapping sequences of elements are deceptively simple to use.
But these can also be overused and fall into some common pitfalls.
To get a better understanding on how Streams work and how to combine them with other language features, check out our guide to Java Streams:
Explore Spring Boot 3 and Spring 6 in-depth through building a full REST API with the framework:
Yes, Spring Security can be complex, from the more advanced functionality within the Core to the deep OAuth support in the framework.
I built the security material as two full courses - Core and OAuth, to get practical with these more complex scenarios. We explore when and how to use each feature and code through it on the backing project.
You can explore the course here:
Spring Data JPA is a great way to handle the complexity of JPA with the powerful simplicity of Spring Boot.
Get started with Spring Data JPA through the guided reference course:
Refactor Java code safely — and automatically — with OpenRewrite.
Refactoring big codebases by hand is slow, risky, and easy to put off. That’s where OpenRewrite comes in. The open-source framework for large-scale, automated code transformations helps teams modernize safely and consistently.
Each month, the creators and maintainers of OpenRewrite at Moderne run live, hands-on training sessions — one for newcomers and one for experienced users. You’ll see how recipes work, how to apply them across projects, and how to modernize code with confidence.
Join the next session, bring your questions, and learn how to automate the kind of work that usually eats your sprint time.
1. Introduction
In this tutorial, we’ll take a look at jCasbin – the Java official port of the popular Apache Casbin authorization library. We’ll see what it is, how to use it and what we can do with it.
2. What is jCasbin
jCasbin is the Java version of the powerful Casbin access control library. This allows us to easily answer questions about access to resources within our applications.
jCasbin, and the entire suite of Casbin libraries, work using a configuration model that allows us to describe the access control model we want to use – such as ACLs or RBAC – and a separate set of policy data applied to that configuration model.
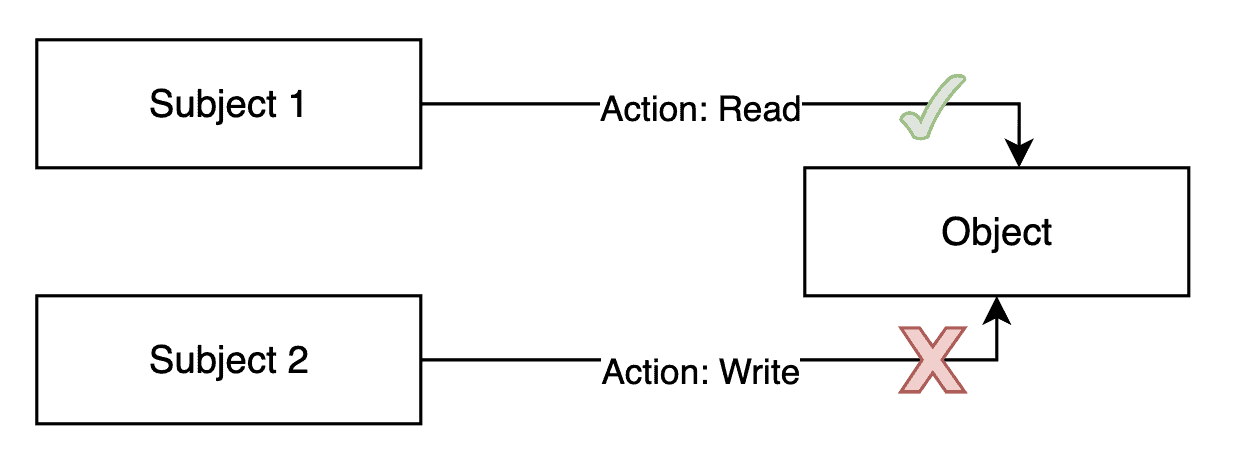
Typically, this works by defining:
- Objects that we want to control access to.
- Subjects who want to access these objects.
- Actions that the objects want to perform.
However, jCasbin is flexible enough that we can use any structure we want, as long as we can model it correctly in our configuration and policy data.
3. Dependencies
Before using jCasbin, we need to include the latest version in our build, which is 1.99.0 at the time of writing.
If we’re using Maven, we can include this dependency in our pom.xml file:
<dependency>
    <groupId>org.casbin</groupId>
    <artifactId>jcasbin</artifactId>
    <version>1.99.0</version>
</dependency>
At this point, we’re ready to start using it in our application.
4. Creating an Enforcer
Once we have jCasbin in our application, we’re ready to use it. The central class for this is the Enforcer. Constructing this requires two data sources: our configuration model and our policy data. The easiest way to manage this is through passing in filenames:
Enforcer enforcer = new Enforcer("path/to/model.conf", "path/to/policy.csv");However, having our policy data be a local file can be difficult. As such, jCasbin allows the use of Adapters here instead. These provide a means to load and manipulate the policy data from any data source we like. We also have a set of standard adapters that can be used for our application. These include familiar technologies such as JDBC, Hibernate, MongoDB and many others:
Adapter jdbcAdapter = new JDBCAdapter(dataSource);
Enforcer enforcer = new Enforcer("path/to/model.conf", jdbcAdapter);
Exactly how these adapters work depends on the adapter in question and is out of scope of this article.
When specifying policy data as a filename, this internally uses the FileAdapter instead. We can also use this to load files available from other sources by providing an InputStream:
FileAdapter fileAdapter = new FileAdapter(getClass().getResourceAsStream("/com/baeldung/jcasbin/policy.csv"));
Enforcer enforcer = new Enforcer("path/to/model.conf", fileAdapter);
In exactly the same way, we can provide our model data using a Model instance instead. This allows us to load our model data from alternative sources:
String content = new String(getClass().getClassLoader().getResourceAsStream("com/baeldung/jcasbin/model.conf").readAllBytes());
Model model = new Model();
model.loadModelFromText(content);

Enforcer enforcer = new Enforcer(model, "path/to/policy.csv");
Once we’ve created our Enforcer, we’re ready to start using it to check permissions.
5. Enforcing Permissions
Now that we’ve got our Enforcer, we can start checking permissions. We do this using the enforce() method. This typically involves passing in our subject, object, and action to check:
if (enforcer.enforce("alice", "data1", "read")) {
    // permit alice to read data1
} else {
    // deny the request
}
Note that the enforce() method actually takes an arbitrary set of objects, depending on how our configuration model is defined.
The exact way permission checking works then depends on both the structure of our configuration model and our policy data.
5.1. Access Control Lists
One of the easiest ways to configure jCasbin is through Access Control Lists (ACLs). A typical configuration model might look like this:
# Request definition
[request_definition]
r = sub, obj, act

# Policy definition
[policy_definition]
p = sub, obj, act

# Matchers
[matchers]
m = r.sub == p.sub && r.obj == p.obj && r.act == p.act
# Policy effect
[policy_effect]
e = some(where (p.eft == allow))
Here, the request_definition section tells us what the shape of the data passed into enforcer.enforce() should be. It gives us names for the parameters we pass in – here, “sub”, “obj” and “act” are used as shorthand for “subject”, “object” and “action”.
The policy_definition section then uses the exact same names to map onto the policy data. If not specified, there’s also an implicit value called “eft” – short for “effect” – which defaults to “allow”.
The matchers section then explains how we can match policy rows to requests. In this case, we’re simply saying that every field must have exactly the same value.
Finally, the policy_effect section tells us how to determine the overall effect of our policy. The action is only allowed if this returns a positive match.
In this mode, our policy data is a straight list of subjects, objects and allowed actions – as defined by our policy_definition:
p, alice, data1, read
p, bob, data2, write
This indicates that the subject “alice” can perform the action “read” on the object “data1”, whereas the subject “bob” can perform the action “write” on the object “data2”.
assertTrue(enforcer.enforce("alice", "data1", "read"));
assertTrue(enforcer.enforce("bob", "data2", "write"));
Any other checks are rejected because they don’t match our configuration.
5.2. Super Users
Sometimes we might want super users – users who can do anything regardless of what the policy data specifies.
We express this in our configuration model by adjusting how the matchers section is defined:
[matchers]
m = r.sub == p.sub && r.obj == p.obj && r.act == p.act || r.sub == "root"
Here, in addition to the same matching as before, we also match when the subject has the exact value “root”, regardless of what the rest of the policy expression says. Using this, a subject of “root” will always pass every check regardless:
assertTrue(enforcer.enforce("root", "data2", "write"));This introduces some risks into our permission checks, so we need to use it carefully.
5.3. Role-Based Access Control
Role-Based Access Control (RBAC) introduces an additional layer of indirection into our configuration model. In this case, we assign roles to users, and can define permissions based on roles.
We start by adding a role_definition section:
[role_definition]
g = _, _
This defines the g() function that we can use to define role membership.
We also need to update our matchers section to make use of this:
[matchers]
m = g(r.sub, p.sub) && r.obj == p.obj && r.act == p.act
Instead of directly comparing the policy subjects with the request, this says they must match via the role definitions.
We can now make use of this within our policy data:
p, alice, data1, read
p, data2_admin, data2, read
p, data2_admin, data2, write

g, bob, data2_admin
All of our rows that start with p define how permissions are assigned, either directly to users or else to roles. Here we’re assigning one permission directly to the subject “alice”, and two permissions to the role “data2_admin”.
The rows starting with g – from our role_definition section above – define how role membership works. Here, we’re defining that the subject “bob” is assigned the role “data2_admin”. This then means that this subject implicitly has all of the permissions assigned to this role as well:
assertTrue(enforcer.enforce("bob", "data2", "write"));We can also nest roles. That is, we can assign one role to another, generating an entire hierarchy of permissions:
g, superuser, data2_admin
g, carol, superuser
Here, the role “data2_admin” has been assigned to the role “superuser”, and the role “superuser” has been assigned to the subject “carol”. This means that this subject has all the permissions all the way up:
assertTrue(enforcer.enforce("carol", "data2", "read"));We never gave “carol” permission on “data2” – either directly or indirectly. Instead, she inherited it through her role “superuser”.
6. Management API
In addition to checking permissions, we also have management APIs for working with our setup.
We do this from the same Enforcer instance that we’ve already been using.
6.1. Querying Subjects, Objects and Actions
The easiest thing we can do is query all the subjects and objects in our policy data. We do this using the getAllSubjects(), getAllObjects() and getAllActions() methods:
List<String> subjects = enforcer.getAllSubjects();
List<String> objects = enforcer.getAllObjects();
List<String> actions = enforcer.getAllActions();
We can also query the actions that any given subject can perform on any given object:
Set<String> subjects = enforcer.getPermittedActions("alice", "data1");This works correctly for both ACL and RBAC setups, as well as for hierarchical roles.
6.2. Querying RBAC Roles
With an RBAC setup, we can also query exactly which roles are assigned to which subjects:
List<String> roles = enforcer.getRolesForUser("carol");
// superuser
This returns only the roles directly assigned, not those included in the configured hierarchy.
However, we can also query which roles are assigned to other roles in the same way:
List<String> roles = enforcer.getRolesForUser("superuser");
// data2_admin
This means we can traverse the hierarchy if needed.
6.3. Managing Permissions and Roles
We also have a set of methods we can use to directly manage the permissions and roles that subjects have.
We can directly add and remove permissions between a subject and an object:
enforcer.addPermissionForUser("alice", "data2", "read");
enforcer.deletePermissionForUser("alice", "data2", "read");
These apply directly once called, and permission checks take effect straight away.
When we’re working in RBAC mode, we can additionally add and remove roles from subjects:
enforcer.addRoleForUser("alice", "superuser");
enforcer.deleteRoleForUser("alice", "superuser");
We apply all of these changes in memory. We need to use the savePolicy() method to write them back to our backing store:
enforcer.savePolicy();However, we can only do this if we’re using certain adapters. It also depends on how the data was loaded. For example, we can’t write back if we loaded from an InputStream.
7. Summary
In this article, we took a very quick look at jCasbin. There’s a lot more that we can do with this. Next time you need to manage access controls for your applications, why not give it a try?
As always, all the code from this article is available over on GitHub.


