

Mocking is an essential part of unit testing, and the Mockito library makes it easy to write clean and intuitive unit tests for your Java code.
Get started with mocking and improve your application tests using our Mockito guide:
Handling concurrency in an application can be a tricky process with many potential pitfalls. A solid grasp of the fundamentals will go a long way to help minimize these issues.
Get started with understanding multi-threaded applications with our Java Concurrency guide:
Spring 5 added support for reactive programming with the Spring WebFlux module, which has been improved upon ever since. Get started with the Reactor project basics and reactive programming in Spring Boot:
Since its introduction in Java 8, the Stream API has become a staple of Java development. The basic operations like iterating, filtering, mapping sequences of elements are deceptively simple to use.
But these can also be overused and fall into some common pitfalls.
To get a better understanding on how Streams work and how to combine them with other language features, check out our guide to Java Streams:
Explore Spring Boot 3 and Spring 6 in-depth through building a full REST API with the framework:
Yes, Spring Security can be complex, from the more advanced functionality within the Core to the deep OAuth support in the framework.
I built the security material as two full courses - Core and OAuth, to get practical with these more complex scenarios. We explore when and how to use each feature and code through it on the backing project.
You can explore the course here:
Spring Data JPA is a great way to handle the complexity of JPA with the powerful simplicity of Spring Boot.
Get started with Spring Data JPA through the guided reference course:
Refactor Java code safely — and automatically — with OpenRewrite.
Refactoring big codebases by hand is slow, risky, and easy to put off. That’s where OpenRewrite comes in. The open-source framework for large-scale, automated code transformations helps teams modernize safely and consistently.
Each month, the creators and maintainers of OpenRewrite at Moderne run live, hands-on training sessions — one for newcomers and one for experienced users. You’ll see how recipes work, how to apply them across projects, and how to modernize code with confidence.
Join the next session, bring your questions, and learn how to automate the kind of work that usually eats your sprint time.
Yes, we're now running our only Summer Sale. All Courses are 30% off until 20th July, 2026:
Yes, we're now running our only Summer Sale. All Courses are 30% off until 20th July, 2026:
1. Introduction
In this article, we’ll explore different access control models how to implement them in practice.
2. What’s an Access Control Model?
A common requirement for applications, especially web-based ones, is that some action can only be performed if a given set of conditions, also referred to as a policy, are satisfied. Ok, this is a very generic requirement, so let’s put forward some examples:
- Internet Forum: only members can post new messages or reply to existing ones
- E-commerce site: a regular user can only see his/her own orders
- Banking back-office: an account manager can manage the portfolio of his/her own clients. In addition to those portfolios, he/she can also manage the portfolio of another account manager’s client when he/she is temporarily unavailable (e.g., vacation) and the former acts as its peer.
- Digital wallet: payments are limited to $500 from 20:00 to 08:00 in the user’s time zone
The Access Control Model we’ll adopt for a given application will be responsible for evaluating an incoming request and come up with a decision: either the request can proceed or not. In the latter case, the result will usually be an error message that is sent back to the user.

Clearly, each of those examples requires a different approach when authorizing a given request.
3. Access Control Model Types
From the previous examples, we can see that to make an allow/deny decision, we need to take into account different aspects related to the request:
- An identity associated with the request. Notice that even anonymous accesses have a form of identity here
- The objects/resources that are targeted by the request
- The action performed on those objects/resources
- Contextual information about the request. Time of day, time zone, and authentication method used are examples of this kind of contextual information
We can categorize Access Control Model into three types:
- Role-based Access Control (RBAC)
- Access Control Lists (ACL)
- Attribute-based Access Control (ABAC)
Regardless of its type, we can usually identify the following entities in a model:
- PEP, or Policy Enforcement Point: Intercepts the request and let it proceed or not based on the result returned by the PDP
- PDP, or Policy Decision Point: Evaluates requests using a policy to produce an access decision
- PIP, or Policy Information Point: Stores and/or mediates access to information used by the PDP to make access decisions.
- PAP, or Policy Administration Point: Manages policies and other operational aspects associated with access decision making.
The following diagram shows how those entities logically relate to each other:
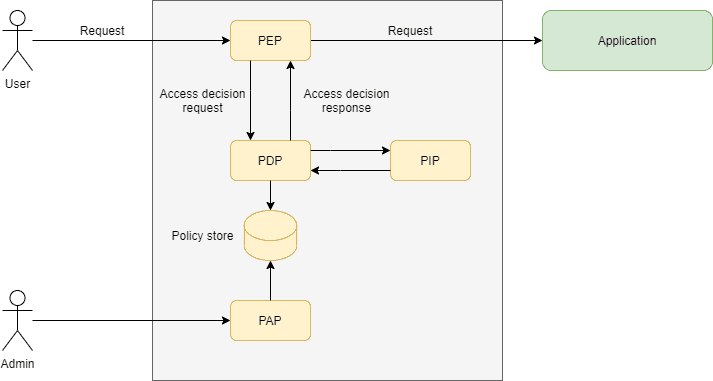
It is important to note that, although depicted as autonomous entities, in practice, we’ll find that some or even all model elements are embedded in the application itself.
Also, this model does not address how to establish a user’s identity. Nevertheless, this aspect may be considered when deciding whether to allow a request to proceed.
Now, let’s see how we can apply this generic architecture to each of the models above.
4. Role-Based Access Control
In this model, the PDP decision process consists of two steps:
- First, it recovers the roles associated with the identity of the incoming request.
- Next, it tries to match those roles with the request policy
A concrete implementation of this model is present in the Java EE specification, in the form of the @HttpConstraint annotation and its XML equivalent. This is a typical use of the annotation when applied to a servlet:
@WebServlet(name="rbac", urlPatterns = {"/protected"})
@DeclareRoles("USER")
@ServletSecurity(
  @HttpConstraint(rolesAllowed = "USER")
)
public class RBACController  extends HttpServlet {
    protected void doGet(HttpServletRequest req, HttpServletResponse resp) throws ServletException, IOException {
        resp.getWriter().println("Hello, USER");
    }
}
For the Tomcat server, we can identify the access control model entities described before as follows:
- PEP: The security Valve that checks for the presence of this annotation in the target servlet and calls the associated Realm to recover the identity associated with the current request
- PDP: The Realm implementation that decides which restrictions to apply for a given request
- PIP: Any backend used by a specific Realm implementation that stores security-related information. For the RBAC model, the key information is the user’s role set, usually retrieved from an LDAP repository.
- Policy Store: In this case, the annotation is the store itself
- PAP: Tomcat does not support dynamic policy changes, so there’s no real need for one. However, with some imagination, we can identify it with any tool used to add the annotations and/or edit the application’s WEB-INF/web.xml file.
Other security frameworks (e.g., Spring Security) work in a similar fashion. The key point here is that even if a particular framework does not adhere exactly to our generic model, its entities are still there, even if somewhat disguised.
4.1. Role Definitions
What exactly constitutes a role? In practice, a role is just a named set of related actions a user can perform in a particular application. They can be coarsely or finely defined as required, depending on the application’s requirements.
Regardless of their granularity level, it is a good practice to define them, so each one maps to a disjoint set of functionalities. This way, we can easily manage user profiles by adding/removing roles without fearing side effects.
As for the association between users and roles, we can use a direct or indirect approach. In the former, we assign roles directly to users. In the latter, there’s an intermediate entity, usually a user group, to which we assign roles:

The benefit of using groups as an intermediary entity in this association is that we can easily reassign roles to many users at once. This aspect is quite relevant in the context of larger organizations, where people are constantly moving from one area to another.
Similarly, the indirect model also allows us to easily change existing role definitions, usually after refactoring an application.
5. Access Control Lists
ACL-based security control allows us to define access restrictions on individual domain objects. This contrasts with RBAC, where restrictions usually apply to whole categories of objects. In the forum example above, we can use an RBAC-only approach to define can read and create new posts.
However, if we decide to create a new functionality where a user can edit his own posts, RBAC alone will not be enough. The decision engine, in this case, needs to consider not only who but also which post is the target for the editing action.
For this simple example, we can just add a single author column to the database and use it to allow or deny access to the edit action. But what if we wanted to support collaborative editing? In this case, we need to store a list of all people that can edit a post – an ACL.
Dealing with ACLs poses a few practical issues:
- Where do we store the ACLs?
- How to efficiently apply ACL restrictions when retrieving large object collections?
The Spring Security ACL library is a good example of an ACL library. It uses a dedicated database schema and caches to implement ACLs and is tightly integrated with Spring Security. This is a short example adapted from our article on this library showing how to implement access controls at the object level:
@PreAuthorize("hasPermission(#postMessage, 'WRITE')")
PostMessage save(@Param("noticeMessage")PostMessage postMessage);
Another good example of ACLs is the permission system used by Windows to secure objects. Every Securable Object (e.g., files, directories, processes, to name a few) has a Security Descriptor attached to it which contains a list of individual users/groups and the associated permissions:
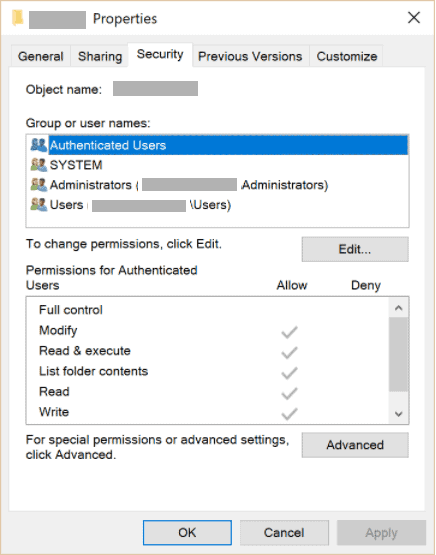
Windows ACLs are quite powerful (or complicated, depending on who we ask), allowing administrators to assign permissions to individual users and/or groups. Furthermore, individual entries define allow/deny permissions for each possible action.
6. Attribute-Based Access Control
Attribute-based control models allow access decisions based not only on the identity, action, and target object but also on contextual information related to a request.
The XACML standard is perhaps the most well-known example of this model, which uses XML documents to describe access policies. This is how we can use this standard to describe the digital wallet withdrawal rule:
<Policy xmlns="urn:oasis:names:tc:xacml:3.0:core:schema:wd-17"
  PolicyId="urn:baeldung:atm:WithdrawalPolicy"
  Version="1.0"
  RuleCombiningAlgId="urn:oasis:names:tc:xacml:1.0:rule-combining-algorithm:deny-overrides">
    <Target/>
    <Rule RuleId="urn:oasis:names:tc:baeldung:WithDrawalPolicy:Rule1" Effect="Deny">
        <Target>
            <AnyOf>
                <AllOf>
... match rule for the withdrawal action omitted
                </AllOf>
            </AnyOf>
        </Target>
        <Condition>
... time-of-day and amount conditions definitions omitted
        </Condition>
    </Rule>
</Policy>
The full rule definition is available in the source project.
Despite its verbosity, it’s not hard to figure out its general structure. A policy contains one or more rules that, when evaluated, results in an Effect: Permit or Deny.
Each rule contains targets, which define a logical expression using attributes of the request. Optionally, a rule can also contain one or more Condition elements that define its applicability.
At runtime, an XACML-based access control PEP creates a RequestContext instance and submits it to the PDP for evaluation. The engine then evaluates all applicable rules and returns the access decision.
The kind of information present in this RequestContext is the main aspect that differentiates this model from the preceding ones. Let’s take, for example, an XML representation of a request context built to authorize a withdrawal in our digital wallet application:
<Request
    xmlns="urn:oasis:names:tc:xacml:3.0:core:schema:wd-17"
    CombinedDecision="true"
    ReturnPolicyIdList="false">

    <Attributes Category="urn:oasis:names:tc:xacml:3.0:attribute-category:action">
... action attributes omitted
    </Attributes>
    <Attributes Category="urn:oasis:names:tc:xacml:3.0:attribute-category:environment">
... environment attributes (e.g., current time) omitted
    </Attributes>
    <Attributes Category="urn:baeldung:atm:withdrawal">
... withdrawal attributes omitted
    </Attributes>
</Request>
When we submit this request to the XAML rule evaluation engine at 21:00, the expected result will be the refusal of this withdrawal, as it exceeds the maximum allowed amount for nightly transactions.
The key advantage of the ABAC model is its flexibility. We can define and, more importantly, modify complex rules simply by changing the policy. Depending on the implementation, we can even do it in real-time.
6.1. XACML4J
XACML4J is an open-source implementation of the XACML 3.0 standard for Java. It provides an evaluation engine and related entities’ implementations required by the ABAC model. Its core API is the PolicyDecisionPoint interface, which, not surprisingly, implements the PDP logic.
Once we’ve built the PDP, using it requires two steps. First, we create and populate a RequestContext with information about the request we want to evaluate:
... attribute categories creation omitted
RequestContext request = RequestContext.builder()
  .attributes(actionCategory,environmentCategory,atmTxCategory)
  .build();
Here, each xxxCategory parameter contains a set of attributes for the associated Category. The full code uses the available builders to create a test request for a withdrawal of $1,200.00 happening at 21:00. Alternatively, we can also create a RequestContext object directly from any JAXB-compatible source.
Next, we pass this object to the decide() method of the PolicyDecisionPoint service for its evaluation:
ResponseContext response = pdp.decide(request);
assertTrue(response.getDecision() == Decision.DENY);
The returned ResponseContext contains a Decision object with the policy evaluation result. Additionally, it may also return diagnostic information and additional obligations and/or advice to the PEP. Obligations and advice are a topic in themselves, so we won’t cover them here; check out this introductory guide for more details.
6.2. ABAC Without XACML
The complexity of XACML usually makes it overkill for most applications. However, we can still use the underlying model in our applications. After all, we can always implement a simpler version tailored to a specific use-case, maybe externalizing just a few parameters, right?
Well, any seasoned developer knows how this ends…
A tricky aspect of any ABAC implementation is how to extract attributes from the request’s payload. Standard methods to insert custom logic before processing a request, such as servlet filters or JAX-RS interceptors have only access to raw payload data.
Since modern applications tend to use JSON or similar representations, the PEP must decode it before it can extract any payload attribute. This means a potential hit on CPU and memory usage, especially for large payloads.
In this case, a better approach is to use AOP to implement the PEP. In this case, the aspect handler code has access to the decoded version of the payload.
7. Conclusion
In this article, we’ve described different access control models and how applications use them to enforce access rules.


