

Mocking is an essential part of unit testing, and the Mockito library makes it easy to write clean and intuitive unit tests for your Java code.
Get started with mocking and improve your application tests using our Mockito guide:
Handling concurrency in an application can be a tricky process with many potential pitfalls. A solid grasp of the fundamentals will go a long way to help minimize these issues.
Get started with understanding multi-threaded applications with our Java Concurrency guide:
Spring 5 added support for reactive programming with the Spring WebFlux module, which has been improved upon ever since. Get started with the Reactor project basics and reactive programming in Spring Boot:
Since its introduction in Java 8, the Stream API has become a staple of Java development. The basic operations like iterating, filtering, mapping sequences of elements are deceptively simple to use.
But these can also be overused and fall into some common pitfalls.
To get a better understanding on how Streams work and how to combine them with other language features, check out our guide to Java Streams:
Explore Spring Boot 3 and Spring 6 in-depth through building a full REST API with the framework:
Yes, Spring Security can be complex, from the more advanced functionality within the Core to the deep OAuth support in the framework.
I built the security material as two full courses - Core and OAuth, to get practical with these more complex scenarios. We explore when and how to use each feature and code through it on the backing project.
You can explore the course here:
Spring Data JPA is a great way to handle the complexity of JPA with the powerful simplicity of Spring Boot.
Get started with Spring Data JPA through the guided reference course:
Refactor Java code safely — and automatically — with OpenRewrite.
Refactoring big codebases by hand is slow, risky, and easy to put off. That’s where OpenRewrite comes in. The open-source framework for large-scale, automated code transformations helps teams modernize safely and consistently.
Each month, the creators and maintainers of OpenRewrite at Moderne run live, hands-on training sessions — one for newcomers and one for experienced users. You’ll see how recipes work, how to apply them across projects, and how to modernize code with confidence.
Join the next session, bring your questions, and learn how to automate the kind of work that usually eats your sprint time.
1. Overview
In this tutorial, we’ll explore the Java API for Apache Paimon, which is essential for managing the Paimon database from custom applications. We’ll use it to create a data lake with a table in HDFS storage and perform CRUD operations on it.
This open-source data lakehouse format provides a unified storage layer for real-time streaming, batch processing, and OLAP. It can serve as a message queue for a streaming application and as a HIVE table for a batch processing application. It supports building data lakes on a variety of storage systems, including object storage, HDFS, and local file systems. Furthermore, it integrates seamlessly with popular distributed data processing engines such as Apache Spark, Apache Flink, and Trino to build scalable data pipelines.
2. Prerequisites
Let’s start with Maven dependencies required in a Java application to integrate with Apache Paimon:
<dependency>
    <groupId>org.apache.paimon</groupId>
    <artifactId>paimon-bundle</artifactId>
    <version>1.4.1</version>
</dependency>
For our example, we’ll use HDFS as the storage, and hence, let’s include the runtime library for interacting with it:
<dependency>
    <groupId>org.apache.hadoop</groupId>
    <artifactId>hadoop-client-runtime</artifactId>
    <version>3.4.3</version>
</dependency>
3. Create Data Lake
Let’s consider a data lake to store IT infrastructure performance metrics collected by monitoring tools that poll devices. These metrics can quickly accumulate in volume, and data lakes such as Paimon can reliably store them for long periods.
Let’s define the data model:
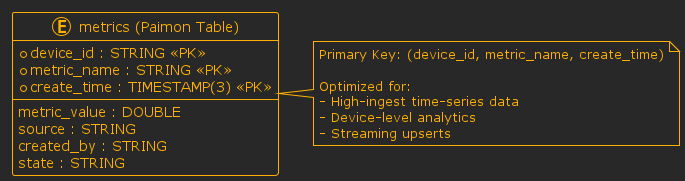
Before ingesting monitoring data into Apache Paimon, we need to set up the storage layer by creating a catalog and defining the table schema. In Paimon, the catalog acts as the entry point to the data lake, while tables define how data is organized, typed, and versioned.
Moving on, let’s look at a simple utility class responsible for initializing the data lake and creating a metrics table:
public class PaimonDatabaseManager {
    public static Catalog createCatalog(String warehousePath) {
        CatalogContext context = CatalogContext.create(new Path(warehousePath));
        return CatalogFactory.createCatalog(context);
    }

    public static Identifier createTable(Catalog catalog) throws Exception {
        Schema schema = Schema.newBuilder()
          .column("device_id", DataTypes.STRING())
          .column("metrics_name", DataTypes.STRING())
          .column("metrics_value", DataTypes.DOUBLE())
          .column("source", DataTypes.STRING())
          .column("create_time", DataTypes.TIMESTAMP(3))
          .column("state", DataTypes.STRING())
          .primaryKey("device_id", "metrics_name", "create_time")
          .build();

        Identifier tableId = Identifier.create("metric_db", "metrics");

        catalog.createDatabase("metric_db", true);
        catalog.createTable(tableId, schema, false);
        return tableId;
    }
}
In the class, PaimonDatabaseManager.createCatalog() creates a Catalog instance backed by the local filesystem, using a CatalogContext to configure the warehouse location. Finally, CatalogFactory.createCatalog() uses the context to create the Paimon database.
Furthermore, the PaimonDatabaseManager.createTable() method builds a Schema for the metrics table and uses an Identifier to register it under the metric_db database. The table schema includes typed columns and a composite primary key.
Now, we’ll use the PaimonDatabaseManager class in a program to create a Paimon database table:
void whenCallCreateTable_thenTableCreated() throws Exception {
    catalog = PaimonDatabaseManager.createCatalog(WAREHOUSE_PATH);
    assertNotNull(catalog);

    tableId = PaimonDatabaseManager.createTable(catalog);
    assertNotNull(tableId);
    assertTrue(catalog.listTables("metric_db").contains("metrics"));
}
In the program, we first call PaimonDatabaseManager.createCatalog(WAREHOUSE_PATH) to create a Paimon database catalog. The argument WAREHOUSE_PATH contains the path to a temporary directory created for the database. Next, we call PaimonDatabaseManager.createTable() to create a metrics table in the catalog. Finally, we invoke Catalog.listTables() to list all the tables in the metric_db database and confirm that it contains the metrics table.
4. Insert Records in Table
In this section, we’ll learn about the API to insert metric records into the Paimon metric table:
public class PaimonTableDataManager {
    public static void insert(Catalog catalog, Identifier tableId, List metrics) throws Exception {

        Table table = catalog.getTable(tableId);

        BatchWriteBuilder builder = table.newBatchWriteBuilder();

        BatchTableWrite write = builder.newWrite();

        metrics.forEach(metric -> {
          try {
              GenericRow row = createGenericRow(metric);
              write.write(row, 0);
          } catch (Exception e) {
              logger.error("Error writing metric", e);
          }
        });

        List messages = write.prepareCommit();
        BatchTableCommit commit = builder.newCommit();
        commit.commit(messages);
    }
}
First, we retrieve the Table object associated with the tableId from the Catalog object. Next, we get an instance of the BatchWriteBuilder class by invoking Table#newBatchWriteBuilder(). The builder object helps create a BatchTableWrite object that executes write operations on tables.
Further, we transform each metric record into a GenericRow object in the createGenericRow() method:
private static GenericRow createGenericRow(Metric metric) {
    GenericRow row = GenericRow.of(
      BinaryString.fromString(metric.getDeviceId()),
      BinaryString.fromString(metric.getMetricsName()),
      metric.getMetricsValue(),
      BinaryString.fromString(metric.getSource()),
      convertToTimestamp(metric.getCreateTime()),
      BinaryString.fromString(metric.getCreatedBy()),
      BinaryString.fromString(metric.getState())
    );
    return row;
}
During this process, each column value is converted to its corresponding Paimon-compatible data type, such as BinaryString and Timestamp.
After creating the GenericRow object in the insert method, BatchTableWrite.write() writes each row into the metrics table. Finally, the data is committed in a single batch outside the loop.
Let’s run the PaimonTableDataManager.insert() to insert some records into the metrics table:
void whenCallInsertRecords_thenRecordsInserted() throws Exception {
    assertTrue(catalog.listTables("metric_db").contains("metrics"));
    PaimonTableDataManager.insert(catalog, tableId, getMetrics());
}
First, with the assert method, we ensure that the metric table exists in the catalog. The arguments, catalog, and tableId hold the Catalog and table Identifier objects that we retrieved and stored while creating the metrics table. The getMetrics() method could be a service fetching the metric data from a monitoring tool. Moreover, for our example, we retrieve the synthetic data from a CSV file metrics.out:
device_id,metric_name,create_time,metric_value,source
dev_101,cpu_usage,2026-04-21 18:57:01,72.5,agent
dev_102,cpu_usage,2026-04-21 18:57:02,65.1,agent
dev_103,memory_usage,2026-04-21 18:57:03,58.3,agent
...
However, real-world applications usually poll monitoring tools at regular intervals to fetch the latest metrics. Finally, we invoke the insert method to create new records into the metrics table.
5. Query Records From Table
After the raw metrics are collected, they must be fetched from the database and then processed to derive actionable analytics. The API supports filter pushdown and column projections, helping enhance performance. Additionally, the API supports both batch reads and streaming data for analytics and real-time use cases.
Let’s use the Paimon Java API to implement a batch read operation:
public static List<Metric> fetchMetricsBySourceAndDateRange(Catalog catalog, Identifier tableId,
      String source, String startDate, String endDate) throws Exception {
    Table table = catalog.getTable(tableId);
    RowType rowType = table.rowType();
    PredicateBuilder predicateBuilder = new PredicateBuilder(rowType);

    int[] projection = new int[] {0, 1, 2, 3, 4};

    Predicate sourcePredicate = predicateBuilder.equal(3, BinaryString.fromString(source));
    Predicate dateRangePredicate = predicateBuilder.between(
      4, convertToTimestamp(startDate), convertToTimestamp(endDate)
    );
    Predicate predicate = PredicateBuilder.and(sourcePredicate, dateRangePredicate);

    ReadBuilder readBuilder = table.newReadBuilder().withFilter(predicate).withProjection(projection);

    List<Split> splits = readBuilder.newScan().plan().splits();

    TableRead read = readBuilder.newRead().executeFilter();

    RecordReader<InternalRow> reader = read.createReader(splits);

    List<Metric> results = new ArrayList<>();

    reader.forEachRemaining(internalRow -> {
        String deviceId = internalRow.getString(0).toString();
        String metricsName = internalRow.getString(1).toString();
        double metricsValue = internalRow.getDouble(2);
        String sourceValue = internalRow.getString(3).toString();
        Timestamp timestamp = internalRow.getTimestamp(4, 3);
        String createTime = ConvertTimestampToStr(timestamp);

        Metric metric = new Metric(deviceId, metricsName, metricsValue, sourceValue, createTime, null);
        logger.info("Fetched Metric: {}", metric);
        results.add(metric);
    });

    return results;
}
The fetchMetricsBySourceAndDateRange() method queries the metrics tables to fetch metric data originating from a specific source within a given date range. In the method, the PredicateBuilder helps create Predicate objects with filter conditions on the source and create_time columns. The Table#newReadBuilder() creates a ReadBuilder object, and subsequently, ReadBuilder#withFilter() sets the necessary predicates. Additionally, we define a projection array to fetch only the required columns.
Moving on, the builder creates data splits that can be distributed across multiple threads or processes, enabling faster execution. The splits are comparable to partitions or data files corresponding to a table. Next, ReadBuilder#newRead() creates a TableRead object on which we invoke the executeFilter() method. After this, TableRead#createReader() creates a RecordReader for the generated splits. Multiple readers can process different splits concurrently, enabling scalable and efficient parallel reads. Finally, we call RecordReader#forEachRemaining() to iterate through the rows and fetch the metric attributes.
Now, let’s run the program to fetch a metric from a certain source and within a date range:
void whenCallReadRecords_thenRecordsRead() throws Exception {
    List<Metric> metrics = PaimonTableDataManager.fetchMetricsBySourceAndDateRange(
      catalog, tableId, "collector", "2026-04-21 18:58:19", "2026-04-21 18:58:30");
    assertFalse(metrics.isEmpty());
    assertTrue(metrics.size() == 4);
}
The program fetched four metric rows with the source collector and created between 2026-04-21 18:58:19 and 2026-04-21 18:58:30.
6. Update Table Records
There’s no particular Java API for updating records in a Paimon Table. However, when we perform a write operation, just like in the case of performing an insert on an existing record with the primary key, instead of a new row, the existing row gets updated.
To understand the update operation, we’ve defined the method in the PaimonTableDataManager class:
public static void updateMetricStateByDeviceIdMetricNameAndCreatedDate(Catalog catalog,
      Identifier tableId, String deviceId, String metricName, String newState, String createdDate)
    throws Exception {

    Metric metric = fetchMetricByDeviceIdMetricNameAndCreatedDate(
      catalog, tableId, deviceId, metricName, createdDate
    );
    Table table = catalog.getTable(tableId);

    BatchWriteBuilder builder = table.newBatchWriteBuilder();

    BatchTableWrite write = builder.newWrite();
    metric.setState(newState);
    write.write(createGenericRow(metric), 0);

    List<CommitMessage> messages = write.prepareCommit();

    BatchTableCommit commit = builder.newCommit();
    commit.commit(messages);
}
First, we fetch a metric record filtered by the primary key, composed of metric attributes such as device ID, metric name, and created date, by invoking the fetchMetricByDeviceIdMetricNameAndCreatedDate() method. The method is in the same line as the method described in the previous section, which queries records from the metric table.
Then, we update the Metric#state attribute with a new state. The remaining steps are largely similar to the insert method described earlier. However, instead of creating a new record, the existing metric’s state is updated with a new state.
Let’s execute updateMetricStateByDeviceIdMetricNameAndCreatedDate():
void whenCallUpdateRecord_thenRecordUpdated() throws Exception {
    Metric metric = PaimonTableDataManager
      .fetchMetricByDeviceIdMetricNameAndCreatedDate(
        catalog, tableId,
        "dev_137", "cpu_usage",
        "2026-04-21 18:58:27"
    );
    assertNotNull(metric);

    assertEquals("active", metric.getState());

    PaimonTableDataManager.updateMetricStateByDeviceIdMetricNameAndCreatedDate(
        catalog, tableId, "dev_137",
            "cpu_usage", "inactive",
            "2026-04-21 18:58:27"
    );

    metric = PaimonTableDataManager.fetchMetricByDeviceIdMetricNameAndCreatedDate(
        catalog, tableId, "dev_137",
        "cpu_usage", "2026-04-21 18:58:27"
    );
    assertNotNull(metric);
    assertEquals("inactive", metric.getState());
}
We fetched a metric record by its composite primary key and updated its state to inactive. Later, we again fetched the record and confirmed that the state has been updated to inactive.
7. Delete Table Records
Moving on, Paimon Java API’s also supports the delete operation:
public static void deleteRecordsByDeviceIdMetricNameAndCreatedDate(Catalog catalog,
    Identifier tableId, String deviceId,
    String metricsName, String createdDate) throws Exception {
    Metric metric = PaimonTableDataManager
     .fetchMetricByDeviceIdMetricNameAndCreatedDate(
       catalog, tableId, deviceId, metricsName, createdDate
    );
    Table table = catalog.getTable(tableId);

    BatchWriteBuilder builder = table.newBatchWriteBuilder();

    BatchTableWrite write = builder.newWrite();

    GenericRow deleteRow = createGenericRow(metric);

    deleteRow.setRowKind(RowKind.DELETE);

    write.write(deleteRow, 0);

    List<CommitMessage> messages = write.prepareCommit();

    builder.newCommit().commit(messages);
}
First, we fetched a metric record by calling PaimonTableDataManager.fetchMetricByDeviceIdMetricNameAndCreatedDate(). The next set of steps is almost similar to the update method, except that we don’t modify any field in the metric record. Later, before invoking BatchTableWrite#write(), we flag the operation as delete by calling the method BatchTableWrite#setRowKind(RowKind.DELETE).
Let’s verify the deleteRecordsByDeviceIdMetricNameAndCreatedDate() method by executing it:
void whenCallDeleteRecord_thenRecordDeleted() throws Exception {
    Metric metric = PaimonTableDataManager.fetchMetricByDeviceIdMetricNameAndCreatedDate(
      catalog, tableId,
      "dev_136", "disk_io", "2026-04-21 18:58:26"
    );
    assertNotNull(metric);

    PaimonTableDataManager.deleteRecordsByDeviceIdMetricNameAndCreatedDate(
      catalog, tableId,
      "dev_136", "disk_io", "2026-04-21 18:58:26"
    );

    metric = PaimonTableDataManager.fetchMetricByDeviceIdMetricNameAndCreatedDate(
      catalog, tableId, "dev_136", "disk_io", "2026-04-21 18:58:26"
    );
    assertTrue(metric == null);
}
First, we fetch a metric record corresponding to a device by invoking PaimonTableDataManager.fetchMetricByDeviceIdMetricNameAndCreatedDate(). After ensuring the record isn’t null, we invoke the delete method. Finally, we query the metric table again and confirm that no such record is present in the Paimon DB.
8. Conclusion
In this article, we explored the core Java APIs for managing a Paimon database, including creating tables, performing batch insertions, updates, deletes, and executing filtered data queries. We used the local file system to create the Paimon DB, but the APIs are standard and effective irrespective of the chosen storage layer.
As usual, the source code can be found over on GitHub.


