

Mocking is an essential part of unit testing, and the Mockito library makes it easy to write clean and intuitive unit tests for your Java code.
Get started with mocking and improve your application tests using our Mockito guide:
Handling concurrency in an application can be a tricky process with many potential pitfalls. A solid grasp of the fundamentals will go a long way to help minimize these issues.
Get started with understanding multi-threaded applications with our Java Concurrency guide:
Spring 5 added support for reactive programming with the Spring WebFlux module, which has been improved upon ever since. Get started with the Reactor project basics and reactive programming in Spring Boot:
Since its introduction in Java 8, the Stream API has become a staple of Java development. The basic operations like iterating, filtering, mapping sequences of elements are deceptively simple to use.
But these can also be overused and fall into some common pitfalls.
To get a better understanding on how Streams work and how to combine them with other language features, check out our guide to Java Streams:
Explore Spring Boot 3 and Spring 6 in-depth through building a full REST API with the framework:
Yes, Spring Security can be complex, from the more advanced functionality within the Core to the deep OAuth support in the framework.
I built the security material as two full courses - Core and OAuth, to get practical with these more complex scenarios. We explore when and how to use each feature and code through it on the backing project.
You can explore the course here:
Spring Data JPA is a great way to handle the complexity of JPA with the powerful simplicity of Spring Boot.
Get started with Spring Data JPA through the guided reference course:
Refactor Java code safely — and automatically — with OpenRewrite.
Refactoring big codebases by hand is slow, risky, and easy to put off. That’s where OpenRewrite comes in. The open-source framework for large-scale, automated code transformations helps teams modernize safely and consistently.
Each month, the creators and maintainers of OpenRewrite at Moderne run live, hands-on training sessions — one for newcomers and one for experienced users. You’ll see how recipes work, how to apply them across projects, and how to modernize code with confidence.
Join the next session, bring your questions, and learn how to automate the kind of work that usually eats your sprint time.
Yes, we're now running our only Summer Sale. All Courses are 30% off until 20th July, 2026:
Yes, we're now running our only Summer Sale. All Courses are 30% off until 20th July, 2026:
1. Overview
In this article, we’ll explore how we can use Gatling to do performance testing on any Rest endpoint focusing specifically on load testing. We’ll start with a quick introduction to various types of performance testing and their Key Performance Indicators (KPIs).
Next, we’ll be giving a quick overview of Gatling terminologies. We’ll set up a sample example using the Maven Gatling plugin and dependencies. We’ll explore Gatling Java DSL to perform our load testing simulating a scenario.
Finally, we’ll run the simulation and look at the generated Report.
2. Performance Testing Types
Performance testing involves measuring various metrics to understand how a system performs under different levels of traffic and throughput. Other types of performance testing include load testing, stress testing, soak testing, spike testing, and scalability testing. Let’s quickly look at the purpose of each type of performance test strategy next.
Load testing involves testing a system under a heavy load of concurrent virtual users over a period of time. On the other hand, stress testing involves gradually increasing the load on a system to find its breaking point. Soak testing aims to put a steady traffic rate through a system for extended periods to identify bottlenecks. As the name indicates, Spike testing consists in testing how a system performs when the number of requests increases to the stress level quickly, then decreasing it again soon after. Finally, Scalability testing involves testing how the system performs when the number of user requests scales up or down.
We can collect several Key Performance Indicators (KPIs) to measure system performance when performing performance testing. These include transaction response times, throughput (the number of transactions handled over a period), and errors (such as timeouts). Stress testing can also help identify memory leaks, slowdowns, security vulnerabilities, and data corruption.
In this article, we’ll focus on load testing using Gatling.
3. Key Terminologies
Let’s start with some of the basic terminologies of the Gatling framework.
- Scenario: A scenario is a series of steps virtual users take to replicate common user actions, such as logging in or purchasing.
- Feeders: Feeders are mechanisms that allow data to be input from external sources, such as CSV or JSON files, into virtual user actions.
- Simulation: The Simulation determines the number of virtual users that run the scenario within a specific time frame
- Session: Each virtual user is supported by a session that tracks the messages exchanged during the scenario.
- Recorder: Gatling’s UI provides a Recorder tool that generates a Scenario and a Simulation
4. Example Setup
Let’s focus on a small part of an Employee management microservice, consisting of a RestController with the POST and GET endpoints that must be load tested.
Before we start implementing our simple solution, let’s add the required Gatling dependencies :
<dependency>
    <groupId>io.gatling</groupId>
    <artifactId>gatling-app</artifactId>
    <version>3.7.2</version>
</dependency>
<dependency>
    <groupId>io.gatling.highcharts</groupId>
    <artifactId>gatling-charts-highcharts</artifactId>
    <version>3.7.2</version>
</dependency>
Next, let’s add the maven plugin:
<plugin>
    <groupId>io.gatling</groupId>
    <artifactId>gatling-maven-plugin</artifactId>
    <version>4.2.9</version>
    <configuration>
        <simulationClass>org.baeldung.EmployeeRegistrationSimulation</simulationClass>
    </configuration>
</plugin>
As indicated by the information in the pom.xml file, we’ve explicitly set the simulation class to EmployeeRegistationSimulation through the plugin configuration. This implies that the plugin will utilize the specified class as the basis for running the simulation.
Next, let’s define our RestController with the POST and GET endpoints which we want to load test using Gatling:
@PostMapping(consumes = { MediaType.APPLICATION_JSON_VALUE })
public ResponseEntity<Void> addEmployee(@RequestBody EmployeeCreationRequest request, UriComponentsBuilder uriComponentsBuilder) {
    URI location = uriComponentsBuilder.path("/api/employees/{id}")
      .buildAndExpand("99")
      .toUri();
    return ResponseEntity.created(location)
      .build();
}
Let’s add the GET endpoint next:
@GetMapping("/{id}")
public Employee getEmployeeWithId(@PathVariable("id") Long id) {
    List<Employee> allEmployees = createEmployees();
    return allEmployees.get(ThreadLocalRandom.current()
      .nextInt(0, allEmployees.size()));
}
Next, let’s expand upon the Simulation class and its constituent components and APIs that enable load testing.
5. Simulation Steps
A simulation represents a load test that captures various aspects, such as how multiple user populations might operate, what scenarios they will execute, and how new virtual users will be injected. In the Gatling framework, the Simulation class is the primary component that initiates the load-testing process. The Gatling Java API includes the mutable abstract class Simulation. We can extend the Simulation class with our specific requirements to create a custom simulation:
public class EmployeeRegistrationSimulation extends Simulation {

    private static final HttpProtocolBuilder HTTP_PROTOCOL_BUILDER = setupProtocolForSimulation();

    private static final Iterator<Map<String, Object>> FEED_DATA = setupTestFeedData();

    private static final ScenarioBuilder POST_SCENARIO_BUILDER = buildPostScenario();

    // ...
}
Essentially, here, we need to define the following:
- HTTP protocol configuration
- Headers
- Feeders
- HTTP Requests
- Scenario
- Load Injection pattern
Now, let’s look into the individual steps and how we can define them using the DSL provided by Gatling. We’ll begin with the protocol configuration next.
5.1. HTTP Protocol Configuration
Gatling is a technology-agnostic load-testing tool that supports various protocols, including HTTP, HTTPS, and WebSockets. This section will focus on configuring the HTTP protocol for our load-testing scenario.
To set up the HTTP protocol details in the EmployeeRegistrationSimulation class, we’ll use the HttpDsl type, which serves as the entry point for the Gatling HTTP DSL. We’ll then use the HTTPProtocolBuilder DSL to define the HTTP protocol configuration:
private static HttpProtocolBuilder setupProtocolForSimulation() {
    return HttpDsl.http.baseUrl("http://localhost:8080")
      .acceptHeader("application/json")
      .maxConnectionsPerHost(10)
      .userAgentHeader("Gatling/Performance Test");
}
Configuring the HTTP protocol in Gatling involves using the HttpDsl class to define the HTTP protocol configuration using the HTTPProtocolBuilder DSL. Key configuration settings include the baseUrl, acceptHeader, maxConnectionsPerHost, and userAgentHeader. These settings help to ensure that our load test accurately simulates real-world scenarios.
5.2. Feeders Definition
Feeders are a convenient API that allows testers to inject data from external sources into virtual user sessions. Gatling supports various feeders, such as CSV, JSON, file-based, and array/list-based feeders.
Next, let’s create a method that will return the test data for the test case:
private static Iterator<Map<String, Object>> feedData() {
    Faker faker = new Faker();
    Iterator<Map<String, Object>> iterator;
    iterator = Stream.generate(() -> {
          Map<String, Object> stringObjectMap = new HashMap<>();
          stringObjectMap.put("empName", faker.name()
            .fullName());
          return stringObjectMap;
      })
      .iterator();
    return iterator;
}
Here, we’ll create a method that returns an Iterator<Map<String, Object>> to retrieve test data for our test case. Then, the method feedData() generates test data using the Faker library, creates a HashMap to store the data, and returns an iterator over the data.
The feeder is essentially a type alias for the Iterator<Map<String, Object>> component created by the feed method. The feed method polls Map<String, Object> records and injects their content into the simulation scenario.
Gatling also provides built-in feeder strategies such as queue(), random(), shuffle(), and circular(). Additionally, depending on the system under test, we can configure the data loading mechanism to be either eager() or batch().
5.3. Scenario Definition
A scenario in Gatling represents a typical user behavior that virtual users will follow. It’s a workflow based on the resources defined in the Employee Controller. In this case, we’ll create a scenario that simulates employee creation using a straightforward workflow:
private static ScenarioBuilder buildPostScenario() {
    return CoreDsl.scenario("Load Test Creating Employee")
      .feed(FEED_DATA)
      .exec(http("create-employee-request").post("/api/employees")
        .header("Content-Type," "application/json")
        .body(StringBody("{ \"empName\": \"${empName}\" }"))
        .check(status().is(201))
        .check(header("Location").saveAs("location")))
      .exec(http("get-employee-request").get(session -> session.getString("location"))
        .check(status().is(200)));
    }
The Gatling API provides the scenario(String name) method, which returns an instance of the ScenarioBuilder class. The ScenarioBuilder encapsulates the details of the scenario, including the source of test data and the HTTP request details, such as the request body, headers, and expected status code.
Essentially, we are building a scenario where we first send the request using the post method to create an employee by sending a JSON request body containing the empName value retrieved from the test data. The method also checks for the expected HTTP status code (201) and saves the Location header value to the session using the saveAs method.
The second request uses the get method to retrieve the created employee by sending the saved Location header value to the request URL. It also checks for the expected HTTP status code (200).
5.4. Load Injection Model
In addition to defining the scenario and protocol, we must define the load injection pattern for our simulation. In our example, we’ll gradually increase the load by adding virtual users over time. Gatling provides two load injection models: open and closed. The open model allows us to control the arrival rate of virtual users, which is more representative of real-life systems.
Gatling’s Java API provides a class called OpenInjectionStep, which encapsulates common attributes and behaviors of open injection workload patterns. There are three subclasses of OpenInjectionStep that we can use:
- ConstantRateOpenInjection: This injection model maintains a constant arrival rate of virtual users.
- RampRateOpenInjection: This injection model gradually increases the arrival rate of virtual users.
- Composite: This injection model allows us to combine different types of injection patterns.
For our example, let’s use RampRateOpenInjection. We’ll start with 50 virtual users and gradually increase the load by adding 50 users every 30 seconds until we reach 200 virtual users. We’ll then maintain the load at 200 virtual users for 5 minutes:
private RampRateOpenInjectionStep postEndpointInjectionProfile() {
    int totalDesiredUserCount = 200;
    double userRampUpPerInterval = 50;
    double rampUpIntervalSeconds = 30;
    int totalRampUptimeSeconds = 120;
    int steadyStateDurationSeconds = 300;

    return rampUsersPerSec(userRampUpPerInterval / (rampUpIntervalSeconds / 60)).to(totalDesiredUserCount)
      .during(Duration.ofSeconds(totalRampUptimeSeconds + steadyStateDurationSeconds));
}
By defining the load injection pattern, we can accurately simulate how our system will behave under different load levels. This helps us identify performance bottlenecks and ensure our system can handle the expected user load.
5.5. Setting Up the Simulator
To set up the simulation, we’ll combine the protocol, scenario, and load injection model we defined earlier. This setup will be called from the constructor of the EmployeeRegistrationSimulation class:
public EmployeeRegistrationSimulation() {

    setUp(BUILD_POST_SCENARIO.injectOpen(postEndpointInjectionProfile())
      .protocols(HTTP_PROTOCOL_BUILDER));
}
5.6. Assertions
Finally, we’ll use the Gatling DSL to assert that the simulation works as expected. Let’s go back to our EmployeeRegistrationSimulation() constructor and add some assertions to the existing setup(..) method:
setUp(BUILD_POST_SCENARIO.injectOpen(postEndpointInjectionProfile())
  .protocols(HTTP_PROTOCOL_BUILDER))
  .assertions(
    global().responseTime().max().lte(10000),
    global().successfulRequests().percent().gt(90d)
As we can see, here we want to assert the following conditions:
- maximum response time based on the setup should be less than or equal to 10 seconds
- percentage of successful requests should be greater than 90
6. Running the Simulation and Report Analysis
When we created our Gatling project, we used Maven with the Gatling Maven Plugin. Therefore, we can use a Maven task to execute our Gatling test. To run a Gatling script through Maven, open a command prompt in the folder of your Gatling project:
mvn gatling:testAs a result, we’ll collect the following metrics:
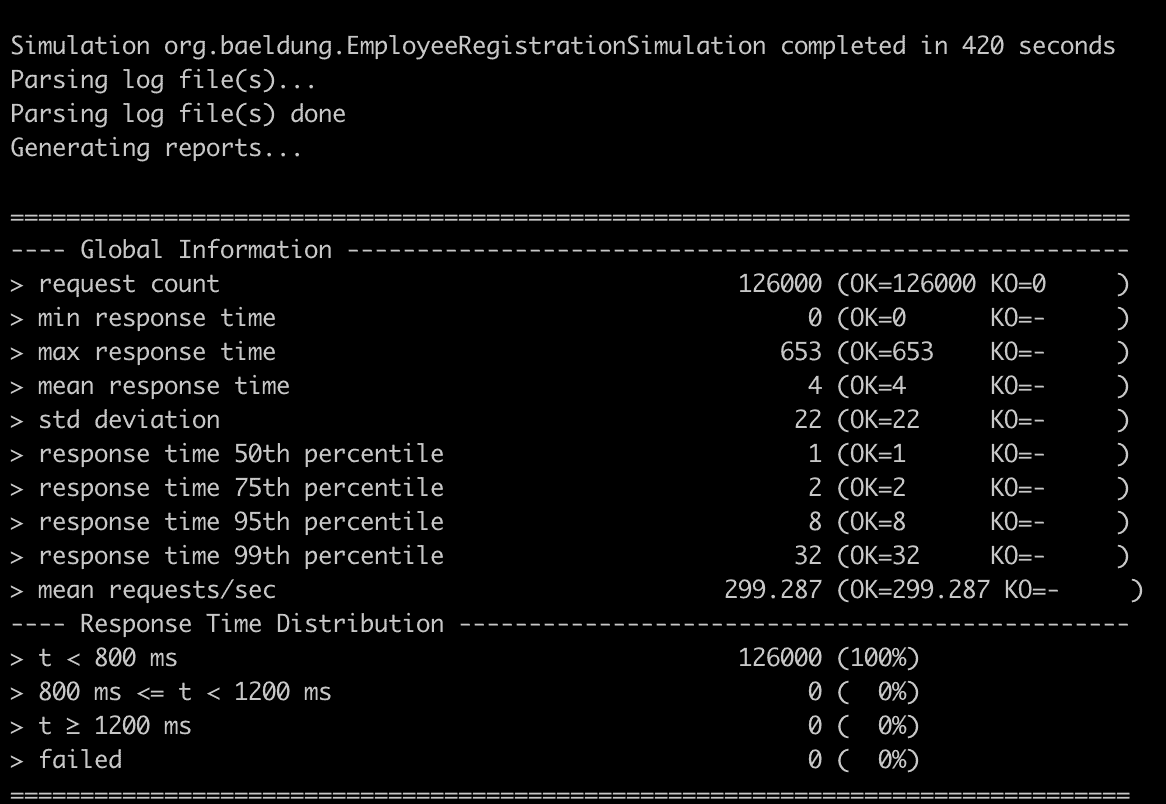
Finally, Gatling generates an HTML report in the target/gatling directory. The main file in this directory is index.html, which summarizes the load test configuration, a chart of the response time distribution, and statistics for each request, as summarised above. Let’s take a look at some of the graphs from the report:
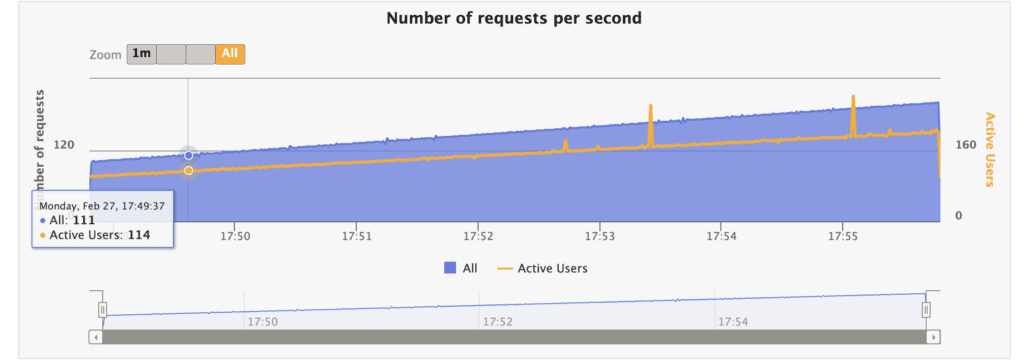
The requests per second graph help us understand how the system handles increasing traffic levels. By analyzing the requests per second graph, we can identify the optimal number of requests the system can operate without degrading performance or causing errors. This information can be used to improve the system’s scalability and ensure it can handle the expected level of traffic.
Another interesting graph to look at is the response time ranges:
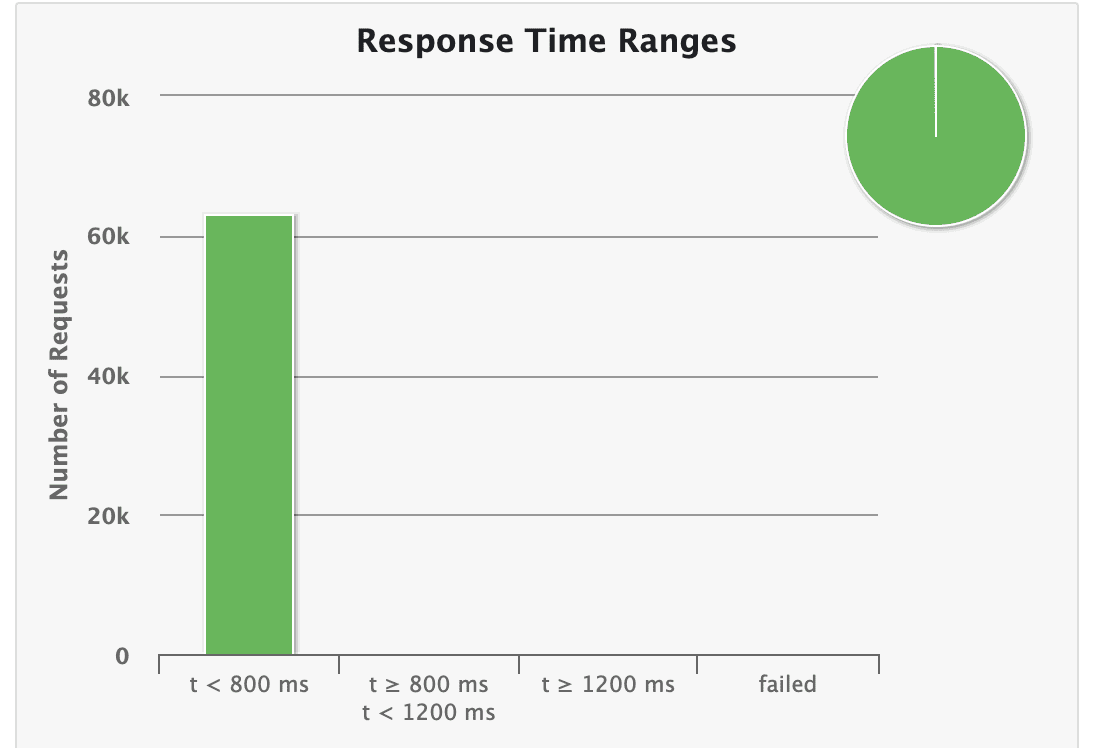
The response time distribution chart shows the percentage of requests that fall into specific response time buckets, such as less than 800 milliseconds, between 800 milliseconds and 1.2 seconds, and greater than 1.2 seconds. We can see that all our responses lie within <800ms.
Let’s look at the Response Time Percentiles:
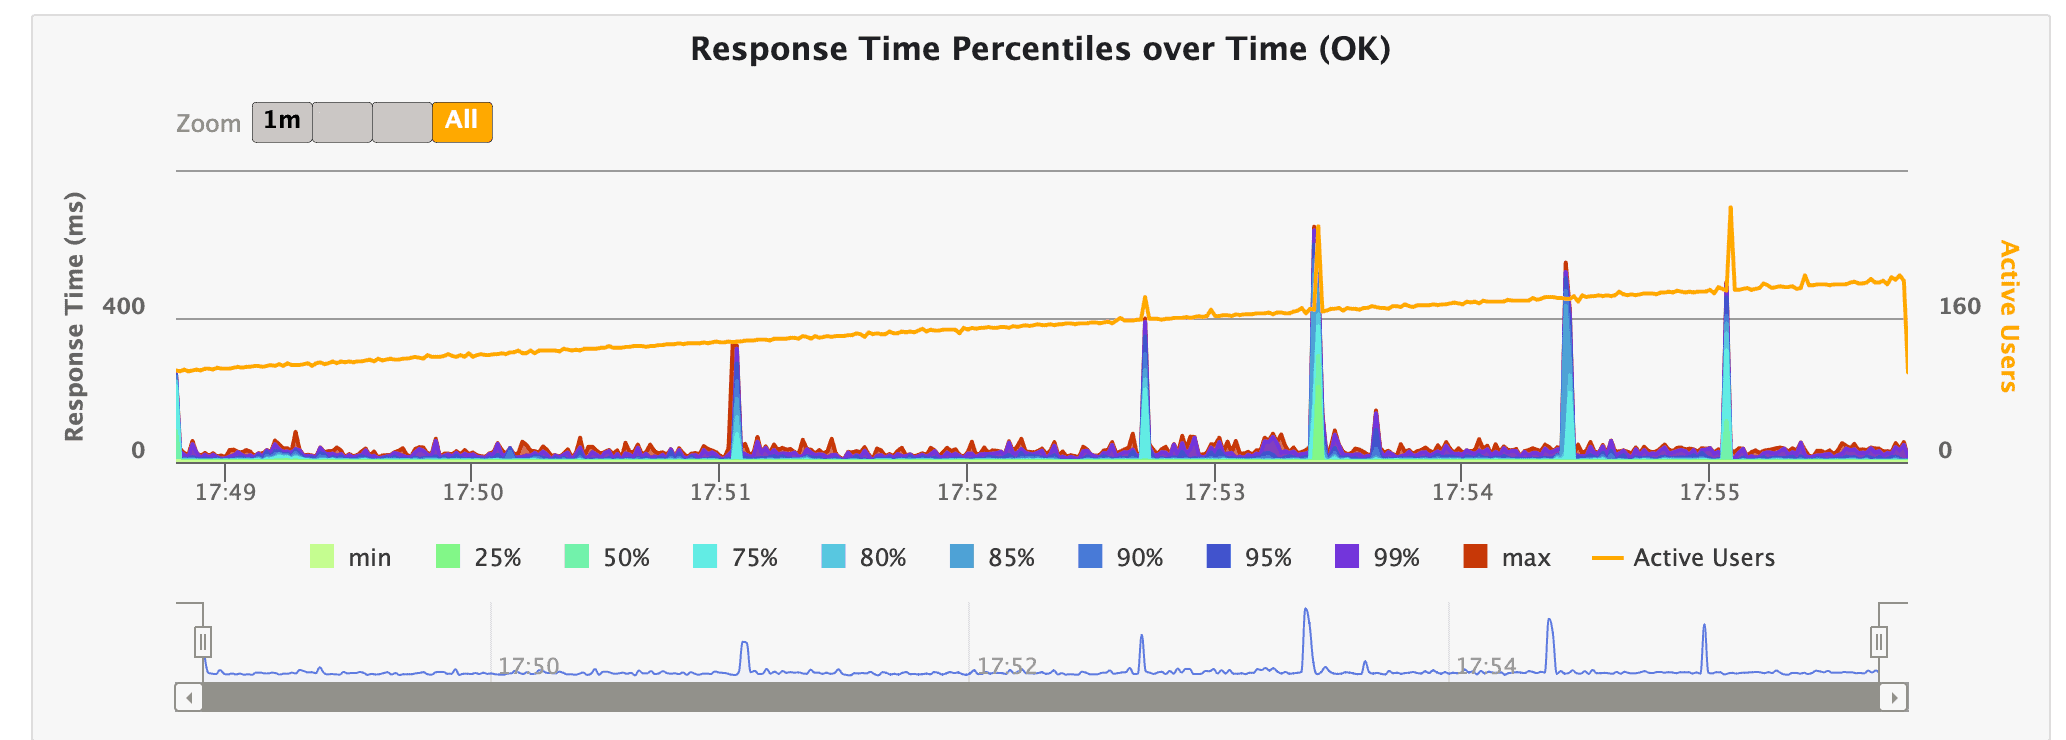
The request statistics section shows detailed information about each request, including the number of requests, the percentage of successful requests, and various response time percentiles, such as the 50th, 75th, 95th, and 99th percentiles. Overall, the index.html file provides a comprehensive summary of the load test results, making it easy to identify performance bottlenecks or issues.
7. Conclusion
In this article, we learned to use Gatling Java DSL for load testing any REST Endpoint.
Firstly, we provided a brief overview of different types of performance testing. Next, we introduced key terminologies specific to Gatling. We demonstrated how to implement a load test on a POST endpoint while adhering to desired injection load and time constraints. Additionally, we can analyze the test results to identify areas for improvement and optimization.


