Distributed Performance Testing with Gatling
Last updated: January 8, 2024


Mocking is an essential part of unit testing, and the Mockito library makes it easy to write clean and intuitive unit tests for your Java code.
Get started with mocking and improve your application tests using our Mockito guide:
Handling concurrency in an application can be a tricky process with many potential pitfalls. A solid grasp of the fundamentals will go a long way to help minimize these issues.
Get started with understanding multi-threaded applications with our Java Concurrency guide:
Spring 5 added support for reactive programming with the Spring WebFlux module, which has been improved upon ever since. Get started with the Reactor project basics and reactive programming in Spring Boot:
Since its introduction in Java 8, the Stream API has become a staple of Java development. The basic operations like iterating, filtering, mapping sequences of elements are deceptively simple to use.
But these can also be overused and fall into some common pitfalls.
To get a better understanding on how Streams work and how to combine them with other language features, check out our guide to Java Streams:
Explore Spring Boot 3 and Spring 6 in-depth through building a full REST API with the framework:
Yes, Spring Security can be complex, from the more advanced functionality within the Core to the deep OAuth support in the framework.
I built the security material as two full courses - Core and OAuth, to get practical with these more complex scenarios. We explore when and how to use each feature and code through it on the backing project.
You can explore the course here:
Spring Data JPA is a great way to handle the complexity of JPA with the powerful simplicity of Spring Boot.
Get started with Spring Data JPA through the guided reference course:
Refactor Java code safely — and automatically — with OpenRewrite.
Refactoring big codebases by hand is slow, risky, and easy to put off. That’s where OpenRewrite comes in. The open-source framework for large-scale, automated code transformations helps teams modernize safely and consistently.
Each month, the creators and maintainers of OpenRewrite at Moderne run live, hands-on training sessions — one for newcomers and one for experienced users. You’ll see how recipes work, how to apply them across projects, and how to modernize code with confidence.
Join the next session, bring your questions, and learn how to automate the kind of work that usually eats your sprint time.
Yes, we're now running our only Summer Sale. All Courses are 30% off until 20th July, 2026:
Yes, we're now running our only Summer Sale. All Courses are 30% off until 20th July, 2026:
1. Introduction
In this tutorial, we’ll understand how to do distributed performance testing with Gatling. In the process, we’ll create a simple application to test with Gatling, understand the rationale for using distributed performance testing, and finally, understand what support is available in Gatling to achieve it.
2. Performance Testing with Gatling
Performance testing is a testing practice that evaluates a system’s responsiveness and stability under a certain workload. There are several types of tests that generally come under performance testing. These include load testing, stress testing, soak testing, spike testing, and several others. All of these have their own specific objectives to attain.
However, one common aspect of any performance testing is to simulate workloads, and tools like Gatling, JMeter, and K6 help us do that. But, before we proceed further, we need an application that we can test for performance.
We’ll then develop a simple workload model for the performance testing of this application.
2.1. Creating an Application
For this tutorial, we’ll create a straightforward Spring Boot web application using Spring CLI:
spring init --dependencies=web my-applicationNext, we’ll create a simple REST API that provides a random number on request:
@RestController
@SpringBootApplication
public class Application {
    public static void main(String[] args) {
        SpringApplication.run(Application.class, args);
    }

    @GetMapping("/api/random")
    public Integer getRandom() {
        Random random = new Random();
        return random.nextInt(1000);
    }
}
There’s nothing special about this API — it simply returns a random integer in the range 0 to 999 on every call.
Starting this application is quite simple using the Maven command:
mvnw spring-boot:run2.2. Creating a Workload Model
If we need to deploy this simple API into production, we need to ensure that it can handle the anticipated load and still provide the desired quality of service. This is where we need to perform various performance tests. A workload model typically identifies one or more workload profiles to simulate real-life usage.
For a web application with a user interface, defining an appropriate workload model can be quite challenging. But for our simple API, we can make assumptions about the load distribution for the load testing.
Gatling provides Scala DSL to create scenarios to test in a simulation. Let’s begin by creating a basic scenario for the API that we created earlier:
package randomapi

import io.gatling.core.Predef._
import io.gatling.core.structure.ScenarioBuilder
import io.gatling.http.Predef._
import io.gatling.http.protocol.HttpProtocolBuilder

class RandomAPILoadTest extends Simulation {
    val protocol: HttpProtocolBuilder = http.baseUrl("http://localhost:8080/")
    val scn: ScenarioBuilder = scenario("Load testing of Random Number API")
      .exec(
        http("Get Random Number")
          .get("api/random")
          .check(status.is(200))
      )

    val duringSeconds: Integer = Integer.getInteger("duringSeconds", 10)
    val constantUsers: Integer = Integer.getInteger("constantUsers", 10)
    setUp(scn.inject(constantConcurrentUsers(constantUsers) during (duringSeconds))
      .protocols(protocol))
      .maxDuration(1800)
      .assertions(global.responseTime.max.lt(20000), global.successfulRequests.percent.gt(95))
}
Let’s discuss the salient points in this basic simulation:
- We begin by adding some necessary Gatling DSL imports
- Next, we define the HTTP protocol configuration
- Then, we define a scenario with a single request to our API
- Finally, we create a simulation definition for the load we want to inject; here, we’re injecting load using 10 concurrent users for 10 seconds
It can be quite complex to create this kind of scenario for more complex applications with a user interface. Thankfully, Gatling comes with another utility, called a recorder. Using this recorder, we can create scenarios by letting it proxy interactions between the browser and the server. It can also consume a HAR (HTTP archive) file to create scenarios.
2.3. Executing the Simulation
Now, we’re ready to execute our load test. For this, we can place our simulation file “RandomAPILoadTest.scala” in the directory “%GATLING_HOME%/user-file/randomapi/”. Please note that this is not the only way to execute the simulation, but it’s certainly one of the easiest ones.
We can start Gatling by running the command:
$GATLING_HOME/bin/gatling.shThis will prompt us to choose the simulation to run:
Choose a simulation number:
     [0] randomapi.RandomAPILoadTest
On selecting the simulation, it will run the simulation and generate an output with the summary:
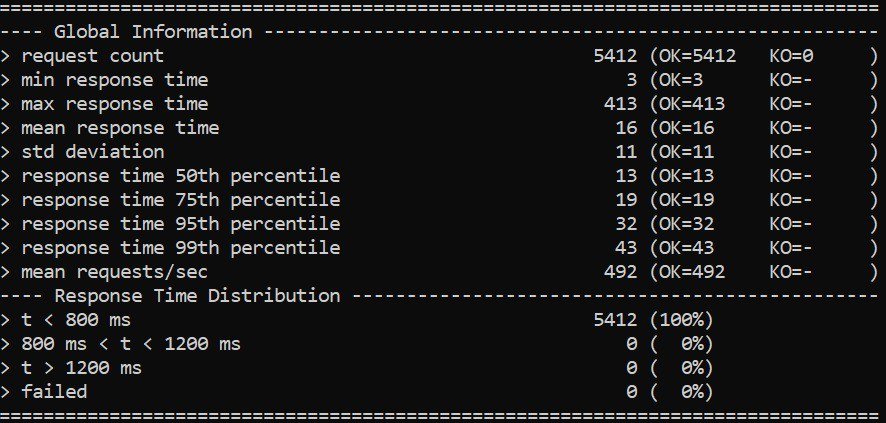
Further, it generates a report in HTML format in the directory “%GATLING_HOME%/results”:
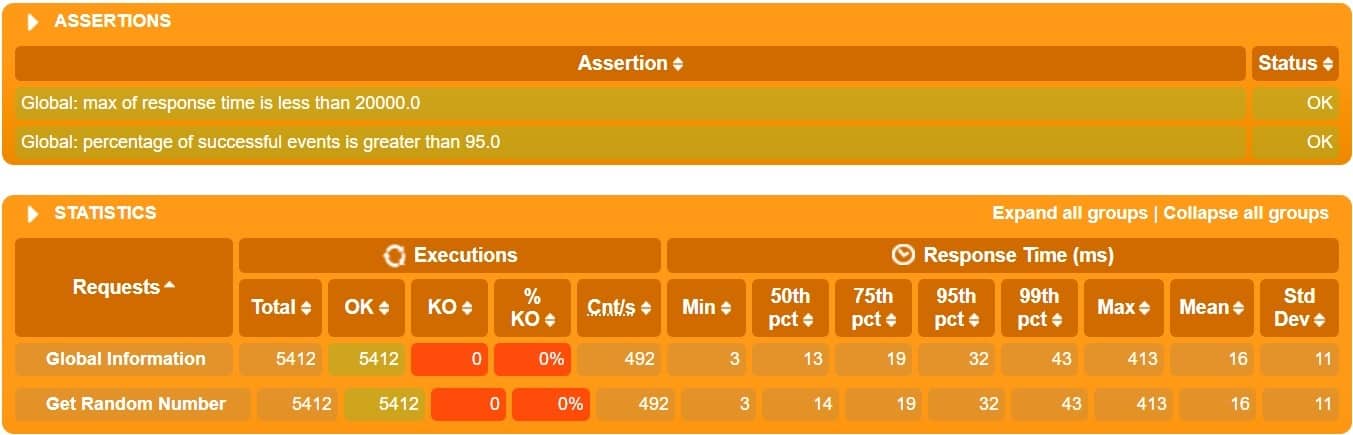
This is just one part of the report that is generated, but we can clearly see the summary of the result. This is quite detailed and easy to follow.
3. Distributed Performance Testing
So far, so good. But, if we recall, the purpose of performance testing is to simulate real-life workloads. This can be significantly higher for popular applications than the load we’ve seen in our trivial case here. If we notice in the test summary, we managed to achieve a throughput of roughly 500 requests/sec. For a real-life application, handling real-life workloads, this can be many times higher!
How do we simulate this kind of workload using any performance tool? Is it really possible to achieve these numbers by injecting load just from a single machine? Perhaps not. Even if the load injection tool can handle much higher loads, the underlying operating system and network have their own limitations.
This is where we have to distribute our load injection over multiple machines. Of course, like any other distributed computing model, this comes with its own share of challenges:
- How do we distribute the workload amongst participating machines?
- Who coordinates their completion and recovery from any errors that may happen?
- How do we collect and summarize the results for consolidated reporting?
A typical architecture for distributed performance testing uses master and slave nodes to address some of these concerns:
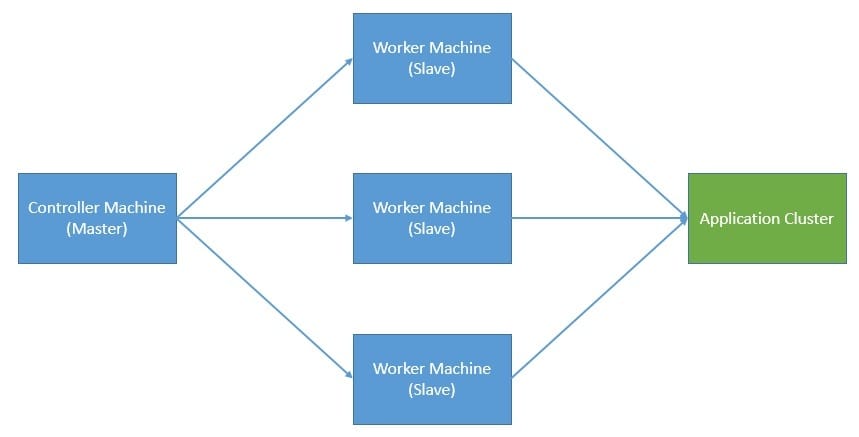
But, here again, what happens if the master breaks down? It’s not in the scope of this tutorial to address all the concerns of distributed computing, but we must certainly emphasize their implications while choosing a distributed model for performance testing.
4. Distributed Performance Testing with Gatling
Now that we’ve understood the need for distributed performance testing, we’ll see how we can achieve this using Gatling. The clustering-mode is a built-in feature of Gatling Frontline. However, Frontline is the enterprise version of Gatling and not available as open-source. Frontline has support for deploying injectors on-premises, or on any of the popular cloud vendors.
Nevertheless, it’s still possible to achieve this with Gatling open-source. But, we’ll have to do most of the heavy lifting ourselves. We’ll cover the basic steps to achieve it in this section. Here, we’ll use the same simulation that we defined earlier to generate a multiple-machine load.
4.1. Setup
We’ll begin by creating a controller machine and several remote worker machines, either on-premise or on any of the cloud vendors. There are certain prerequisites that we have to perform on all these machines. These include installing Gatling open-source on all worker machines and setting up some controller machine environment variables.
To achieve a consistent result, we should install the same version of Gatling on all worker machines, with the same configuration on each one. This includes the directory we install Gatling in and the user we create to install it.
Let’s see the important environment variables that we need to set on the controller machine:
HOSTS=( 192.168.x.x 192.168.x.x 192.168.x.x)And let’s also define the list of remote worker machines that we’ll use to inject the load from:
GATLING_HOME=/gatling/gatling-charts-highcharts-1.5.6
GATLING_SIMULATIONS_DIR=$GATLING_HOME/user-files/simulations
SIMULATION_NAME='randomapi.RandomAPILoadTest'
GATLING_RUNNER=$GATLING_HOME/bin/gatling.sh
GATLING_REPORT_DIR=$GATLING_HOME/results/
GATHER_REPORTS_DIR=/gatling/reports/
Some variables point to the Gatling installation directory and other scripts that we need to start the simulation. It also mentions the directory where we wish to generate the reports. We’ll see where to use them later on.
It’s important to note that we’re assuming the machines have a Linux-like environment. But, we can easily adapt the procedure for other platforms like Windows.
4.2. Distributing Load
Here, we’ll copy the same scenario to multiple worker machines that we created earlier. There can be several ways to copy the simulation to a remote host. The simplest way is to use scp for supported hosts. We can also automate this using a shell script:
for HOST in "${HOSTS[@]}"
do
  scp -r $GATLING_SIMULATIONS_DIR/* $USER_NAME@$HOST:$GATLING_SIMULATIONS_DIR
done
The above command copies a directory’s contents on the local host to a directory on the remote host. For windows users, PuTTY is a better option that also comes with PSCP (PuTTY Secure Copy Protocol). We can use PSCP to transfer files between Windows clients and Windows or Unix servers.
4.3. Executing Simulation
Once we’ve copied the simulations to the worker machines, we’re ready to trigger them. The key to achieving an aggregated number of concurrent users is to execute the simulation on all hosts, almost simultaneously.
We can again automate this step using a shell script:
for HOST in "${HOSTS[@]}"
do
  ssh -n -f $USER_NAME@$HOST \
    "sh -c 'nohup $GATLING_RUNNER -nr -s $SIMULATION_NAME \
    > /gatling/run.log 2>&1 &'"
done
We’re using ssh to trigger the simulation on remote worker machines. The key point to note here is that we’re using the “no reports” option (-nr). This is because we’re only interested in collecting the logs at this stage, and we’ll create the report by combining logs from all worker machines later.
4.4. Gathering Results
Now, we need to collect the log files generated by simulations on all the worker machines. This is, again, something we can automate using a shell script and execute from the controller machine:
for HOST in "${HOSTS[@]}"
do
  ssh -n -f $USER_NAME@$HOST \
    "sh -c 'ls -t $GATLING_REPORT_DIR | head -n 1 | xargs -I {} \
    mv ${GATLING_REPORT_DIR}{} ${GATLING_REPORT_DIR}report'"
  scp $USER_NAME@$HOST:${GATLING_REPORT_DIR}report/simulation.log \
    ${GATHER_REPORTS_DIR}simulation-$HOST.log
done
The commands may seem complex for those of us not well versed with shell scripting. But, it’s not that complex when we break them into parts. First, we ssh into a remote host, list all the files in the Gatling report directory in reverse chronological order, and take the first file.
Then, we copy the selected logfile from the remote host to the controller machine and rename it to append the hostname. This is important, as we’ll have multiple log files with the same name from different hosts.
4.5. Generating a Report
Lastly, we have to generate a report from all the log files collected from simulations executed on different worker machines. Thankfully, Gatling does all the heavy lifting here:
mv $GATHER_REPORTS_DIR $GATLING_REPORT_DIR
$GATLING_RUNNER -ro reports
We copy all the log files into the standard Gatling report directory and execute the Gating command to generate the report. This assumes that we have Gatling installed on the controller machine as well. The final report is similar to what we’ve seen earlier:
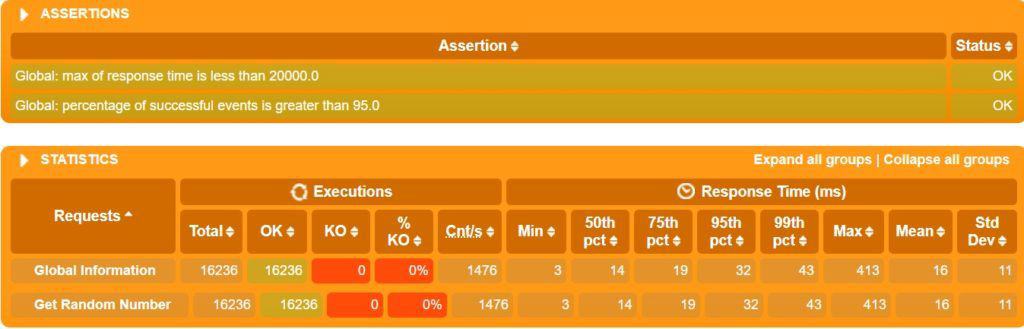
Here, we don’t even realize that the load was actually injected from multiple machines! We can clearly see that the number of requests almost tripled when we used three worker machines. In real-life scenarios, the scaling would not be this perfectly linear, though!
5. Considerations for Scaling Performance Testing
We’ve seen that distributed performance testing is a way to scale performance testing to simulate real-life workloads. Now, while distributed performance testing is useful, it does have its nuances. Hence, we should definitely attempt to scale the load injection capability vertically as much as possible. Only when we reach the vertical limit on a single machine should we consider using distributed testing.
Typically, the limiting factors to scale load injection on a machine comes from the underlying operating system or network. There are certain things we can optimize to make this better. In Linux-like environments, the number of concurrent users that a load injector can spawn is generally limited by the open files limit. We can consider increasing it using the ulimit command.
Another important factor concerns the resources available on the machine. For instance, load injection typically consumes a lot of network bandwidth. If the network throughput of the machine is the limiting factor, we can consider upgrading it. Similarly, CPU or memory available on the machine can be other limiting factors. In cloud-based environments, it’s fairly easy to switch to a more powerful machine.
Finally, the scenarios that we include in our simulation should be resilient, as we should not assume a positive response always under load. Hence, we should be careful and defensive in writing our assertions on the response. Also, we should keep the number of assertions to the bare minimum to save our effort for increasing the throughput.
6. Conclusion
In this tutorial, we went through the basics of executing a distributed performance test with Gatling. We created a simple application to test, developed a simple simulation in Gatling, and then understood how we could execute this from multiple machines.
In the process, we also understood the need for distributed performance testing and the best practices related to it.


