1. Overview
In this tutorial, we’ll introduce one of the behavioral GoF design patterns – the State pattern.
At first, we’ll give an overview of its purpose and explain the problem it tries to solve. Then, we’ll have a look at the State’s UML diagram and implementation of the practical example.
2. State Design Pattern
The main idea of State pattern is to allow the object for changing its behavior without changing its class. Also, by implementing it, the code should remain cleaner without many if/else statements.
Imagine we have a package which is sent to a post office, the package itself can be ordered, then delivered to a post office and finally received by a client. Now, depending on the actual state, we want to print its delivery status.
The simplest approach would be to add some boolean flags and apply simple if/else statements within each of our methods in the class. That won’t complicate it much in a simple scenario. However, it might complicate and pollute our code when we’ll get more states to process which will result in even more if/else statements.
Besides, all logic for each of the states would be spread across all methods. Now, this is where the State pattern might be considered to use. Thanks to the State design pattern, we can encapsulate the logic in dedicated classes, apply the Single Responsibility Principle and Open/Closed Principle, have cleaner and more maintainable code.
3. UML Diagram
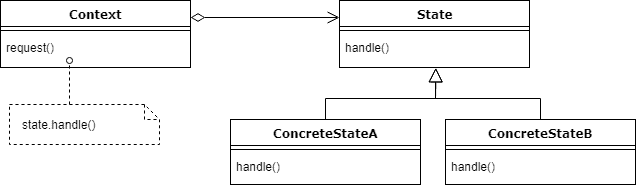
In the UML diagram, we see that Context class has an associated State which is going to change during program execution.
Our context is going to delegate the behavior to the state implementation. In other words, all incoming requests will be handled by the concrete implementation of the state.
We see that logic is separated and adding new states is simple – it comes down to adding another State implementation if needed.
4. Implementation
Let’s design our application. As already mentioned, the package can be ordered, delivered and received, therefore we’re going to have three states and the context class.
First, let’s define our context, that’s going to be a Package class:
public class Package {

    private PackageState state = new OrderedState();

    // getter, setter

    public void previousState() {
        state.prev(this);
    }

    public void nextState() {
        state.next(this);
    }

    public void printStatus() {
        state.printStatus();
    }
}
As we can see, it contains a reference for managing the state, notice previousState(), nextState() and printStatus() methods where we delegate the job to the state object. The states will be linked to each other and every state will set another one based on this reference passed to both methods.
The client will interact with the Package class, yet he won’t have to deal with setting the states, all the client has to do is go to the next or previous state.
Next, we’re going to have the PackageState which has three methods with the following signatures:
public interface PackageState {

    void next(Package pkg);
    void prev(Package pkg);
    void printStatus();
}
This interface will be implemented by each concrete state class.
The first concrete state will be OrderedState:
public class OrderedState implements PackageState {

    @Override
    public void next(Package pkg) {
        pkg.setState(new DeliveredState());
    }

    @Override
    public void prev(Package pkg) {
        System.out.println("The package is in its root state.");
    }

    @Override
    public void printStatus() {
        System.out.println("Package ordered, not delivered to the office yet.");
    }
}
Here, we point to the next state which will occur after the package is ordered. The ordered state is our root state and we mark it explicitly. We can see in both methods how the transition between states is handled.
Let’s have a look at the DeliveredState class:
public class DeliveredState implements PackageState {

    @Override
    public void next(Package pkg) {
        pkg.setState(new ReceivedState());
    }

    @Override
    public void prev(Package pkg) {
        pkg.setState(new OrderedState());
    }

    @Override
    public void printStatus() {
        System.out.println("Package delivered to post office, not received yet.");
    }
}
Again, we see the linking between the states. The package is changing its state from ordered to delivered, the message in the printStatus() changes as well.
The last status is ReceivedState:
public class ReceivedState implements PackageState {

    @Override
    public void next(Package pkg) {
        System.out.println("This package is already received by a client.");
    }

    @Override
    public void prev(Package pkg) {
        pkg.setState(new DeliveredState());
    }
}
This is where we reach the last state, we can only rollback to the previous state.
We already see there is some payoff since one state knows about the other. We’re making them tightly coupled.
5. Testing
Let’s see how the implementation behaves. First, let’s verify whether setup transitions work as expected:
@Test
public void givenNewPackage_whenPackageReceived_thenStateReceived() {
    Package pkg = new Package();

    assertTrue(pkg.getState() instanceOf OrderedState);
    pkg.nextState();

    assertTrue(pkg.getState() instanceOf DeliveredState);
    pkg.nextState();

    assertTrue(pkg.getState() instanceOf ReceivedState);
}
Then, quick check if our package can move back with its state:
@Test
public void givenDeliveredPackage_whenPrevState_thenStateOrdered() {
    Package pkg = new Package();
    pkg.setState(new DeliveredState());
    pkg.previousState();

    assertTrue(pkg.getState() instanceOf OrderedState);
}
After that, let’s verify change the state and see how the implementation of printStatus() method changes its implementation at runtime:
public class StateDemo {

    public static void main(String[] args) {

        Package pkg = new Package();
        pkg.printStatus();

        pkg.nextState();
        pkg.printStatus();

        pkg.nextState();
        pkg.printStatus();

        pkg.nextState();
        pkg.printStatus();
    }
}
This will give us the following output:
Package ordered, not delivered to the office yet.
Package delivered to post office, not received yet.
Package was received by client.
This package is already received by a client.
Package was received by client.
As we’ve been changing the state of our context, the behavior was changing but the class remains the same. As well as the API we make use of.
Also, the transition between the states has occurred, our class changed its state and consequentially its behavior.
6. Downsides
State pattern drawback is the payoff when implementing transition between the states. That makes the state hardcoded, which is a bad practice in general.
But, depending on our needs and requirements, that might or might not be an issue.
7. State vs. Strategy Pattern
Both design patterns are very similar, but their UML diagram is the same, with the idea behind them slightly different.
First, the strategy pattern defines a family of interchangeable algorithms. Generally, they achieve the same goal, but with a different implementation, for example, sorting or rendering algorithms.
In state pattern, the behavior might change completely, based on actual state.
Next, in strategy, the client has to be aware of the possible strategies to use and change them explicitly. Whereas in state pattern, each state is linked to another and create the flow as in Finite State Machine.
8. Conclusion
The state design pattern is great when we want to avoid primitive if/else statements. Instead, we extract the logic to separate classes and let our context object delegate the behavior to the methods implemented in the state class. Besides, we can leverage the transitions between the states, where one state can alter the state of the context.
In general, this design pattern is great for relatively simple applications, but for a more advanced approach, we can have a look at Spring’s State Machine tutorial.
As usual, the complete code is available on the GitHub project.