A Guide to the Spring State Machine Project
Last updated: June 12, 2025


Mocking is an essential part of unit testing, and the Mockito library makes it easy to write clean and intuitive unit tests for your Java code.
Get started with mocking and improve your application tests using our Mockito guide:
Handling concurrency in an application can be a tricky process with many potential pitfalls. A solid grasp of the fundamentals will go a long way to help minimize these issues.
Get started with understanding multi-threaded applications with our Java Concurrency guide:
Spring 5 added support for reactive programming with the Spring WebFlux module, which has been improved upon ever since. Get started with the Reactor project basics and reactive programming in Spring Boot:
Since its introduction in Java 8, the Stream API has become a staple of Java development. The basic operations like iterating, filtering, mapping sequences of elements are deceptively simple to use.
But these can also be overused and fall into some common pitfalls.
To get a better understanding on how Streams work and how to combine them with other language features, check out our guide to Java Streams:
Explore Spring Boot 3 and Spring 6 in-depth through building a full REST API with the framework:
Yes, Spring Security can be complex, from the more advanced functionality within the Core to the deep OAuth support in the framework.
I built the security material as two full courses - Core and OAuth, to get practical with these more complex scenarios. We explore when and how to use each feature and code through it on the backing project.
You can explore the course here:
Spring Data JPA is a great way to handle the complexity of JPA with the powerful simplicity of Spring Boot.
Get started with Spring Data JPA through the guided reference course:
Refactor Java code safely — and automatically — with OpenRewrite.
Refactoring big codebases by hand is slow, risky, and easy to put off. That’s where OpenRewrite comes in. The open-source framework for large-scale, automated code transformations helps teams modernize safely and consistently.
Each month, the creators and maintainers of OpenRewrite at Moderne run live, hands-on training sessions — one for newcomers and one for experienced users. You’ll see how recipes work, how to apply them across projects, and how to modernize code with confidence.
Join the next session, bring your questions, and learn how to automate the kind of work that usually eats your sprint time.
1. Introduction
This article is focused on Spring’s State Machine project – which can be used to represent workflows or any other kind of finite state automata representation problems.
2. Maven Dependency
To get started, we need to add the main Maven dependency:
<dependency>
    <groupId>org.springframework.statemachine</groupId>
    <artifactId>spring-statemachine-core</artifactId>
    <version>3.2.0.RELEASE</version>
</dependency>
The latest version of this dependency may be found here.
3. State Machine Configuration
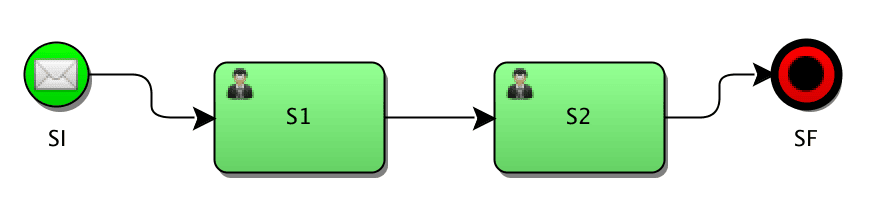
Now, let’s get started by defining a simple state machine:
@Configuration
@EnableStateMachine
public class SimpleStateMachineConfiguration
  extends StateMachineConfigurerAdapter<String, String> {

    @Override
    public void configure(StateMachineStateConfigurer<String, String> states)
      throws Exception {

        states
          .withStates()
          .initial("SI")
          .end("SF")
          .states(
            new HashSet<String>(Arrays.asList("S1", "S2", "S3")));

    }

    @Override
    public void configure(
      StateMachineTransitionConfigurer<String, String> transitions)
      throws Exception {

        transitions.withExternal()
          .source("SI").target("S1").event("E1").and()
          .withExternal()
          .source("S1").target("S2").event("E2").and()
          .withExternal()
          .source("S2").target("SF").event("end");
    }
}
Note that this class is annotated as a conventional Spring configuration as well as a state machine. It also needs to extend StateMachineConfigurerAdapter so that various initialization methods can be invoked. In one of the configuration methods, we define all the possible states of the state machine, in the other, how events change the current state.
The configuration above sets out a pretty simple, straight-line transition state machine which should be easy enough to follow.
Now we need to start a Spring context and obtain a reference to the state machine defined by our configuration:
@Autowired
private StateMachine<String, String> stateMachine;
Once we have the state machine, it needs to be started:
stateMachine.start();Now that our machine is in the initial state, we can send events and thus trigger transitions:
stateMachine.sendEvent("E1");We can always check the current state of the state machine:
stateMachine.getState();4. Actions
Let us add some actions to be executed around state transitions. First, we define our action as a Spring bean in the same configuration file:
@Bean
public Action<String, String> initAction() {
    return ctx -> System.out.println(ctx.getTarget().getId());
}
Then we can register the above-created action on the transition in our configuration class:
@Override
public void configure(
  StateMachineTransitionConfigurer<String, String> transitions)
  throws Exception {

    transitions.withExternal()
      .source("SI").target("S1")
      .event("E1").action(initAction())
This action will be executed when the transition from SI to S1 via event E1 occurs. Actions can be attached to the states themselves:
@Bean
public Action<String, String> executeAction() {
    return ctx -> System.out.println("Do" + ctx.getTarget().getId());
}

states
  .withStates()
  .state("S3", executeAction(), errorAction());
This state definition function accepts an operation to be executed when the machine is in the target state and, optionally, an error action handler.
An error action handler is not much different from any other action, but it will be invoked if an exception is thrown any time during the evaluation of state’s actions:
@Bean
public Action<String, String> errorAction() {
    return ctx -> System.out.println(
      "Error " + ctx.getSource().getId() + ctx.getException());
}
It is also possible to register individual actions for entry, do and exit state transitions:
@Bean
public Action<String, String> entryAction() {
    return ctx -> System.out.println(
      "Entry " + ctx.getTarget().getId());
}

@Bean
public Action<String, String> executeAction() {
    return ctx ->
      System.out.println("Do " + ctx.getTarget().getId());
}

@Bean
public Action<String, String> exitAction() {
    return ctx -> System.out.println(
      "Exit " + ctx.getSource().getId() + " -> " + ctx.getTarget().getId());
}
states
.withStates()
.stateEntry("S3", entryAction())
.state("S3", executeAction())
.stateExit("S3", exitAction());Respective actions will be executed on the corresponding state transitions. For example, we might want to verify some pre-conditions at the time of entry or trigger some reporting at the time of exit.
5. Global Listeners
Global event listeners can be defined for the state machine. These listeners will be invoked any time a state transition occurs and can be utilized for things such as logging or security.
First, we need to add another configuration method – one that does not deal with states or transitions but with the config for the state machine itself.
We need to define a listener by extending StateMachineListenerAdapter:
public class StateMachineListener extends StateMachineListenerAdapter {

    @Override
    public void stateChanged(State from, State to) {
        System.out.printf("Transitioned from %s to %s%n", from == null ?
          "none" : from.getId(), to.getId());
    }
}
Here we only overrode stateChanged though many other event hooks are available.
6. Extended State
Spring State Machine keeps track of its state, but to keep track of our application state, be it some computed values, entries from admins or responses from calling external systems, we need to use what is called an extended state.
Suppose we want to make sure that an account application goes through two levels of approval. We can keep track of approvals count using an integer stored in the extended state:
@Bean
public Action<String, String> executeAction() {
    return ctx -> {
        int approvals = (int) ctx.getExtendedState().getVariables()
          .getOrDefault("approvalCount", 0);
        approvals++;
        ctx.getExtendedState().getVariables()
          .put("approvalCount", approvals);
    };
}
7. Guards
A guard can be used to validate some data before a transition to a state is executed. A guard looks very similar to an action:
@Bean
public Guard<String, String> simpleGuard() {
    return ctx -> (int) ctx.getExtendedState()
      .getVariables()
      .getOrDefault("approvalCount", 0) > 0;
}
The noticeable difference here is that a guard returns a true or false which will inform the state machine whether the transition should be allowed to occur.
Support for SPeL expressions as guards also exists. The example above could also have been written as:
.guardExpression("extendedState.variables.approvalCount > 0")8. State Machine from a Builder
StateMachineBuilder can be used to create a state machine without using Spring annotations or creating a Spring context:
StateMachineBuilder.Builder<String, String> builder
  = StateMachineBuilder.builder();
builder.configureStates().withStates()
  .initial("SI")
  .state("S1")
  .end("SF");

builder.configureTransitions()
  .withExternal()
  .source("SI").target("S1").event("E1")
  .and().withExternal()
  .source("S1").target("SF").event("E2");

StateMachine<String, String> machine = builder.build();
9. Hierarchical States
Hierarchical states can be configured by using multiple withStates() in conjunction with parent():
states
  .withStates()
    .initial("SI")
    .state("SI")
    .end("SF")
    .and()
  .withStates()
    .parent("SI")
    .initial("SUB1")
    .state("SUB2")
    .end("SUBEND");
This kind of setup allows the state machine to have multiple states, so a call to getState() will produce multiple IDs. For example, immediately after startup the following expression results in:
stateMachine.getState().getIds()
["SI", "SUB1"]
10. Junctions (Choices)
So far, we’ve created state transitions which were linear by nature. Not only is this rather uninteresting, but it also does not reflect real-life use-cases that a developer will be asked to implement either. The odds are conditional paths will need to be implemented, and Spring state machine’s junctions (or choices) allow us to do just that.
First, we need to mark a state a junction (choice) in the state definition:
states
  .withStates()
  .junction("SJ")
Then in the transitions, we define first/then/last options which correspond to an if-then-else structure:
.withJunction()
  .source("SJ")
  .first("high", highGuard())
  .then("medium", mediumGuard())
  .last("low")
first and then take a second argument which is a regular guard which will be invoked to find out which path to take:
@Bean
public Guard<String, String> mediumGuard() {
    return ctx -> false;
}

@Bean
public Guard<String, String> highGuard() {
    return ctx -> false;
}
Note that a transition does not stop at a junction node but will immediately execute defined guards and go to one of the designated routes.
In the example above, instructing state machine to transition to SJ will result in the actual state to become low as the both guards just return false.
A final note is that the API provides both junctions and choices. However, functionally they are identical in every aspect.
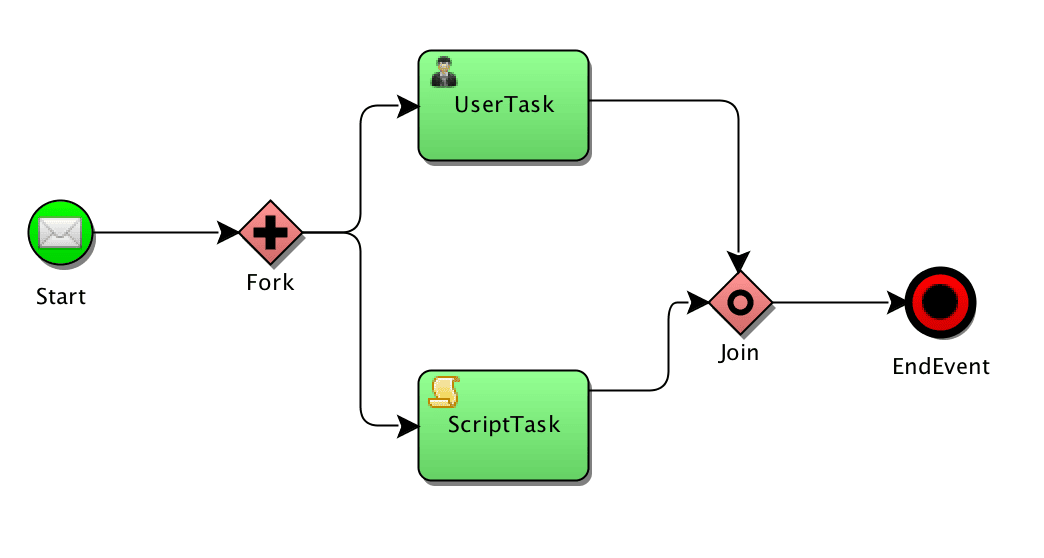
11. Fork
Sometimes it becomes necessary to split the execution into multiple independent execution paths. This can be achieved using the fork functionality.
First, we need to designate a node as a fork node and create hierarchical regions into which the state machine will perform the split:
states
  .withStates()
  .initial("SI")
  .fork("SFork")
  .and()
  .withStates()
    .parent("SFork")
    .initial("Sub1-1")
    .end("Sub1-2")
  .and()
  .withStates()
    .parent("SFork")
    .initial("Sub2-1")
    .end("Sub2-2");
Then define fork transition:
.withFork()
  .source("SFork")
  .target("Sub1-1")
  .target("Sub2-1");
12. Join
The complement of the fork operation is the join. It allows us to set a state transitioning to which is dependent on completing some other states:
As with forking, we need to designate a join node in the state definition:
states
  .withStates()
  .join("SJoin")
Then in transitions, we define which states need to complete to enable our join state:
transitions
  .withJoin()
    .source("Sub1-2")
    .source("Sub2-2")
    .target("SJoin");
That’s it! With this configuration, when both Sub1-2 and Sub2-2 are achieved, the state machine will transition to SJoin
13. Enums Instead of Strings
In the examples above we have used string constants to define states and events for clarity and simplicity. On a real-world production system, one would probably want to use Java’s enums to avoid spelling errors and gain more type safety.
First, we need to define all possible states and events in our system:
public enum ApplicationReviewStates {
    PEER_REVIEW, PRINCIPAL_REVIEW, APPROVED, REJECTED
}

public enum ApplicationReviewEvents {
    APPROVE, REJECT
}
We also need to pass our enums as generic parameters when we extend the configuration:
public class SimpleEnumStateMachineConfiguration
  extends StateMachineConfigurerAdapter
  <ApplicationReviewStates, ApplicationReviewEvents>
Once defined, we can use our enum constants instead of strings. For example to define a transition:
transitions.withExternal()
  .source(ApplicationReviewStates.PEER_REVIEW)
  .target(ApplicationReviewStates.PRINCIPAL_REVIEW)
  .event(ApplicationReviewEvents.APPROVE)
14. Conclusion
This article explored some of the features of the Spring state machine.


