

Mocking is an essential part of unit testing, and the Mockito library makes it easy to write clean and intuitive unit tests for your Java code.
Get started with mocking and improve your application tests using our Mockito guide:
Handling concurrency in an application can be a tricky process with many potential pitfalls. A solid grasp of the fundamentals will go a long way to help minimize these issues.
Get started with understanding multi-threaded applications with our Java Concurrency guide:
Spring 5 added support for reactive programming with the Spring WebFlux module, which has been improved upon ever since. Get started with the Reactor project basics and reactive programming in Spring Boot:
Since its introduction in Java 8, the Stream API has become a staple of Java development. The basic operations like iterating, filtering, mapping sequences of elements are deceptively simple to use.
But these can also be overused and fall into some common pitfalls.
To get a better understanding on how Streams work and how to combine them with other language features, check out our guide to Java Streams:
Explore Spring Boot 3 and Spring 6 in-depth through building a full REST API with the framework:
Yes, Spring Security can be complex, from the more advanced functionality within the Core to the deep OAuth support in the framework.
I built the security material as two full courses - Core and OAuth, to get practical with these more complex scenarios. We explore when and how to use each feature and code through it on the backing project.
You can explore the course here:
Spring Data JPA is a great way to handle the complexity of JPA with the powerful simplicity of Spring Boot.
Get started with Spring Data JPA through the guided reference course:
Refactor Java code safely — and automatically — with OpenRewrite.
Refactoring big codebases by hand is slow, risky, and easy to put off. That’s where OpenRewrite comes in. The open-source framework for large-scale, automated code transformations helps teams modernize safely and consistently.
Each month, the creators and maintainers of OpenRewrite at Moderne run live, hands-on training sessions — one for newcomers and one for experienced users. You’ll see how recipes work, how to apply them across projects, and how to modernize code with confidence.
Join the next session, bring your questions, and learn how to automate the kind of work that usually eats your sprint time.
Yes, we're now running our only Summer Sale. All Courses are 30% off until 20th July, 2026:
Yes, we're now running our only Summer Sale. All Courses are 30% off until 20th July, 2026:
1. Overview
Spring WebFlux is a reactive web framework that provides a non-blocking event loop to handle I/O operations asynchronously. Also, it uses Mono and Flux reactive stream publishers to emit data when subscribed to.
This reactive approach helps applications handle large volumes of requests and data without allocating huge resources.
In this tutorial, we’ll learn how to upload multiple files to a directory using Spring WebFlux through a step-by-step guide. Also, we’ll map the filename to an entity class for easy retrieval.
2. Project Setup
Let’s create a simple reactive Spring Boot project that uploads multiple files to a directory. For simplicity, we’ll use the root directory of our project to store the files. In production, we can use a file system like AWS S3, Azure Blob Storage, Oracle Cloud Infrastructure storage, etc.
2.1. Maven Dependencies
To begin with, let’s bootstrap a Spring WebFlux application by adding the spring-boot-starter-webflux dependency to the pom.xml:
<dependency>
    <groupId>org.springframework.boot</groupId>
    <artifactId>spring-boot-starter-webflux</artifactId>
    <version>3.3.2</version>
</dependency>
This provides the core Spring WebFlux APIs and embedded Netty server to build reactive web applications.
Also, let’s add the spring-boot-starter-data-r2dbc and H2 database dependencies to the pom.xml file:
<dependency>
    <groupId>org.springframework.boot</groupId>
    <artifactId>spring-boot-starter-data-r2dbc</artifactId>
    <version>3.2.0</version>
</dependency>
<dependency>
    <groupId>com.h2database</groupId>
    <artifactId>h2</artifactId>
    <version>2.2.224</version>
</dependency>
Spring WebFlux R2DBC is a reactive database connector and the H2 database is an in-memory database.
Finally, let’s add the R2DBC native driver dependency to the pom.xml:
<dependency>
    <groupId>io.r2dbc</groupId>
    <artifactId>r2dbc-h2</artifactId>
    <version>1.0.0.RELEASE</version>
</dependency>
This native driver is implemented for the H2 database.
2.2. Entity, Repository and Controller
Let’s create an entity class named FileRecord:
class FileRecord {
    @Id
    private int id;
    private List<String> filenames;

   // standard getters, setters, constructor
}
Next, let’s create a repository named FileRecordRepository:
@Repository
interface FileRecordRepository extends R2dbcRepository<FileRecord, Integer> {
}
Finally, let’s create a controller class:
@RestController
class FileRecordController {
}
In the subsequent sections, we’ll map our file name and its extension to the fileName field.
3. Uploading Files to a Directory
Occasionally, we may upload multiple files to a filesystem without mapping the filenames to database entities. In this case, retrieving the files later may be challenging.
Let’s see an example code that uploads multiple files to our root directory without mapping the file name to an entity:
PostMapping("/upload-files")
Mono uploadFileWithoutEntity(@RequestPart("files") Flux<FilePart> filePartFlux) {
    return filePartFlux.flatMap(file -> file.transferTo(Paths.get(file.filename())))
      .then(Mono.just("OK"))
      .onErrorResume(error -> Mono.just("Error uploading files"));
}
First, we create a method named uploadFileWithoutEntity() which accepts Flux of FilePart objects. Then, we invoke the flatMap() method on each FilePart object to transfer the file and return a Mono. This creates a separate Mono for each file transfer operation and flattens the stream of Monos into a single Mono.
Let’s test the endpoint by uploading multiple files through Postman:
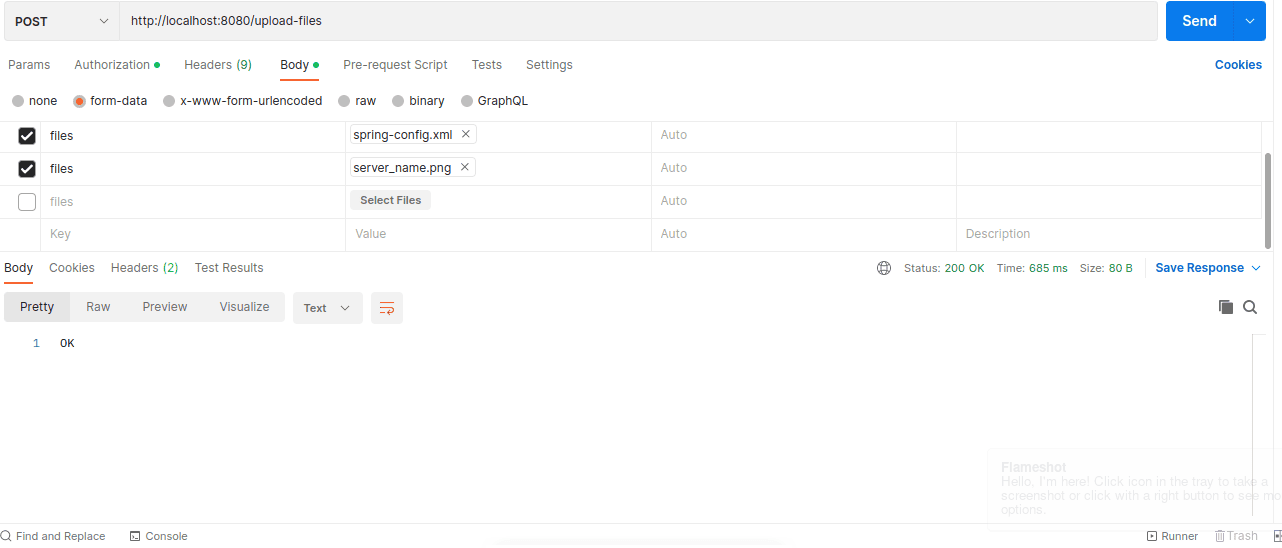
In the image above, we upload three files to the project root directory. The endpoint returns OK to show that the operation was completed successfully.
Notably, we use the onErrorResume() method to handle errors related to file upload explicitly. In a case where failure occurs while uploading, the endpoint returns the error message.
However, files uploaded earlier may have been transferred successfully before the failure. In this case, clean-up may be needed to delete partially uploaded files on error. For simplicity, we didn’t cover the clean-up process.
4. Mapping Uploaded Files to Database Entities
Furthermore, we can map the file name to the database entity. This gives us the flexibility to retrieve files by their Id later. This is useful when we want to display an image or perform further computation.
4.1. Database Configuration
First, let’s create a schema.sql file in the resource folder to define the database table structure:
CREATE TABLE IF NOT EXISTS file_record (
    id INT NOT NULL AUTO_INCREMENT,
    filenames VARCHAR(255),
    PRIMARY KEY (id)
);
Here, we create a file record table to store the uploaded file name and its extension. Next, let’s write a configuration to initialize the schema on startup:
@Bean
ConnectionFactoryInitializer initializer(ConnectionFactory connectionFactory) {
    ConnectionFactoryInitializer initializer = new ConnectionFactoryInitializer();
    initializer.setConnectionFactory(connectionFactory);
    initializer.setDatabasePopulator(new ResourceDatabasePopulator(new ClassPathResource("schema.sql")));

    return initializer;
}
Also, let’s define the database URL in the application.properties file:
spring.r2dbc.url=r2dbc:h2:file:///./testdb
Here, we define the R2DBC URL to connect to the H2 database. For simplicity, the database isn’t protected with a password.
4.2. Service Layer
First, let’s create a service class and add the logic to handle data persistence:
@Service
public class FileRecordService {

    private FileRecordRepository fileRecordRepository;

    public FileRecordService(FileRecordRepository fileRecordRepository) {
        this.fileRecordRepository = fileRecordRepository;
    }

    public Mono<FileRecord> save(FileRecord fileRecord) {
        return fileRecordRepository.save(fileRecord);
    }
}
Here, we inject the FileRecordRepository interface in the service class and define the logic to save the file name and its extension in the database.
Next, let’s inject the FileRecordService class into the controller class:
private FileRecordService fileRecordService;

public FileRecordController(FileRecordService fileRecordService) {
    this.fileRecordService = fileRecordService;
}
The code above makes the logic to persist data available in the controller class.
4.3. Upload Endpoint
Finally, let’s write an endpoint that uploads multiple files to the root directory and maps the file names and their extension to an entity class:
@PostMapping("/upload-files-entity")
Mono uploadFileWithEntity(@RequestPart("files") Flux<FilePart> filePartFlux) {
    FileRecord fileRecord = new FileRecord();

    return filePartFlux.flatMap(filePart -> filePart.transferTo(Paths.get(filePart.filename()))
      .then(Mono.just(filePart.filename())))
      .collectList()
      .flatMap(filenames -> {
          fileRecord.setFilenames(filenames);
          return fileRecordService.save(fileRecord);
      })
      .onErrorResume(error -> Mono.error(error));
}
Here, we create an endpoint that emits Mono. It accepts Flux of FilePart and uploads each file. Next, it collects the file name and its extension and maps them to the FileRecord entity.
Let’s test the endpoint with Postman:
Here, we upload two files named spring-config.xml and server_name.png to the server. The POST request emits a Mono showing details of the request.
For simplicity, we didn’t validate the file name, type, and size.
4.4. Retrieve Book by Id
Let’s implement an endpoint to retrieve stored a file record by its Id to view the associated file names.
First, let’s add the logic to retrieve a file record by its Id to the service class:
Mono findById(int id) {
    return fileRecordRepository.findById(id);
}
Here, we invoke the findById() on bookRepository to retrieve the store Book by its id.
Next, let’s write an endpoint to retrieve the file record:
@GetMapping("/files/{id}")
Mono geFilesById(@PathVariable("id") int id) {
    return fileRecordService.findById(id)
      .onErrorResume(error -> Mono.error(error));
}
This endpoint returns a Mono containing the file Id and file name.
Let’s see the endpoint in action using Postman:
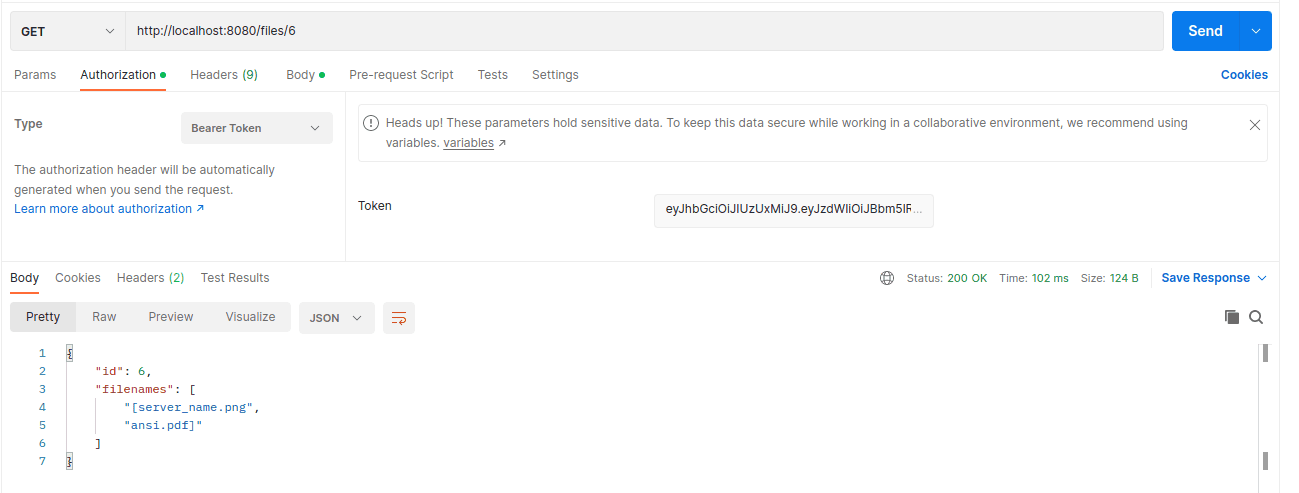
The image above shows the return file information. The image file URLs can be returned in the API response. The client can use these URLs to retrieve and display the images. Additional processing and editing of the images can be implemented by passing the files through processing services.
5. Conclusion
In this article, we learned how to upload multiple files to the server file system using Spring WebFlux. Also, we saw how to upload files with or without mapping the file name and extension to a database entity.
Finally, we saw an approach that uploads the files and persists the file name and its extension to the database.


