A Guide to SAML with Spring Security
Last updated: May 29, 2025

Mocking is an essential part of unit testing, and the Mockito library makes it easy to write clean and intuitive unit tests for your Java code.
Get started with mocking and improve your application tests using our Mockito guide:
Handling concurrency in an application can be a tricky process with many potential pitfalls. A solid grasp of the fundamentals will go a long way to help minimize these issues.
Get started with understanding multi-threaded applications with our Java Concurrency guide:
Spring 5 added support for reactive programming with the Spring WebFlux module, which has been improved upon ever since. Get started with the Reactor project basics and reactive programming in Spring Boot:
Since its introduction in Java 8, the Stream API has become a staple of Java development. The basic operations like iterating, filtering, mapping sequences of elements are deceptively simple to use.
But these can also be overused and fall into some common pitfalls.
To get a better understanding on how Streams work and how to combine them with other language features, check out our guide to Java Streams:
Explore Spring Boot 3 and Spring 6 in-depth through building a full REST API with the framework:
Yes, Spring Security can be complex, from the more advanced functionality within the Core to the deep OAuth support in the framework.
I built the security material as two full courses - Core and OAuth, to get practical with these more complex scenarios. We explore when and how to use each feature and code through it on the backing project.
You can explore the course here:
Spring Data JPA is a great way to handle the complexity of JPA with the powerful simplicity of Spring Boot.
Get started with Spring Data JPA through the guided reference course:
Refactor Java code safely — and automatically — with OpenRewrite.
Refactoring big codebases by hand is slow, risky, and easy to put off. That’s where OpenRewrite comes in. The open-source framework for large-scale, automated code transformations helps teams modernize safely and consistently.
Each month, the creators and maintainers of OpenRewrite at Moderne run live, hands-on training sessions — one for newcomers and one for experienced users. You’ll see how recipes work, how to apply them across projects, and how to modernize code with confidence.
Join the next session, bring your questions, and learn how to automate the kind of work that usually eats your sprint time.
Yes, we're now running our only Summer Sale. All Courses are 30% off until 20th July, 2026:
Yes, we're now running our only Summer Sale. All Courses are 30% off until 20th July, 2026:
1. Overview
This dependency has reached end-of-life. We have a new article on SAML with Spring Security.
In this tutorial, we’ll explore Spring Security SAML with Okta as an identity provider (IdP).
2. What Is SAML?
Security Assertion Markup Language (SAML) is an open standard that allows an IdP to securely send the user’s authentication and authorization details to the Service Provider (SP). It uses XML-based messages for the communication between the IdP and the SP.
In other words, when a user attempts to access a service, he’s required to log in with the IdP. Once logged in, the IdP sends the SAML attributes with authorization and authentication details in the XML format to the SP.
Apart from providing a secured authentication-transmission mechanism, SAML also promotes Single Sign-On (SSO), allowing users to log in once and reuse the same credentials to log into other service providers.
3. Okta SAML Setup
First, as a prerequisite, we should set up an Okta developer account.
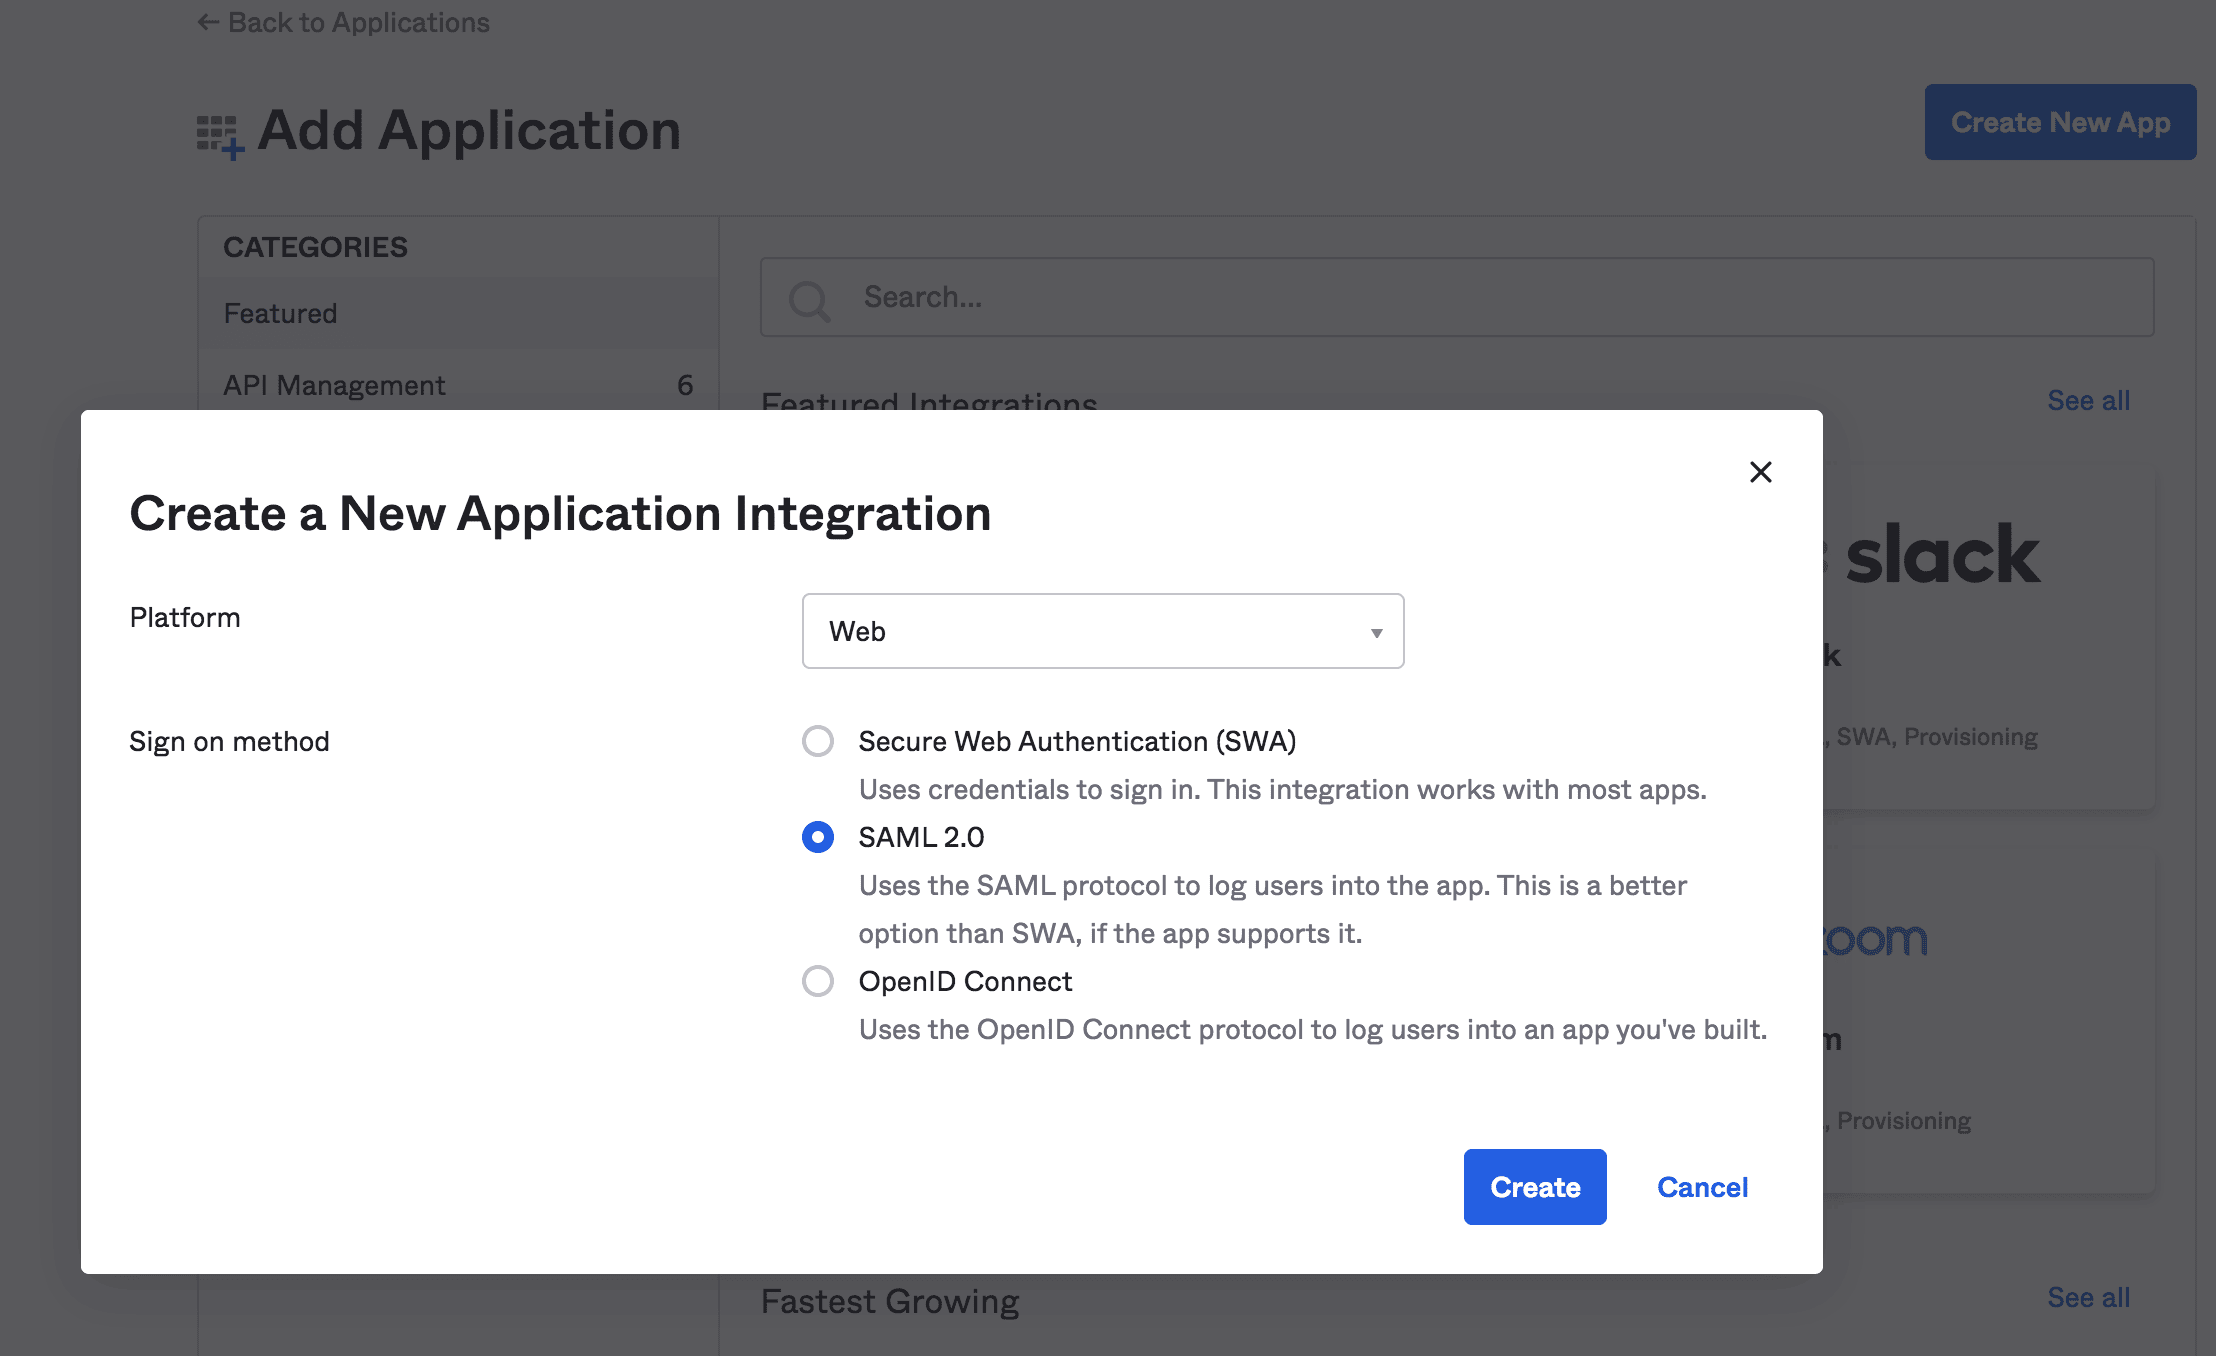
3.1. Create New Application
Then, we’ll create a new Web application integration with SAML 2.0 support:
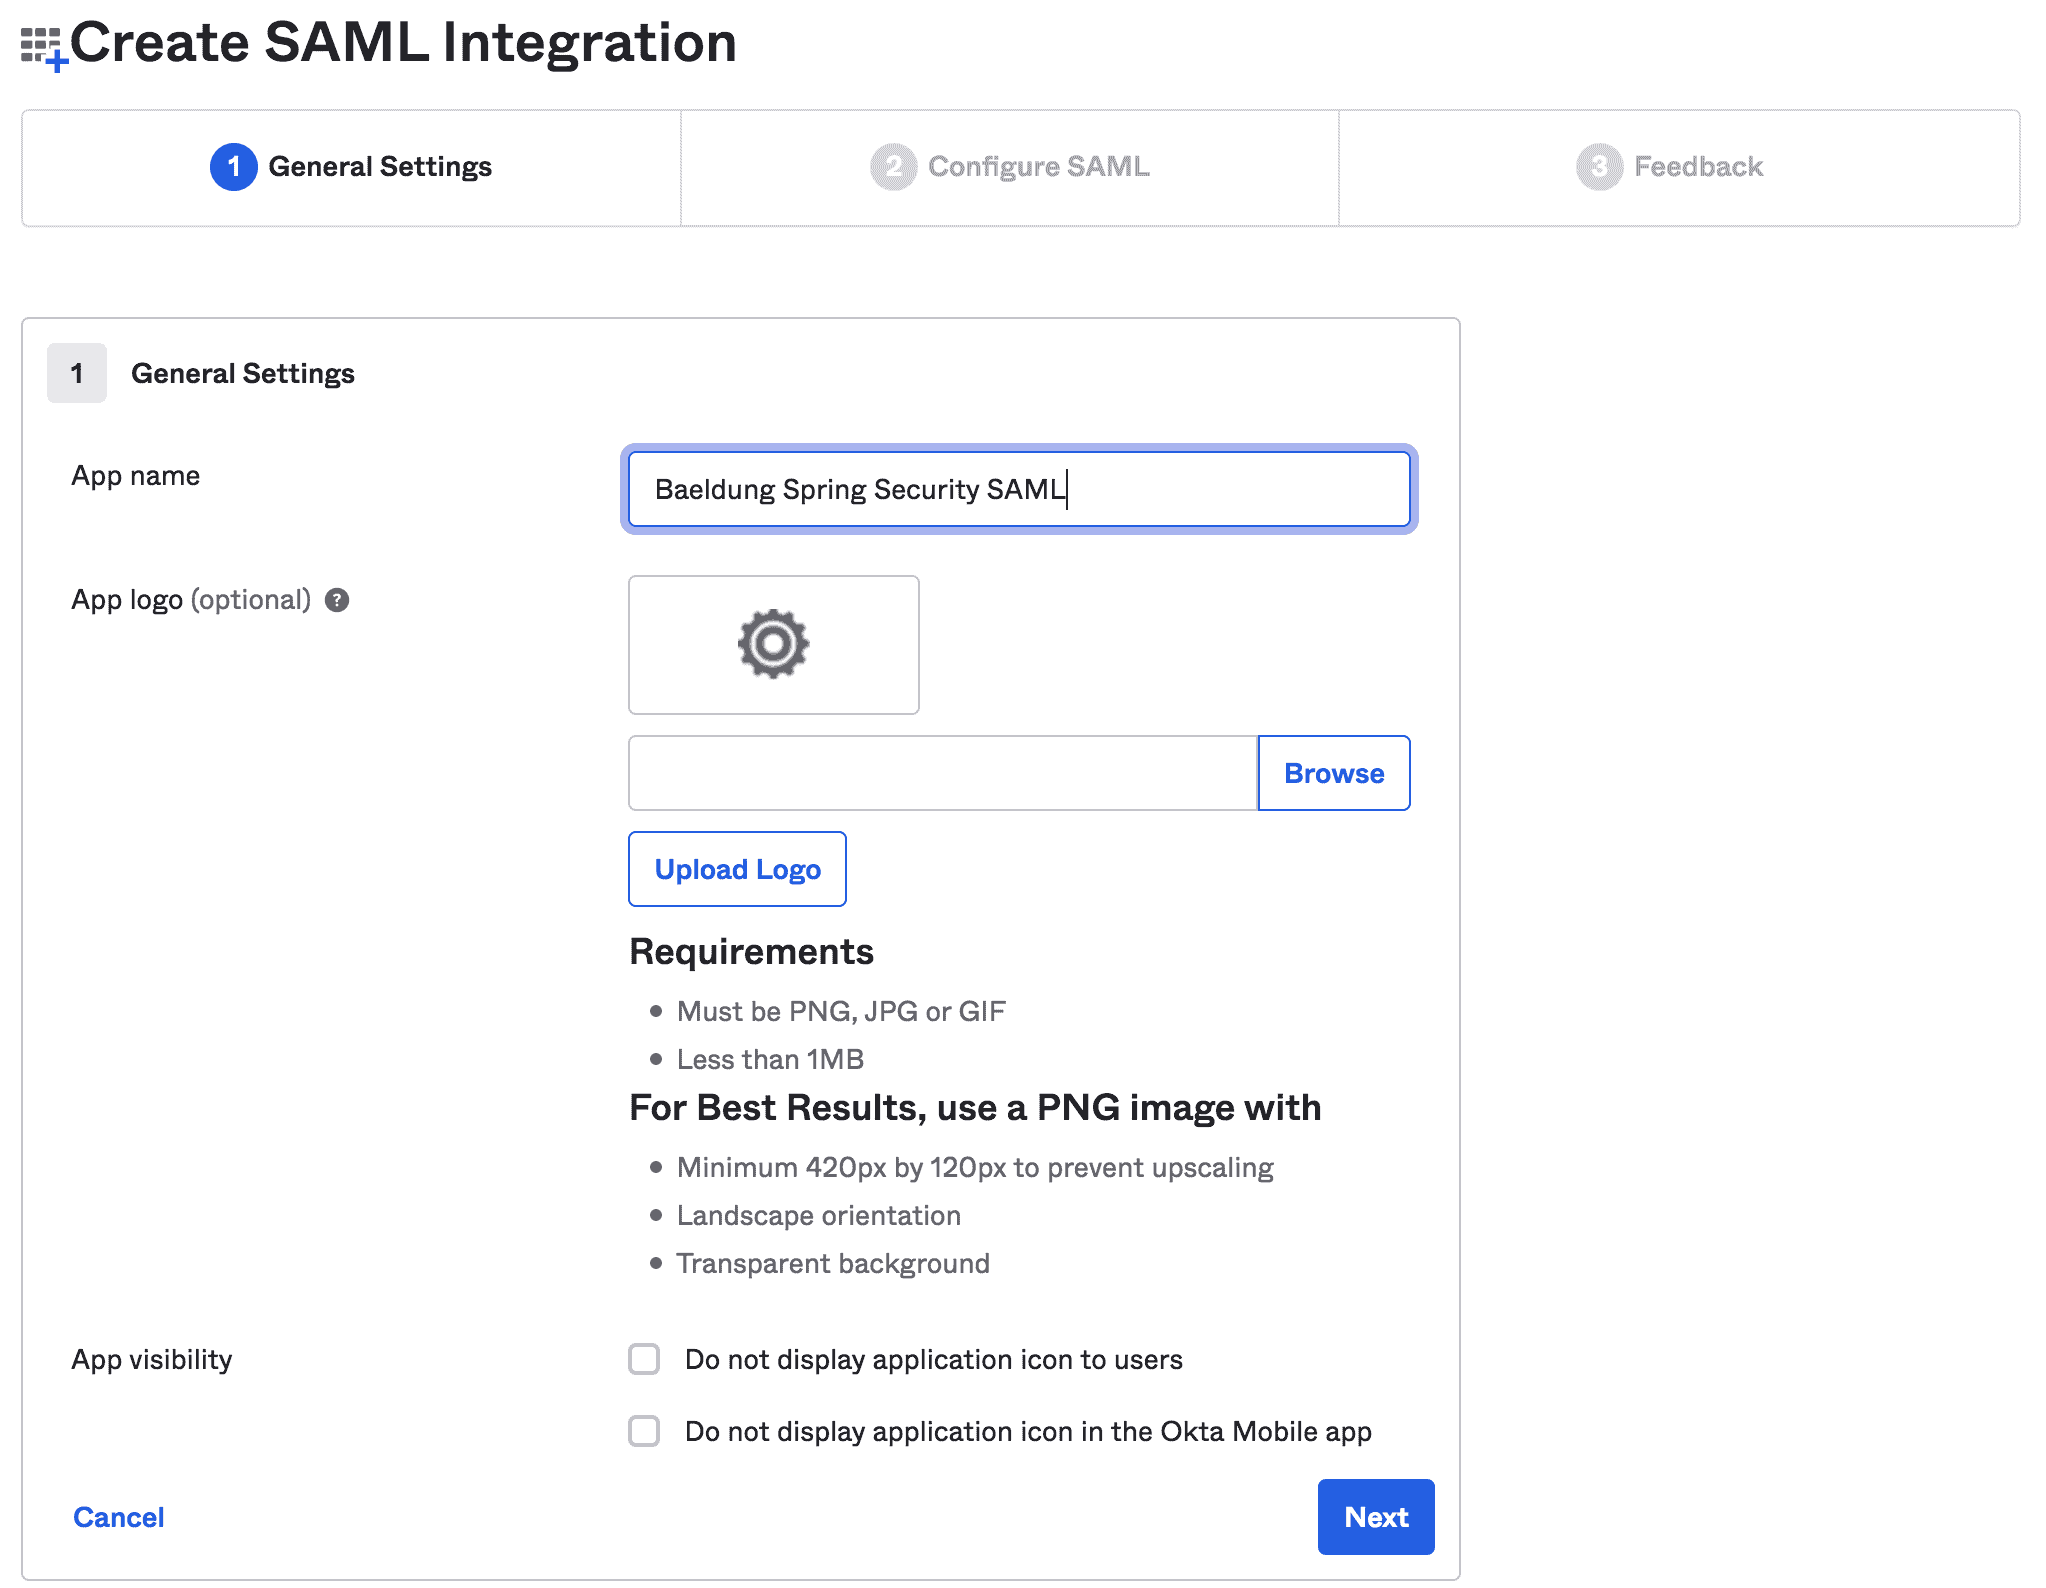
Next, we’ll fill in the general information like App name and App logo:
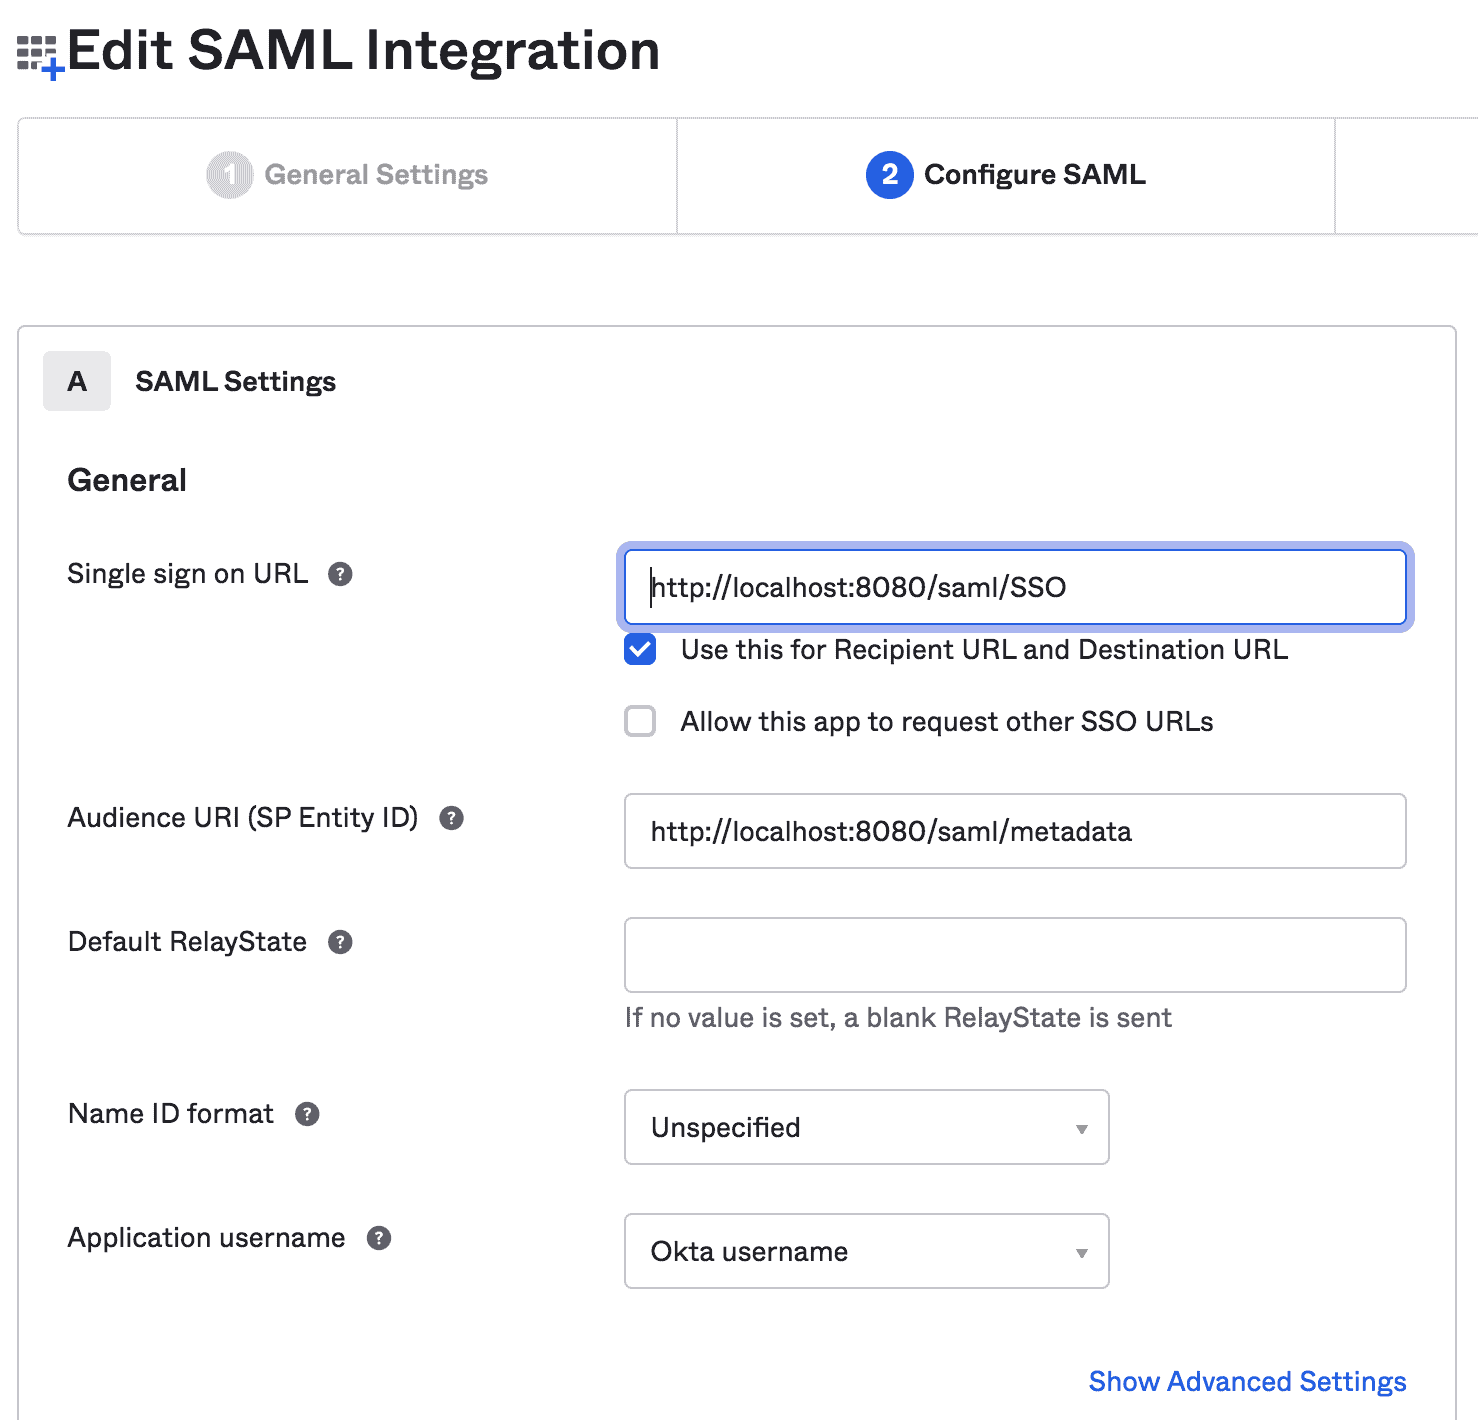
3.2. Edit SAML Integration
In this step, we’ll provide SAML settings like SSO URL and Audience URI:
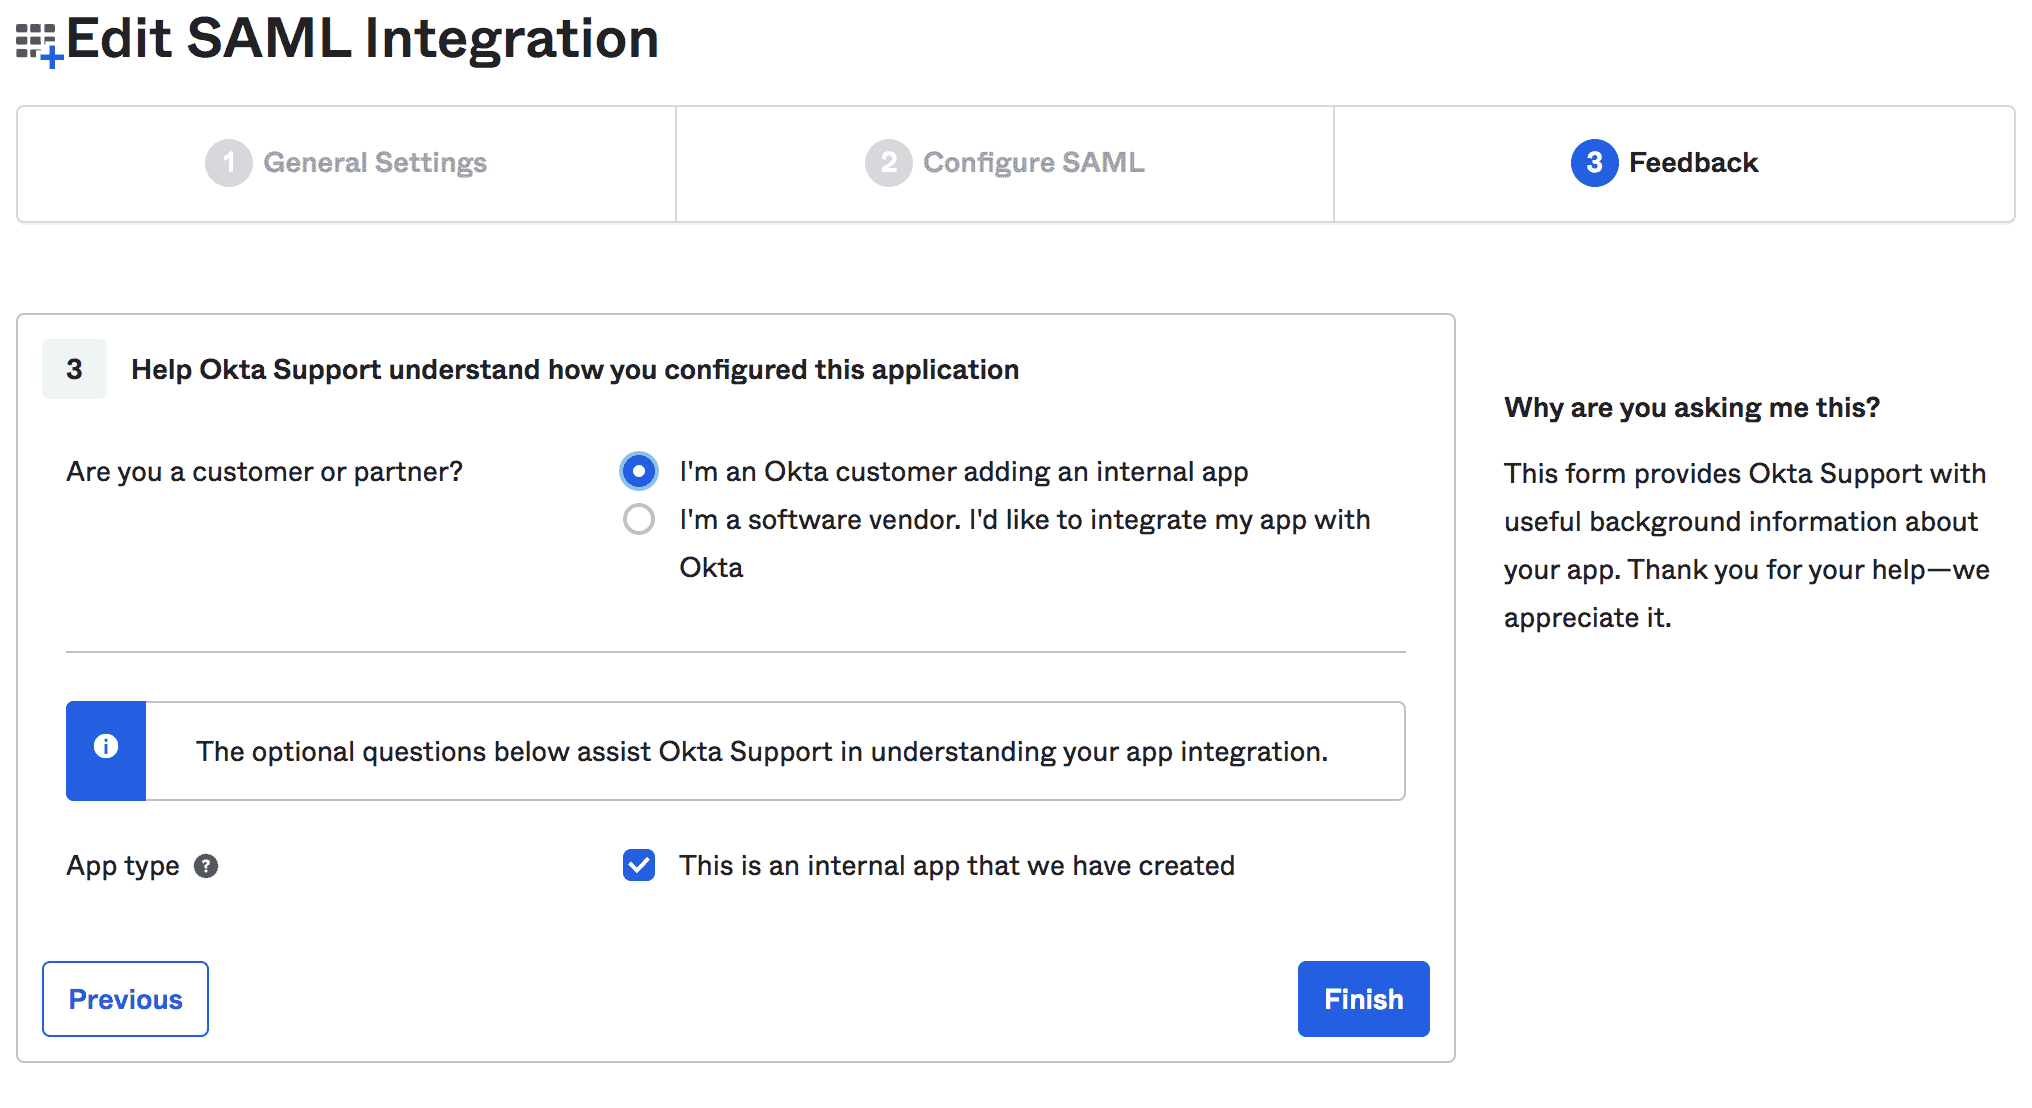
Last, we can provide feedback about our integration:
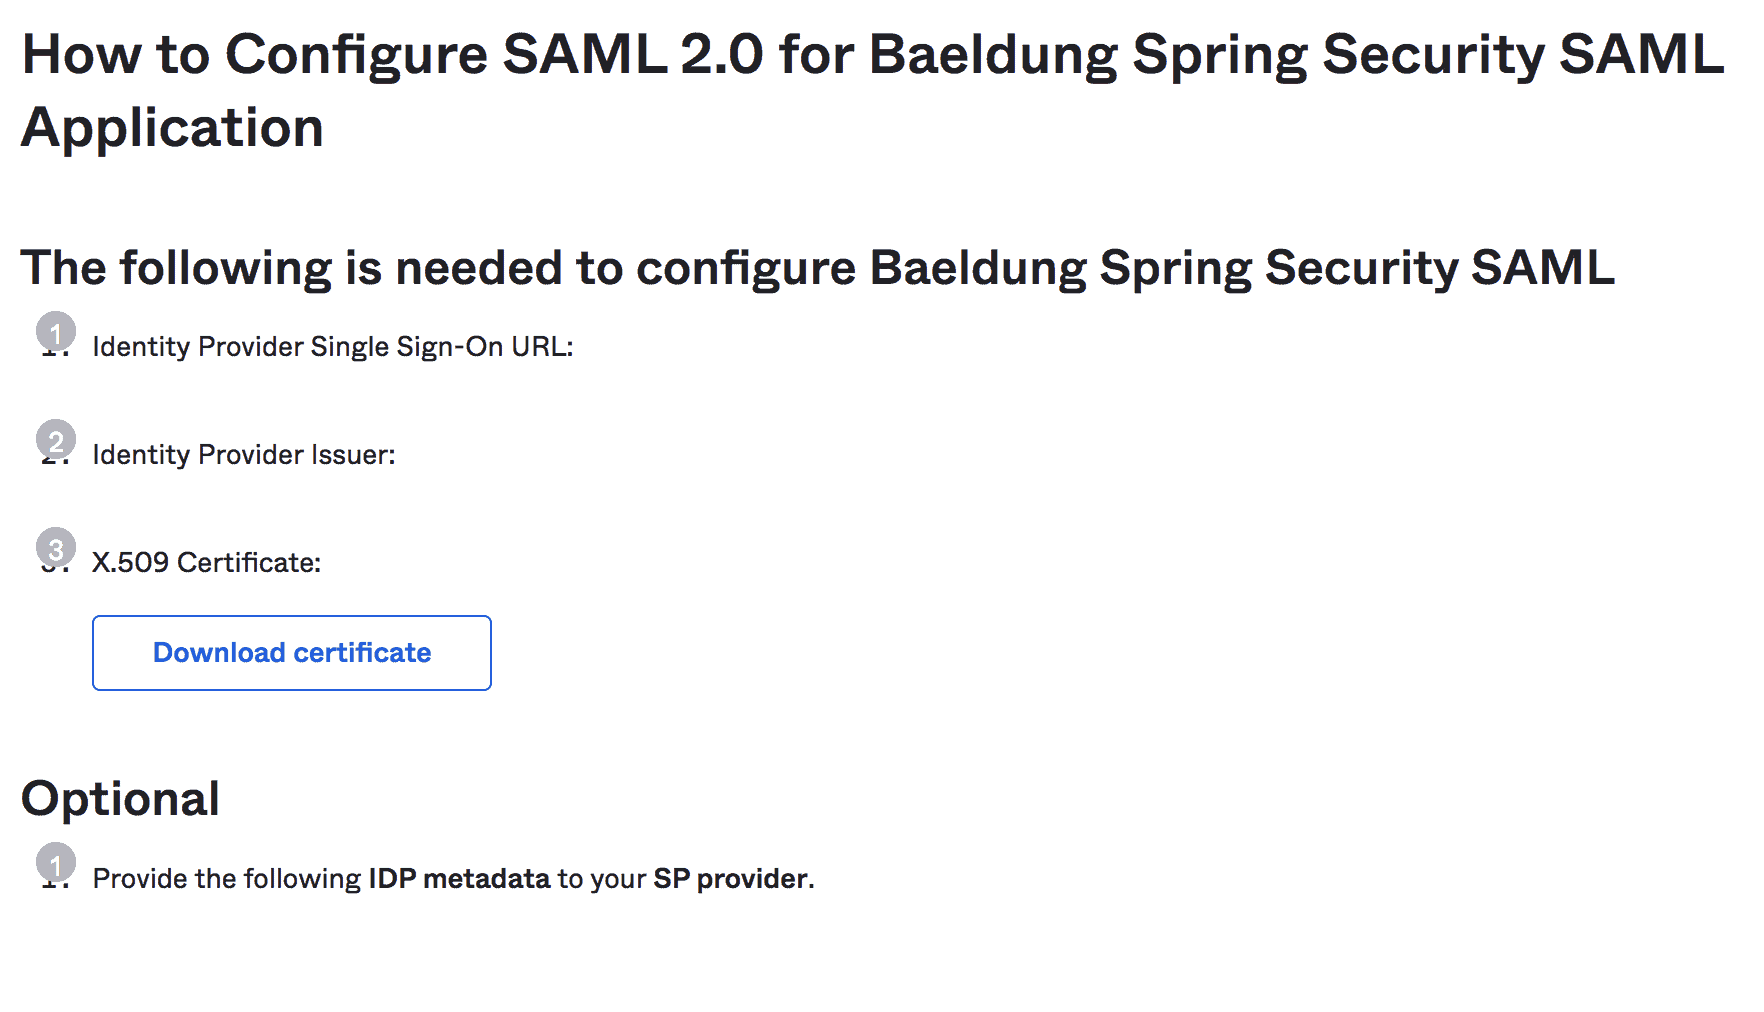
3.3. View Setup Instructions
Once finished, we can view setup instructions for our Spring Boot App:
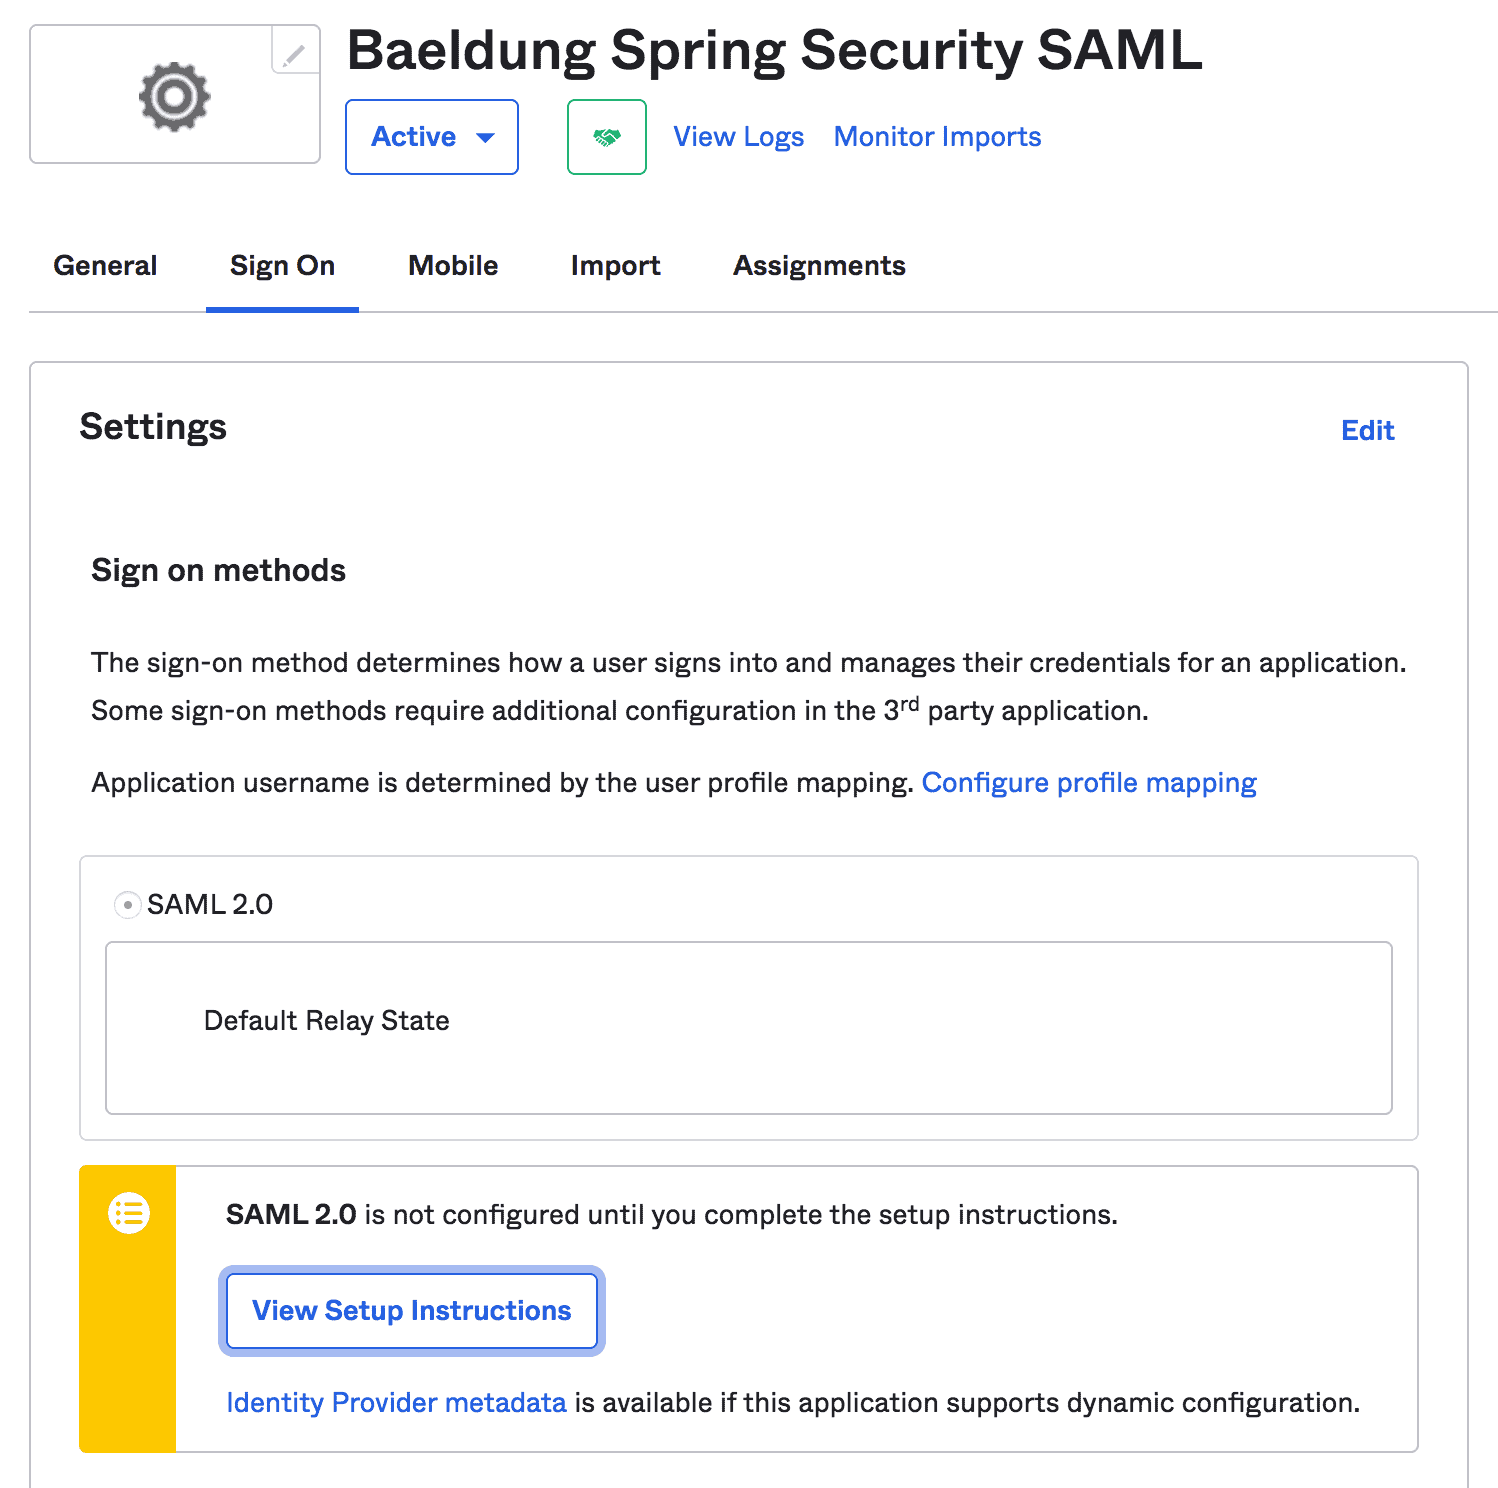
Note: we should copy the instructions like IdP Issuer URL and IdP metadata XML that will be required further in the Spring Security configurations:
4. Spring Boot Setup
Other than usual Maven dependencies like spring-boot-starter-web and spring-boot-starter-security, we’ll require the spring-security-saml2-core dependency:
<dependency>
    <groupId>org.springframework.boot</groupId>
    <artifactId>spring-boot-starter-web</artifactId>
    <version>2.7.2</version>
</dependency>
<dependency>
    <groupId>org.springframework.boot</groupId>
    <artifactId>spring-boot-starter-security</artifactId>
    <version>2.7.2</version>
</dependency>
<dependency>
    <groupId>org.springframework.security.extensions</groupId>
    <artifactId>spring-security-saml2-core</artifactId>
    <version>1.0.10.RELEASE</version>
</dependency>
Also, make sure to add the Shibboleth repository to download the latest opensaml jar required by the spring-security-saml2-core dependency:
<repository>
    <id>Shibboleth</id>
    <name>Shibboleth</name>
    <url>https://build.shibboleth.net/nexus/content/repositories/releases/</url>
</repository>
Alternatively, we can set up the dependencies in a Gradle project:
compile group: 'org.springframework.boot', name: 'spring-boot-starter-web', version: "2.7.2"
compile group: 'org.springframework.boot', name: 'spring-boot-starter-security', version: "2.7.2"
compile group: 'org.springframework.security.extensions', name: 'spring-security-saml2-core', version: "1.0.10.RELEASE"
5. Spring Security Configuration
Now that we have Okta SAML Setup and Spring Boot project ready, let’s start with the Spring Security configurations required for SAML 2.0 integration with Okta.
5.1. SAML Entry Point
First, we’ll create a bean of the SAMLEntryPoint class that will work as an entry point for SAML authentication:
@Bean
public WebSSOProfileOptions defaultWebSSOProfileOptions() {
    WebSSOProfileOptions webSSOProfileOptions = new WebSSOProfileOptions();
    webSSOProfileOptions.setIncludeScoping(false);
    return webSSOProfileOptions;
}

@Bean
public SAMLEntryPoint samlEntryPoint() {
    SAMLEntryPoint samlEntryPoint = new SAMLEntryPoint();
    samlEntryPoint.setDefaultProfileOptions(defaultWebSSOProfileOptions());
    return samlEntryPoint;
}
Here, the WebSSOProfileOptions bean allows us to set up parameters of the request sent from SP to IdP asking for user authentication.
5.2. Login and Logout
Next, let’s create a few filters for our SAML URIs like /discovery, /login, and /logout:
@Bean
public FilterChainProxy samlFilter(SAMLProcessingFilter samlProcessingFilter) throws Exception {
    List<SecurityFilterChain> chains = new ArrayList<>();
    chains.add(new DefaultSecurityFilterChain(new AntPathRequestMatcher("/saml/SSO/**"),
        samlProcessingFilter));
    chains.add(new DefaultSecurityFilterChain(new AntPathRequestMatcher("/saml/discovery/**"),
        samlDiscovery()));
    chains.add(new DefaultSecurityFilterChain(new AntPathRequestMatcher("/saml/login/**"),
        samlEntryPoint));
    chains.add(new DefaultSecurityFilterChain(new AntPathRequestMatcher("/saml/logout/**"),
        samlLogoutFilter));
    chains.add(new DefaultSecurityFilterChain(new AntPathRequestMatcher("/saml/SingleLogout/**"),
        samlLogoutProcessingFilter));
    return new FilterChainProxy(chains);
}
Then, we’ll add a few corresponding filters and handlers:
@Bean
public SAMLProcessingFilter samlWebSSOProcessingFilter(AuthenticationManager authenticationManager) {
    SAMLProcessingFilter samlWebSSOProcessingFilter = new SAMLProcessingFilter();
    samlWebSSOProcessingFilter.setAuthenticationManager(authenticationManager);
    samlWebSSOProcessingFilter.setAuthenticationSuccessHandler(samlAuthSuccessHandler);
    samlWebSSOProcessingFilter.setAuthenticationFailureHandler(samlAuthFailureHandler);
    return samlWebSSOProcessingFilter;
}

@Bean
public SAMLDiscovery samlDiscovery() {
    return new SAMLDiscovery();
}

@Bean
public SavedRequestAwareAuthenticationSuccessHandler successRedirectHandler() {
    SavedRequestAwareAuthenticationSuccessHandler successRedirectHandler = new SavedRequestAwareAuthenticationSuccessHandler();
    successRedirectHandler.setDefaultTargetUrl("/home");
    return successRedirectHandler;
}

@Bean
public SimpleUrlAuthenticationFailureHandler authenticationFailureHandler() {
    SimpleUrlAuthenticationFailureHandler failureHandler = new SimpleUrlAuthenticationFailureHandler();
    failureHandler.setUseForward(true);
    failureHandler.setDefaultFailureUrl("/error");
    return failureHandler;
}
So far, we’ve configured the entry point for the authentication (samlEntryPoint) and a few filter chains. So, let’s take a deep dive into their details.
When the user tries to log in for the first time, the samlEntryPoint will handle the entry request. Then, the samlDiscovery bean (if enabled) will discover the IdP to contact for authentication.
Next, when the user logs in, the IdP redirects the SAML response to the /saml/sso URI for processing, and corresponding samlWebSSOProcessingFilter will authenticate the associated auth token.
When successful, the successRedirectHandler will redirect the user to the default target URL (/home). Otherwise, the authenticationFailureHandler will redirect the user to the /error URL.
Last, let’s add the logout handlers for single and global logouts:
@Bean
public SimpleUrlLogoutSuccessHandler successLogoutHandler() {
    SimpleUrlLogoutSuccessHandler successLogoutHandler = new SimpleUrlLogoutSuccessHandler();
    successLogoutHandler.setDefaultTargetUrl("/");
    return successLogoutHandler;
}

@Bean
public SecurityContextLogoutHandler logoutHandler() {
    SecurityContextLogoutHandler logoutHandler = new SecurityContextLogoutHandler();
    logoutHandler.setInvalidateHttpSession(true);
    logoutHandler.setClearAuthentication(true);
    return logoutHandler;
}

@Bean
public SAMLLogoutProcessingFilter samlLogoutProcessingFilter() {
    return new SAMLLogoutProcessingFilter(successLogoutHandler(), logoutHandler());
}

@Bean
public SAMLLogoutFilter samlLogoutFilter() {
    return new SAMLLogoutFilter(successLogoutHandler(),
        new LogoutHandler[] { logoutHandler() },
        new LogoutHandler[] { logoutHandler() });
}
5.3. Metadata Handling
Now, we’ll provide IdP metadata XML to the SP. It’ll help to let our IdP know which SP endpoint it should redirect to once the user is logged in.
So, we’ll configure the MetadataGenerator bean to enable Spring SAML to handle the metadata:
public MetadataGenerator metadataGenerator() {
    MetadataGenerator metadataGenerator = new MetadataGenerator();
    metadataGenerator.setEntityId(samlAudience);
    metadataGenerator.setExtendedMetadata(extendedMetadata());
    metadataGenerator.setIncludeDiscoveryExtension(false);
    metadataGenerator.setKeyManager(keyManager());
    return metadataGenerator;
}

@Bean
public MetadataGeneratorFilter metadataGeneratorFilter() {
    return new MetadataGeneratorFilter(metadataGenerator());
}

@Bean
public ExtendedMetadata extendedMetadata() {
    ExtendedMetadata extendedMetadata = new ExtendedMetadata();
    extendedMetadata.setIdpDiscoveryEnabled(false);
    return extendedMetadata;
}
The MetadataGenerator bean requires an instance of the KeyManager to encrypt the exchange between SP and IdP:
@Bean
public KeyManager keyManager() {
    DefaultResourceLoader loader = new DefaultResourceLoader();
    Resource storeFile = loader.getResource(samlKeystoreLocation);
    Map<String, String> passwords = new HashMap<>();
    passwords.put(samlKeystoreAlias, samlKeystorePassword);
    return new JKSKeyManager(storeFile, samlKeystorePassword, passwords, samlKeystoreAlias);
}
Here, we have to create and provide a Keystore to the KeyManager bean. We can create a self-signed key and Keystore with the JRE command:
keytool -genkeypair -alias baeldungspringsaml -keypass baeldungsamlokta -keystore saml-keystore.jks -keyalg RSA5.4. MetadataManager
Then, we’ll configure the IdP metadata into our Spring Boot application using the ExtendedMetadataDelegate instance:
@Bean
@Qualifier("okta")
public ExtendedMetadataDelegate oktaExtendedMetadataProvider() throws MetadataProviderException {
    org.opensaml.util.resource.Resource resource = null
    try {
        resource = new ClasspathResource("/saml/metadata/sso.xml");
    } catch (ResourceException e) {
        e.printStackTrace();
    }
    Timer timer = new Timer("saml-metadata")
    ResourceBackedMetadataProvider provider = new ResourceBackedMetadataProvider(timer,resource);
    provider.setParserPool(parserPool());
    return new ExtendedMetadataDelegate(provider, extendedMetadata());
}

@Bean
@Qualifier("metadata")
public CachingMetadataManager metadata() throws MetadataProviderException, ResourceException {
    List<MetadataProvider> providers = new ArrayList<>();
    providers.add(oktaExtendedMetadataProvider());
    CachingMetadataManager metadataManager = new CachingMetadataManager(providers);
    metadataManager.setDefaultIDP(defaultIdp);
    return metadataManager;
}
Here, we’ve parsed the metadata from the sso.xml file that contains the IdP metadata XML, copied from the Okta developer account while viewing the setup instructions.
Similarly, the defaultIdp variable contains the IdP Issuer URL, copied from the Okta developer account.
5.5. XML Parsing
For XML parsing, we can use an instance of the StaticBasicParserPool class:
@Bean(initMethod = "initialize")
public StaticBasicParserPool parserPool() {
    return new StaticBasicParserPool();
}

@Bean(name = "parserPoolHolder")
public ParserPoolHolder parserPoolHolder() {
    return new ParserPoolHolder();
}
5.6. SAML Processor
Then, we require a processor to parse the SAML message from the HTTP request:
@Bean
public HTTPPostBinding httpPostBinding() {
    return new HTTPPostBinding(parserPool(), VelocityFactory.getEngine());
}

@Bean
public HTTPRedirectDeflateBinding httpRedirectDeflateBinding() {
    return new HTTPRedirectDeflateBinding(parserPool());
}

@Bean
public SAMLProcessorImpl processor() {
    ArrayList<SAMLBinding> bindings = new ArrayList<>();
    bindings.add(httpRedirectDeflateBinding());
    bindings.add(httpPostBinding());
    return new SAMLProcessorImpl(bindings);
}
Here, we’ve used POST and Redirect bindings with respect to our configuration in the Okta developer account.
5.7. SAMLAuthenticationProvider Implementation
Last, we require a custom implementation of the SAMLAuthenticationProvider class to check the instance of the ExpiringUsernameAuthenticationToken class and set the obtained authorities:
public class CustomSAMLAuthenticationProvider extends SAMLAuthenticationProvider {
    @Override
    public Collection<? extends GrantedAuthority> getEntitlements(SAMLCredential credential, Object userDetail) {
        if (userDetail instanceof ExpiringUsernameAuthenticationToken) {
            List<GrantedAuthority> authorities = new ArrayList<GrantedAuthority>();
            authorities.addAll(((ExpiringUsernameAuthenticationToken) userDetail).getAuthorities());
            return authorities;
        } else {
            return Collections.emptyList();
        }
    }
}
Also, we should configure the CustomSAMLAuthenticationProvider as a bean in the SecurityConfig class:
@Bean
public SAMLAuthenticationProvider samlAuthenticationProvider() {
    return new CustomSAMLAuthenticationProvider();
}
5.8. SecurityConfig
Finally, we’ll configure a basic HTTP security using the already discussed samlEntryPoint and samlProcessingFilter:
Bean
public SecurityFilterChain filterChain(HttpSecurity http, SAMLProcessingFilter samlProcessingFilter) throws Exception {
    http.csrf().disable();

    http.httpBasic().authenticationEntryPoint(samlEntryPoint);

    http
      .addFilterBefore(metadataGeneratorFilter(), ChannelProcessingFilter.class)
      .addFilterAfter(samlProcessingFilter, BasicAuthenticationFilter.class)
      .addFilterBefore(samlProcessingFilter, CsrfFilter.class);

    http
      .authorizeRequests()
      .antMatchers("/").permitAll()
      .anyRequest().authenticated();

    http
      .logout()
      .addLogoutHandler((request, response, authentication) -> {
          response.sendRedirect("/saml/logout");
      });

   http.authenticationProvider(samlAuthenticationProvider);
   return http.build();
}
Voila! We finished our Spring Security SAML configuration that allows the user to log in to the IdP and then receive the user’s authentication details in XML format from the IdP. Last, it authenticates the user token to allow access to our web app.
6. HomeController
Now that our Spring Security SAML configurations are ready along with the Okta developer account setup, we can set up a simple controller to provide a landing page and home page.
6.1. Index and Auth Mapping
First, let’s add mappings to the default target URI (/) and /auth URI:
@RequestMapping("/")
public String index() {
    return "index";
}

@GetMapping(value = "/auth")
public String handleSamlAuth() {
    Authentication auth = SecurityContextHolder.getContext().getAuthentication();
    if (auth != null) {
        return "redirect:/home";
    } else {
        return "/";
    }
}
Then, we’ll add a simple index.html that allows the user to redirect Okta SAML authentication using the login link:
<!doctype html>
<html>
<head>
<title>Baeldung Spring Security SAML</title>
</head>
<body>
<h3><Strong>Welcome to Baeldung Spring Security SAML</strong></h3>
<a th:href="@{/auth}">Login</a>
</body>
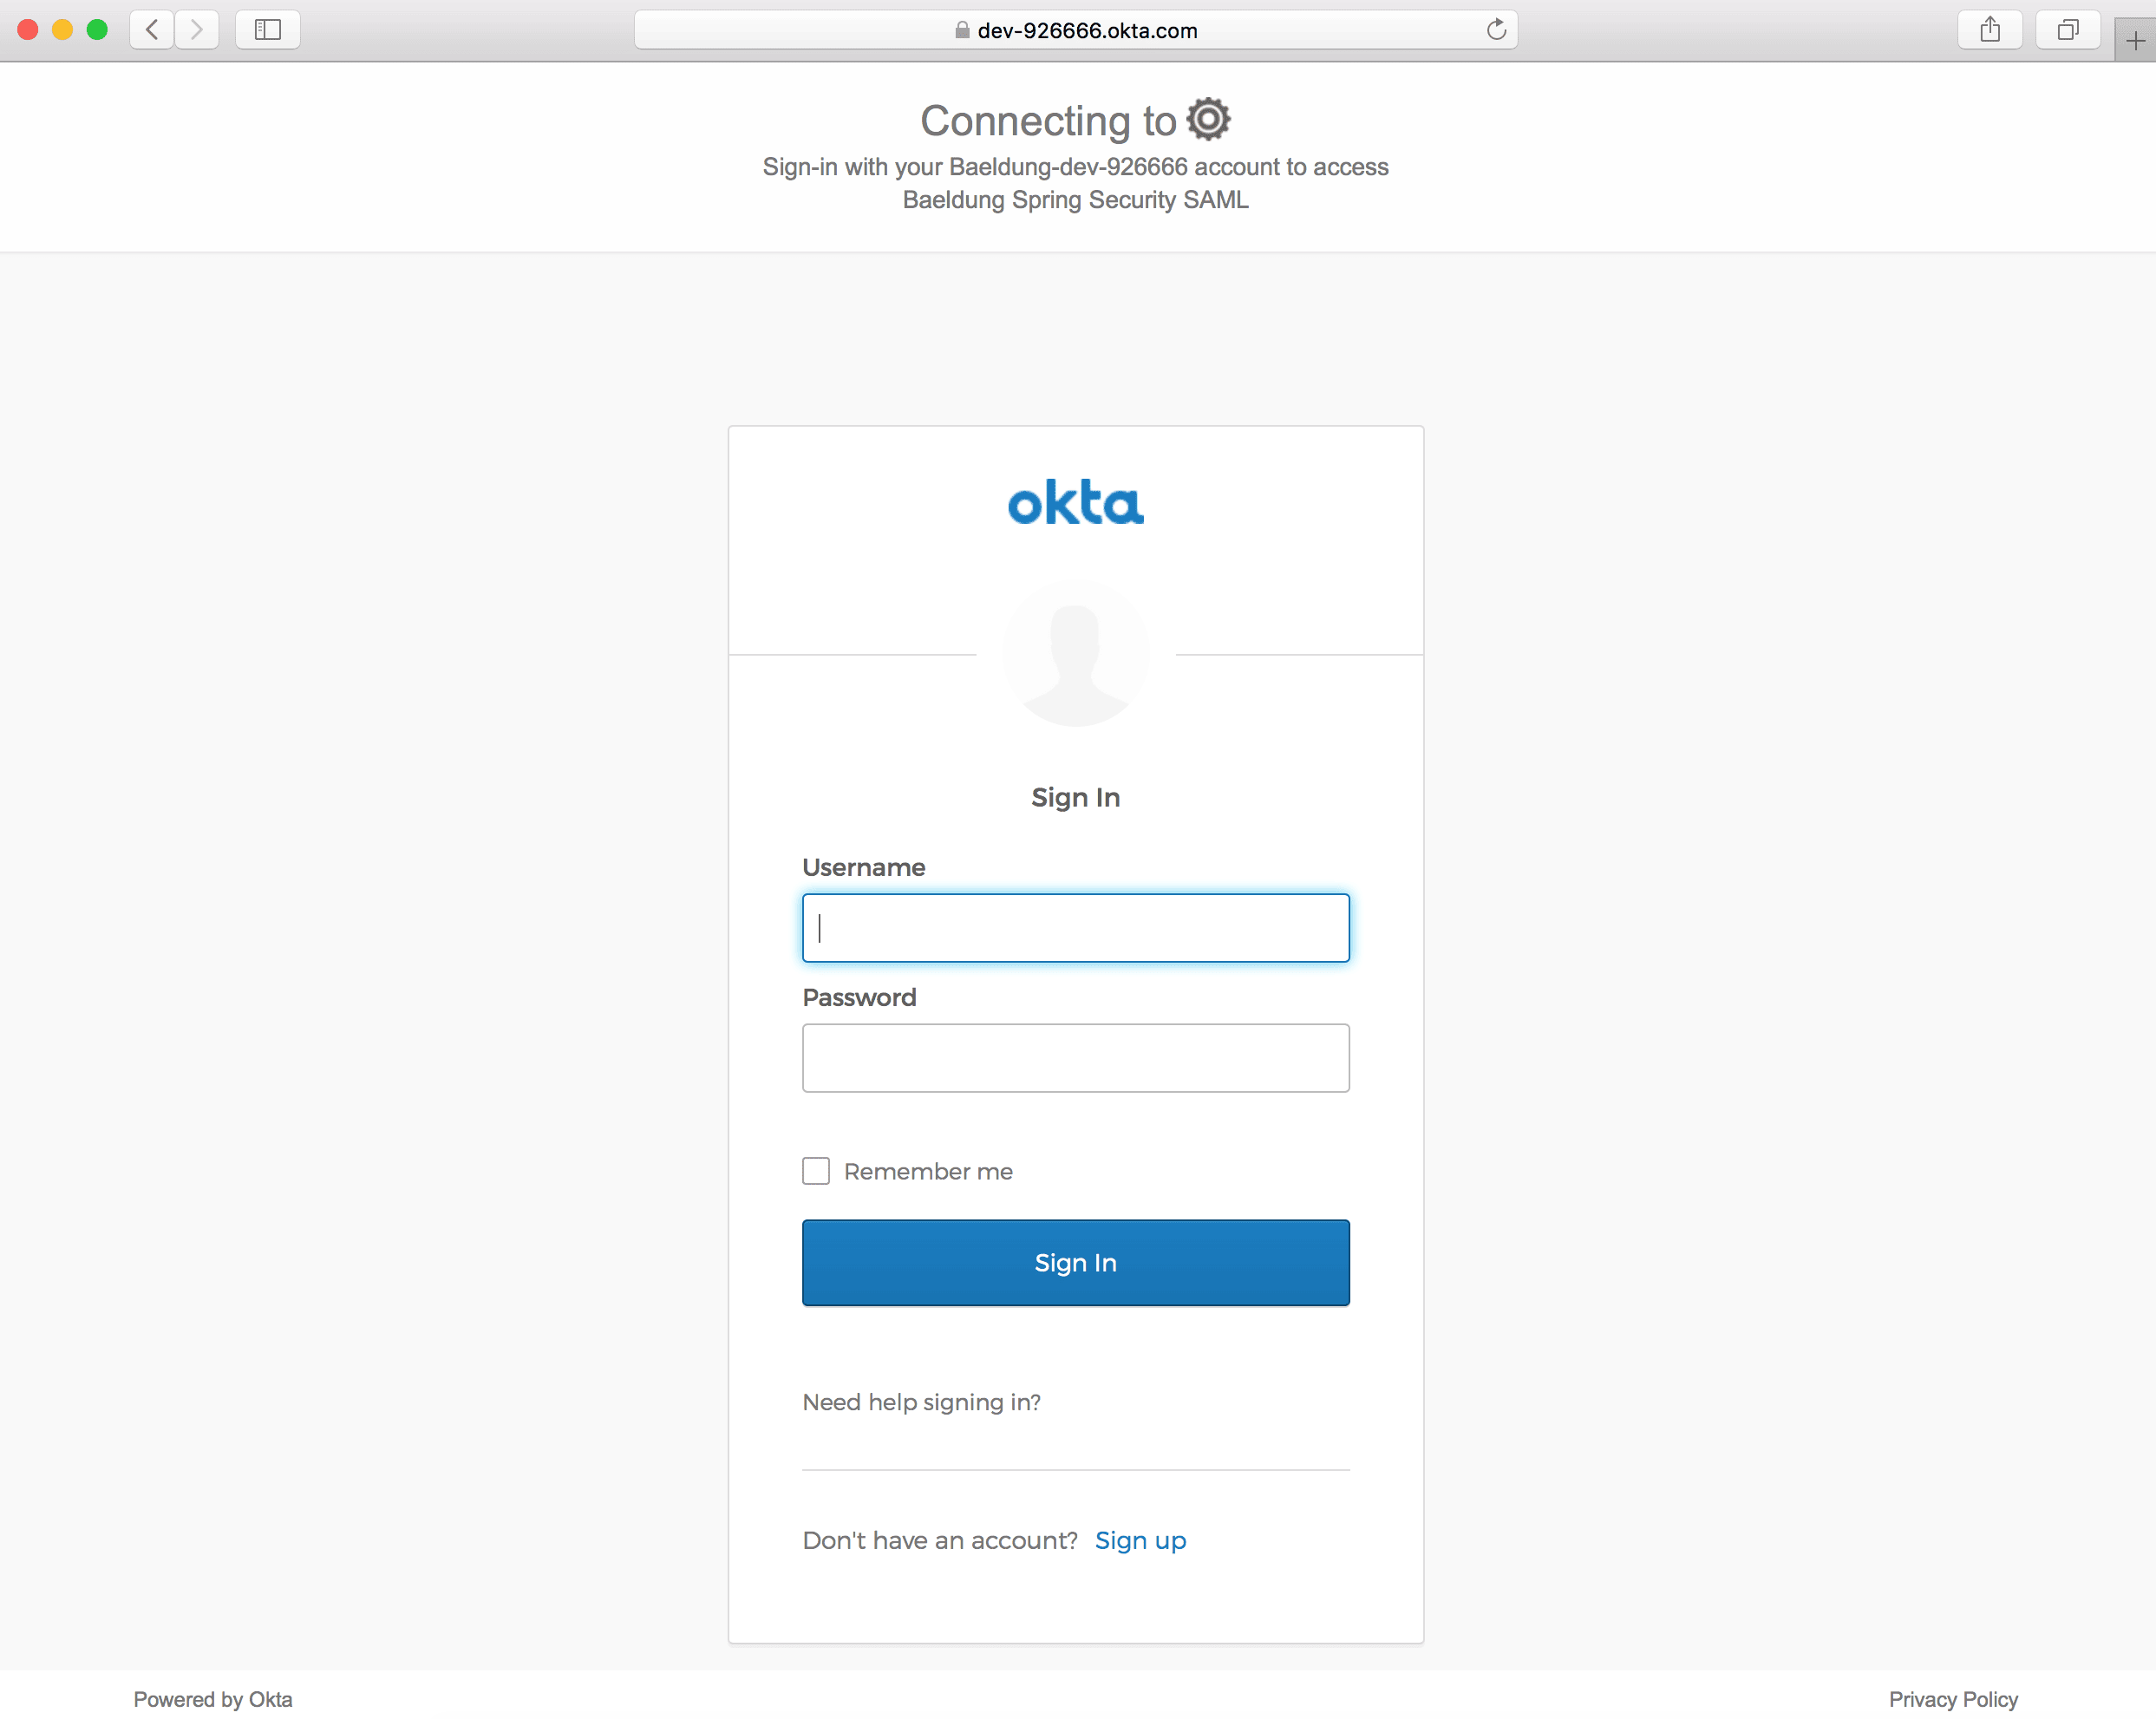
</html>Now, we’re ready to run our Spring Boot App and access it at http://localhost:8080/:

An Okta Sign-In page should open when clicking on the Login link:
6.2. Home Page
Next, let’s add the mapping to the /home URI to redirect the user when successfully authenticated:
@RequestMapping("/home")
public String home(Model model) {
    Authentication authentication = SecurityContextHolder.getContext().getAuthentication();
    model.addAttribute("username", authentication.getPrincipal());
    return "home";
}
Also, we’ll add the home.html to show the logged-in user and a logout link:
<!doctype html>
<html>
<head>
<title>Baeldung Spring Security SAML: Home</title>
</head>
<body>
    <h3><Strong>Welcome!</strong><br/>You are successfully logged in!</h3>
    <p>You are logged as <span th:text="${username}">null</span>.</p>
    <small>
        <a th:href="@{/logout}">Logout</a>
    </small>
</body>
</html>
Once logged in successfully, we should see the home page:

7. Conclusion
In this tutorial, we discussed Spring Security SAML integration with Okta.
First, we set up an Okta developer account with SAML 2.0 web integration. Then, we created a Spring Boot project with required Maven dependencies.
Next, we did all the required setup for the Spring Security SAML like samlEntryPoint, samlFilter, metadata handling, and SAML processor.
Last, we created a controller and a few pages like index and home to test our SAML integration with Okta.


