How to Implement a Soft Delete with Spring JPA
Last updated: January 8, 2024


Mocking is an essential part of unit testing, and the Mockito library makes it easy to write clean and intuitive unit tests for your Java code.
Get started with mocking and improve your application tests using our Mockito guide:
Handling concurrency in an application can be a tricky process with many potential pitfalls. A solid grasp of the fundamentals will go a long way to help minimize these issues.
Get started with understanding multi-threaded applications with our Java Concurrency guide:
Spring 5 added support for reactive programming with the Spring WebFlux module, which has been improved upon ever since. Get started with the Reactor project basics and reactive programming in Spring Boot:
Since its introduction in Java 8, the Stream API has become a staple of Java development. The basic operations like iterating, filtering, mapping sequences of elements are deceptively simple to use.
But these can also be overused and fall into some common pitfalls.
To get a better understanding on how Streams work and how to combine them with other language features, check out our guide to Java Streams:
Explore Spring Boot 3 and Spring 6 in-depth through building a full REST API with the framework:
Yes, Spring Security can be complex, from the more advanced functionality within the Core to the deep OAuth support in the framework.
I built the security material as two full courses - Core and OAuth, to get practical with these more complex scenarios. We explore when and how to use each feature and code through it on the backing project.
You can explore the course here:
Spring Data JPA is a great way to handle the complexity of JPA with the powerful simplicity of Spring Boot.
Get started with Spring Data JPA through the guided reference course:
Refactor Java code safely — and automatically — with OpenRewrite.
Refactoring big codebases by hand is slow, risky, and easy to put off. That’s where OpenRewrite comes in. The open-source framework for large-scale, automated code transformations helps teams modernize safely and consistently.
Each month, the creators and maintainers of OpenRewrite at Moderne run live, hands-on training sessions — one for newcomers and one for experienced users. You’ll see how recipes work, how to apply them across projects, and how to modernize code with confidence.
Join the next session, bring your questions, and learn how to automate the kind of work that usually eats your sprint time.
1. Introduction
Physically deleting data from a table is a common requirement when interacting with databases. But sometimes there are business requirements to not permanently delete data from the database. These requirements, for example, the need for data history tracking or audit and also related to reference integrity.
Instead of physically deleting the data, we can just hide that data so that it can’t be accessed from the application front-end.
In this tutorial, we’ll learn about soft delete and how to implement this technique with Spring JPA.
2. What Is Soft Delete?
Soft delete performs an update process to mark some data as deleted instead of physically deleting it from a table in the database. A common way to implement soft delete is to add a field that will indicate whether data has been deleted or not.
For example, let’s suppose we have a product table with the following structure: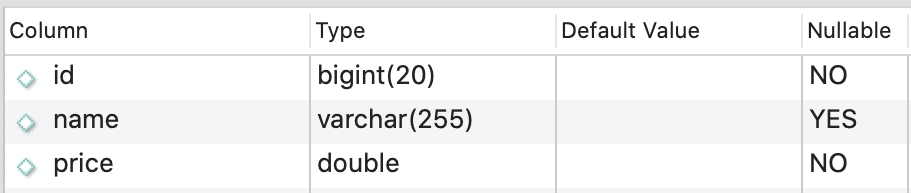
Let’s now look at the SQL command we’ll run when physically deleting a record from the table:
delete from table_product where id=1This SQL command will permanently remove the product with id=1 from the table in the database.
Let’s now implement the soft delete mechanism described above: 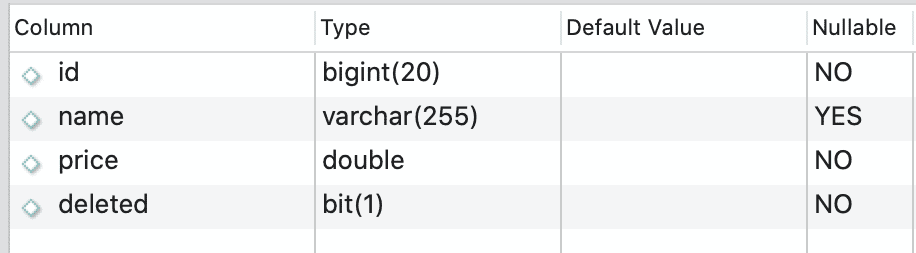
Note we added a new field called deleted. This field will contain the values 0 or 1.
The value 1 will indicate the data has been deleted and 0 will indicate the data has not been deleted. We should set 0 as the default value, and for every data deletion process, we don’t run the SQL delete command, but the following SQL update command instead:
update from table_product set deleted=1 where id=1Using this SQL command we didn’t actually delete the row, but only marked it as deleted. So, when we’re going to perform a read query, and we only want those rows that have not been deleted, we should only add a filter in our SQL query:
select * from table_product where deleted=03. How to Implement Soft Delete in Spring JPA
With Spring JPA the implementation of soft delete has become much easier. We’ll only need a few JPA annotations for this purpose.
As we know, we generally use only a few SQL commands with JPA. It will create and execute the majority of the SQL queries behind the scenes.
Let’s now implement the soft delete in Spring JPA with the same table example as above.
3.1. Entity Class
The most important part is creating the entity class.
Let’s create a Product entity class:
@Entity
@Table(name = "table_product")
public class Product {
    @Id
    @GeneratedValue(strategy = GenerationType.IDENTITY)
    private Long id;

    private String name;

    private double price;

    private boolean deleted = Boolean.FALSE;

    // setter getter methods
}
As we can see, we’ve added a deleted property with the default value set as FALSE.
The next step will be to override the delete command in the JPA repository.
By default, the delete command in the JPA repository will run a SQL delete query, so let’s first add some annotations to our entity class:
@Entity
@Table(name = "table_product")
@SQLDelete(sql = "UPDATE table_product SET deleted = true WHERE id=?")
@Where(clause = "deleted=false")
public class Product {
    @Id
    @GeneratedValue(strategy = GenerationType.IDENTITY)
    private Long id;

    private String name;

    private double price;

    private boolean deleted = Boolean.FALSE;

    // setter getter method
}
We are using the @SQLDelete annotation to override the delete command. Every time we execute the delete command, we actually have turned it into a SQL update command that changes the deleted field value to true instead of deleting the data permanently.
The @Where annotation, on the other hand, will add a filter when we read the product data. So, according to the code example above, product data with the value deleted = true won’t be included within the results.
3.2. Repository
There are no special changes in the repository class, we can write it like a normal repository class in the Spring Boot application:
public interface ProductRepository extends CrudRepository<Product, Long>{

}
3.3. Service
Also for the service class, there is nothing special yet. We can call the functions from the repository that we want.
In this example, let’s call three repository functions to create a record, and then perform a soft delete:
@Service
public class ProductService {

    @Autowired
    private ProductRepository productRepository;

    public Product create(Product product) {
        return productRepository.save(product);
    }

    public void remove(Long id){
        productRepository.deleteById(id);
    }

    public Iterable<Product> findAll(){
        return productRepository.findAll();
    }
}
4. How to Get the Deleted Data?
By using the @Where annotation, we can’t get the deleted product data in case we still want the deleted data to be accessible. An example of this is a user with administrator-level that has full access and can view the data that has been “deleted”.
To implement this, we shouldn’t use the @Where annotation but two different annotations, @FilterDef, and @Filter. With these annotations we can dynamically add conditions as needed:
@Entity
@Table(name = "tbl_products")
@SQLDelete(sql = "UPDATE tbl_products SET deleted = true WHERE id=?")
@FilterDef(name = "deletedProductFilter", parameters = @ParamDef(name = "isDeleted", type = "boolean"))
@Filter(name = "deletedProductFilter", condition = "deleted = :isDeleted")
public class Product {

    @Id
    @GeneratedValue(strategy = GenerationType.IDENTITY)
    private Long id;

    private String name;

    private double price;

    private boolean deleted = Boolean.FALSE;
}
Here @FilterDef annotation defines the basic requirements that will be used by @Filter annotation. Furthermore, we also need to change the findAll() function in the ProductService service class to handle dynamic parameters or filters:
@Service
public class ProductService {

    @Autowired
    private ProductRepository productRepository;

    @Autowired
    private EntityManager entityManager;

    public Product create(Product product) {
        return productRepository.save(product);
    }

    public void remove(Long id){
        productRepository.deleteById(id);
    }

    public Iterable<Product> findAll(boolean isDeleted){
        Session session = entityManager.unwrap(Session.class);
        Filter filter = session.enableFilter("deletedProductFilter");
        filter.setParameter("isDeleted", isDeleted);
        Iterable<Product> products =  productRepository.findAll();
        session.disableFilter("deletedProductFilter");
        return products;
    }
}
Here we add the isDeleted parameter that we’ll add to the object Filter affecting the process of reading the Product entity.
5. Conclusion
It’s easy to implement soft delete techniques using Spring JPA. What we need to do is define a field that will store whether a row has been deleted or not. Then we’ve to override the delete command using the @SQLDelete annotation on that particular entity class.
If we want more control, we can use the @FilterDef and @Filter annotations so we can determine if query results should include deleted data or not.


