

Mocking is an essential part of unit testing, and the Mockito library makes it easy to write clean and intuitive unit tests for your Java code.
Get started with mocking and improve your application tests using our Mockito guide:
Handling concurrency in an application can be a tricky process with many potential pitfalls. A solid grasp of the fundamentals will go a long way to help minimize these issues.
Get started with understanding multi-threaded applications with our Java Concurrency guide:
Spring 5 added support for reactive programming with the Spring WebFlux module, which has been improved upon ever since. Get started with the Reactor project basics and reactive programming in Spring Boot:
Since its introduction in Java 8, the Stream API has become a staple of Java development. The basic operations like iterating, filtering, mapping sequences of elements are deceptively simple to use.
But these can also be overused and fall into some common pitfalls.
To get a better understanding on how Streams work and how to combine them with other language features, check out our guide to Java Streams:
Explore Spring Boot 3 and Spring 6 in-depth through building a full REST API with the framework:
Yes, Spring Security can be complex, from the more advanced functionality within the Core to the deep OAuth support in the framework.
I built the security material as two full courses - Core and OAuth, to get practical with these more complex scenarios. We explore when and how to use each feature and code through it on the backing project.
You can explore the course here:
Spring Data JPA is a great way to handle the complexity of JPA with the powerful simplicity of Spring Boot.
Get started with Spring Data JPA through the guided reference course:
Refactor Java code safely — and automatically — with OpenRewrite.
Refactoring big codebases by hand is slow, risky, and easy to put off. That’s where OpenRewrite comes in. The open-source framework for large-scale, automated code transformations helps teams modernize safely and consistently.
Each month, the creators and maintainers of OpenRewrite at Moderne run live, hands-on training sessions — one for newcomers and one for experienced users. You’ll see how recipes work, how to apply them across projects, and how to modernize code with confidence.
Join the next session, bring your questions, and learn how to automate the kind of work that usually eats your sprint time.
Yes, we're now running our only Summer Sale. All Courses are 30% off until 20th July, 2026:
Yes, we're now running our only Summer Sale. All Courses are 30% off until 20th July, 2026:
1. Overview
OpenFeign is a declarative REST client that we can use in Spring Boot applications. Let’s assume that we have a REST API secured using OAuth2, and we want to invoke it using OpenFeign. In this situation, we’ll need to provide an access token with OpenFeign.
In this tutorial, we’ll describe how to add OAuth2 support to the OpenFeign client.
2. Service to Service Authentication
The service to service authentication is a popular topic in API security. We can use mTLS or JWT to provide an authentication mechanism for a REST API. However, the OAuth2 protocol is the defacto solution to protect the APIs. Let’s say we want to call a secure service (server role) using another service (client role). In this scenario, we use the client credential grant type. We usually use client credentials for authentication between two APIs or systems with no end-user. The below figure shows the main actors in this grant type:
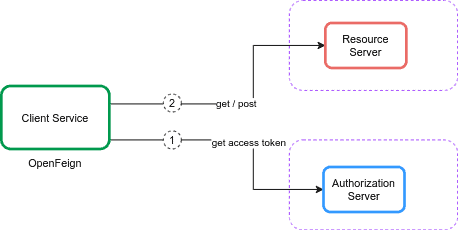
In client credentials, the client service obtains an access token from the authorization server using the token endpoint. It then uses the access token to access resources protected by a resource server. The resource server validates the access token, and if valid, serves the request.
2.1. Authorization Server
Let’s set up an authorization server for issuing access tokens. To keep things simple for now, we’ll be using Keycloak embedded in a Spring Boot application. Let’s assume that we use the authorization server project available on GitHub. First, we define the payment-app client in realm master in our embedded Keycloak server:
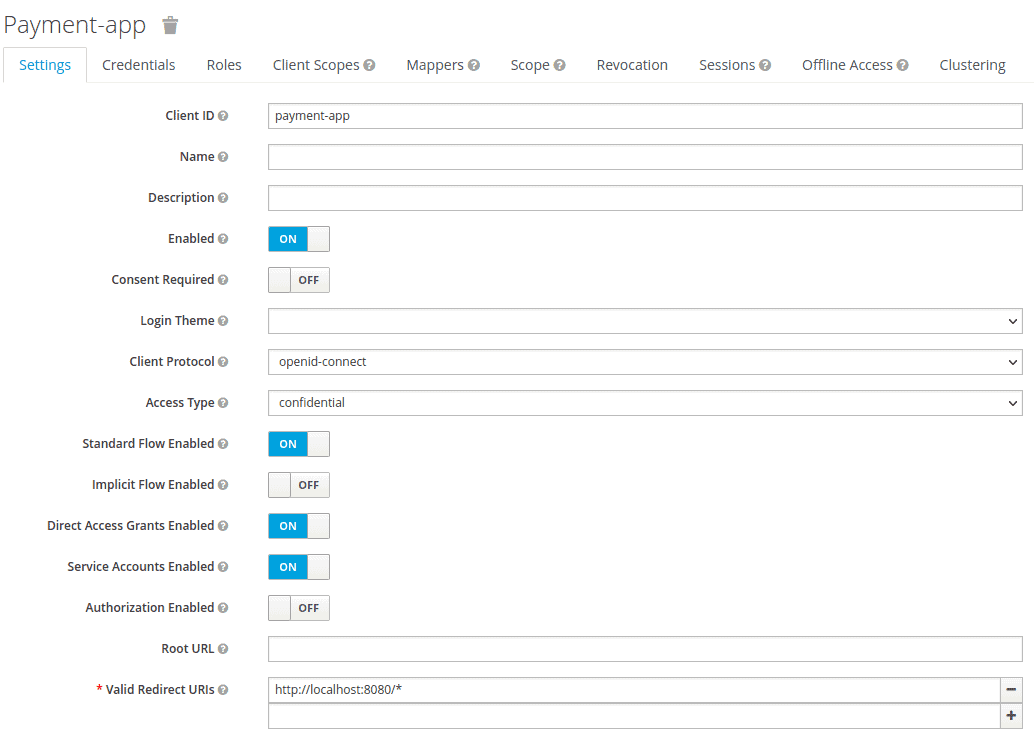
We set the Access Type to credential and enable the Service Accounts Enabled option. Then, we export the realm details as feign-realm.json and set the realm file in our application-feign.yml:
keycloak:
  server:
    contextPath: /auth
    adminUser:
      username: bael-admin
      password: pass
    realmImportFile: feign-realm.json
Now, the authorization server is ready. Finally, we can run the application using the –spring.profiles.active=feign option. Since we’re focusing on the OpenFeign OAuth2 support in this tutorial, we don’t need to dive any deeper into it.
2.2. Resource Server
Now that we’ve configured the authorization server, let’s set up the resource server. For that, we’ll use the resource server project available on GitHub. First, we add the Payment class as a resource:
public class Payment {

    private String id;
    private double amount;

   // standard getters and setters
}
Then, we declare an API in PaymentController class:
@RestController
public class PaymentController {

    @GetMapping("/payments")
    public List<Payment> getPayments() {
        List<Payment> payments = new ArrayList<>();
        for(int i = 1; i < 6; i++){
            Payment payment = new Payment();
            payment.setId(String.valueOf(i));
            payment.setAmount(2);
            payments.add(payment);
        }
        return payments;
    }

}
The getPayments() API returns a list of payments. Also, we configure the resource server in our application-feign.yml file:
spring:
  security:
    oauth2:
      resourceserver:
        jwt:
          issuer-uri: http://localhost:8083/auth/realms/master
Now, the getPayments() API is secure using the OAuth2 authorization server, and we must provide a valid access token for invoking this API:
curl --location --request POST 'http://localhost:8083/auth/realms/master/protocol/openid-connect/token' \
  --header 'Content-Type: application/x-www-form-urlencoded' \
  --data-urlencode 'client_id=payment-app' \
  --data-urlencode 'client_secret=863e9de4-33d4-4471-b35e-f8d2434385bb' \
  --data-urlencode 'grant_type=client_credentials'
After getting the access token, we set it in the Authorization header of the request:
curl --location --request GET 'http://localhost:8081/resource-server-jwt/payments' \
  --header 'Authorization: Bearer Access_Token'
Now, we want to call the secure API using OpenFeign instead of cURL or Postman.
3. OpenFeign Client
3.1. Dependencies
To use the Spring Cloud OpenFeign for invoking the secure API, we’ll need to add the spring-cloud-starter-openfeign to our pom.xml file:
<dependency>
    <groupId>org.springframework.cloud</groupId>
    <artifactId>spring-cloud-starter-openfeign</artifactId>
    <version>3.1.0</version>
</dependency>
Additionally, we need to add the spring-cloud-dependencies to the pom.xml:
<dependency>
    <groupId>org.springframework.cloud</groupId>
    <artifactId>spring-cloud-dependencies</artifactId>
    <version>2021.0.0</version>
    <type>pom</type>
</dependency>
3.2. Configuration
First, we need to add @EnableFeignClients to our main class:
@SpringBootApplication
@EnableFeignClients
public class ExampleApplication {
    public static void main(String[] args) {
        SpringApplication.run(ExampleApplication.class, args);
    }
}
Then, we define the PaymentClient interface for invoking the getPayments() API. Also, we need to add @FeignClient to our PaymentClient interface:
@FeignClient(
  name = "payment-client",
  url = "http://localhost:8081/resource-server-jwt",
  configuration = OAuthFeignConfig.class)
public interface PaymentClient {

    @RequestMapping(value = "/payments", method = RequestMethod.GET)
    List<Payment> getPayments();
}
We set the url according to the address of the resource server. In this case, the main parameter of the @FeignClient is the configuration attribute that supports OAuth2 for OpenFeign. After that, we define a PaymentController class and inject PaymentClient into it:
@RestController
public class PaymentController {

    private final PaymentClient paymentClient;

    public PaymentController(PaymentClient paymentClient) {
        this.paymentClient = paymentClient;
    }

    @GetMapping("/payments")
    public List<Payment> getPayments() {
        List<Payment> payments = paymentClient.getPayments();
        return payments;
    }
}
4. OAuth2 Support
4.1. Dependencies
To add the OAuth2 support to Spring Cloud OpenFeign, we’ll need to add the spring-security-oauth2-client and spring-boot-starter-security to our pom.xml file:
<dependency>
    <groupId>org.springframework.boot</groupId>
    <artifactId>spring-boot-starter-security</artifactId>
    <version>2.6.1</version>
</dependency>
<dependency>
    <groupId>org.springframework.security</groupId>
    <artifactId>spring-security-oauth2-client</artifactId>
    <version>5.6.0</version>
</dependency>
4.2. Configuration
Now, we want to create a configuration. The idea is to get and add an access token to the OpenFeign request. The interceptors can perform this task for every HTTP request/response. Adding interceptors is a useful feature provided by Feign. We’ll use a RequestInterceptor, which injects the OAuth2 access token into the request of the OpenFeign client by adding an Authorization Bearer header. Let’s define the OAuthFeignConfig configuration class and define the requestInterceptor() bean:
@Configuration
public class OAuthFeignConfig {

    public static final String CLIENT_REGISTRATION_ID = "keycloak";

    private final OAuth2AuthorizedClientService oAuth2AuthorizedClientService;
    private final ClientRegistrationRepository clientRegistrationRepository;

    public OAuthFeignConfig(OAuth2AuthorizedClientService oAuth2AuthorizedClientService,
      ClientRegistrationRepository clientRegistrationRepository) {
        this.oAuth2AuthorizedClientService = oAuth2AuthorizedClientService;
        this.clientRegistrationRepository = clientRegistrationRepository;
    }

    @Bean
    public RequestInterceptor requestInterceptor() {
        ClientRegistration clientRegistration = clientRegistrationRepository.findByRegistrationId(CLIENT_REGISTRATION_ID);
        OAuthClientCredentialsFeignManager clientCredentialsFeignManager =
          new OAuthClientCredentialsFeignManager(authorizedClientManager(), clientRegistration);
        return requestTemplate -> {
            requestTemplate.header("Authorization", "Bearer " + clientCredentialsFeignManager.getAccessToken());
        };
    }
}
In the requestInterceptor() bean, we use the ClientRegistration and OAuthClientCredentialsFeignManager classes to register the oauth2 client and get an access token from the authorization server. To do this, we need to define the oauth2 client properties in our application.properties file:
spring.security.oauth2.client.registration.keycloak.authorization-grant-type=client_credentials
spring.security.oauth2.client.registration.keycloak.client-id=payment-app
spring.security.oauth2.client.registration.keycloak.client-secret=863e9de4-33d4-4471-b35e-f8d2434385bb
spring.security.oauth2.client.provider.keycloak.token-uri=http://localhost:8083/auth/realms/master/protocol/openid-connect/token
Let’s create the OAuthClientCredentialsFeignManager class and define the getAccessToken() method:
public String getAccessToken() {
    try {
        OAuth2AuthorizeRequest oAuth2AuthorizeRequest = OAuth2AuthorizeRequest
          .withClientRegistrationId(clientRegistration.getRegistrationId())
          .principal(principal)
          .build();
        OAuth2AuthorizedClient client = manager.authorize(oAuth2AuthorizeRequest);
        if (isNull(client)) {
            throw new IllegalStateException("client credentials flow on " + clientRegistration.getRegistrationId() + " failed, client is null");
        }
        return client.getAccessToken().getTokenValue();
    } catch (Exception exp) {
        logger.error("client credentials error " + exp.getMessage());
    }
    return null;
}
We use OAuth2AuthorizeRequest and OAuth2AuthorizedClient classes for getting the access token from the authorization server. Now for every request, the OpenFeign interceptor manages the oauth2 client and adds the access token to the request.
5. Test
To test the OpenFeign client, let’s create the PaymentClientUnitTest class:
@RunWith(SpringRunner.class)
@SpringBootTest
public class PaymentClientUnitTest {

    @Autowired
    private PaymentClient paymentClient;

    @Test
    public void whenGetPayment_thenListPayments() {
        List<Payment> payments = paymentClient.getPayments();
        assertFalse(payments.isEmpty());
    }
}
In this test, we call the getPayments() API. The PaymentClient under the hood connects to the OAuth2 client and gets an access token using the interceptor.
6. Conclusion
In this article, we set up the required environment for invoking a secure API. Then, we configure the OpenFeign to call the secure API through a practical example. For this, we add and configure the interceptor to OpenFeign. The interceptor manages the OAuth2 client and adds the access token to the request.


