

Mocking is an essential part of unit testing, and the Mockito library makes it easy to write clean and intuitive unit tests for your Java code.
Get started with mocking and improve your application tests using our Mockito guide:
Handling concurrency in an application can be a tricky process with many potential pitfalls. A solid grasp of the fundamentals will go a long way to help minimize these issues.
Get started with understanding multi-threaded applications with our Java Concurrency guide:
Spring 5 added support for reactive programming with the Spring WebFlux module, which has been improved upon ever since. Get started with the Reactor project basics and reactive programming in Spring Boot:
Since its introduction in Java 8, the Stream API has become a staple of Java development. The basic operations like iterating, filtering, mapping sequences of elements are deceptively simple to use.
But these can also be overused and fall into some common pitfalls.
To get a better understanding on how Streams work and how to combine them with other language features, check out our guide to Java Streams:
Explore Spring Boot 3 and Spring 6 in-depth through building a full REST API with the framework:
Yes, Spring Security can be complex, from the more advanced functionality within the Core to the deep OAuth support in the framework.
I built the security material as two full courses - Core and OAuth, to get practical with these more complex scenarios. We explore when and how to use each feature and code through it on the backing project.
You can explore the course here:
Spring Data JPA is a great way to handle the complexity of JPA with the powerful simplicity of Spring Boot.
Get started with Spring Data JPA through the guided reference course:
Refactor Java code safely — and automatically — with OpenRewrite.
Refactoring big codebases by hand is slow, risky, and easy to put off. That’s where OpenRewrite comes in. The open-source framework for large-scale, automated code transformations helps teams modernize safely and consistently.
Each month, the creators and maintainers of OpenRewrite at Moderne run live, hands-on training sessions — one for newcomers and one for experienced users. You’ll see how recipes work, how to apply them across projects, and how to modernize code with confidence.
Join the next session, bring your questions, and learn how to automate the kind of work that usually eats your sprint time.
1. Overview
One of the most important topics in programming is testing. Spring Framework and Spring Boot have pretty good support by providing test framework extensions and by leading us to write minimal, testable code with lots of automation in the background. To run a Spring Boot integration test, we simply need to add @SpringBootTest to our test class. We can find a short introduction in Testing in Spring Boot. Even if we use Spring Framework without Spring Boot, we can do Integration Testing very efficiently.
But the easier it is to develop tests, the greater the risk of running into pitfalls. In this tutorial, we’ll explore how Spring Boot tests are executed and what we have to consider when writing tests.
2. Pitfall Example
Let’s start with a small example: Let’s implement a service to manage pets (a PetService) like that:
public record Pet(String name) {}@Service
public class PetService {
private final Set<Pet> pets = new HashSet<>();
public Set<Pet> getPets() {
return Collections.unmodifiableSet(pets);
}
public boolean add(Pet pet) {
return this.pets.add(pet);
}
}The service should not allow duplicates, so the tests could look like this:
@SpringBootTest
class PetServiceIntegrationTest {

    @Autowired
    PetService service;

    @Test
    void shouldAddPetWhenNotAlreadyExisting() {
        var pet = new Pet("Dog");
        var result = service.add(pet);
        assertThat(result).isTrue();
        assertThat(service.getPets()).hasSize(1);
    }

    @Test
    void shouldNotAddPetWhenAlreadyExisting() {
        var pet = new Pet("Cat");
        var result = service.add(pet);
        assertThat(result).isTrue();
        // try a second time
        result = service.add(pet);
        assertThat(result).isFalse();
        assertThat(service.getPets()).hasSize(1);
    }
}
When we execute each test separately, everything’s fine. But when we execute them together, we’ll get a test failure:
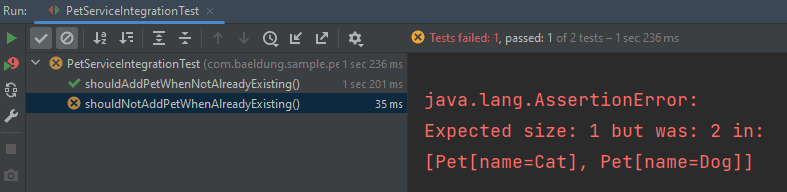
But why does the test fail? How could we prevent this? We’ll clarify this, but first, let’s start with some basics.
3. Design Goals for Functional Tests
We write functional tests to document the requirements and ensure that the application code implements them correctly. Therefore, the test itself must be correct too, and it must be easy to understand, ideally self-explanatory. But, for this article, we’ll focus on further design goals:
- Regression: Tests must be repeatable. They have to produce deterministic results
- Isolation: Tests may not influence each other. It should not matter in which order they are executed or even if they are executed in parallel
- Performance: Tests should run as quickly and as resource-saving as possible, especially those that are part of a CI pipeline or TDD
Concerning Spring Boot tests, we need to be aware that they are a kind of integration test because they lead to the initialization of an ApplicationContext, i.e. beans are initialized and wired using dependency injection. So isolation needs special attention – and the example shown above seems to have an isolation problem. On the other side, a good performance is also a challenge for Spring Boot tests.
As a first conclusion, we can say that avoiding integration tests is the most important point. The best solution for the PetService test would be a unit test:
// no annotation here
class PetServiceUnitTest {

    PetService service = new PetService();

    // ...
}
We should only write a Spring Boot test, if necessary, e.g. when we want to test our application code to be correctly handled by the framework (lifecycle management, dependency injection, event handling) or if we want to test a special layer (HTTP layer, persistence layer).
4. Context Caching
Obviously, when we add @SpringBootTest to our test class, the ApplicationContext gets started, and the beans are initialized. But, to support isolation, JUnit initializes this step for each test method. This would result in one ApplicationContext per test case, slowing test performance significantly. To avoid this, the Spring Test Framework caches the context and allows re-using it for multiple test cases. Of course, this leads to re-using the bean instances too. This is the cause of why the PetService test failed – both test methods deal with the same instance of the PetService.
Different ApplicationContexts are only created if they differ from each other – e.g. if they contain different beans or have different application properties. We can find the details about that in the Spring Test Framework documentation. Because the ApplicationContext configuration is done on the class level, all methods within a test class, by default, share the same context.
The following illustration shows the situation:
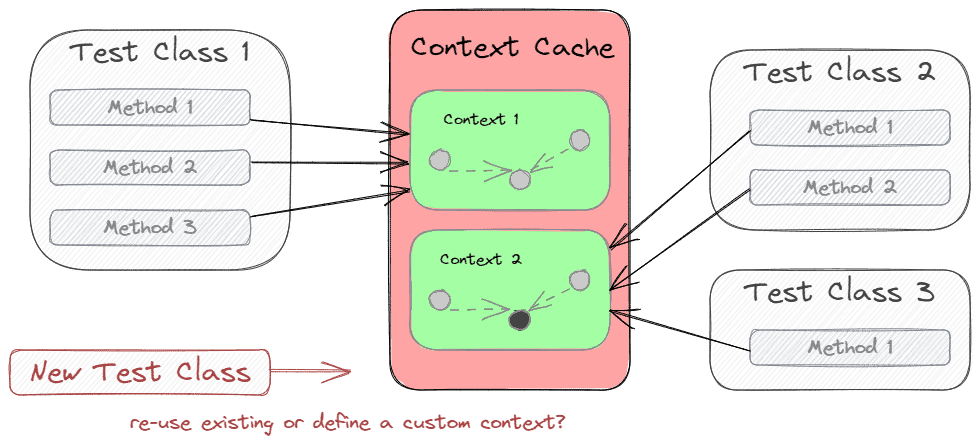
Context Caching as a kind of performance optimization contradicts isolation, so we can only re-use an ApplicationContext if isolation between tests is ensured. This is the most important reason Spring Boot tests should only be run in parallel within the same JVM when some conditions are met. We could run tests using different JVM processes (e.g. by setting the forkMode for the Maven Surefire plug-in), but then we bypass the caching mechanism.
4.1. PetService Sample Solutions
Concerning the PetService test, there might be multiple solutions. All of them are applicable because the PetService is stateful.
One solution is to annotate each test method with @DirtiesContext. This marks the ApplicationContext as dirty, so it is closed and removed from the cache after the test. This prevents performance optimization and should never be the preferred way:
@SpringBootTest
class PetServiceIntegrationTest {

    @Autowired
    PetService service;

    @Test
    @DirtiesContext
    void shouldAddPetWhenNotAlreadyExisting() {
        // ...
    }

    @Test
    @DirtiesContext
    void shouldNotAddPetWhenAlreadyExisting() {
        // ...
    }
}
Another solution is to reset the state of the PetService after each test:
@SpringBootTest
class PetServiceIntegrationTest {

    @Autowired
    PetService service;

    @AfterEach
    void resetState() {
        service.clear(); // deletes all pets
    }

    // ...
}
However, the best solution is to implement the PetService stateless. Right now, the pets are not stored in memory, which would never be a good practice, especially in scalable environments.
4.2. Pitfall: Too Many Contexts
To avoid the unconscious initialization of additional ApplicationContexts, we need to know what leads to different configurations. The most obvious is the direct configuration of beans, e.g. using @ComponentScan, @Import, @AutoConfigureXXX (e.g. @AutoConfigureTestDatabase). But derivations can also be caused by enabling profiles (@ActiveProfiles) or recording events (@RecordApplicationEvents):
@SpringBootTest
// each of them derives from the original (cached) context
@ComponentScan(basePackages = "com.baeldung.sample.blogposts")
@Import(PetServiceTestConfiguration.class)
@AutoConfigureTestDatabase
@ActiveProfiles("test")
@RecordApplicationEvents
class PetServiceIntegrationTest {
    // ...
}
We can find the details in the Spring Test Framework documentation.
4.3. Pitfall: Mocking
Spring Test Framework includes Mockito to create and use mocks. When using @MockBean, we let Mockito create a mock instance and put it into the ApplicationContext. This instance is specific to the test class. The consequence is that we cannot share the ApplicationContext with other test classes:
@SpringBootTest
class PetServiceIntegrationTest {

    // context is not shareable with other test classes
    @MockBean
    PetServiceRepository repository;

    // ...
}
One recommendation could be to refrain from using mocks and test the whole application instead. But if we want to test exception handling, we cannot always prevent mocking. If we still want to share the ApplicationContext with other test classes, we must also share the mock instance. This is possible when we define a @TestConfiguration that creates the mock and replaces the original bean in the ApplicationContext. But then, we have to be aware of the isolation problem.
As we know, caching and re-using ApplicationContexts assumes that we reset each stateful bean within the context after the test. Mocks are a special kind of stateful beans because they are configured to return values or throw exceptions, and they record each method invocation for verification for each test case. After the test, we need to reset them too. This is automatically done when using @MockBean, but when we create the mock within a @TestConfiguration, we are responsible for the reset. Fortunately, Mockito itself provides a setting. So the whole solution could be:
@TestConfiguration
public class PetServiceTestConfiguration {

    @Primary
    @Bean
    PetServiceRepository createRepositoryMock() {
        return mock(
          PetServiceRepository.class,
          MockReset.withSettings(MockReset.AFTER)
        );
    }
}
@SpringBootTest
@Import(PetServiceTestConfiguration.class) // if not automatically detected
class PetServiceIntegrationTest {

    @Autowired
    PetService repository;
    @Autowired // Mock
    PetServiceRepository repository;

    // ...
}
4.4. Configuring the Context Cache
If we want to find out how often ApplicationContexts are initialized during test execution, we can set the logging level in application.properties:
logging.level.org.springframework.test.context.cache=DEBUGWe then get a logging output containing statistics like this:
org.springframework.test.context.cache:
  Spring test ApplicationContext cache statistics:
  [DefaultContextCache@34585ac9 size = 1, maxSize = 32, parentContextCount = 0, hitCount = 8, missCount = 1]
The default cache size is 32 (LRU). If we want to increase or decrease it, we can specify another cache size:
spring.test.context.cache.maxSize=50If we want to dive deeply into the code of the caching mechanism, the org.springframework.test.context.cache.ContextCache interface can be a starting point.
5. Context Configuration
Not only for caching purposes but also for ApplicationContext initialization performance, we might optimize the configuration. The fewer initializations, the faster the test setup. We can configure the tests for lazy bean initialization, but we must take care of potential side effects. Another possibility is to reduce the count of beans.
5.1. Configuration Detection
@SpringBootTest, by default, starts searching in the current package of the test class and then searches upwards through the package structure, looking for a class annotated with @SpringBootConfiguration, from which it then reads the configuration to create an application context. This class is usually our main application since the @SpringBootApplication annotation includes the @SpringBootConfiguration annotation. It then creates an application context similar to the one that would be started in a production environment.
5.2. Minimize ApplicationContext
If we need a different (minimal) ApplicationContext for our test class, we can create a static inner @Configuration class:
@SpringBootTest
class PetServiceIntegrationTest {

    @Autowired
    PetService service;

    @Configuration
    static class MyCustomConfiguration {

        @Bean
        PetService createMyPetService() {
            // create your custom pet service
        }
    }

    // ...
}
In contrast to using @TestConfiguration, this completely prevents the auto-detection of @SpringBootConfiguration.
Another way to reduce the size of the ApplicationContext is to use @SpringBootTest(classes=…). This would ignore inner @Configuration classes too and initializes only the given classes.
@SpringBootTest(classes = PetService.class)
public class PetServiceIntegrationTest {

    @Autowired
    PetService service;

    // ...
}
If we don’t need any Spring Boot functionality like profiles and reading application properties, we could replace @SpringBootTest. Let’s take a look at what’s behind this annotation:
@ExtendWith(SpringExtension.class)
@BootstrapWith(SpringBootTestContextBootstrapper.class)
public @interface SpringBootTest {
    // ...
}
We can see that this annotation only enables the JUnit SpringExtension (that is part of the Spring Framework, not of Spring Boot) and declares a TestContextBootstrapper that Spring Boot provides and that implements the search mechanism. If we remove the @BootstrapWith, the DefaultTestContextBootstrapper is used, which is not SpringBoot-aware. We then have to specify the context using @ContextConfiguration:
@ExtendWith(SpringExtension.class)
@ContextConfiguration(classes = PetService.class)
class PetServiceIntegrationTest {

    @Autowired
    PetService service;

    // ...
}
5.3. Test Slices
Spring Boot’s auto-configuration system works well for applications but can sometimes be too much for tests. It’s often helpful to load only the parts of the configuration required to test a ‘slice’ of our application. For example, we might want to test that Spring MVC controllers are mapping URLs correctly, and we don’t want to involve database calls in those tests; or we might want to test JPA entities, and we’re not interested in the web layer when those tests run.
We can find an overview of available test slices within the Spring Boot documentation.
5.4. Context Optimization vs. Caching
Context optimization leads to faster startup time for single tests, but we should be aware that this will lead to different configurations and, thus, more ApplicationContext initialization. Summed up, the whole test execution time might increase. As a result, skipping context optimization could be better but using an already existing configuration that fits the test case requirements.
6. Proposal: Custom Slices
As we have learned, we must find a compromise between the count and the size of ApplicationContexts. The challenge is to keep track of the configurations. One possible solution to solve this is to define a couple of custom slices (maybe one per layer, one for the whole application) and use them exclusively in all tests, i.e. we have to avoid further configurations and mocking with @MockBean within the test classes.
A solution for the Pet Domain Layer could be:
@Documented
@Inherited
@Retention(RetentionPolicy.RUNTIME)
@Target(ElementType.TYPE)
@ExtendWith(SpringExtension.class)
@ComponentScan(basePackageClasses = PetsDomainTest.class)
@Import(PetsDomainTest.PetServiceTestConfiguration.class)
// further features that can help to configure and execute tests
@ActiveProfiles({"test", "domain-test"})
@Tag("integration-test")
@Tag("domain-test")
public @interface PetsDomainTest {

    @TestConfiguration
    class PetServiceTestConfiguration {

        @Primary
        @Bean
        PetServiceRepository createRepositoryMock() {
            return mock(
              PetServiceRepository.class,
              MockReset.withSettings(MockReset.AFTER)
            );
        }
    }
}
It can then be used as shown below:
@PetsDomainTest
public class PetServiceIntegrationTest {

    @Autowired
    PetService service;
    @Autowired // Mock
    PetServiceRepository repository;

    // ...
}
7. Further Pitfalls
7.1. Deriving Test Configuration
One principle of integration tests is that we test the application as close as possible to the production state. We only derive for the specific test case. Unfortunately, the test framework itself reconfigures the behavior of our application, and we should be aware of that. For example, the built-in observability features are disabled during tests, so if we want to test for observations in our application, we explicitly need to re-enable it using @AutoConfigureObservability.
7.2. Package Structure
When we want to test slices of our application, we need to declare which components have to be initialized within the ApplicationContext. We could do this by listing the corresponding classes, but to get a more stable test configuration, it might be better to specify packages. For example, we have a mapper like this:
@Component
public class PetDtoMapper {

    public PetDto map(Pet source) {
        // ...
    }
}
And we need this mapper within our test; we could configure the test with this lean solution:
@ExtendWith(SpringExtension.class)
@ContextConfiguration(classes = PetDtoMapper.class)
class PetDtoMapperIntegrationTest {

    @Autowired
    PetDtoMapper mapper;

    // ...
}
If we replace the mapper implementation with MapStruct, the PetDtoMapper type will become an interface, and MapStruct then generates the implementation class in the same package. So the given test fails unless we import the whole package:
@ExtendWith(SpringExtension.class)
public class PetDtoMapperIntegrationTest {

    @Configuration
    @ComponentScan(basePackageClasses = PetDtoMapper.class)
    static class PetDtoMapperTestConfig {}

    @Autowired
    PetDtoMapper mapper;

    // ...
}
This has the side-effect of initializing all other beans placed within the same package and the sub-packages. That’s why we should create a package structure based on the slices’ structure. This includes domain-specific components, global configurations for security, the web or persistence layer, or event handlers.
8. Conclusion
In this tutorial, we explored the pitfalls of writing Spring Boot tests. We have learned that ApplicationContexts are cached and re-used, so we need to consider the isolation.


