1. Overview
The Spring Boot Project provides features that help to create stand-alone Spring-based applications and support cloud-native development. So, it’s an extension to the Spring Framework that is pretty helpful.
Sometimes, we don’t want to use Spring Boot, such as when integrating Spring Framework into a Jakarta EE application, however, we still want to benefit from the production-ready features such as metrics and health checks, so-called “observability”. (We can find details in the article “Observability with Spring Boot 3“.)
Observability features are provided by Spring Boot Actuator, which is a sub-project of Spring Boot. In this article, we’ll find out how to integrate Actuator into an application that does not use Spring Boot.
2. Project Configuration
When excluding Spring Boot, we need to deal with application packaging and server runtime provisioning, and we need to externalize configuration by ourselves. Those features provided by Spring Boot aren’t necessary to use Actuator in our Spring-based application. And, while we definitely need the project dependencies, we cannot use Spring Boot’s Starter Dependencies (spring-boot-starter-actuator in this case). Aside from that, we also need to add the necessary beans to the application context.
We could do this manually or by using auto-configuration. Because the configuration of the Actuator is pretty complex and not documented in any detail, we should prefer auto-configuration. This is the one part we’ll need from Spring Boot, so we cannot exclude Spring Boot completely.
2.1. Add Project Dependency
To integrate the Actuator, we need the spring-boot-actuator-autoconfigure dependency:
<dependency>
    <groupId>org.springframework.boot</groupId>
    <artifactId>spring-boot-actuator-autoconfigure</artifactId>
    <version>3.0.6</version>
</dependency>
This will also include spring-boot-actuator, spring-boot, and spring-boot-autoconfigure as transitive dependencies.
2.2. Enable Auto-Configuration
Then, we enable auto-configuration. This is easily done by adding @EnableAutoConfiguration to the application’s configuration:
@EnableAutoConfiguration
// ... @ComponentScan, @Import or any other application configuration
public class AppConfig {
    // ...
}
We should be aware that this could affect the whole application because this will also auto-configure other parts of the framework if further auto-configuration classes are in the classpath.
2.3. Enable Endpoints
By default, only the health endpoint is enabled. The auto-configuration classes of the Actuator use configuration properties. For example, WebEndpointAutoConfiguration uses WebEndpointProperties that are mapped to properties with the “management.endpoints.web” prefix. To enable all endpoints, we need
management.endpoints.web.exposure.include=*
The properties must be available to the context — for example, by placing them into an application.properties file and annotating our configuration class with @PropertySource:
@EnableAutoConfiguration
@PropertySource("classpath:application.properties")
// ... @ComponentScan, @Import or any other application configuration
public class AppConfig {
}
2.4. Test Project Configuration
Now, we’re ready to call the actuator endpoints. We can enable health details with this property:
management.endpoint.health.show-details=always
And we can implement a custom health endpoint:
@Configuration
public class ActuatorConfiguration {

    @Bean
    public HealthIndicator sampleHealthIndicator() {
        return Health.up()
          .withDetail("info", "Sample Health")
          ::build;
    }

}
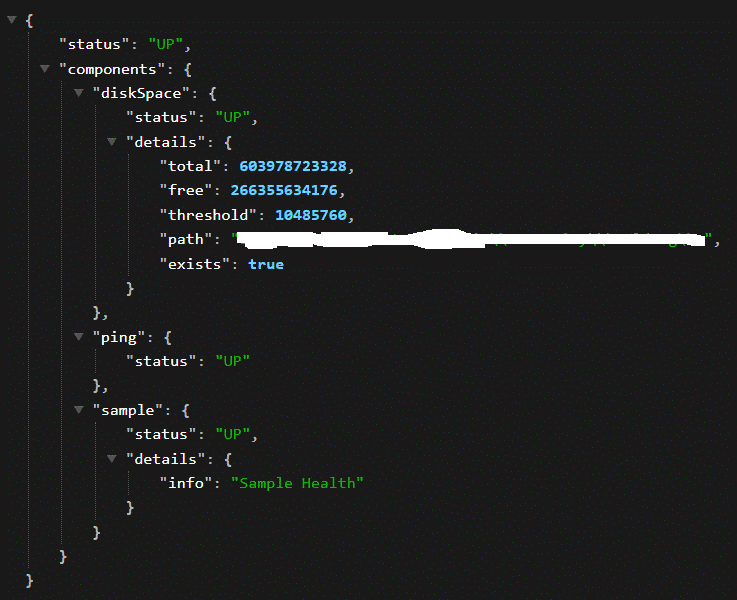
A call to “{url_to_project}/actuator/health” would then bring an output like:

3. Conclusion
In this tutorial, we saw how to integrate Spring Boot Actuator in a non-Boot application. As usual, all the code implementations are available over on GitHub.


