


Mocking is an essential part of unit testing, and the Mockito library makes it easy to write clean and intuitive unit tests for your Java code.
Get started with mocking and improve your application tests using our Mockito guide:
Handling concurrency in an application can be a tricky process with many potential pitfalls. A solid grasp of the fundamentals will go a long way to help minimize these issues.
Get started with understanding multi-threaded applications with our Java Concurrency guide:
Spring 5 added support for reactive programming with the Spring WebFlux module, which has been improved upon ever since. Get started with the Reactor project basics and reactive programming in Spring Boot:
Since its introduction in Java 8, the Stream API has become a staple of Java development. The basic operations like iterating, filtering, mapping sequences of elements are deceptively simple to use.
But these can also be overused and fall into some common pitfalls.
To get a better understanding on how Streams work and how to combine them with other language features, check out our guide to Java Streams:
Explore Spring Boot 3 and Spring 6 in-depth through building a full REST API with the framework:
Yes, Spring Security can be complex, from the more advanced functionality within the Core to the deep OAuth support in the framework.
I built the security material as two full courses - Core and OAuth, to get practical with these more complex scenarios. We explore when and how to use each feature and code through it on the backing project.
You can explore the course here:
All Access is finally out, with all of my Spring courses. Learn JUnit is out as well, and Learn Maven is coming fast. And, of course, quite a bit more affordable. Finally.
>> GET THE COURSE
Spring Data JPA is a great way to handle the complexity of JPA with the powerful simplicity of Spring Boot.
Get started with Spring Data JPA through the guided reference course:
Refactor Java code safely — and automatically — with OpenRewrite.
Refactoring big codebases by hand is slow, risky, and easy to put off. That’s where OpenRewrite comes in. The open-source framework for large-scale, automated code transformations helps teams modernize safely and consistently.
Each month, the creators and maintainers of OpenRewrite at Moderne run live, hands-on training sessions — one for newcomers and one for experienced users. You’ll see how recipes work, how to apply them across projects, and how to modernize code with confidence.
Join the next session, bring your questions, and learn how to automate the kind of work that usually eats your sprint time.
1. Introduction
Application startup aims to speed up overall performance post-load. This means creating all necessary objects for initial use, but also caching or preparing data that’s highly likely to be required. In addition to being a way to improve the user experience, application startup may be problematic.
In this tutorial, we’ll learn how to facilitate, track, and monitor the context creation of a Spring application.
First, we’ll recap what the Spring context is and why we want to track its creation. After that, we’ll look at the three implementations that Spring Boot provides to easily monitor context creation. Finally, we’ll take a quick look at how and why we might want to implement custom startup tracking logic.
2. Spring Application Context
The Spring Boot application context serves as the Inversion of Control (IoC) container. This container manages the lifecycle of a Spring application and provides dependency injection, Spring bean management, events, and configuration management.
The context is created during the startup of a Spring application. For simple applications, a Spring application typically starts quickly, but can take longer for complex ones and even freeze during initialization.
There are various ways to improve the startup time. To help us better understand the startup process, Spring provides the ability to track the application context creation.
3. The ApplicationStartup Interface
Spring provides two implementations of the ApplicationStartup interface:
- DefaultApplicationStartup
- FlightRecorderApplicationStartup
The default implementation is a no-op, while FlightRecorderApplicationStartup provides an implementation for use with the Java Flight Recorder (JFR).
In addition, Spring Boot comes with the BufferingApplicationStartup implementation that records startup events in memory. If we want to use anything other than DefaultApplicationStartup, we need to initialize the Spring application with the desired ApplicationStartup implementation before we start the application.
4. BufferingApplicationStartup
Let’s look at BufferingApplicationStartup, an implementation that stores startup events in memory and also provides an actuator endpoint for convenient access to the recorded events.
4.1. Configuration
First, we need to register BufferingApplicationStartup with the Spring Boot application:
@SpringBootApplication
public class ApplicationStartupTrackingApplication {

    public static void main(String[] args) {

        SpringApplication app = new SpringApplication(ApplicationStartupTrackingApplication.class);

        app.setApplicationStartup(new BufferingApplicationStartup(2048));

        app.run(args);
    }
}
The constructor parameter (2048 in this example) specifies the buffer size, i.e., the maximum number of events that can be recorded.
4.2. Access via the Actuator Endpoint
One way to retrieve the recorded events is via an actuator endpoint. Specifically, we can enable the startup actuator in the application properties:
management.endpoints.web.exposure.include=startupIn case we have a Spring bean, we also make the necessary addition:
@Service
public class SpecialService {
}
If we access the actuator, we can see an entry for the service bean:
curl localhost:8080/actuator/startup | jq
{
  "duration": "PT0.000754S",
  "endTime": "2026-07-19T18:31:27.493778Z",
  "startTime": "2026-07-19T18:31:27.493024Z",
  "startupStep": {
    "id": 107,
    "name": "spring.beans.instantiate",
    "parentId": 4,
    "tags": [
      {
        "key": "beanName",
        "value": "specialService"
      }
    ]
  }
}
It’s important to note that the actuator only works with BufferingApplicationStartup. If we configure the application with any other implementation of the ApplicationStartup interface, we see an error message:
curl localhost:8080/actuator/startup | jq
{
  "timestamp": "2026-07-19T14:37:45.989Z",
  "status": 404,
  "error": "Not Found",
  "path": "/actuator/startup"
}
Furthermore, we can call the actuator endpoint with a GET or a POST request. In both cases, the response should be the same; however, GET returns a snapshot of the timeline, while POST returns the snapshot and also clears the buffer.
4.3. Access via the Application Context
In addition to using the actuator endpoint, we can programmatically access the timeline BufferingApplicationStartup provides. To do so, we access the configured BufferingApplicationStartup instance:
@Component
public class StartupTracker {

    private BufferingApplicationStartup startup;

    public StartupTracker(@Autowired ApplicationContext context) {
        startup = (BufferingApplicationStartup) (
            (ConfigurableApplicationContext) context).getApplicationStartup();
    }

    public List recorded() {

        List recordedEvents = new ArrayList<>();

        for(StartupTimeline.TimelineEvent event : startup.getBufferedTimeline().getEvents()) {
            for(StartupStep.Tag tag : event.getStartupStep().getTags()) {
                recordedEvents.add(
                    event.getStartupStep().getName() + "  " +
                        tag.getKey() + " " +
                        tag.getValue()
                );
            }
        }

        return recordedEvents;
    }
}
Thus, we have access to the deeper startup context.
4.4. Usage in Spring Boot Tests
This way, we can analyze the timeline and create a custom output format, filter certain events, and also test the implementation:
@SpringBootTest(useMainMethod = SpringBootTest.UseMainMethod.ALWAYS)
public class ApplicationTest {

    @Autowired
    private StartupTracker startupTracker;

    @Test
    void givenTheApplicationStarts_whenRetrieveRecordedEvents_ThenContainsCustomBeans() {
        Assertions.assertThat(startupTracker.recorded()).contains(
            "spring.beans.instantiate  beanName specialService",
            "spring.beans.instantiate  beanName startupTracker"
        );
    }
}
We can see that the list of events includes the two beans that we have created, SpecialService and StartupTracker.
Notably, we need to configure the test with SpringBootTest.UseMainMethod.ALWAYS. This ensures that we start the application via the main method and Spring Boot is configured to use BufferingApplicationStartup instead of the no-op implementation.
5. FlightRecorderApplicationStartup
Another option to track application startup is FlightRecorderApplicationStartup, an implementation that provides Spring startup metrics in a format suitable for the Java Flight Recorder (JFR), which can be viewed in the Java Mission Control (JMC) tool.
Let’s configure the application to use FlightRecorderApplicationStartup:
app.setApplicationStartup(new FlightRecorderApplicationStartup());In addition, we need to provide a JVM parameter:
-XX:StartFlightRecording:filename=recording.jfr,duration=20sNow, Spring records the application startup events in a file named recording.jfr that we can view in the Java Mission Control (JMC) viewer:
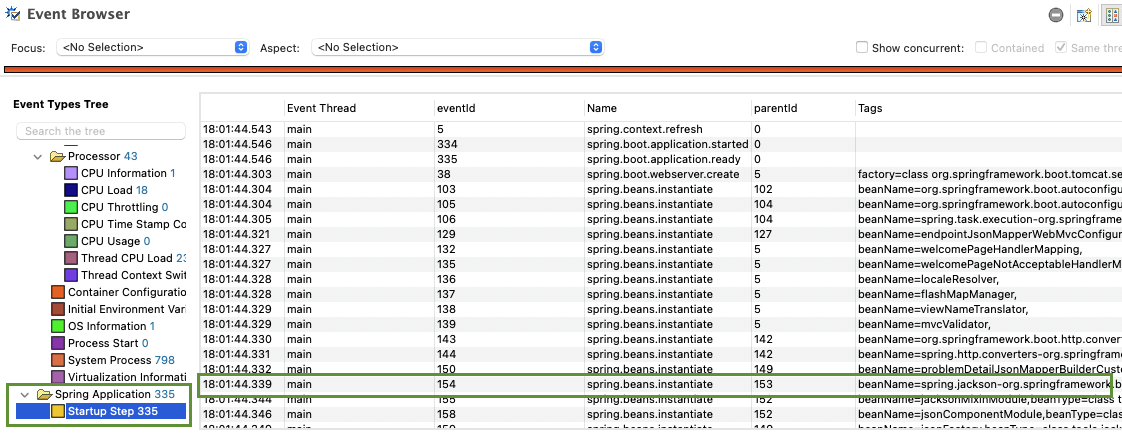
In particular, we can find the startup steps under the category Spring Application.
6. Adding Custom Steps
The recommended way to customize the startup timeline is to add custom startup steps to the ApplicationStartup instance that we can retrieve from the application context. To demonstrate how to do that, let’s create a service class and add some custom steps:
@Service
public class SpecialService {

    private ApplicationStartup applicationStartup;

    public SpecialService(ApplicationContext context) {
        this.applicationStartup = ((ConfigurableApplicationContext) context).getApplicationStartup();
    }

    @PostConstruct
    public void init() {
        StartupStep startupStep1 = this.applicationStartup.start("com.baeldung.special.service");
        try {
            startupStep1.tag("init", "connect to databases");
            // some long-running initialization
        } finally {
            startupStep1.end();
        }

        StartupStep startupStep2 = this.applicationStartup.start("com.baeldung.special.service");
        try {
            startupStep2.tag("init", "connect to AI agent");
            // more long-running initialization
        } finally {
            startupStep2.end();
        }
    }
}
So, we can now see a step for the initialization of the SpecialService bean as the parent step (id=107) and the two additional steps (id=[108,109]) in the response of the actuator:
[
  {
    "duration": "PT0.000006S",
    "endTime": "2026-07-18T19:15:12.096227Z",
    "startTime": "2026-07-18T19:15:12.096221Z",
    "startupStep": {
      "id": 108,
      "name": "com.baeldung.special.service",
      "parentId": 107,
      "tags": [
        {
          "key": "init",
          "value": "connect to databases"
        }
      ]
    }
  },
  {
    "duration": "PT0.000002S",
    "endTime": "2026-07-18T19:15:12.096238Z",
    "startTime": "2026-07-18T19:15:12.096236Z",
    "startupStep": {
      "id": 109,
      "name": "com.baeldung.special.service",
      "parentId": 107,
      "tags": [
        {
          "key": "init",
          "value": "connect to AI agent"
        }
      ]
    }
  },
  {
    "duration": "PT0.000682S",
    "endTime": "2026-07-18T19:15:12.096328Z",
    "startTime": "2026-07-18T19:15:12.095646Z",
    "startupStep": {
      "id": 107,
      "name": "spring.beans.instantiate",
      "parentId": 4,
      "tags": [
        {
          "key": "beanName",
          "value": "specialService"
        }
      ]
    }
  }
]
The output shows metrics for both startup steps: connect to databases and connect to AI agent, as well as a step for the creation of the service itself spring.beans.instantiate. As seen earlier, we can also monitor these startup steps in the Java Flight Recorder or programmatically via the BufferingApplicationStartup.
7. Implementing the ApplicationStartup Interface
The recommended way to access Spring startup metrics is using one of the three implementations of the ApplicationStartup interface that Spring provides. However, it’s possible to provide a custom implementation:
public class CustomStartup implements ApplicationStartup {
    @Override
    public StartupStep start(String name) {
        return new CustomStartupStep(name);
    }
}
In this case, we should also provide an implementation of the StartupStep interface:
public class CustomStartupStep implements StartupStep {

    private String name;

    public CustomStartupStep(String name) {
        this.name = name;
    }

    @Override
    public String getName() {
        return name;
    }

    // Override other methods

}
Since it’s a rare scenario, we don’t discuss a complete implementation of a custom ApplicationStartup class. One reason to implement a custom startup logic is the possibility to observe the steps in real time during context creation. This way, if needed, we can take action immediately, for example, to send a message if a bean creation takes a long time, instead of waiting until the entire context is created.
8. Conclusion
In this article, we looked at how Spring tracks the creation of its application context through the ApplicationStartup interface.
Specifically, we covered the three implementations that Spring provides:
- DefaultApplicationStartup
- BufferingApplicationStartup
- FlightRecorderApplicationStartup
In all cases, we learned how to access the recorded steps and add further steps to the timeline. Lastly, we had a quick look at how to plug a custom implementation of the ApplicationStartup interface.














