Exploring Agent2Agent Protocol (A2A) With Spring AI
Last updated: September 16, 2026


Mocking is an essential part of unit testing, and the Mockito library makes it easy to write clean and intuitive unit tests for your Java code.
Get started with mocking and improve your application tests using our Mockito guide:
Handling concurrency in an application can be a tricky process with many potential pitfalls. A solid grasp of the fundamentals will go a long way to help minimize these issues.
Get started with understanding multi-threaded applications with our Java Concurrency guide:
Spring 5 added support for reactive programming with the Spring WebFlux module, which has been improved upon ever since. Get started with the Reactor project basics and reactive programming in Spring Boot:
Since its introduction in Java 8, the Stream API has become a staple of Java development. The basic operations like iterating, filtering, mapping sequences of elements are deceptively simple to use.
But these can also be overused and fall into some common pitfalls.
To get a better understanding on how Streams work and how to combine them with other language features, check out our guide to Java Streams:
Explore Spring Boot 3 and Spring 6 in-depth through building a full REST API with the framework:
Yes, Spring Security can be complex, from the more advanced functionality within the Core to the deep OAuth support in the framework.
I built the security material as two full courses - Core and OAuth, to get practical with these more complex scenarios. We explore when and how to use each feature and code through it on the backing project.
You can explore the course here:
All Access is finally out, with all of my Spring courses. Learn JUnit is out as well, and Learn Maven is coming fast. And, of course, quite a bit more affordable. Finally.
>> GET THE COURSE
Spring Data JPA is a great way to handle the complexity of JPA with the powerful simplicity of Spring Boot.
Get started with Spring Data JPA through the guided reference course:
Refactor Java code safely — and automatically — with OpenRewrite.
Refactoring big codebases by hand is slow, risky, and easy to put off. That’s where OpenRewrite comes in. The open-source framework for large-scale, automated code transformations helps teams modernize safely and consistently.
Each month, the creators and maintainers of OpenRewrite at Moderne run live, hands-on training sessions — one for newcomers and one for experienced users. You’ll see how recipes work, how to apply them across projects, and how to modernize code with confidence.
Join the next session, bring your questions, and learn how to automate the kind of work that usually eats your sprint time.
1. Overview
We’re increasingly building AI agents that can handle a user’s entire request on their own. Instead of simply answering questions from what a Large Language Model (LLM) already knows, these agents reason through a problem, break it down into steps, call external tools, and even execute local scripts.
As these requests grow in complexity, packing every capability into a single agent becomes unmanageable. The natural fix is to create smaller agents, each specialized in one job. However, getting these agents to talk to each other is a challenge in itself, as they run as independent services built using different languages, frameworks, and LLMs.
The Agent2Agent (A2A) Protocol addresses this issue by defining a standard for agents to discover each other and communicate.
In this tutorial, we’ll practically explore the A2A protocol by implementing its client and server architecture using Spring AI.
2. Agent2Agent (A2A) Protocol 101
Before we dive into the implementation, let’s take a closer look at the protocol and the way two agents interact:
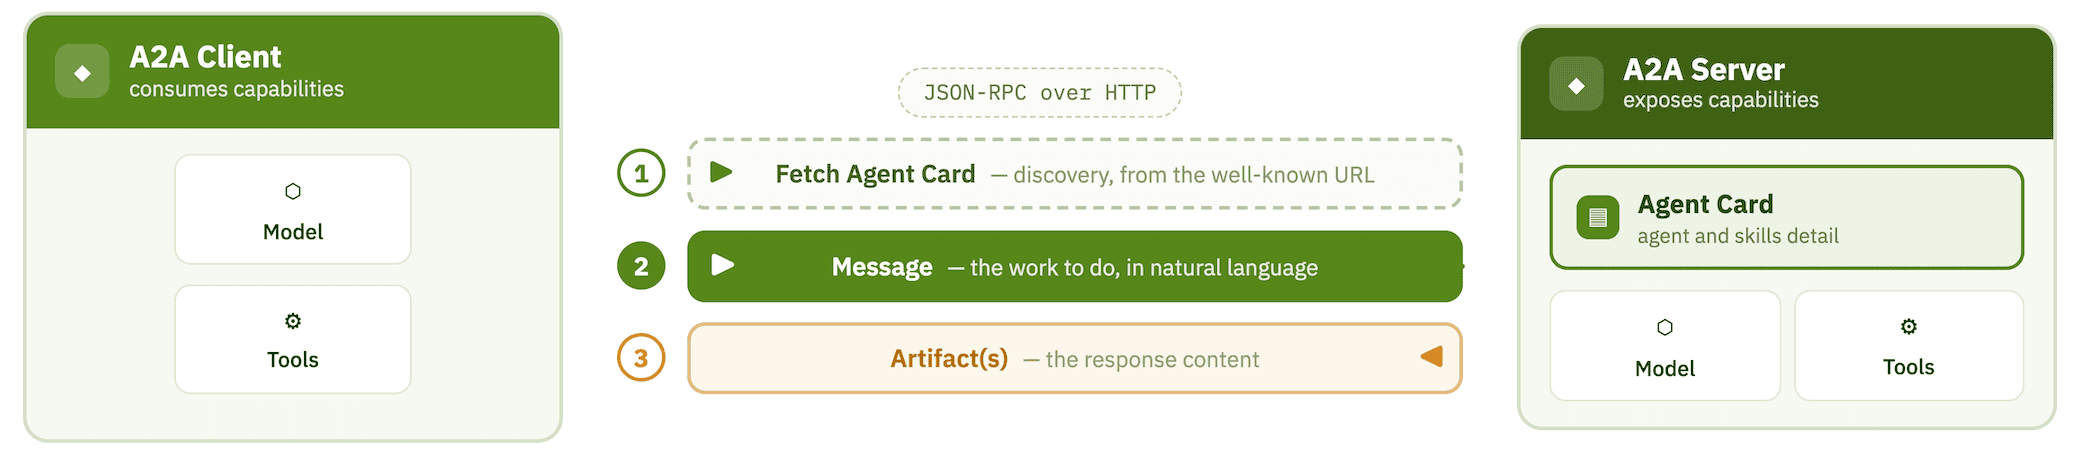
An agent acting as a server exposes its capabilities to the outside world, while an agent acting as a client consumes them.
Discovery happens through an Agent Card, which is a JSON document that a server publishes at a well-known URL. This card exposes the agent’s details, including the list of skills it offers. A client agent fetches this card first to learn what a remote agent can do and where to reach it.
The client sends a Message that describes the work to be done in plain natural language. The remote agent turns that message into a Task, processes it, and returns one or more Artifacts that carry the actual response content.
A2A is a complex and vast topic. We can refer to the official specification to learn more.
3. The Project We’re Building
To see the protocol in action, we’ll build a job screening system for recruiters:
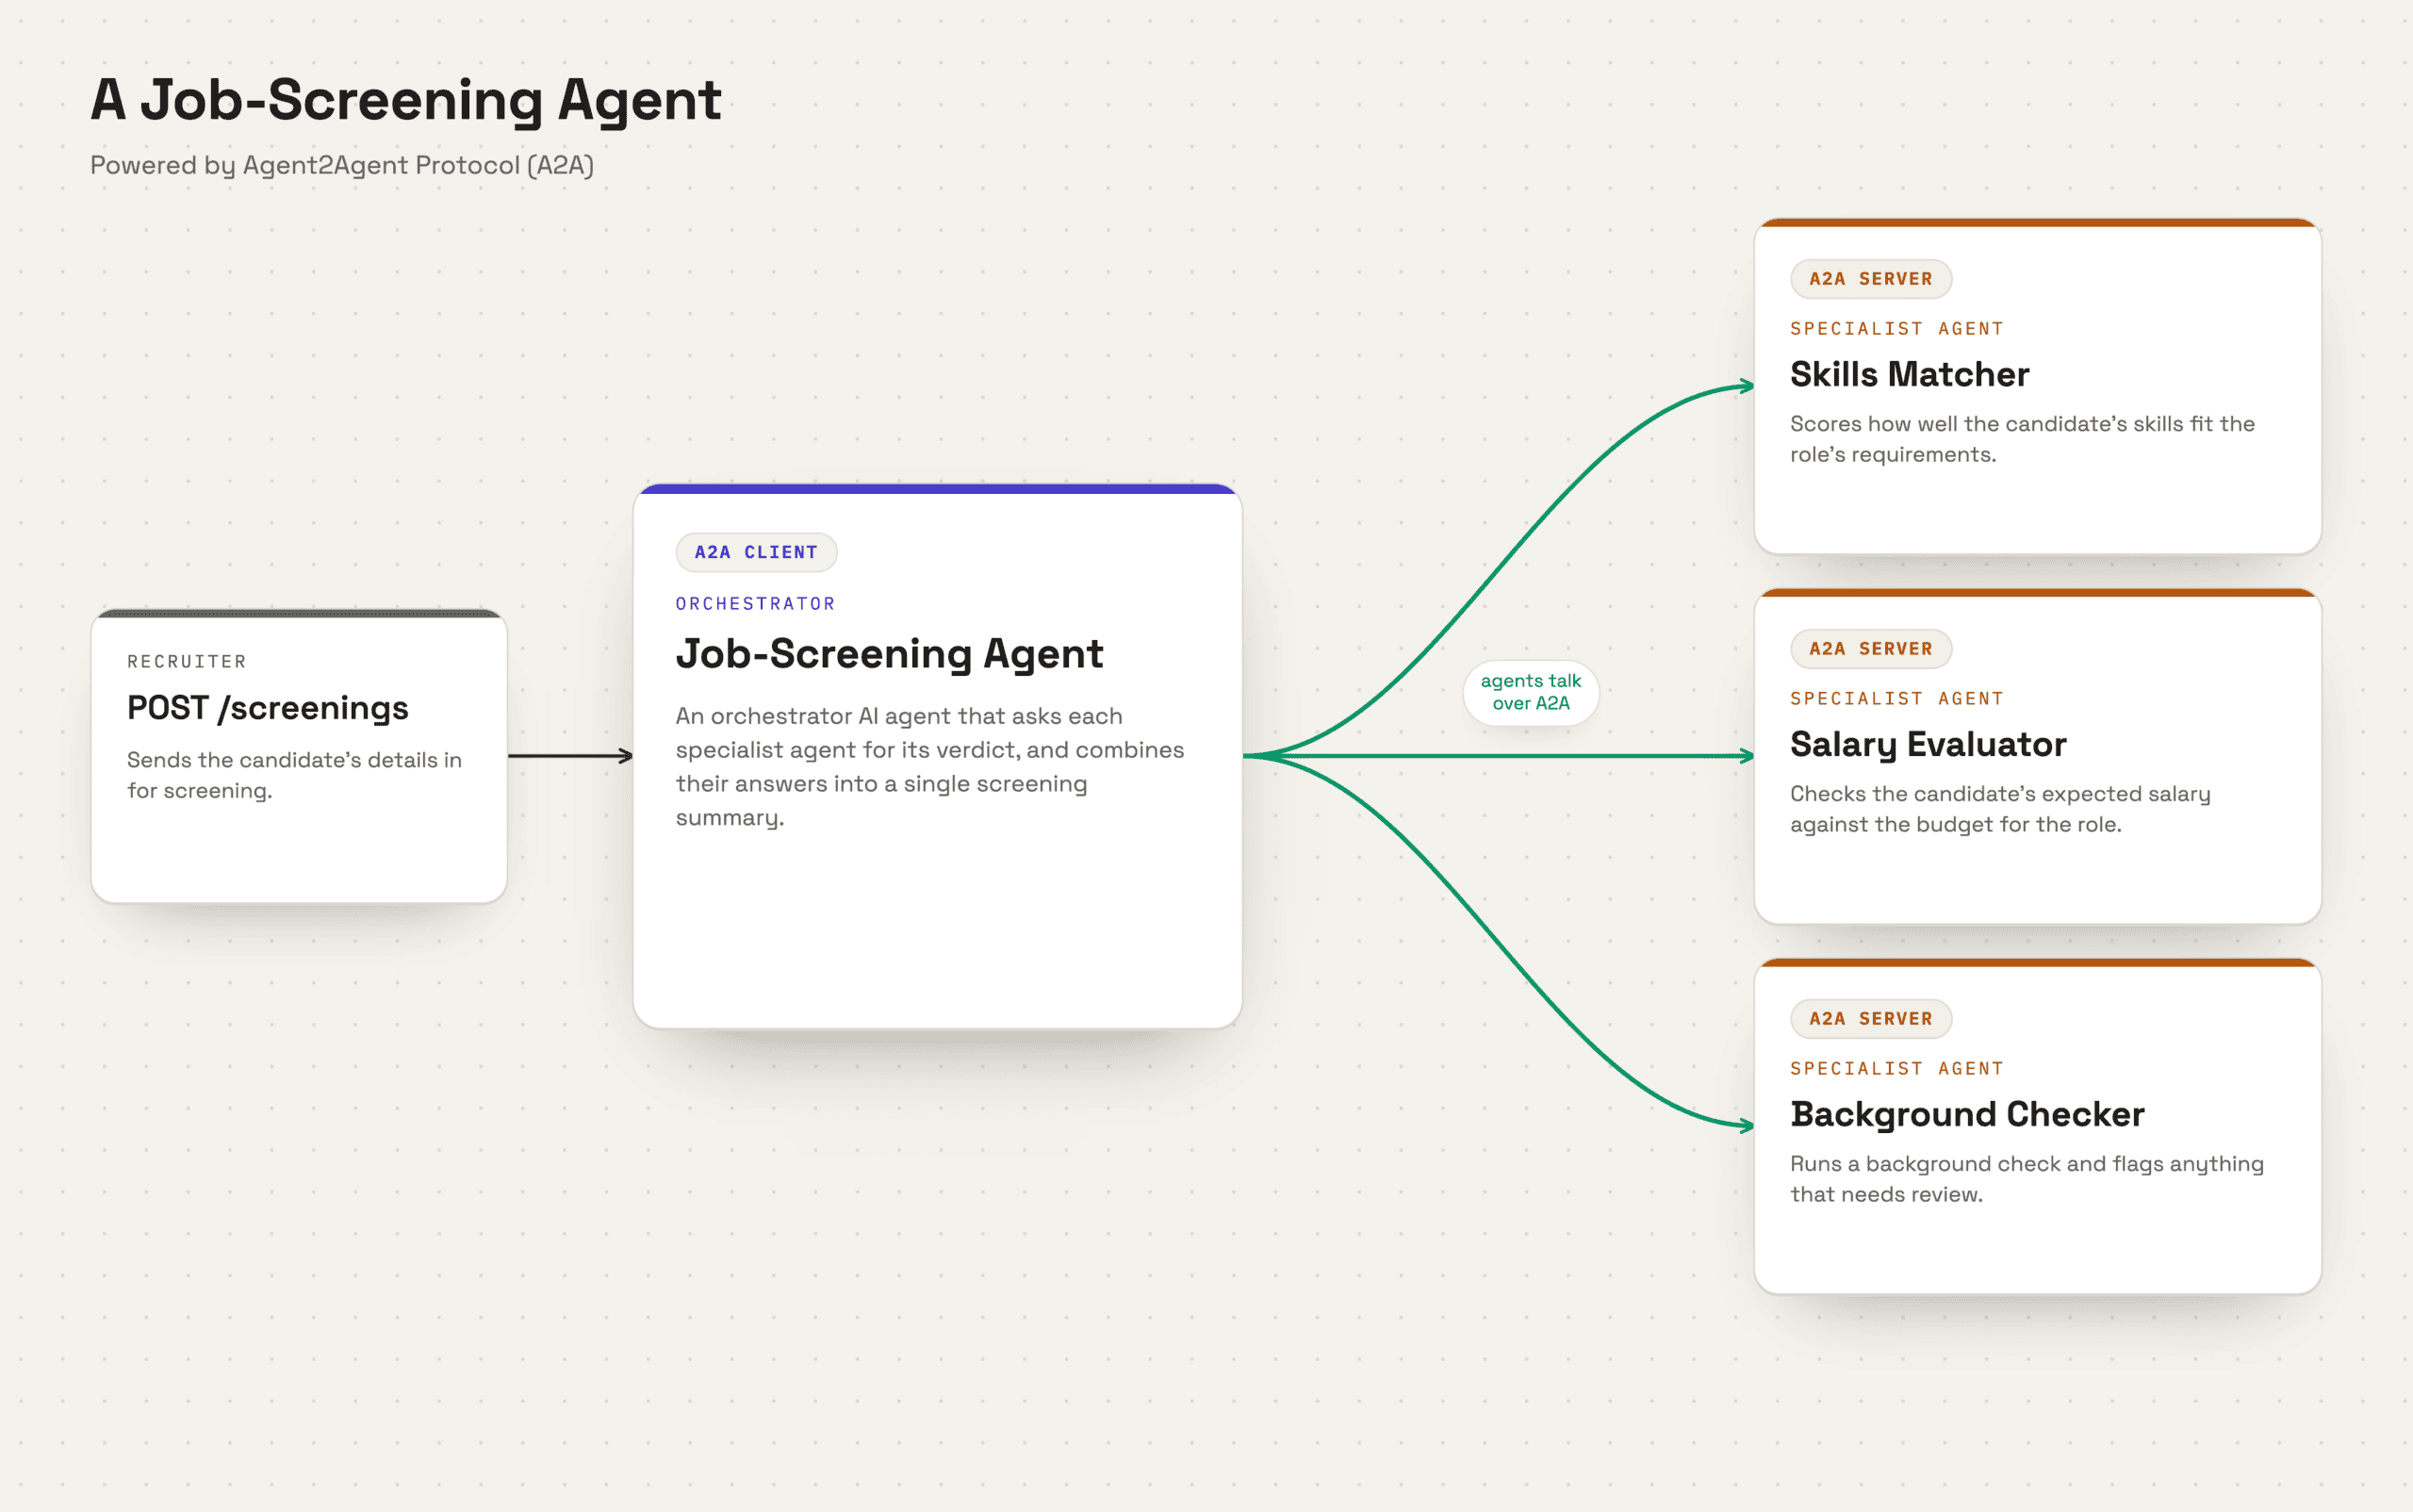
As we can see, our system is made up of one orchestrator agent that acts as the A2A client and communicates with three specialized remote agents that act as A2A servers.
A recruiter submits a candidate’s details to a single REST endpoint. Behind the scenes, the orchestrator agent will break the request down and delegate each task to a specialized agent. Once every agent responds, the orchestrator will merge the individual verdicts into one short screening summary.
4. Creating an A2A Server
Since creating A2A servers follows the exact same structure, we’ll only walk through implementing the skills matcher agent.
The remaining two remote servers differ solely in their tools and prompts. To view the complete implementation of the project, we can refer to the repository backing this tutorial.
4.1. Dependencies and LLM Configuration
Let’s start by adding the necessary dependencies to our project’s pom.xml file:
<dependency>
    <groupId>org.springframework.ai</groupId>
    <artifactId>spring-ai-starter-model-openai</artifactId>
    <version>2.0.0</version>
</dependency>
<dependency>
    <groupId>org.springaicommunity</groupId>
    <artifactId>spring-ai-a2a-server-autoconfigure</artifactId>
    <version>0.3.0</version>
</dependency>
Here, we first import Spring AI’s OpenAI starter dependency, which we’ll use to interact with an LLM. Additionally, we import the A2A server autoconfigure dependency from the Spring AI community, which takes care of serving our agent card at startup and handling A2A requests.
Next, let’s configure our OpenAI API key and chat model in the application.yaml file:
spring:
  ai:
    openai:
      api-key: ${OPENAI_API_KEY}
      chat:
        model: gpt-5.5
Here, we specify OpenAI’s GPT 5.5 model using the gpt-5.5 model ID. Alternatively, we can use a different chat model, as the specific AI model or provider is irrelevant for this demonstration.
With these two properties set, Spring AI automatically creates a bean of type ChatClient.Builder, which we’ll use in the upcoming section.
4.2. Creating a Tool and Registering It With ChatClient
Next, let’s configure the actual capability that our A2A server offers. We’ll create a SkillsMatcherTools class and define a tool that evaluates a candidate’s skills:
@Tool(
  name = "match-skills",
  description = "Compares a candidate's skills against a job's required skills and returns a fit score"
)
SkillsMatchResult matchSkills(
  @ToolParam(description = "Candidate skills, comma-separated") String candidateSkills,
  @ToolParam(description = "Required job skills, comma-separated") String requiredSkills
) {
    // ... rudimentary implementation
}

record SkillsMatchResult(
    int score,
    Verdict verdict,
    Set<String> matchedSkills,
    Set<String> missingSkills
) {}

enum Verdict {
    STRONG_MATCH,
    PARTIAL_MATCH,
    WEAK_MATCH
}
We annotate our method with the @Tool annotation and give it an explicit name along with a short description. Both of these values help the AI model decide if and when to invoke this tool. Similarly, we describe both method parameters with the @ToolParam annotation so that the LLM knows the format we expect the inputs to be in.
We’ve deliberately omitted the method implementation here, since it’s not important to our A2A understanding.
Next, let’s create a ChatClient bean and register our tool with it:
@Bean
ChatClient chatClient(
  ChatClient.Builder chatClientBuilder,
  SkillsMatcherTools skillsMatcherTools
) {
    return chatClientBuilder
      .defaultSystem("""
        You are a skills-matching assistant for recruiters.
        Use the match-skills tool to compare a candidate's skills
        against a job's required skills, then summarize the result.
        """)
      .defaultTools(skillsMatcherTools)
      .build();
}
Here, we use the ChatClient.Builder bean that Spring AI configures for us, along with the SkillsMatcherTools bean we defined above, to create a ChatClient bean. This class acts as our main entry point for interacting with the configured LLM.
Additionally, we define a system prompt defining the agent’s role, and then register our tool class using the defaultTools() method. This enables the model to call our tool method when it receives a matching request.
4.3. Defining an AgentExecutor to Handle A2A Requests
The ChatClient bean we’ve defined can only be used by components within our own application. To let other agents send us tasks, we need to define an AgentExecutor bean that handles incoming A2A requests:
@Bean
AgentExecutor agentExecutor(ChatClient chatClient) {
    return new DefaultAgentExecutor(chatClient, (client, requestContext) -> {
        String userMessage = DefaultAgentExecutor.extractTextFromMessage(requestContext.getMessage());
        return client
          .prompt()
          .user(userMessage)
          .call()
          .content();
    });
}
Here, we use the DefaultAgentExecutor class, passing it our ChatClient bean along with a handler function that defines how we want to respond. In the handler function, we extract the plain text of the incoming message and pass it to our LLM as a user prompt. The response from our chatClient bean is automatically wrapped into an artifact and sent back to the calling agent.
4.4. Describing Our Agent Using an AgentCard
Finally, we need to expose an Agent Card that accurately describes our agent:
@Bean
AgentCard agentCard(
  @Value("${server.host}") String host,
  @Value("${server.port}") int port
) {
    return new AgentCard.Builder()
      .name("Skills Matcher Agent")
      .description("Evaluates how well a candidate's skills match a job's required skills")
      .url(String.format("http://%s:%d/", host, port))
      .version("1.0.0")
      .capabilities(new AgentCapabilities
        .Builder()
        .streaming(false)
        .build())
      .defaultInputModes(List.of("text"))
      .defaultOutputModes(List.of("text"))
      .skills(List.of(new AgentSkill.Builder()
        .id("skills_matching")
        .name("Skills Matching")
        .description("Compares candidate skills to job requirements and scores the fit")
        .tags(List.of("hiring", "recruiting"))
        .build()))
      .protocolVersion("1.0.1")
      .build();
}
Here, we create an AgentCard bean and define the important properties of name, description, and skills. Client agents rely on these properties to decide whether a remote agent and the capabilities it offers are a good fit for a given task.
Similarly, we define the url property from the host and port of our running application, telling clients where to reach us. Additionally, we declare that our agent doesn’t support streaming and it exchanges plain text in both directions.
It’s worth noting that every property we set above is mandatory, and the builder rejects a card with any of them missing. With this bean defined, the auto-configuration serves our agent card at the .well-known/agent-card.json path.
5. Creating an A2A Client
With our specialized agents ready, we’ll build our A2A client, i.e., the job screening orchestrator that delegates the actual evaluation to them.
5.1. Dependencies
Our orchestrator is a separate application that also talks with an LLM. For this reason, we’ll need to import a chat model dependency and configure the API key and model properties, just like we did in our A2A server.
In addition to that, we need to add the A2A Java SDK to our pom.xml:
<dependency>
    <groupId>io.github.a2asdk</groupId>
    <artifactId>a2a-java-sdk-client</artifactId>
    <version>0.3.3.Final</version>
</dependency>
This SDK provides us the classes we need to fetch agent cards, open connections to remote agents, and send them messages.
We should note that we didn’t explicitly declare this dependency while building our A2A server, as the server autoconfigure dependency brings it in transitively. However, for an agent purely acting as a client, we’ll need to add this ourselves.
5.2. Discovering Remote Agents at Startup
Our orchestrator can only delegate work to agents it knows about, so let’s list their addresses in the application.yaml:
remote:
  agents:
    urls:
      - http://localhost:8081
      - http://localhost:8082
      - http://localhost:8083
Here, we configure the base URLs of our remote agents using a custom property. We need to make sure to update these values if the agents run on a different host or port.
Next, let’s create an AgentRegistry component that fetches agent cards from these URLs when the application starts:
private final Map<String, AgentCard> agentCards = new HashMap<>();

AgentRegistry(@Value("${remote.agents.urls}") List<String> agentUrls) {
    for (String url : agentUrls) {
        String path = new URI(url).getPath();
        AgentCard card = A2A.getAgentCard(url, path + ".well-known/agent-card.json", null);
        agentCards.put(card.name(), card);
    }
}
Here, we iterate over each configured URL inside the constructor and retrieve its agent card from the .well-known/agent-card.json path. Then, we store the resulting AgentCard instances in an in-memory map keyed by the agent’s name.
To expose the fetched agent cards to other components, let’s add a couple of helper methods to this class:
AgentCard get(String agentName) {
    return agentCards.get(agentName);
}

String describeAgents() {
    return agentCards
      .values()
      .stream()
      .map(card -> "- " + card.name() + ": " + card.description())
      .collect(Collectors.joining("\n"));
}
The get() method returns the card of a specific agent by its name. Meanwhile, the describeAgents() method renders the formatted summary of all available remote agents with their descriptions. We’ll use these helper methods in the upcoming sections to define additional components.
5.3. Communicating With Remote Agents
Our A2A client is now capable of discovering remote agents at startup. Next, let’s create a RemoteAgentClient component that actually communicates with these agents:
String sendMessage(String agentName, String task) {
    AgentCard agentCard = agentRegistry.get(agentName);

    CompletableFuture<String> response = new CompletableFuture<>();
    BiConsumer<ClientEvent, AgentCard> responseConsumer = (event, card) -> {
        TaskEvent taskEvent = (TaskEvent) event;
        response.complete(taskEvent.getTask()
          .getArtifacts()
          .stream()
          .map(Artifact::parts)
          .map(this::extractText)
          .collect(Collectors.joining("\n")));
    };

    Client client = Client.builder(agentCard)
      .clientConfig(new ClientConfig.Builder()
        .setAcceptedOutputModes(List.of("text"))
        .build())
      .withTransport(JSONRPCTransport.class, new JSONRPCTransportConfig())
      .addConsumers(List.of(responseConsumer))
      .streamingErrorHandler(response::completeExceptionally)
      .build();

    Message message = A2A.toUserMessage(task);
    client.sendMessage(message);
    return response.get(60, TimeUnit.SECONDS);
}

private String extractText(List<Part<?>> parts) {
    return parts
      .stream()
      .filter(TextPart.class::isInstance)
      .map(TextPart.class::cast)
      .map(TextPart::getText)
      .collect(Collectors.joining("\n"));
}
Here, we start by fetching the target agent’s card from our registry, as the SDK uses it to build a client.
Since the SDK returns responses asynchronously, we register a consumer that receives the completed task. Then, it pulls the text out of its artifacts, and passes it to our CompletableFuture response. Then, we convert the given task into an A2A message, send it to the remote agent, and wait for the response to complete.
Next, let’s expose this capability as a tool that our orchestrator’s LLM can call:
@Tool(
  name = "send-message-to-agent",
  description = "Sends a task to a remote agent and returns its response."
)
String sendMessageToAgent(
  @ToolParam(description = "Name of the remote agent") String agentName,
  @ToolParam(description = "The task to perform") String task
) {
    return remoteAgentClient.sendMessage(agentName, task);
}
This single tool is all the orchestrator needs to reach all our configured agents. The LLM will decide which agent to contact and what to ask it, simply by filling in the agentName and task parameters.
5.4. Building the Orchestrator ChatClient
With our discovery and communication logic in place, let’s create the ChatClient bean for our orchestrator agent:
@Bean
ChatClient chatClient(
  ChatClient.Builder chatClientBuilder,
  AgentRegistry agentRegistry,
  RemoteAgentTools remoteAgentTools
) {
    return chatClientBuilder
      .defaultSystem("""
        You are a job-screening orchestrator for recruiters.
        You do not evaluate candidates yourself. Instead, you delegate
        to the following remote agents:

        %s

        Once all agents have responded, combine their responses into a short screening summary.
        """.formatted(agentRegistry.describeAgents()))
      .defaultTools(remoteAgentTools)
      .build();
}
In our system prompt, we explicitly instruct the model not to evaluate candidates on its own. Instead, we inject the list of discovered agents using the describeAgents() method and ask it to delegate the individual evaluations to them.
Then, we register our tool, which gives the model the capability to actually reach these agents.
5.5. Exposing a REST API
Finally, let’s use the orchestrator ChatClient we’ve defined and expose a REST API endpoint to accept candidate screening requests:
@PostMapping("/screenings")
ScreeningResponse screenCandidate(@RequestBody ScreeningRequest screeningRequest) {
    String verdict = chatClient
      .prompt()
      .user(screeningRequest.toString())
      .call()
      .content();
    return new ScreeningResponse(verdict);
}

record ScreeningRequest(
  String name,
  String email,
  String jobTitle,
  String requiredSkills,
  String candidateSkills,
  int expectedSalary
) {}

record ScreeningResponse(
  String verdict
) {}
Our endpoint accepts a ScreeningRequest record holding everything our agents need, namely the candidate’s identity, the job details, and the expected salary.
We simply pass the record’s string representation to the model as a user prompt and return the resulting summary as a ScreeningResponse. This way, our orchestrator client receives the full candidate details and distributes the relevant data to each of our specialized agents.
6. Testing Our Implementation
With our architecture implemented, let’s start all our agents and test the job screening flow.
We’ll use the HTTPie CLI to invoke our screening endpoint:
http POST :8080/screenings \
  name="John Doe" \
  email="[email protected]" \
  jobTitle="Backend Developer" \
  requiredSkills="Java, Spring Boot, AWS, Kafka" \
  candidateSkills="Java, Spring Boot, Azure, Kafka" \
  expectedSalary:=110000 \
  | jq -r '.verdict'
Here, we submit sample data for a candidate and pipe the response through jq to print the verdict as readable text.
Let’s see what we get as a response:
Screening summary for John Doe (Backend Developer):

- Salary: Expected salary of $110,000 is within budget.
- Background check: Clear; no relevant flags found.
- Skills match: Strong match, 75% fit. Only missing AWS experience, though Azure experience may be transferable.

Overall: John Doe appears to be a good candidate to proceed with, with follow-up recommended on AWS/cloud experience.
As we can see, the orchestrator delegated the request to all three remote agents and consolidated their individual verdicts into a single summary.
7. Conclusion
In this article, we’ve understood what the Agent2Agent (A2A) protocol is and practically implemented it using Spring AI.
We started by building an A2A server, exposing its capability through an agent card. Next, we built an A2A client that acts as an orchestrator, dynamically discovering remote agents and delegating tasks to them. Finally, we tested the complete flow of our implementation and confirmed that our orchestrator combines the responses of all the specialized agents into one screening summary.














