Automating Shadow DOM in Selenium WebDriver
Last updated: November 8, 2026


Mocking is an essential part of unit testing, and the Mockito library makes it easy to write clean and intuitive unit tests for your Java code.
Get started with mocking and improve your application tests using our Mockito guide:
Handling concurrency in an application can be a tricky process with many potential pitfalls. A solid grasp of the fundamentals will go a long way to help minimize these issues.
Get started with understanding multi-threaded applications with our Java Concurrency guide:
Spring 5 added support for reactive programming with the Spring WebFlux module, which has been improved upon ever since. Get started with the Reactor project basics and reactive programming in Spring Boot:
Since its introduction in Java 8, the Stream API has become a staple of Java development. The basic operations like iterating, filtering, mapping sequences of elements are deceptively simple to use.
But these can also be overused and fall into some common pitfalls.
To get a better understanding on how Streams work and how to combine them with other language features, check out our guide to Java Streams:
Explore Spring Boot 3 and Spring 6 in-depth through building a full REST API with the framework:
Yes, Spring Security can be complex, from the more advanced functionality within the Core to the deep OAuth support in the framework.
I built the security material as two full courses - Core and OAuth, to get practical with these more complex scenarios. We explore when and how to use each feature and code through it on the backing project.
You can explore the course here:
All Access is finally out, with all of my Spring courses. Learn JUnit is out as well, and Learn Maven is coming fast. And, of course, quite a bit more affordable. Finally.
>> GET THE COURSE
Spring Data JPA is a great way to handle the complexity of JPA with the powerful simplicity of Spring Boot.
Get started with Spring Data JPA through the guided reference course:
Refactor Java code safely — and automatically — with OpenRewrite.
Refactoring big codebases by hand is slow, risky, and easy to put off. That’s where OpenRewrite comes in. The open-source framework for large-scale, automated code transformations helps teams modernize safely and consistently.
Each month, the creators and maintainers of OpenRewrite at Moderne run live, hands-on training sessions — one for newcomers and one for experienced users. You’ll see how recipes work, how to apply them across projects, and how to modernize code with confidence.
Join the next session, bring your questions, and learn how to automate the kind of work that usually eats your sprint time.
1. Introduction
Shadow DOM is a powerful encapsulation technique that has many advantages for development. As a browser-native web standard, it’s widely supported by modern browsers. However, it brings challenges when it comes to automation. Moreover, the Selenium architecture further limits the scope of actions.
Essentially, shadow DOM is a fragment of the DOM tree isolated from the regular DOM, also known as the light DOM. Markup, styles, and scripts are hidden from the light DOM and vice versa (with some exceptions). Thus, only limited deliberate interaction is possible.
In this tutorial, we’ll see how to work with shadow DOM. Further, we’ll look into an example with Selenium and compare modern and legacy approaches.
2. Understanding Shadow DOM
To begin with, let’s understand why use shadow DOM in automation. We frequently see shadow DOM in custom elements and UI libraries. There, encapsulation ensures no global style or code accidentally interferes with the component presentation and functionality. Still, we often need to interact with web components encapsulated inside. Also, we might need to validate the styles and the rendered content.
2.1. The Selenium Approach
Selenium works with shadow DOM in a quite manual way compared to other popular automation tools. The limitation comes from its architecture as a WebDriver messenger. Besides, standard functions for finding elements in the light DOM don’t work with the shadow DOM. If we try to find a shadow tree element using driver.findElement(), we get NoSuchElementException. To pierce the shadow boundary, we need access to the shadow root, the root element of the shadow tree.
The algorithm is straightforward. First, we find the shadow host, the element to which the shadow tree is attached, then we get its shadow root. From there, we have access to the shadow DOM and can use, for example, CSS selectors to find elements. If no shadow root exists, Selenium throws NoSuchShadowRootException.
2.2. Types
We can inspect the shadow root type in the browser developer tools:
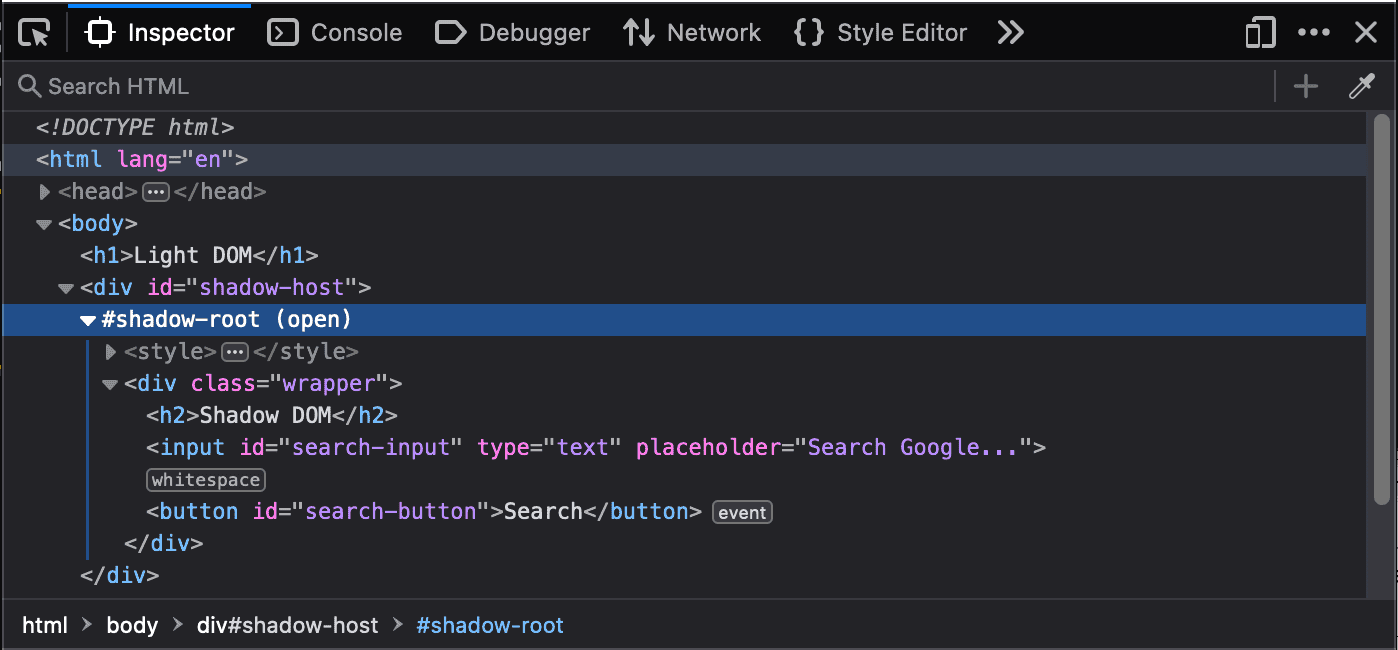
Text in parentheses next to #shadow-root tells us the type:
- open
- closed
- user-agent
In JavaScript, the shadowRoot property of a host element returns null when shadow root is absent or closed. However, WebDriver implementations access shadow root via a different mechanism rather than through this JavaScript property. Since WebDriver specification doesn’t mention closed shadow root, its instructions on null case are open to interpretation. As a result, Selenium’s shadow root API provides closed shadow root access in supporting browser drivers.
In experiments we conducted, ChromeDriver returned shadow root and allowed to query the shadow DOM. Yet, interactions with the queried elements threw ElementNotInteractableException. In comparison, GeckoDriver provided both access and interactability. These results show that, alongside closed shadow root support, we also need further investigation into element interactability across browser drivers.
If direct access to closed shadow root isn’t available, we can consider two workarounds. When the code isn’t from a third party, we can ask the development team to leave a testing backdoor, such as a global reference hook. Additionally, we can utilize the fact that a closed shadow tree is still part of the browser accessibility and focus tree. So, after locating the shadow host, we can bypass the shadow boundary using Actions API to simulate user keyboard inputs, such as Tab and Enter key events. However, this second approach is flaky.
The last shadow root type is user-agent, used for built-in elements, such as <video>, <select>, and <input type=”range”>. By default, this type of shadow root appears closed in the developer tools, but we can often change the browser configuration. Though normally, we won’t need to test the browser implementation of such components.
2.3. XPath
Since shadow DOM is an isolated DOM tree, it might seem intuitive to work with XPath from the shadow root. In fact, the WebDriver specification lists it as a supported locator strategy. However, we cannot locate a shadow root or its child elements using XPath.
As of the writing of this article, mainstream browser driver implementations, like ChromeDriver and GeckoDriver, don’t support that. The reason is not made public. A possible technical challenge could be that a shadow root isn’t a Document but a DocumentFragment. Meanwhile, DocumentFragment has no direct API for XPath evaluation.
2.4. Nesting
Shadow trees can be nested, with no limit on the depth. Nesting happens when we add an element containing a shadow root to another shadow tree. Although rare in standard web development, it’s a common pattern in component libraries.
For instance, a custom drop-down element can be inside a custom form:
<settings-form>
  #shadow-root (open)
  <div class="form-container">
    <div class="field-group">
      <label>Country</label>
      <country-dropdown>
        #shadow-root (closed)
      </country-dropdown>
    </div>
  </div>
</settings-form>
When working with nested shadow roots, we need to recursively traverse them until we reach the shadow root containing our target element.
2.5. Event Propagation
Being able to catch shadow DOM events is important when doing issue root cause analyses. In fact, shadow DOM events can propagate to the light DOM. When its composed flag is set to true, the event crosses the shadow boundary. Another important flag is bubbles, indicating whether the event bubbles up from the target element.
Both flags are true for click, touch, or keyboard events. The mouseenter and mouseleave events neither bubble nor cross the shadow boundary. Finally, a capture: true listener listens to events that don’t bubble up and have composed: true, such as blur and focus.
After crossing the shadow boundary, the event target changes to the shadow host. For an event originating inside an open shadow root, an outside listener can retrieve the original target from the first element of the array returned by composedPath(). For a closed root, the path hides its internal nodes. In addition, we use JavascriptExecutor for listening to events as well as retrieving the original target.
3. Automating With Selenium
Now, let’s see Selenium in action. We’ll look into two available approaches, the modern approach and the legacy approach which can be useful in certain cases.
3.1. Prerequisites and Setup
First, we set up a simple Selenium test. To do this, we assume basic familiarity with several topics:
- Java development environment
- initializing a Maven project
- running tests
- JavaScript
For the example code, we use a quickstart Maven project and add Selenium WebDriver, WebDriver Manager, and JUnit packages to the pom.xml file:
<dependencies>
  <dependency>
    <groupId>org.seleniumhq.selenium</groupId>
    <artifactId>selenium-java</artifactId>
    <version>4.46.0</version>
  </dependency>
  <dependency>
      <groupId>io.github.bonigarcia</groupId>
      <artifactId>webdrivermanager</artifactId>
      <version>6.3.0</version>
  </dependency>
  <dependency>
    <groupId>org.junit.jupiter</groupId>
    <artifactId>junit-jupiter</artifactId>
    <version>5.11.0</version>
    <scope>test</scope>
  </dependency>
</dependencies>
In this case, we use WebDriver Manager to automatically download and set up the correct version of the browser driver we use in the tests. We also use JUnit to annotate and organize the sample code.
Next, we create a sample test file in the src/test/java directory of the project. Let’s name it ShadowSearchTest.java and add setup code to get started:
public class ShadowSearchTest {

    private WebDriver driver;

    @BeforeEach
    void setup() {
        WebDriverManager.chromedriver().setup();
        driver = new ChromeDriver();
    }

    @AfterEach
    void teardown() {
        if (driver != null) {
            driver.quit();
        }
    }

    // add tests here
}
In the setup and teardown functions, we initialize the Chrome driver before and quit the driver after each test.
Finally, to the src/test/resources directory, we add a sample web code that creates a web page with shadow DOM:
<!DOCTYPE html>
<html lang="en">
<head>
    <meta charset="UTF-8">
    <title>Shadow DOM Example</title>
    <style>
        body {
            font-family: sans-serif;
            margin: 20px;
        }
    </style>
</head>
<body>
    <h1>Light DOM</h1>
    <div id="shadow-host"></div>
    <script>
        const host = document.getElementById('shadow-host');
        const root = host.attachShadow({ mode: 'open' });
        root.innerHTML = `
            <style>
                .wrapper {
                    border: 1px solid #ccc;
                    padding: 0 20px 20px;
                }
                input, button {
                    padding: 5px;
                }
            </style>
            <div class="wrapper">
                <h2>Shadow DOM</h2>
                <input type="text" id="search-input" placeholder="Search Google...">
                <button id="search-button">Search</button>
            </div>
        `;

        root.getElementById('search-button').addEventListener('click', () => {
            const query = root.getElementById('search-input').value.trim();
            const encodedQuery = encodeURIComponent(query);

            if (query) {
                window.location.href = "https://google.com/search?q=" + encodedQuery;
            }
        });
    </script>
</body>
</html>
Let’s see the result:
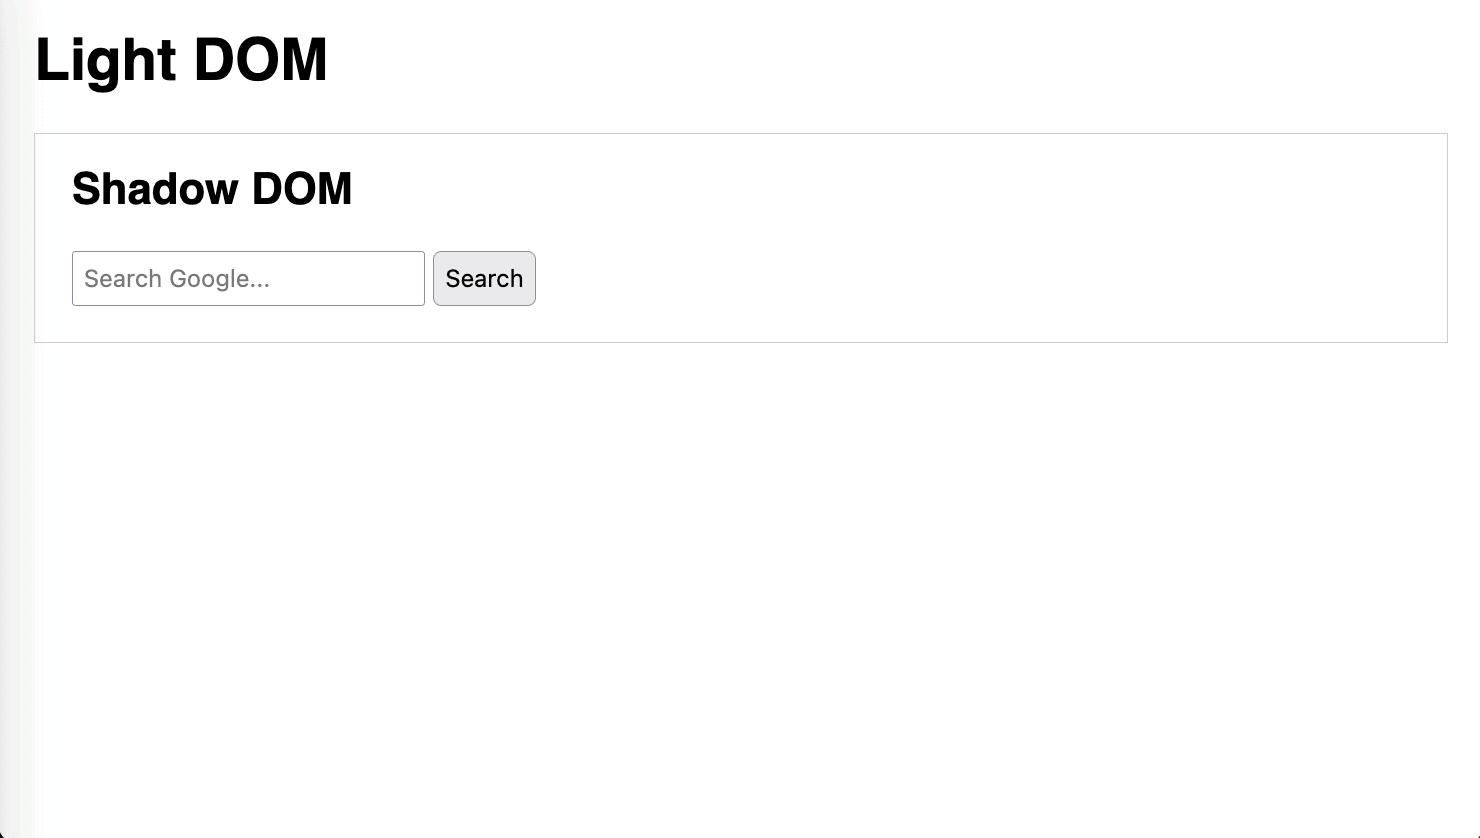
As expected, we have a simple Google search form inside a shadow DOM.
3.2. The Modern Approach
Selenium 4 introduced native support for shadow DOM through the getShadowRoot() function. It returns SearchContext, an interface for finding elements, which enables the lookup of elements inside the shadow tree of that specific shadow root.
Let’s automate a Google search for the example we set up using the algorithm discussed earlier:
- Find the shadow host element
- Get its shadow root
- Find the input element
- Input a search query
- Find the submit button
- Click on the button
- Wait for navigation
Next, we add a test after the setup functions:
    @Test
    void googleSearchFromShadowDom() throws InterruptedException, UnsupportedEncodingException {
        try {
            // Sets up driver wait
            WebDriverWait wait = new WebDriverWait(driver, Duration.ofSeconds(10));

            // Loads local HTML file
            URL htmlUrl = getClass().getClassLoader().getResource("shadow-sample.html");
            driver.get(htmlUrl.toString());
            String shadowSampleUrl = driver.getCurrentUrl();

            // 1. Finds shadow host
            WebElement shadowHost = driver.findElement(By.cssSelector("#shadow-host"));

            // 2. Finds shadow root
            SearchContext shadowRoot = wait.until(driver -> {
                try {
                    return shadowHost.getShadowRoot();
                } catch (NoSuchShadowRootException e) {
                    return null;
                }
            });

            // 3, 4. Finds input element and inputs query
            WebElement searchField = shadowRoot.findElement(By.cssSelector("#search-input"));
            searchField.sendKeys("shadow dom");
            TimeUnit.SECONDS.sleep(2);

            // 5, 6. Finds submit button and clicks it
            WebElement searchButton = shadowRoot.findElement(By.cssSelector("#search-button"));
            searchButton.click();

            // 7. Waits for navigation
            wait.until(driver -> !driver.getCurrentUrl().equals(shadowSampleUrl));
            TimeUnit.SECONDS.sleep(2);
        } catch (Exception e) {
            e.printStackTrace();
            throw e;
        }
    }
Importantly, we use a waiting mechanism on the shadow root because it’s loaded dynamically.
Elements inside it don’t need waiting in this example. Also, we use timers to observe automation steps.
The URL-change wait confirms navigation away from the sample page, but doesn’t verify successful Google search results. Google may display a bot check, so we shouldn’t rely on its results page to validate this demonstration.
3.3. The Legacy Approach
Selenium 3 and older versions can only use JavascriptExecutor to work with shadow DOM. So, we run a single script that finds the shadow root, queries and returns the element:
WebDriverWait wait = new WebDriverWait(driver, 10);
JavascriptExecutor js = (JavascriptExecutor) driver;

URL htmlUrl = getClass().getClassLoader().getResource("shadow-sample.html");
driver.get(htmlUrl.toString());

WebElement shadowHost = driver.findElement(By.cssSelector("#shadow-host"));

WebElement searchField = wait.until(driver -> {
    return (WebElement) js.executeScript(
            "return arguments[0].shadowRoot.querySelector('#search-input')",
            shadowHost
    );
});

searchField.sendKeys("shadow dom");
Here, arguments[0] resolves to the shadow host. We work with the returned WebElement as usual.
We can use this legacy approach in modern Selenium with the convenience of having a SearchContext returned:
SearchContext shadowRoot = wait.until(driver -> {
    return (SearchContext) js.executeScript("return arguments[0].shadowRoot", shadowHost);
});
Thus, we find just the shadow root and cast it to SearchContext before returning. Afterwards, we have a shadow root in the Java environment we can work with the same way we did in the modern approach example.
In comparison, it seems intuitive to find the target element inside the same script, thereby optimizing and sending only one request to WebDriver API instead of two. This approach could also eliminate verbose code when working with nested shadow DOMs. However, the optimization comes with a cost.
We can use WebDriverWait to poll JavaScript lookups, including lookups through nested shadow roots. For dynamically attached roots, the script should check each root and return null until the target element exists. Longer scripts can make failures harder to diagnose, so we should keep these lookups small and readable.
We should always prioritize reliability, particularly the elimination of flaky tests, over execution speed.
4. Conclusion
In this article, we looked at what shadow DOM is and the nuances of working with it. Then, we implemented an example using Selenium. Finally, we examined the legacy approach and its modern applications.
While working with shadow roots in Selenium can be cumbersome, it’s important to understand its capabilities and limitations to effectively work with modern web applications.
As always, all the source code is available over on GitHub.