

Learn through the super-clean Baeldung Pro experience:
>> Membership and Baeldung Pro.
No ads, dark-mode and 6 months free of IntelliJ Idea Ultimate to start with.
Last updated: March 18, 2024
Learn through the super-clean Baeldung Pro experience:
>> Membership and Baeldung Pro.
No ads, dark-mode and 6 months free of IntelliJ Idea Ultimate to start with.
One of the most underrated code editors nowadays is Vim, due to misconceptions and its steep learning curve. In reality, Vim is one of the most powerful editors out there and has its own share of popularity among developers. It might look dry and intimidating at first, but in practice, Vim is highly customizable and feature-rich.
This code editor ships out many features that make it possible for programmers to expand its use. One of the tweaks that can be implemented to its view is visualizing the indent levels. This can be a very useful tweak when dealing with an indentation-based language like YAML or Python.
In this tutorial, we’ll discuss how to use Vim’s commands and plugins to display vertical indicators for every indentation level in deeply nested code.
Before getting started with tweaking Vim to add indentation guide lines to its view, we should get acquainted with applying and setting Vim’s switches and options to get the desired behavior.
By adding options to our Vim’s configuration file (dotfile), we can apply special effects to every Vim session. If the dotfile is not already created, we can do that by creating a new file called “.vimrc” in the home directory:
$ touch ~/.vimrcNow let’s open the dotfile with any text editor to add a simple Vim option for using an indent of three characters width:
set tabstop=3After saving and quitting out the dotfile, tab characters will be 3 spaces wide when entered with the tab key.
However, in case we want to test out options without modifying the dotfile, we can always apply customization from the Vim command mode.
As mentioned in the previous section, the Vim dotfile (.vimrc) is used to configure the appearance and other functionality of the editor. This is possible using Vim’s own programming language, Vimscript.
In this section, we’ll take a look at how to use and set Vim’s internal variables and switches to implement our own custom indentation guide lines.
Our first step in displaying visual indicators of tab indentations is to set the list Vim option to true. To achieve that, we should add the following to our dotfile:
set listAfter enabling the list option, tab characters will be displayed as ^I (ctrl+i).
Moreover, we’ll have to add the listchar (lsc for short) option to modify its tab string setting. By doing so, we’ll be able to change the default behavior of the tab character to our liking:
set listchars=tab:\ \ ┊As seen above, we used two spaces in front of the vertical character (┊) to fit our objective.
Now, let’s open a file that has some indentation-based code to check the new appearance:
def getExternalLinks(bs, excludeUrl):
  ┊externalLinks = []
  ┊for link in bs.find_all('a',{'href':re.compile('bouhannana')}):
  ┊if link.attrs['href'] is not None:
  ┊  ┊if link.attrs['href'] not in externalLinks:
  ┊  ┊  ┊externalLinks.append(link.attrs['href'])
return externalLinks
As we can notice above, Vim provided visual indicators of the indent level of each corresponding line.
In the previous sub-section, we instructed Vim to show vertical indent guides based on tab characters. But for our next example, we’ll implement these guides based on spaces.
Same as before, we’ll use the listchar option and the previous value passed to its tab string setting. Except for this case, we’ll pass the value to the multispace setting:
set listchars=multispace:\ \ ┊After adding the above command to the dotfile, Vim displays multiple spaces as ” ┊”. That is, two spaces followed by the vertical character:
stuff:
┊foo: barr
┊command: |
┊ ┊if [ "${FOO}" == "bar" ];
┊ ┊ ┊then x y.yml -i z;
┊ ┊fi
For this to work using spaces instead of tabs as indentations, we should always insert these spaces according to the width of our multispace setting (which is three characters in this case).
As an aside, we can instruct Vim to use spaces instead of tabs when clicking the tab key by setting the expandtab to true:
set expandtabAfter executing the above command, every time we use the tab key, the editor inserts three spaces – hence the tabstop. Then, the three spaces will be displayed as ” ┊”, which is the string value given to the multispace setting.
Another way to show indentation levels is by using a plugin. Choosing this method offers us a wide range of choices regarding Vim visuals and behaviors. Additionally, it saves us the trouble of hard coding the configurations ourselves.
Even though there are a lot of choices regarding “visual indentation” plugins, it’s beyond the scope of this article to go over all of them. Therefore, we’ll use one of the popular plugins out there which is Indent Guides.
Moreover, this plugin has many features regarding indentation guides. One of them is highlighting the indentation levels using different colors.
After installing the plugin, we should modify our dotfile to be able to select the colors and the size of the indentation vertical indicator:
let g:indent_guides_auto_colors=0
hi IndentGuidesOdd ctermbg=blue
hi IndentGuidesEven ctermbg=red
let g:indent_guides_start_level=2
let g:indent_guides_guide_size=1
As seen above, let g:indent_guides_auto_colors is set to 0 so we can choose the indicators’ colors. Otherwise, if not defined, we’ll get the default behavior of the plugin.
Let’s check the effects of the plugin on the previous code:
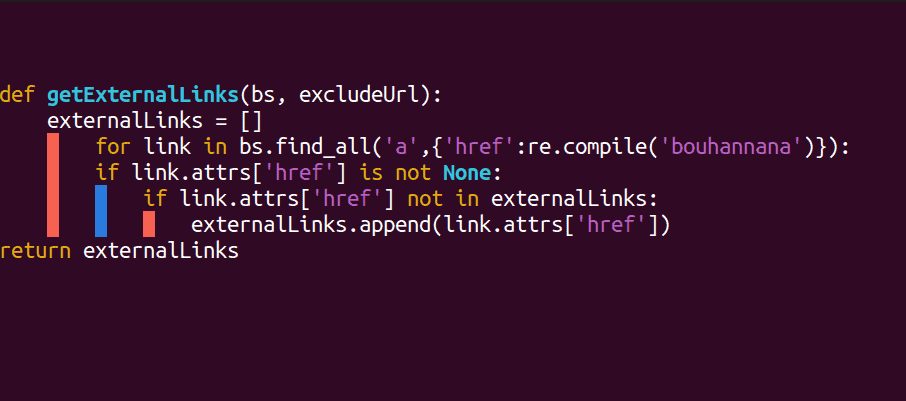
In our dotfile, we’ve used let g:indent_guides_start_level to control the starting indent level position. That’s why we can notice above that the highlighted guide lines started from the second occurrence of the indentation.
In this article, we discussed how to configure Vim dotfile to implement options for the purpose of expanding Vim’s appearance and use. Furthermore, we’ve tackled different ways to use Vim’s internal variables and commands to visually add indent indicators.
We also learned how to use these visual guide lines for both tab and space indent styles. Finally, we saw how the use of a Vim plugin can be more helpful in highlighting indentation levels.