Learn through the super-clean Baeldung Pro experience:
>> Membership and Baeldung Pro.
No ads, dark-mode and 6 months free of IntelliJ Idea Ultimate to start with.
Last updated: March 18, 2024

Learn through the super-clean Baeldung Pro experience:
>> Membership and Baeldung Pro.
No ads, dark-mode and 6 months free of IntelliJ Idea Ultimate to start with.
Getting things done in the digital age relies heavily on how fast and effectively we can work with textual data.
In this tutorial, we’ll take an old-school approach to learn about the traditional vi editor as a minimalistic yet powerful tool for text editing.
We’ll be restricting the scope of our exploration to the traditional vi editor. With that in mind, let’s start by understanding vi’s connection with the ex line editor.
For a long time, vi’s feature set has been a part of the Single Unix Specification, making it the default editor in most Linux distributions. However, at present, most operating systems offer vi support through its clone as Vim (Vi IMproved):
ls -l $(which vi)
lrwxr-xr-x  1 root  wheel  3 Jan  9 05:03 /usr/bin/vi -> vim
So, whenever we invoke vi, we’re actually invoking vim.
To ensure that all things that work in vi continue to work in Vim, we have the option to use Vim’s compatibility mode (-C):
$ vim -CBut, as an enhanced clone, Vim naturally offers a wider feature set than the traditional vi editor. And, compatibility mode doesn’t restrict us from using those mutually exclusive features within Vim.
Now, from a functional perspective, that’s all fair and fine. However, we might end up using a non-vi feature and assume that it is a vi feature.
To avoid such confusion, and to develop a distinct clarity on the features supported by the vi editor, we’ll leverage a ready-to-use virtual Docker environment that has vi pre-installed.
So, let’s run our virtual environment and get things going:
$ docker run -it tapankavasthi/vi
root@0bf072c119aa:/tmp/vi/work#Within our virtual container, let’s inspect the vi executable binary file using the file command:
# file $(which vi)
/usr/local/bin/vi: symbolic link to ex
As we can see that the vi executable file is a symbolic link to the ex binary file. So, it’s evident that the underlying program that powers vi is ex.
Let’s create a sample hello.txt file and open it using the ex command:
# printf "Line-1\nLine-2\n" > list.txt
# /usr/local/bin/ex list.txt
Surprisingly, once the file is opened, we don’t see the contents of the file. On the other hand, we see a colon (:) command prompt:
"hello.txt" 2 lines, 14 characters
:
As such, this is the ex’s default mode where we’re expected to run the ex-commands at the colon prompt. So, let’s try out the p (print) command prefixed with a % symbol:
"hello.txt" 1 line, 14 characters
:%p
Line-1
Line-2
:
If we take a look at the command line usage of ex, then we can spot a -v (visual) option:
Usage: ex [- | -s] [-l] [-L] [-R] [-r [file]] [-t tag]
       [-v] [-V] [-w size] [+cmd | -c cmd] file...
Let’s quit the last opened file with the q (quit) command and reopen it with the -v option:
$ /usr/local/bin/ex -v list.txtInterestingly, we’re now able to see the file’s content as soon as the file is open. Well, it’s rightly called the visual mode:
Line-1
Line-2
~
~
~
"list.txt" 2 lines, 14 characters
Alternatively, we can invoke ex’s visual mode, directly with the vi command:
$ vi list.txtSo, we can say that vi is ex -v.
When we open a file using the vi command, we enter into ex’s visual mode. But, from vi’s perspective, that’s the default mode.
We can use a subset of ex commands in this mode to do the editing. So, it’s popularly known as the command mode. vi also supports an insert mode where most of the keystrokes translate into typing text into the file.
And, we can easily toggle between the command mode and insert mode by pressing Esc or typing i, respectively.
Lastly, vi also provides easy access to an ex-like mode where we can enter commands at the colon prompt without losing the visual context.
Now, when it comes to switching across these modes, it’s best to understand this by taking a visual approach:
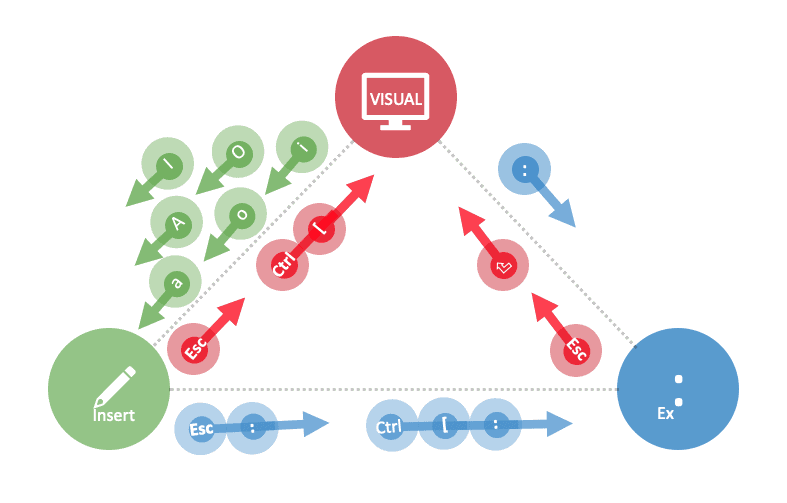
As a quick exercise, let’s use this cyclic flow to figure out how we can go from ex’s colon prompt to the insert mode.
In each of the modes, vi understands a specific set of instructions. To work effectively in the visual mode, let’s start by learning its language concepts.
Generally speaking, we need to provide editing instructions to vi in a particular sequence:
[Modifier][Operator][Operand]To clarify, let’s take a simple instruction that deletes three characters:
As such, text objects in the form of characters, words, and lines serve as operands. On the other hand, operators perform text processing such as change (c), delete (d), copy (y), replace (r), and so on. And, lastly, modifiers such as a numeric count can modify the original behavior of an operator.
Essentially, text editing is quite analogous to solving a mathematical equation where we can get multiple solutions to a problem. But, in this case, we should strive to do with the minimum number of keystrokes. And, that’s one reason why single keystrokes are quite common while working with vi.
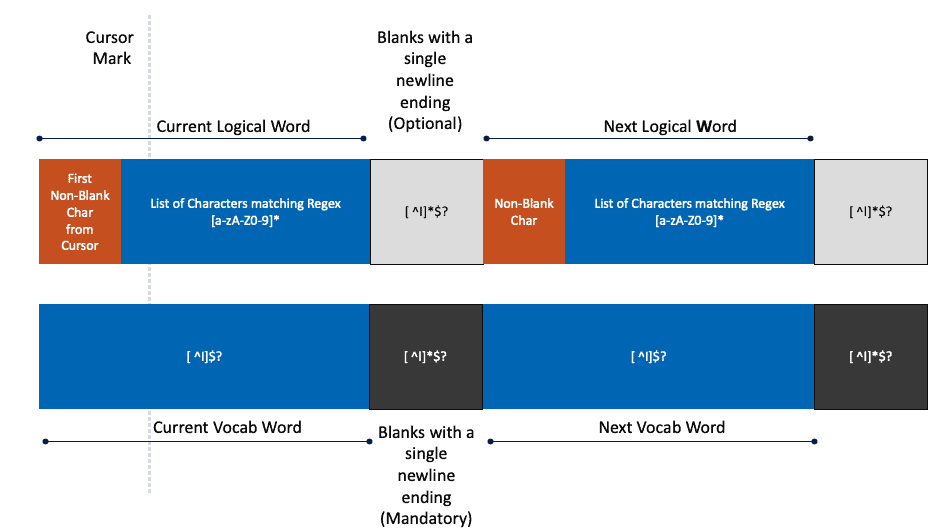
As we’re dealing with text, vi understands three broad categories of operands; namely, characters, words, and lines.
So, sounds simple right? But, the devil sleeps in detail, especially for the concept of words.
Let’s begin by grasping the concept of characters. Well, character operands are identified using reference points such as the current position of the cursor, or the beginning of the line:
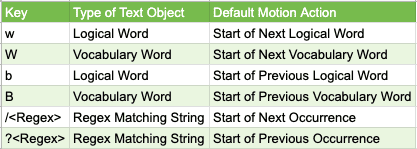
Now, let’s spell out the vi definitions used for words:
Further, let’s learn about a few character identifiers derived from the word operands:
Finally, let’s also take a look at a few line-specific operands:
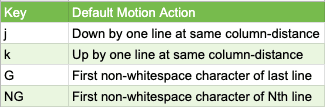
As operands carry an unambiguous position identity of an associated character, so cursor movement is the default operator that applies to them when we don’t specify an operator explicitly. So, when we’re in the command mode, pressing keys corresponding to operands will move the cursor to the position identified by an operand.
However, there’re a few other operators that require us to express our intention explicitly, so as to prevent an accidental modification to text. Let’s see a few of them:
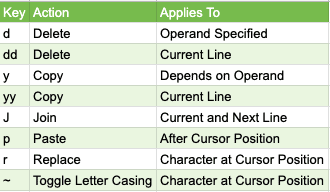
Of course, the list of operators could initially overwhelm us. But, with a strong foundation of grammar constructs, these are intuitive to remember. Let’s get ready to see them in action:
So far, so good. Now, let’s take a look at two operators that gives a feeling that we’re in the insert mode:

And now, let’s see how we can change a word by using the combination of c (operator) and w (operand):
We can see that it takes us into a scoped version of insert mode where $ symbol signifies the intended soft-boundary of replacement text. And, to confirm the changes and return to the normal visual-mode, we have to press Esc key.
For edit operations such as dw, d/<search_word>, and so on, we’re traversing character by character from left to right. So, our scope of operation is at a character level.
However, when it comes to editing operations such as dj, ck, or yj, then, we’re operating at a line level.
In such cases, the text lying between the current cursor position and the character position targetted by j or k spans over two lines. So, for these operations, the outcome is a deletion, change, or copying of two lines:
Quite often, text editing involves repetitive work, such as applying the same operation to multiple characters, words, or lines. And, vi makes it easy for us with two of its offerings:
Let’s say that we have some code that needs proper tab indentation. Of course, >> and << operators will come handy here.
So, if we have to indent multiple contiguous lines by a single tab, then we can use a numeric quantifier before >>:
Now, we have another scenario where we want multiple tab indentation for the same line. So, here we can use >> or << once, followed by the dot operator to repeat the previous command execution:
For easy navigation and context management, vi offers markers and registers. Let’s learn them in detail.
Text editing involves a lot of cursor movement from one line to another. Unfortunately, while doing so, we might lose track of our current context. So, to solve this issue, vi lets us mark the current cursor position for later use.
To use markers, let’s first get familiar with the important key bindings associated with them:
Let’s say we have a file that contains two sections, namely, a poem body and its references. Let’s see how we can navigate between the two sections by marking them with mp and mr:
Now, if at some point in time, we don’t need the list of references in the file, then we can make use of this marker information in our editing operation, G$d’r:
In most text editing environments, we have a concept of a clipboard where we can copy some content for later use. But, with vi, we get multiple such placeholder buckets called registers.
As such, we must not confuse registers with variables. While variable names are often user-defined, there’s a pre-defined set of registers, and we don’t get to rename them. All register names begin with the “ character, followed by a single character.
Naturally, registers support to and fro text transfer operations such as yank (y), delete (d), cut (x), and paste (p):
<register-name><text-transfer-operator>So, “5yy operation will copy the line into the number-register “5, and when needed, we can do something like “5p or “5P.
Though this works fine for a simple use case, however, we should refrain from explicitly overriding the content in the number-registers “0-9. That’s because vi uses the number registers as a means of saving text from our last ten text-transfer operations:
Text Transfer -> "0 -> "1 -> "2 -> "3 -> "4 -> "5 -> "6 -> "7 -> "8 -> "9 -> LostThis sequence of text transfer happens, even if we make explicit use of a register. So, there’s always a chance for vi to interfere with our workflow, when we’re explicitly writing to number registers.
Well, amongst the pool of vi registers, “a-z and “A-Z are called as named-registers. An important thing to note about these registers is that every lowercase named-register and its corresponding uppercase named-register points to the same storage location. But, they exhibit a different behavior while moving text into them:
Now, let’s imagine that we’re working on a file that contains a mix of HTTP and HTTPS URIs. And our goal is to segregate them. Interestingly, delete operations in vi work more like a cut operation, and the data can be saved and retrieved from a register. So, let’s sketch out a strategy to solve our use case with delete operations and registers:
Finally, let’s see our plan in action:
As ex was originally a line editor utility. So, when our editing tasks involve line-level operations, then ex mode can prove to be of great use. Let’s gear up to execute some commands at the colon prompt.
In the ex mode, we need to provide the line addresses for which we want to execute a particular command. For this reason, most of the ex’s editing commands need an address_range prefix:
:<address_range> <editing-command>Further, we can specify the address range in a variety of formats:
We must note that, if we don’t specify an address, then, by default, the operation will execute only for the current line (.).
Now that we’ve developed a theoretical understanding of the address concept, let’s see this in action using the p (print) command:
We must note that the current line changes after each address evaluation. As such, this behavior can be used without p (print) command to go to the last line of an address range:
:<address-range>Though p (command) is handy while trying to understand the concept of address, we don’t really need it when we have a multi-line visual screen. So, let’s invest some time to get hands-on experience with some frequently used editing commands in ex mode.
First, let’s see some simple commands such as delete (d), move (m):
Next, let’s look at the substitution command (s) as it’s perhaps one of the most frequently used ex commands:
:[address_range] s/pattern/replacement/[[g|count][cp]]As the name suggests, the s command searches for a pattern in a given address range and then replaces it with a replacement string. By default, only one replacement is done per line, but we can change this behavior:
Now, let’s say we’ve got a list of item names in a file, one on each line. And, our goal is to convert it into a comma-separated list on a single line. Let’s see how we can do this using the substitution (s) and join (j) commands:
We must note that keys can perform different actions in different modes, like j moves cursor one-line down in command mode, but does a join in ex mode.
One of the features that make vi so powerful is the ability to easily repeat an action. And, to perform an editing operation repetitively in the ex–mode, we can use the g (global) command:
:[address_range]g/pattern/cmdBy default, any editing command in ex-mode will execute once on the entire address range. However, when used in conjunction with the global (g) command, a command will execute once for each line in the address range that matches a pattern.
Let’s revisit the URIs segregation problem where we had to segregate a mix list of HTTP and HTTPS URIs, but this time, we’ll solve it in the ex-mode:
Yet another gem in the category of repetition commands is the & command that lets us repeat the last substitution command.
So, let’s use it to find out if a given expression consisting of only “(” and “)” characters meets the criteria of a balanced string or not. Well, for a balanced string, all the open parentheses will be followed by a corresponding closing parenthesis.
Now, we can check this by repeatedly reducing each pair of matching parentheses () to an empty string. Further, we’ll stop when the substitution command fails to match the pattern. And, if we are left with an empty line, then the original string was balanced:
By now, we’ve performed various editing operations on the files. Though we verified that the changes were visible on the screen, but guess what, our changes didn’t go permanently into the file on the disk. That’s because we were working with a buffer, which is actually a copy of the file’s content and resides in volatile memory. For that matter, even registers are a category of buffers.
To write the changes permanently to the file on disk, we can use the w (write) or w! (forced write) commands:
:w[!] [filename]We must note that we can write our changes to a new file by giving a different filename than the currently opened file. And, later, if we want to quit, then we can use q (quit) or q! (quit without writing) commands. However, as soon as we exit from vi, we also lose all our data available in its registers.
Let’s pick our file that contains the segregated list of HTTP and HTTPS URIs. Now, our requirement is that we should have these segregated lists in two different files, namely http_urls.txt and https_urls.txt.
To work with multiple buffers, we’ll use the edit (e) command, so that we can transfer the text across files with the help of vi’s named-registers:
:e [file1 file2 ...]As such, vi requires us to save the current file before switching to a different file for edit. However, at times, we might not want to save the changes; in such situations, we can use e! to revert to the last written version of the file buffer.
Now, let’s see how we can use the edit (e) command to segregate the URIs into two different files:
Each of us has a unique style of working, and hence, we certainly like a few personalizations in our editor. For vi, the way to do this is through the .exrc file.
Let’s explore how we can tune our vi editing sessions.
As the name suggests, set command helps us in setting values of flags and variables that control the functional behavior of the editor. Well, some of us usually like to see line numbers on the left. So, let’s see how we can make line numbers appear automatically in each of our sessions:
As such, there’re more of such flags that we can use as per our requirement. To do so, we can view all the options available with the set command in the ex mode:
:set allTo save us some keystrokes, vi lets us define abbreviations inside the .exrc file:
ab <short-phrase> <expanded-text>After we’ve set an abbreviation, we get to use it in the insert mode by pressing space after typing the abbreviated word. However, it only expands when used as a whole word, and not as part of another word.
Now, let’s see how we can define and use abbreviations for country codes:
Later, if we want to remove an abbreviation, then we can use the unab command:
:unab <phrase>Yet another useful feature of vi to do things faster is the ability to define custom keyboard shortcuts with the map command:
map <NewKeySequence> <TargetKeySequence>Let’s say that our job requires us to work with a lot of comma-separated data. So, wouldn’t it be nice if we can generate comma-separated values from column data by using a single keystroke? Well, let’s go ahead and assign this behavior to the V key:
map V :1,$-1s/$/,/^M :%j^MFinally, let’s see this in action:
We must note that ^M represents the text representation of the carriage return keystroke, which needs to be written in the .exrc file as a combination of <Ctrl-v> <CR> keys.
In this tutorial, we laid a strong foundation of vi fundamentals by solving a few text editing problems. As such, the best part of working with vi is that there are always multiple ways to solve a given problem. And, discovering new vi tricks with our own creativity is a lot of fun.