

Learn through the super-clean Baeldung Pro experience:
>> Membership and Baeldung Pro.
No ads, dark-mode and 6 months free of IntelliJ Idea Ultimate to start with.
Learn through the super-clean Baeldung Pro experience:
>> Membership and Baeldung Pro.
No ads, dark-mode and 6 months free of IntelliJ Idea Ultimate to start with.
Renaming a USB drive label can help us correctly identify and access the drive among other storage devices present in a system. Therefore, setting a meaningful name for the USB drive can reduce the probability of accidentally accessing the wrong drive.
In this tutorial, we’ll discuss three methods to change the label of a USB drive in Linux.
GParted is a powerful disk partition editor tool in Linux. In particular, it offers a graphical user-friendly interface and is mainly used for the management of disk partitions. Furthermore, we can utilize the GParted tool for creating, deleting, formatting, copying, and cloning partitions.
To use the GParted tool in Debian-based systems, first, we install it from the Linux terminal using the apt command:
$ sudo apt-get install gparted
Now, let’s check the installation status of the GParted tool:
$ gparted --version
GParted 1.3.1
configuration --enable-libparted-dmraid --enable-online-resize
libparted 3.4
After the successful installation, we can find it in the application menu. Alternatively, we can start GParted from the terminal:
$ sudo gparted
Let’s take a glimpse at the main screen of the tool:

We can see all the partitions of the main storage drive.
Now, to start the procedure for renaming a USB drive, first, we go to the top left corner and click the GParted option. Furthermore, from the dropdown menu, we click on the Devices option and select the USB drive that is attached to the system:

After selecting the USB drive, we find a list of partitions for the USB drive. Then, we can click on the partition that represents the USB drive. Using the Label File System option, we can change the label of the USB drive:
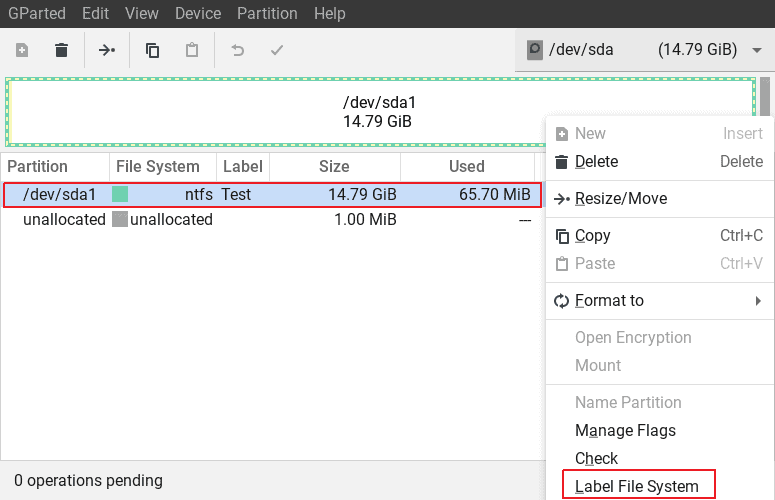
As soon as we click the Label File System option, a dialog box pops up and we can set a custom name for the USB drive.
Using the System Settings, we can perform various disk operations, including renaming a USB drive. Additionally, all Linux desktop environments contain a system settings widget or screen, which provides a user-friendly interface. Therefore, users with limited technical experience are often better equipped to use this method.
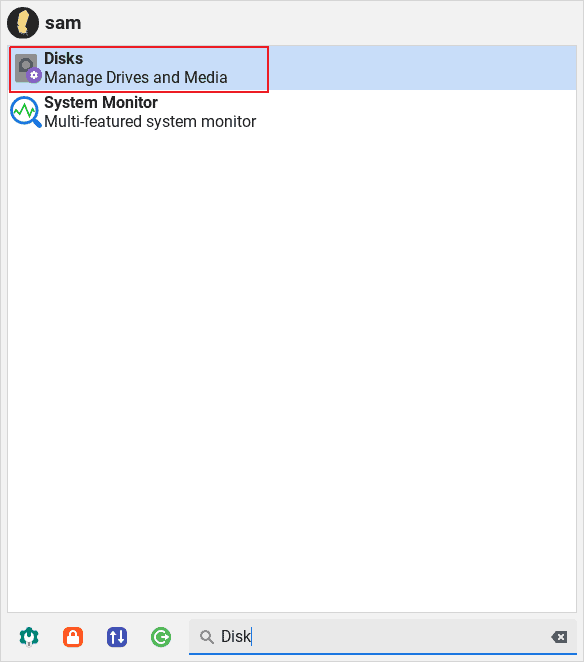
In the XFCE desktop environment, we first go to the Start menu and then search for the Disks tool:
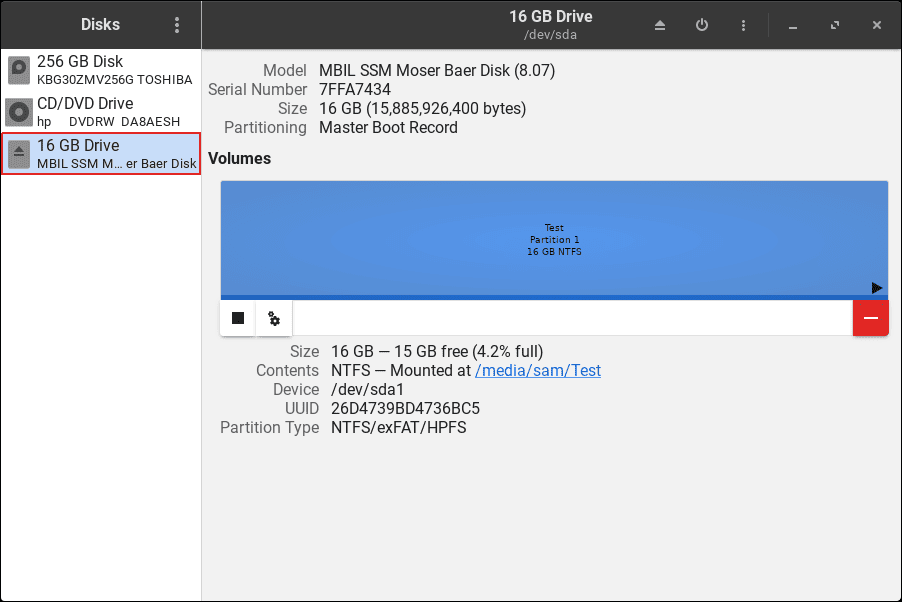
Now, let’s launch the Disks tool. It shows us a list of drives, such as the internal storage drive, CD drive, and USB drive that are part of the system.
At this point, we select the USB drive from the list:
Furthermore, to change the USB drive label, we click on the settings wheelwork icon and select the Edit Filesystem option:
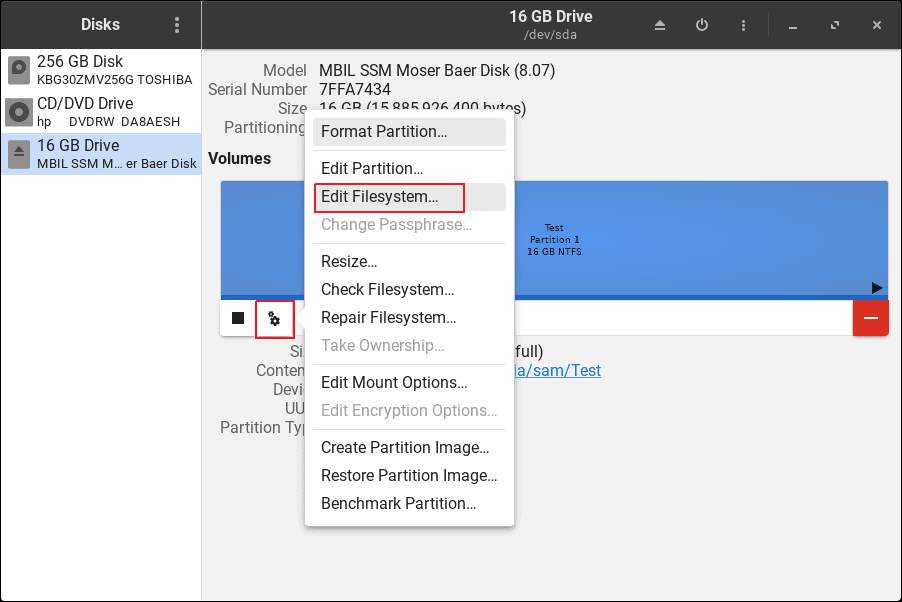
The Edit Filesystem provides the option of changing the label of USB drives.
udisksctl is a command-line tool that enables users to execute various operations on the storage devices in Linux. Additionally, it’s efficient in managing removable storage devices, including USB drives.
udisksctl is a pre-installed tool present in various Linux desktop environments, such as GNOME and XFCE. Additionally, it’s a part of the udisks package. So, if we face an error while opening the udisksctl tool, we can install it manually:
$ sudo apt install udisks2Now, let’s check the status of the udisksctl tool installation:
$ which udisksctl
/usr/bin/udisksctl
If the tool is installed in the system, we get the path of the executable as an output.
To rename a USB drive, we first need to know the path of the targeted USB drive’s partition. Therefore, we utilize the lsblk command to view all the partitions:
$ lsblk
NAME        MAJ:MIN RM   SIZE RO TYPE MOUNTPOINTS
sda           8:0    1  14.8G  0 disk
└─sda1        8:1    1  14.8G  0 part /media/sam/Test
sr0          11:0    1  1024M  0 rom
nvme0n1     259:0    0 238.5G  0 disk
├─nvme0n1p1 259:1    0   260M  0 part /boot/efi
├─nvme0n1p2 259:2    0    16M  0 part
├─nvme0n1p3 259:3    0 189.3G  0 part
├─nvme0n1p4 259:4    0  17.9G  0 part /
├─nvme0n1p5 259:5    0    30G  0 part
└─nvme0n1p6 259:6    0   980M  0 part
Furthermore, to know more information about the block devices, we can use the fdisk command:
$ sudo fdisk -l
Disk /dev/nvme0n1: 238.47 GiB, 256060514304 bytes, 500118192 sectors
Disk model: KBG30ZMV256G TOSHIBA
Units: sectors of 1 * 512 = 512 bytes
Sector size (logical/physical): 512 bytes / 512 bytes
I/O size (minimum/optimal): 512 bytes / 512 bytes
Disklabel type: gpt
Disk identifier: 617273B9-3063-4F2F-A689-E85E2CB4E4E5

Device             Start       End   Sectors   Size Type
/dev/nvme0n1p1      2048    534527    532480   260M EFI System
/dev/nvme0n1p2    534528    567295     32768    16M Microsoft reserved
/dev/nvme0n1p3    567296 397649919 397082624 189.3G Microsoft basic data
/dev/nvme0n1p4 397649920 435181567  37531648  17.9G Microsoft basic data
/dev/nvme0n1p5 435183616 498096127  62912512    30G Microsoft basic data
/dev/nvme0n1p6 498098176 500105215   2007040   980M Windows recovery environment

Disk /dev/sda: 14.79 GiB, 15885926400 bytes, 31027200 sectors
Disk model: Moser Baer Disk
Units: sectors of 1 * 512 = 512 bytes
Sector size (logical/physical): 512 bytes / 512 bytes
I/O size (minimum/optimal): 512 bytes / 512 bytes
Disklabel type: dos
Disk identifier: 0x424b9c41

Device     Boot Start      End  Sectors  Size Id Type
/dev/sda1        2048 31025151 31023104 14.8G  7 HPFS/NTFS/exFAT
Now we know the path of the USB drive’s partition.
Let’s rename the USB drive using the udisksctl tool:
$ sudo udisksctl set-part-label --block-device /dev/sda1 --label "NewLabelAdded"
Here, the set-part-label option indicates that we want to change the label of the USB drive. After successfully executing the command, the label of the USB drive would be NewLabelAdded. Let’s verify the change:
$ lsblk -o NAME,LABEL /dev/sda1
NAME LABEL
sda1 NewLabelAdded
As the output shows, we successfully renamed the label of the USB drive.
In this article, we discussed three methods to modify the label of a USB drive in Linux.
The GParted tool provides a user-friendly interface similar to the Disks tool, which is part of System Settings. However, GParted isn’t usually a pre-installed tool. On the other hand, the udisksctl tool facilitates various disk operations in Linux, but users often need technical knowledge to use it efficiently.