

Learn through the super-clean Baeldung Pro experience:
>> Membership and Baeldung Pro.
No ads, dark-mode and 6 months free of IntelliJ Idea Ultimate to start with.
Last updated: November 29, 2024
Learn through the super-clean Baeldung Pro experience:
>> Membership and Baeldung Pro.
No ads, dark-mode and 6 months free of IntelliJ Idea Ultimate to start with.
The tmux tool is terminal multiplexer software that enhances the usual text-based interaction of the terminal by introducing terminal user interface (TUI) elements. In particular, windows, panes, and similar visual aids bring the experience of a graphical user interface (GUI) to the terminal. One feature that tmux also has control over is the mouse and, more specifically, copying and pasting with it.
In this tutorial, we explore ways to copy and paste text with and without the mouse in tmux along with ways to enhance this functionality. First, we briefly refresh our knowledge about elements and interdependencies within a tmux environment. After that, we overview simple copy-and-paste operations through the terminal emulator. Next, we look at the copy mode of tmux. Then, we turn to general mouse support within a text-based terminal. Finally, we apply this idea to tmux by exploring the feature that it offers natively.
We tested the code in this tutorial on Debian 12 (Bookworm) with GNU Bash 5.2.15 and tmux 3.3a. Unless otherwise specified, it should work in most POSIX-compliant environments.
On its first start, tmux creates a server instance, which acts like the orchestrator for future instances. Of course, it also creates a client that we can interact with the server through. Any next tmux run checks whether a server is already running. If it is, it becomes a client to that existing instance unless otherwise requested.
In any case, every time we execute tmux without subcommands, with new-session, or similar, we immediately get three elements in order:
Sessions represent instances of a running client and can be referenced via their identifiers:
$ tmux list-sessions
0: 1 windows (created Sun Apr  7 07:04:00 2024)
Here, we only have a single client-server session with the identifier 0. By default, tmux names sessions with consecutive numbers. Still, we can also use new-session subcommand in combination with the [-s]ession flag to give a session a specific name.
Regardless, a session contains at least one window, which contains at least one pane:
[Ctrl+B, w]
[...]
(0) - 0: 1 windows (attached)
(1) └─> + 0: [tmux]*Z
(2) - named: 1 windows
(3) └─> 0: bash*: "baeldung@xost: ~"
[...]
Thus, if we kill the only pane of the last window of a session, we effectively kill the session.
On the other hand, if we split a window into more than one pane, only tmux is aware of this virtual split. To the terminal emulator itself, these borders are just regular characters, the same as any other part of the terminal.
Many terminal emulators are actually a window within a GUI. The GUI usually supports mouse actions. Thus, we can often operate on the terminal emulator and its contents via the mouse cursor even in remote sessions:
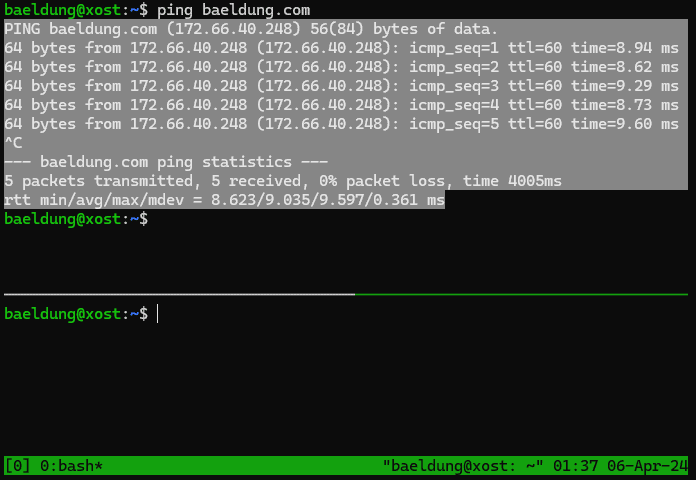
Here, we see the selected output from ping within one of two panes. Once we perform the selection, a Right Click or a combination like Ctrl+C usually results in the contents being saved to the clipboard.
Yet, this way, we can only select by line from left to right.
So, if we attempt to leverage this method to only get the contents from one of two left-and-right instead of top-and-bottom panes, we won’t be successful:
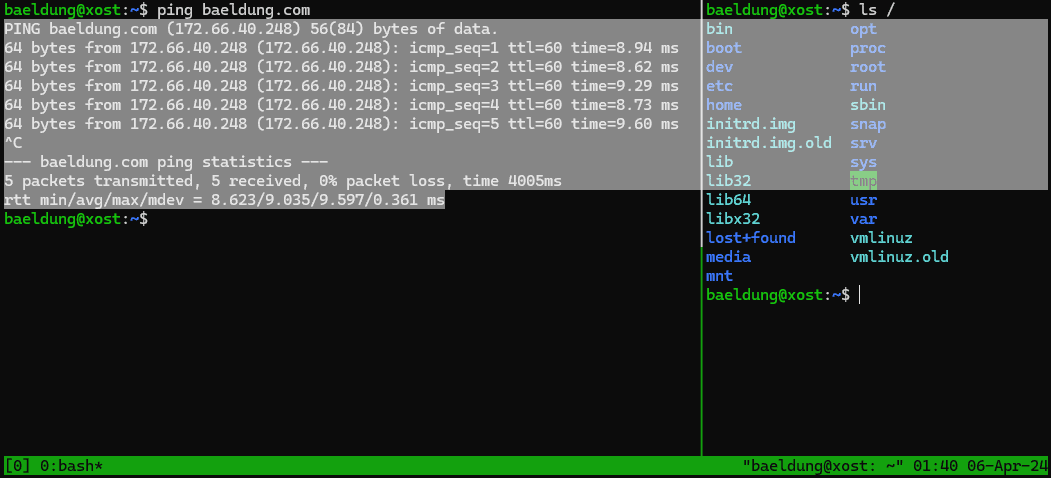
As we can see, the selection now includes a lot of content that isn’t related to the original target: the ping output. Pruning the resulting text can be very tedious:
PING baeldung.com (172.66.40.248) 56(84) bytes of data.                      │bin             opt
64 bytes from 172.66.40.248 (172.66.40.248): icmp_seq=1 ttl=60 time=8.94 ms  │boot            proc
64 bytes from 172.66.40.248 (172.66.40.248): icmp_seq=2 ttl=60 time=8.62 ms  │dev             root
64 bytes from 172.66.40.248 (172.66.40.248): icmp_seq=3 ttl=60 time=9.29 ms  │etc             run
64 bytes from 172.66.40.248 (172.66.40.248): icmp_seq=4 ttl=60 time=8.73 ms  │home            sbin
64 bytes from 172.66.40.248 (172.66.40.248): icmp_seq=5 ttl=60 time=9.60 ms  │initrd.img      snap
^C                                                                           │initrd.img.old  srv
--- baeldung.com ping statistics ---                                         │lib             sys
5 packets transmitted, 5 received, 0% packet loss, time 4005ms               │lib32           tmp
rtt min/avg/max/mdev = 8.623/9.035/9.597/0.361 ms
In addition, tmux often doesn’t break lines with regular newline characters. Because of this, pasting the clipboard might result in a single line.
In general, the method is very convenient due to the use of the mouse and GUI without extra configuration. Still, such shortcomings can prevent us from being able to use a terminal emulator as an effective tool for copying and pasting.
In tmux, the way to scroll around a pane buffer or select data from it is the so-called copy mode.
To enter copy mode, we employ the current bind combination (usually Ctrl+B), followed by the [ open square bracket key, i.e., Ctrl+B [:
Consequently, we see several indicators that we’re in copy mode:
The indicator shows how many lines are currently hidden from view at the bottom of the screen and how many lines in total were in the upper buffer before entering copy mode.
Once in copy mode, the navigation and action keys we can use depend on the current key schema.
There are two possible options:
These are based on the way keys are assigned within the respective text editor.
To get the current schema, we can run tmux with the show-options subcommand and the [-g]lobal flag:
$ tmux show-options -g | grep status-keys
status-keys emacs
In particular, we use grep to filter according to the status-keys string. The output shows that our current schema is emacs.
Notably, emacs keys don’t always work well in all terminal emulators, especially those that employ the special keys for other actions in the GUI. This has to do with the priority of key processing.
Because of this, we can [-g]lobally switch to the less-involved vi key schema via setw:
setw -g mode-keys viThis command sets vi as the default schema for the tmux session. To ensure it remains configured, we can also add it to the respective .tmux.conf file.
Let’s see some of the main shortcut keys and combinations in copy mode:
+-------------------+--------------------+---------------+
| Action            | emacs              | vi            |
+-------------------+--------------------+---------------+
| move character    | Up Down Left Right | j k h l       |
| move line         | Ctrl-Up Ctrl-Down  | Ctrl+Y Ctrl+E |
| move whole screen | PageUp PageDown    | Ctrl+B Ctrl+F |
| search            | Ctrl+S             | /             |
| start selection   | Ctrl+Space         | Space         |
| copy selection    | Ctrl+W             | Enter         |
| clear selection   | Ctrl+G             | Escape        |
| exit copy mode    | Escape             | q             |
+-------------------+--------------------+---------------+
Once we have a selection copied, we exit copy mode via the respective hotkey and can then paste with Ctrl+B, followed by a ] closed square bracket, i.e., Ctrl+B ].
So, let’s see an example of copying in copy mode.
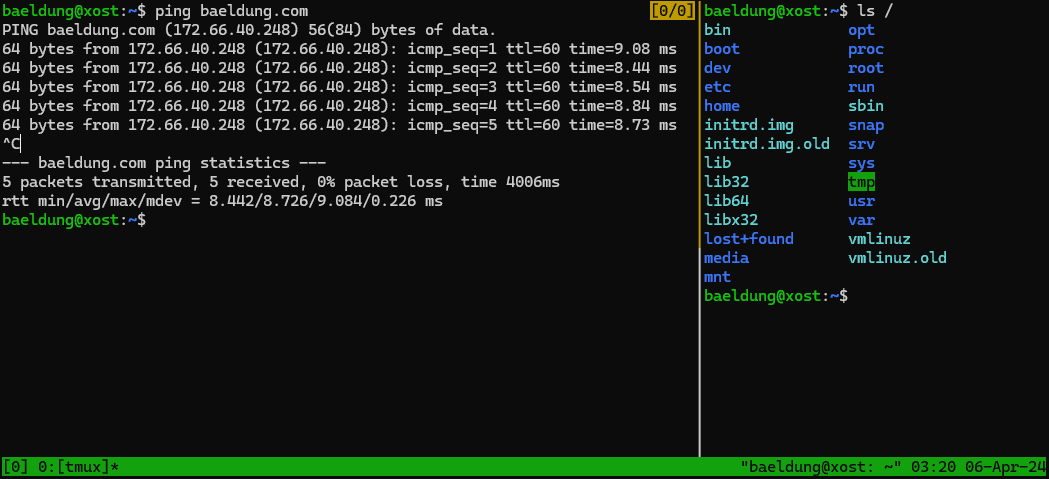
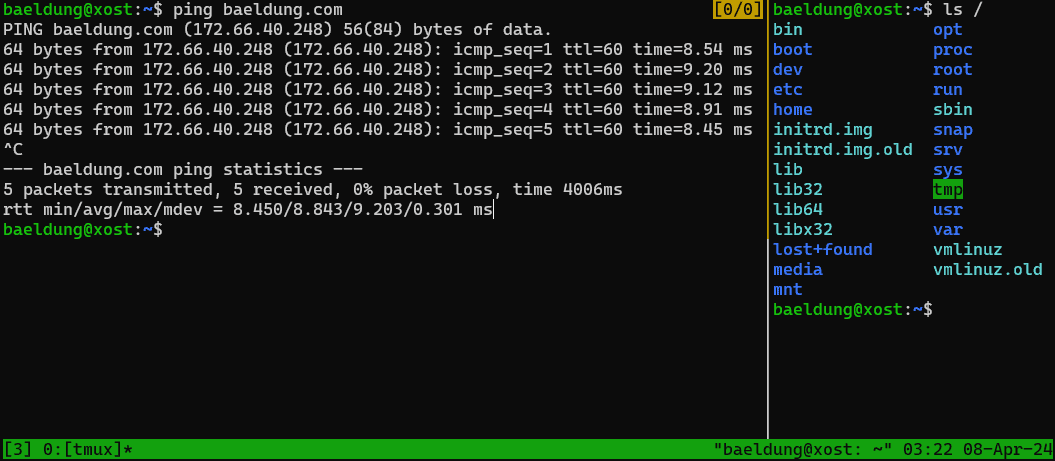
First, we open a tmux session with two side-by-side panes:
After that, we go to the left pane via Ctrl+B and the Left Arrow. Next, we press Ctrl+B and [ to enter copy mode:

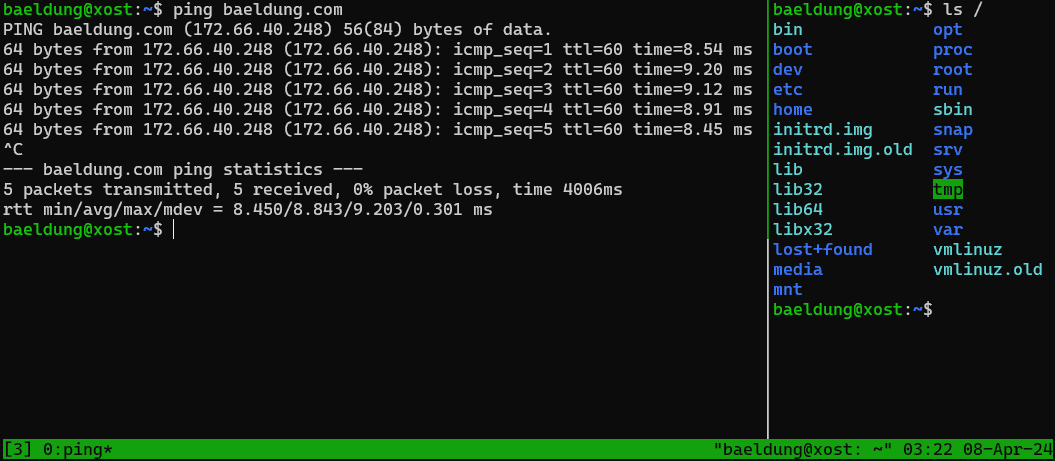
Once in copy mode, we can press the Up Arrow and $ to move the caret from the prompt to the far right of the last ping output line:
Then, we press Space to start copying and move the selecting cursor to the beginning of the second line:
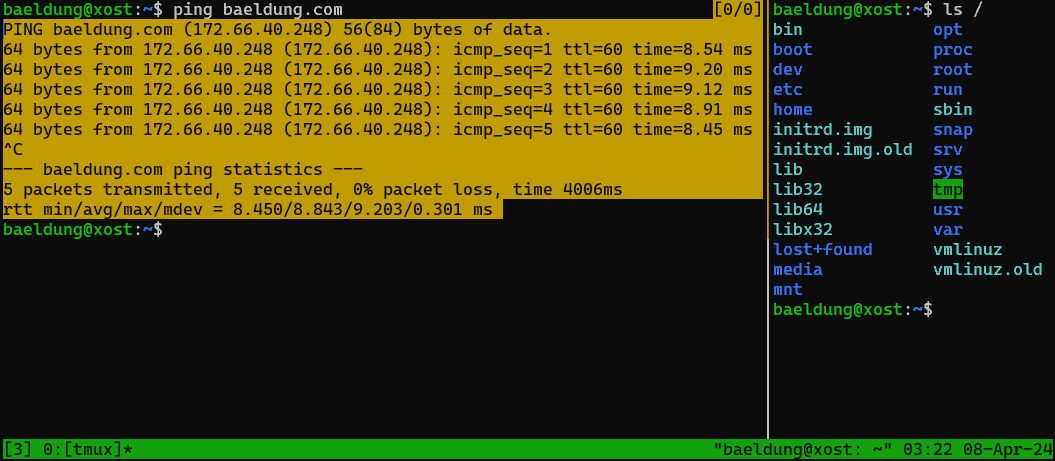
Critically, the selection doesn’t go beyond the pane borders. Now, upon pressing Return, we copy the selection to the clipboard and exit copy mode.
Finally, we can store the clipboard in a Bash variable by entering the respective command and pressing Ctrl+B and ] while the cursor is between the single quotes:
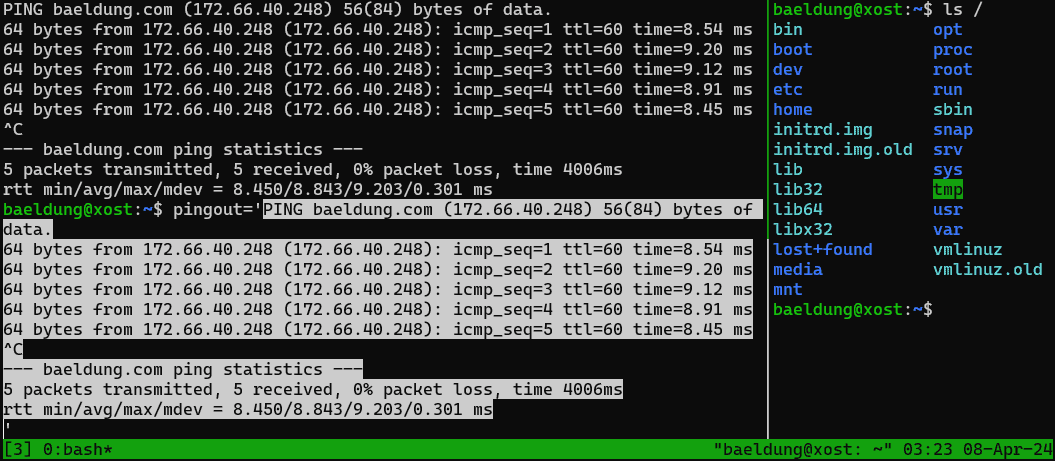
Thus, we can copy and store the data from any part of the pane, including the hidden buffer. Since this mechanism is native to tmux, borders are considered while selecting. Yet, the data is often stored in the clipboard accessible both within the terminal emulator and the GUI that runs it.
Since it has been a standard part of desktop and portable computer equipment, terminals often support the mouse despite their text-based heritage.
In practice, both GUI and command line interface (CLI) environments have a cursor. One is often a pointer in the form of a slanted arrow, while the other is a caret:
$ the cursor is at the end of this line █Although modern shells have basic and advanced line editing features that may enable us to move around, going up the screen isn’t always possible using conventional methods.
Because of this, the mouse can be invaluable as a way to move the caret around the screen. In particular, mouse movements map to a respective caret position change.
To achieve mouse support for text-only terminal control, systems first have to know how to read the input from the mouse. This is usually done via the fairly basic usbhid or psmouse drivers:
$ lsmod
[...]
hid_generic   60010  0
usbhid        66601  0
hid          160667  2 hid_generic,usbhid
[...]
psmouse       14301  0
[...]
In fact, for many systems, the driver loads automatically when we insert a mouse or keyboard via USB or PS/2 respectively.
Once the system intercepts the mouse movements, it can react with the respective ANSI codes for caret relocation.
By doing so, a terminal can map these changes according to the current sensitivity. So, for instance, if we move the physical mouse to the left, the caret moves to the left as well.
The General Purpose Mouse (gpm) package extends basic mouse drivers for terminal interoperability via a daemon.
This daemon is usually the way most terminals make the link between mouse and caret movement:
$ gpmNotably, gpm supports both USB and PS/2 mouse devices. To get a list of types, we specify a device with -m and use the -t option with help.
Having many of the features that a regular GUI provides, tmux naturally includes mouse support.
To enable mouse support, we set the mouse [-g]lobal option to on:
set -g mouse onOf course, we can do this both within a session, outside of it, and via the .tmux.conf configuration file.
In tmux running within a non-GUI environment and not within a terminal emulator, this spawns an inverse block caret indicator. Otherwise, we can just use the GUI cursor.
Further, tmux mouse support mainly provides selection hooks:
Let’s see a couple of these features in action.
One of the most convenient uses of a mouse is the context menu. In fact, some GUI environments such as Openbox have a minimal interface in favor of cascadable right-click menus.
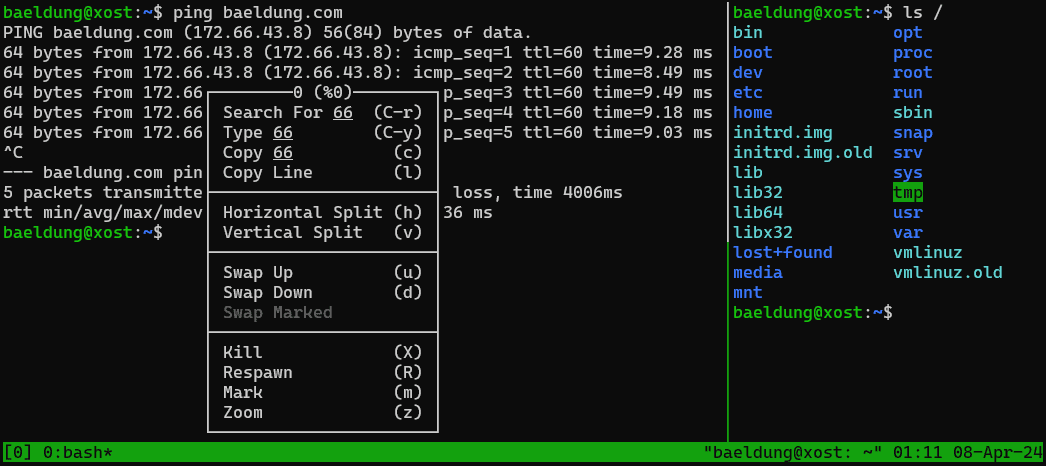
Considering this, tmux also implements a menu that we can activate with the mouse:
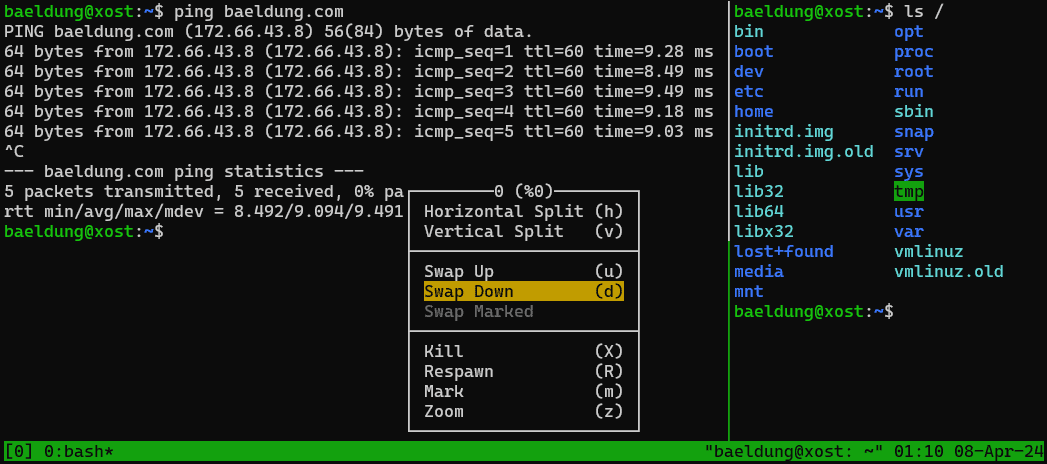
In this case, we see that right-clicking on a blank part of the terminal provides several options:
Further, the number, type, and availability of these options depend on the context of the right click:
This way, we can get only relevant functions.
As we saw earlier, a selection normally doesn’t respect pane borders, since the terminal doesn’t see them as a special area.
However, when mouse support is on, the selection is confined to the pane that we started the selection in. Thus, although it’s still line by line, we can freely move around the window via the mouse pointer without the selection expanding beyond the desired pane.
Effectively, this is achieved by performing several mappings:
This way, a minimal amount of specialized code handles the mouse.
Notably, earlier versions of tmux have very limited mouse support and might require custom code to get it working as expected:
set -g mouse on
bind -n WheelUpPane if-shell -F -t = "#{mouse_any_flag}" "send-keys -M" "if -Ft= '#{pane_in_mode}' 'send-keys -M' 'select-pane -t=; copy-mode -e; send-keys -M'"
bind -n WheelDownPane select-pane -t= \; send-keys -M
bind -n C-WheelUpPane select-pane -t= \; copy-mode -e \; send-keys -M
bind -T copy-mode-vi    C-WheelUpPane   send-keys -X halfpage-up
bind -T copy-mode-vi    C-WheelDownPane send-keys -X halfpage-down
bind -T copy-mode-emacs C-WheelUpPane   send-keys -X halfpage-up
bind -T copy-mode-emacs C-WheelDownPane send-keys -X halfpage-down

setw -g mode-keys vi
unbind -T copy-mode-vi Enter
bind-key -T copy-mode-vi Enter send-keys -X copy-pipe-and-cancel "xclip -selection c"
bind-key -T copy-mode-vi MouseDragEnd1Pane send-keys -X copy-pipe-and-cancel "xclip -in -selection clipboard"
Effectively, this configuration script provides a similar behavior to the now-default tmux mouse copy support:
Most of this functionality is already implemented in recent versions of tmux.
In this article, we talked about tmux and ways to copy and paste session contents with the keyboard and mouse.
In conclusion, although tmux works predominantly within text-based environments, there are ways to employ the mouse for selection and copy operations even through remote sessions.