Yes, we're now running our only Summer Sale. All Courses are 30% off until 20th July, 2026:
Checking for Errors in RAM on Linux
Last updated: January 30, 2024

Learn through the super-clean Baeldung Pro experience:
>> Membership and Baeldung Pro.
No ads, dark-mode and 6 months free of IntelliJ Idea Ultimate to start with.
1. Introduction
Ensuring the stability and reliability of system memory (RAM) becomes important for maintaining its optimal performance. To tackle this, we employ various tools to test and verify the integrity of the RAM in Linux systems.
In this tutorial, we’ll learn various methodologies and tools to assess the functionality of system memory, seeking out potential issues and ensuring a seamless operational experience.
2. Using memtester
memtester is a command-line tool available on Linux systems. It’s used to test a portion of the RAM while the system is running. It performs RAM testing within the operating system and identifies specific errors while the system is active.
Notably, if the system is busy, attempting to allocate more memory than what’s available might cause the test to deadlock and potentially halt the system. So, because of the usage by the operating system and active processes, we need to verify the available free RAM before assigning an appropriate amount to memtester for testing purposes.
First, let’s install memtester via apt-get and sudo:
$ sudo apt-get install memtesterOnce installed, we can run memtester with its basic syntax:
$ sudo memtester <amount of memory to test> <number of test iterations>For instance, let’s test 1GB of memory in one iteration:
$ sudo memtester 1G 1
...
pagesize is 4096
pagesizemask is 0xfffffffffffff000
want 1024MB (1073741824 bytes)
got 1024MB (1073741824 bytes), trying mlock ...locked.
Loop 1/1:
  Stuck Address       : ok
  Random Value        : ok
  Compare XOR         : ok
  Compare SUB         : ok
  Compare MUL         : ok
  Compare DIV         : ok
  Compare OR          : ok
  Compare AND         : ok
  Sequential Increment: ok
  Solid Bits          : ok
  Block Sequential    : ok
  Checkerboard        : ok
  Bit Spread          : ok
  Bit Flip            : ok
  Walking Ones        : ok
  Walking Zeroes      : ok
  8-bit Writes        : ok
  16-bit Writes       : ok

Done.
memtester attempts to write different bit patterns to the specified portion of RAM and then reads them back to ensure accuracy. These tests involve various memory access patterns and operations to check for potential issues or faults in the memory. In this case, 1G specifies the amount of memory to test. Further, 1 specifies the number of passes.
3. Using pcmemtest
pcmemtest is a standalone memory testing tool that runs outside of the Linux operating system. It’s a comprehensive low-level RAM testing tool to detect memory issues in computer systems.
First, let’s install pcmemtest:
$ sudo apt install pcmemtestOnce it’s installed, we should be able to access it via the GRUB menu after restarting the system. Naturally, if we use a different bootloader, we might need to configure pcmemtest for that instead.
Now, let’s boot to PCMemTest: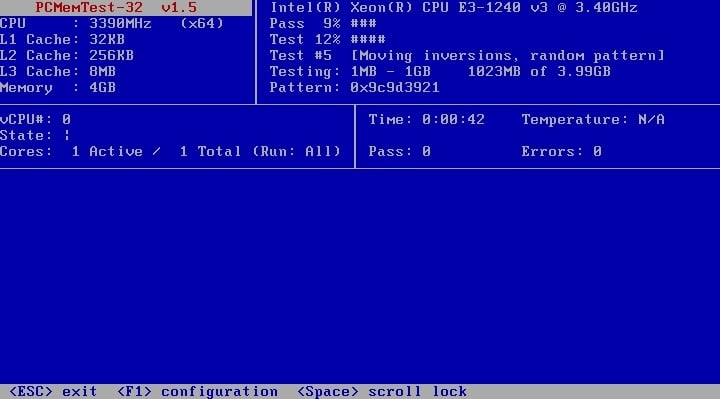
As we can see, the test is performed by writing and reading different patterns of data to and from the RAM. If the test is successful, it’ll indicate that the RAM is functioning properly. Otherwise, we’d see Errors.
4. Using mprime
mprime is a tool for stress testing computer hardware, including checking for errors in RAM on Linux. The process involves utilizing stress-testing capabilities to apply a heavy load on the system’s memory by performing complex calculations and iterations.
This stress test is particularly effective in identifying issues with RAM or the memory controller.
Notably, mprime operates interactively, offering various test types and options that users can select and configure during its execution.
First, let’s download and extract mprime via wget and tar:
$ wget https://www.mersenne.org/download/software/v30/30.8/p95v308b17.linux64.tar.gz
$ tar -xvf p95v308b17.linux64.tar.gz
Now, let’s run mprime and choose the test type:
$ ./mprime

...
Choose a type of torture test to run.
  1 = Smallest FFTs (tests L1/L2 caches, high power/heat/CPU stress).
  2 = Small FFTs (tests L1/L2/L3 caches, maximum power/heat/CPU stress).
  3 = Large FFTs (stresses memory controller and RAM).
  4 = Blend (tests all of the above).
...
Type of torture test to run (4): 3
...
[Main thread Dec 23 14:35] Starting workers.
[Worker #1 Dec 23 14:35] Worker starting
[Worker #2 Dec 23 14:35] Worker starting
[Worker #2 Dec 23 14:35] Beginning a continuous torture test on your computer.
[Worker #2 Dec 23 14:35] Please read stress.txt. Hit ^C to end this test.
[Worker #1 Dec 23 14:35] Beginning a continuous torture test on your computer.
[Worker #1 Dec 23 14:35] Please read stress.txt. Hit ^C to end this test.
[Worker #1 Dec 23 14:35] Test 1, 12400 Lucas-Lehmer iterations of M21871519 using FMA3 FFT length 1120K, Pass1=448, Pass2=2560, clm=2.
[Worker #2 Dec 23 14:35] Test 1, 12400 Lucas-Lehmer iterations of M21871519 using FMA3 FFT length 1120K, Pass1=448, Pass2=2560, clm=2.
[Worker #1 Dec 23 15:07] Self-test 1120K passed!
[Worker #2 Dec 23 15:07] Self-test 1120K passed!
...
[Worker #2 Dec 23 15:17] Torture Test completed 1 tests in 41 minutes - 0 errors, 0 warnings.
[Worker #1 Dec 23 15:17] Torture Test completed 1 tests in 41 minutes - 0 errors, 0 warnings.

[Worker #2 Dec 23 15:17] Worker stopped.
[Worker #1 Dec 23 15:17] Worker stopped.
As we can see, we selected the Large FFTs option, which is specifically designed to stress the memory controller and RAM. The test runs several Lucas-Lehmer tests on various Fast Fourier Transform (FFT) lengths and settings. The workers are performing continuous tests, each reporting their progress, the number of iterations completed, and the details of the specific prime number and FFT length used in the test.
Moreover, between these iterations, the program also conducts self-tests at different FFT lengths, ensuring that the specific FFT lengths used in the stress test perform correctly without errors.
5. Using stress-ng
stress-ng primarily focuses on stressing system components rather than explicitly testing for physical RAM errors. However, by utilizing memory stressors in stress-ng, we can indirectly test the physical RAM for stability and potential issues under heavy loads.
First, let’s install stress-ng:
$ sudo apt-get install stress-ngOnce it’s installed, we can use stress-ng to check errors in RAM:
$ stress-ng --vm 1 --vm-bytes 50% --vm-method all --verify -t 10m
stress-ng: info: [5485] setting to a 600 second run per stressor
stress-ng: info: [5485] dispatching hogs: 1 vm
stress-ng: info: [5485] successful run completed in 603.95s (10 min, 3.95 secs)
Let’s break down the code:
- –vm 1 specifies the number of virtual memory stressors to run (in this case 1)
- –vm-bytes 50% sets the memory allocation for the stressor to 50% of the available system memory
- –vm-method all directs the stressor to use all available methods to stress the virtual memory
- –verify enables memory verification, checking for errors or inconsistencies during the stress test
- -t 10m sets 10 minutes for the stress test
In summary, stress-ng creates a memory stressor using half of the system’s available memory. This test employs various methods to stress the memory while verifying for any potential errors or issues, all within a 10-minute timeframe.
6. Conclusion
In this article, we checked diverse tools to examine and verify the functionality of system memory in Linux.
From in-system tests like memtester to standalone tools like pcmemtest and stress-ng‘s stressors, each method plays a role in detecting potential memory issues.