

Yes, we're now running our only Summer Sale. All Courses are 30% off until 20th July, 2026:
How To Use QEMU From the Linux Command-Line
Last updated: January 26, 2024
Learn through the super-clean Baeldung Pro experience:
>> Membership and Baeldung Pro.
No ads, dark-mode and 6 months free of IntelliJ Idea Ultimate to start with.
1. Overview
QEMU is a type-2 hypervisor that uses dynamic translation to emulate CPU instructions on a foreign architecture. It’s helpful for many tasks, such as testing and development, cloud computing, and system administration. In conjunction with other virtualization technologies like KVM or Xen, it allows the guest to run directly on the host CPU at near-native speed.
In this tutorial, we’ll see how to use QEMU to emulate an entire machine (CPU, memory, and devices) to run a popular Linux distro as a guest OS inside a Linux host.
2. Why Use QEMU
There are dozens of hypervisors, as we can see in a careful comparison. However, many have proprietary licenses, are little known, or are suitable only for particular use cases. Some are old and no longer actively developed.
In contrast, QEMU is free, open-source, general-purpose, and among the most widely used type-2 hypervisors. In fact, it can emulate many kinds of peripherals and devices, and its license allows its use in any environment, including servers, without restrictions.
QEMU has a vast set of options that make it suitable even for non-common use cases. As there are methods for achieving greatly accelerated video performance, it’s even good for gaming. It’s also helpful for remote use because it can redirect the VGA display over a VNC session.
We can use it either from the terminal, which is the default mode, or with support from a graphic frontend. The only fundamental limitation of QEMU is the difficulty of use. It’s not designed to be user-friendly but targeted at advanced users.
3. Using QEMU From the Command-Line
Using QEMU from the terminal has several advantages over using a graphical frontend:
- Flexibility → Terminal commands allow more customization options and fine-grained control.
- Scriptability → Automation and scripting of QEMU commands are more straightforward in the terminal.
- Remote Access → The terminal allows for remote access and management of QEMU virtual machines.
- Resource Usage → Using the terminal reduces resource usage compared to GUI frontends, especially on systems with limited resources, such as older computers or embedded systems. The terminal’s lower resource usage also makes it a good choice for running multiple virtual machines simultaneously on a single system.
- Consistency → Terminal commands ensure consistency across different platforms and environments.
Let’s now see how to install Linux Mint 21.1 Cinnamon edition on a guest QEMU machine within a host running the same operating system. Before proceeding further, let’s download the distro’s ISO.
3.1. Choice of Virtual Disk Type
QEMU supports several types of virtual hard drives, also used by other hypervisors, for example:
- Raw disk image
- QCOW2 (QEMU Copy On Write)
- VMDK (VMware virtual disk)
- VDI (VirtualBox virtual disk)
- Physical disk (direct access to a physical disk)
These are only the most common formats, as others are supported. In addition, QEMU can access a disk image locally or remotely via ssh.
In this example, we choose QCOW2, the QEMU’s native format, because it has several advantages over the other formats related to snapshots, space efficiency, compression, near-raw performance, multi-threading, error handling, memory usage, and encryption capabilities. We can create a fixed-size (preallocated) or variable-size (non-preallocated) QCOW2 disk. In the latter case, that is the default, the space occupied on the host grows as the virtual disk is used, which comes in handy when we don’t know how much space we need in advance.
Therefore, let’s create with qemu-img a variable-size QCOW2 disk of 20GB:
$ qemu-img create -f qcow2 myVirtualDisk.qcow2 20G
Formatting 'myVirtualDisk.qcow2', fmt=qcow2 cluster_size=65536 extended_l2=off compression_type=zlib size=21474836480 lazy_refcounts=off refcount_bits=16
The virtual disk is ready with all the default options. Let’s do a verification:
$ file myVirtualDisk.qcow2
myVirtualDisk.qcow2: QEMU QCOW2 Image (v3), 21474836480 bytes
$ ls -l myVirtualDisk.qcow2
-rw-r--r-- 1 francesco francesco 196928 Feb  3 19:31 myVirtualDisk.qcow2
As expected, although it’s a 20GiB (21.474.836.480 bytes) virtual disk, its initially occupied space is only 192KiB (196.928 bytes). Out of curiosity, “QCOW2 Image (v3)” refers to what was initially called QCOW3 and is sometimes still incorrectly called that on outdated web pages.
3.2. Emulation of a Complete Hardware System With KVM
Let’s suppose we want to create a virtual machine with the following characteristics:
- Virtual hard disk “myVirtualDisk.qcow2“, previously created
- Boot from ISO file “linuxmint-21.1-cinnamon-64bit.iso“
- 2 CPUs
- 4 GB RAM
- Network card connected to the host via NAT
- High-resolution video card
- Sound card
- Mouse and keyboard
The following command meets these requirements:
$ qemu-system-x86_64 \
-enable-kvm                                                    \
-m 4G                                                          \
-smp 2                                                         \
-hda myVirtualDisk.qcow2                                       \
-boot d                                                        \
-cdrom linuxmint-21.1-cinnamon-64bit.iso                       \
-netdev user,id=net0,net=192.168.0.0/24,dhcpstart=192.168.0.9  \
-device virtio-net-pci,netdev=net0                             \
-vga qxl                                                       \
-device AC97
Let’s look at the meaning of each option:
- -enable-kvm → KVM to boost performance
- -m 4G → 4GB RAM
- -smp 2 → 2CPUs
- -hda myVirtualDisk.qcow2 → our 20GB variable-size disk
- -boot d → boots the first virtual CD drive
- -cdrom linuxmint-21.1-cinnamon-64bit.iso → Linux Mint ISO
- -netdev user,id=net0,net=192.168.0.0/24,dhcpstart=192.168.0.9 → NAT with DHCP
- -device virtio-net-pci,netdev=net0 → network card
- -vga qxl → powerful graphics card
- -device AC97 → sound card
Let’s verify that the virtual machine works as expected:
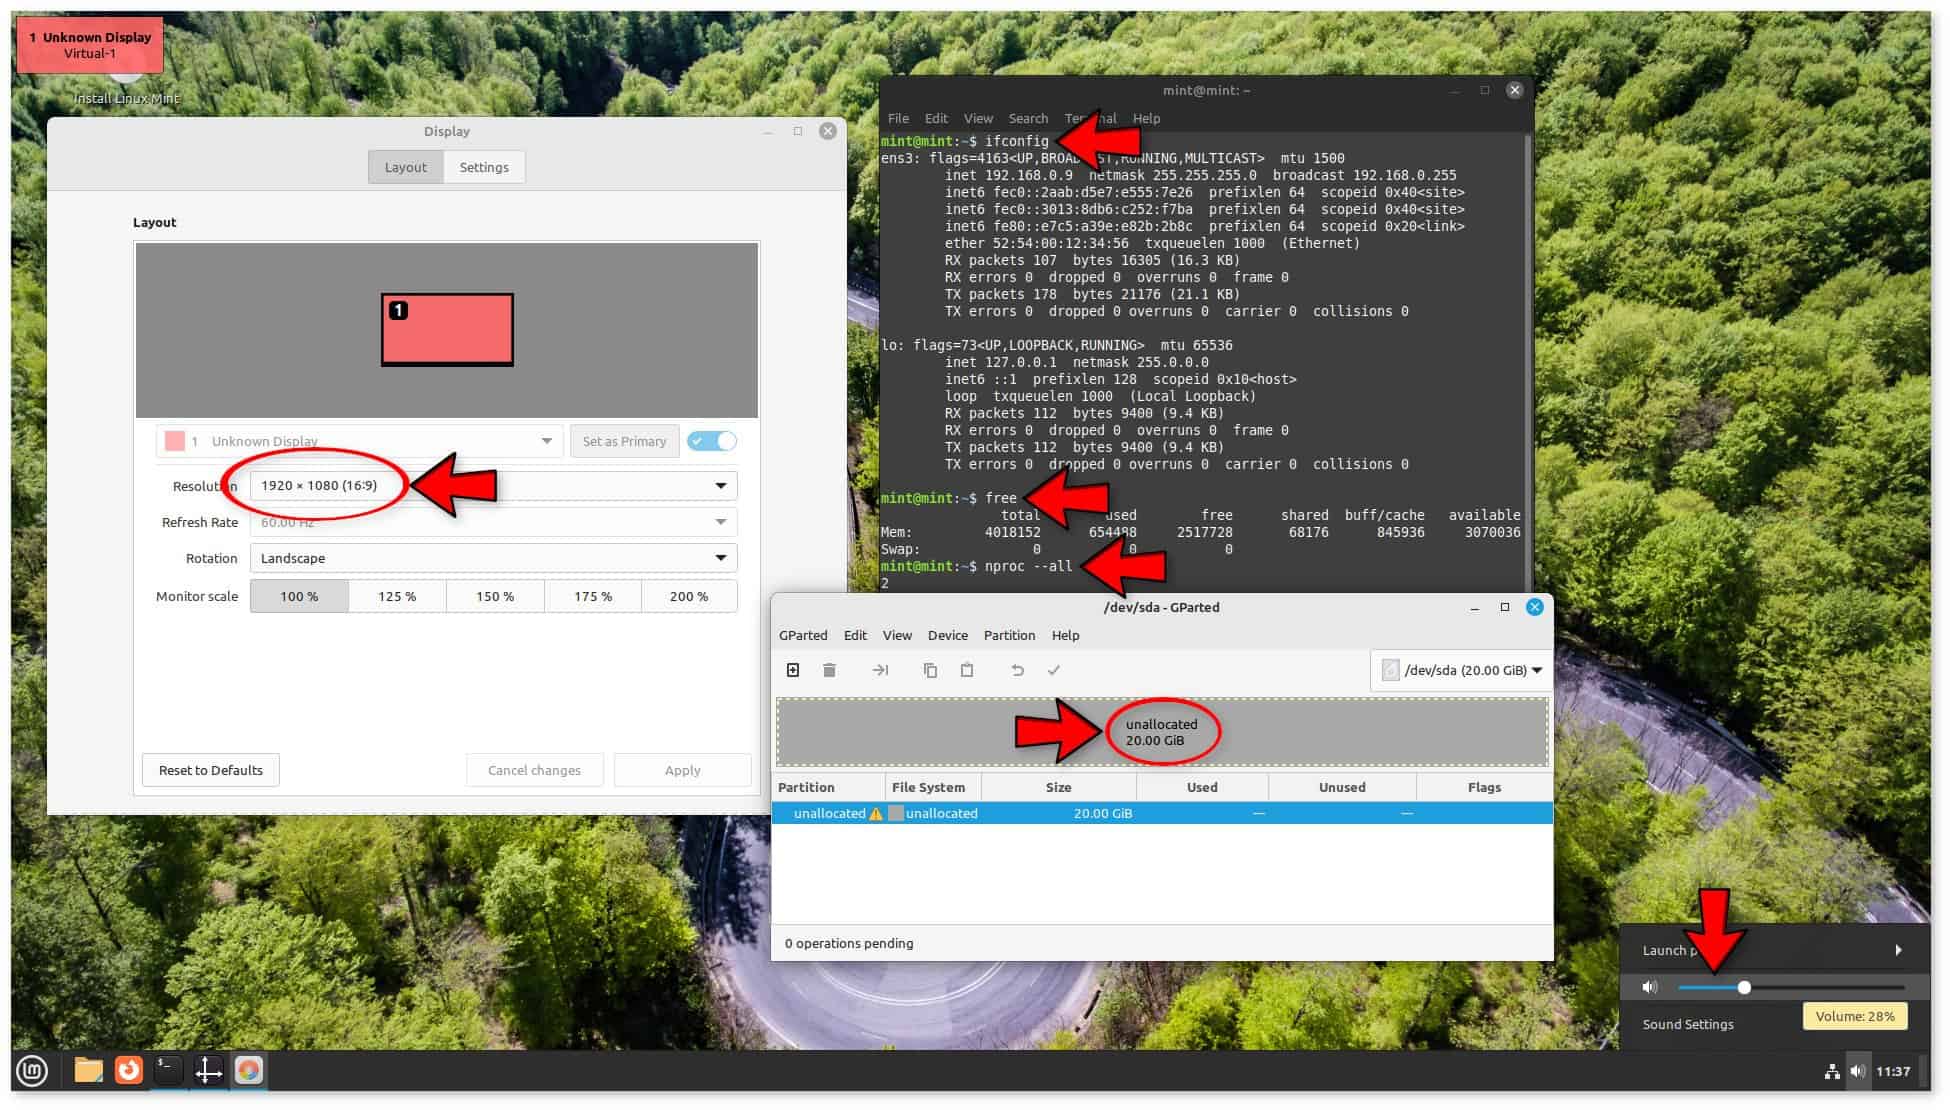 The guest booting is fast, and the host CPU load is negligible (8% after guest system boot, measured by top). We heard the default login sound. Using the Display module of Cinnamon Settings, we chose the same video resolution as the host, as shown in the screenshot above. After that, we pressed CTRL+ALT+F to switch the windowed guest view to full screen. GParted showed us the 20GB virtual disk, yet to be partitioned. From the terminal, we checked the NAT configuration with ifconfig, the amount of RAM with free, and the number of CPUs with nproc. Their outputs are in the screenshot and everything is as expected.
In addition to the manual that details every possible command, we can consult more concise and easy-to-access documentation on the most common QEMU options.
3.3. Installation and Configuration of a Guest Operating System
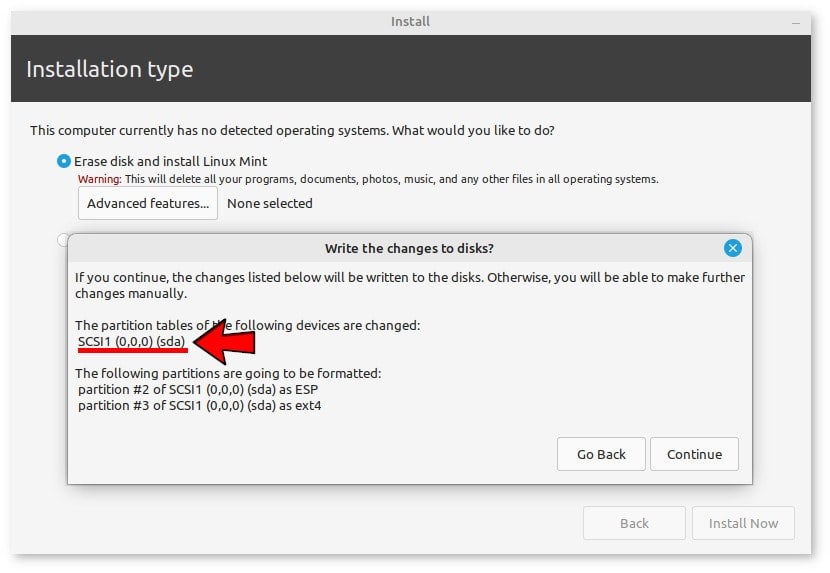
We followed the wizard’s standard steps for installation, including automatic partitioning. The following screenshot shows that Linux sees the QEMU’s virtual hard drive as if it were SCSI:
 After installation, “myVirtualDisk.qcow2” became 11.2 GiB. In all subsequent starts, we can remove the -boot and -cdrom parameters. Alternatively, we can use the -boot menu=on parameter to choose which device to boot with.
3.4. Pass-Through Access to a Host USB Stick
Pass-through is a QEMU feature that allows a virtual machine to access physical hardware directly, bypassing the virtualization layer without any overhead or limitations. It’s helpful with devices such as graphics cards, network adapters, or storage devices. It can improve performance and provide access to device-specific features unavailable in a purely virtual environment. In the case of a USB flash drive, pass-through is a way to exchange files with the outside world.
First, we need some information about the device:
$ lsusb -v
[...]
Bus 001 Device 002: ID 0930:6545 Toshiba Corp. Kingston DataTraveler [...] 4GB Stick
Device Descriptor:
[...]
  idVendor           0x0930 Toshiba Corp.
  idProduct          0x6545 Kingston DataTraveler
[...]
The device file path is like /dev/bus/usb/XXX/YYY. According to the Linux kernel’s naming policies, XXX is the bus number (001 in our case), which usually doesn’t change. Instead, YYY is the device number (002 in our case), which changes every time the USB device gets unplugged and re-plugged. That said, let’s check the device file permissions:
$ ls -l /dev/bus/usb/001/002
crw-rw-rw- 1 root root 189, 1 Feb  6 08:35 /dev/bus/usb/001/002
The user and group are root. This isn’t good for QEMU because the group must be kvm to allow the guest to access the device. So, let’s run the following two commands with root permissions to change permanently, via an udev rule, the group associated with this particular device:
# echo 'SUBSYSTEM=="usb", ATTR{idVendor}=="0930", ATTR{idProduct}=="6545", OWNER="root", GROUP="kvm", MODE="0666"' > /etc/udev/rules.d/99-usb-stick.rules
# udevadm control --reload-rules && udevadm trigger
Let’s unplug and re-plug the USB stick. Let’s recheck the device file permissions and, if the group is still root, let’s reboot the host. Finally, let’s launch QEMU with the following three more parameters, in which we use the idVendor and idProduct previously provided by lsusb:
-device usb-ehci,id=ehci \
-usb \
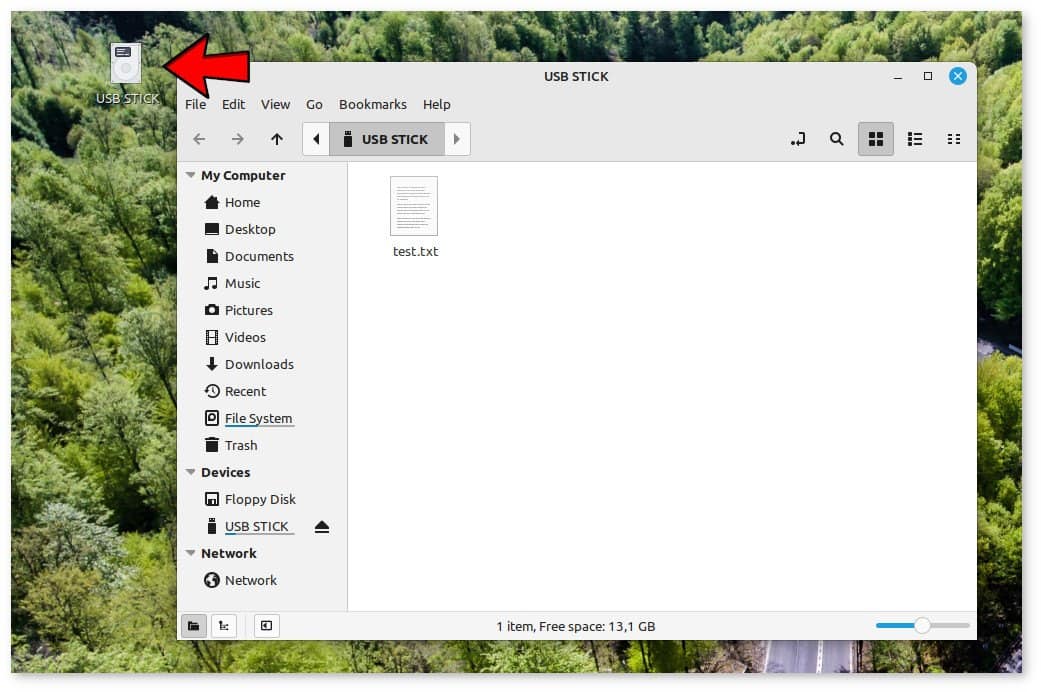
-device usb-host,bus=ehci.0,vendorid=0x0930,productid=0x6545In this way, we added an EHCI controller named ehci, which gives us a USB 2.0 bus named ehci.0. As a result, the device icon appears on the desktop:
 With pass-through, however, while the guest uses the flash drive, it’ll be inaccessible to the host. That’s why sharing the same directory between host and guest requires a different solution, as we’ll see later.
3.5. Copy & Paste + Drag & Drop + Automatic Resolution Adjustment
SPICE (Simple Protocol for Independent Computing Environments) is a remote display protocol that provides a high-quality and low-latency virtual desktop experience to remote clients. However, we can also use it locally to get several benefits. In particular, it allows some very convenient features:
- Copy & paste the clipboard from the host to the guest and vice versa
- Drag & drop files from the host to the guest
- Automatic resizing of the guest’s video resolution to fit any size we choose by resizing the window
First, let’s see an animated example of all three features:
 To enable SPICE, we need to launch QEMU with additional parameters. The following options are ready to use without further customization, so we can omit discussing them in detail:
-device virtio-serial-pci                                             \
-spice port=5930,disable-ticketing=on                                 \
-device virtserialport,chardev=spicechannel0,name=com.redhat.spice.0  \
-chardev spicevmc,id=spicechannel0,name=vdagent                       \
-display spice-app
If we don’t already have a SPICE client installed and configured correctly in the host, we’ll get this error:
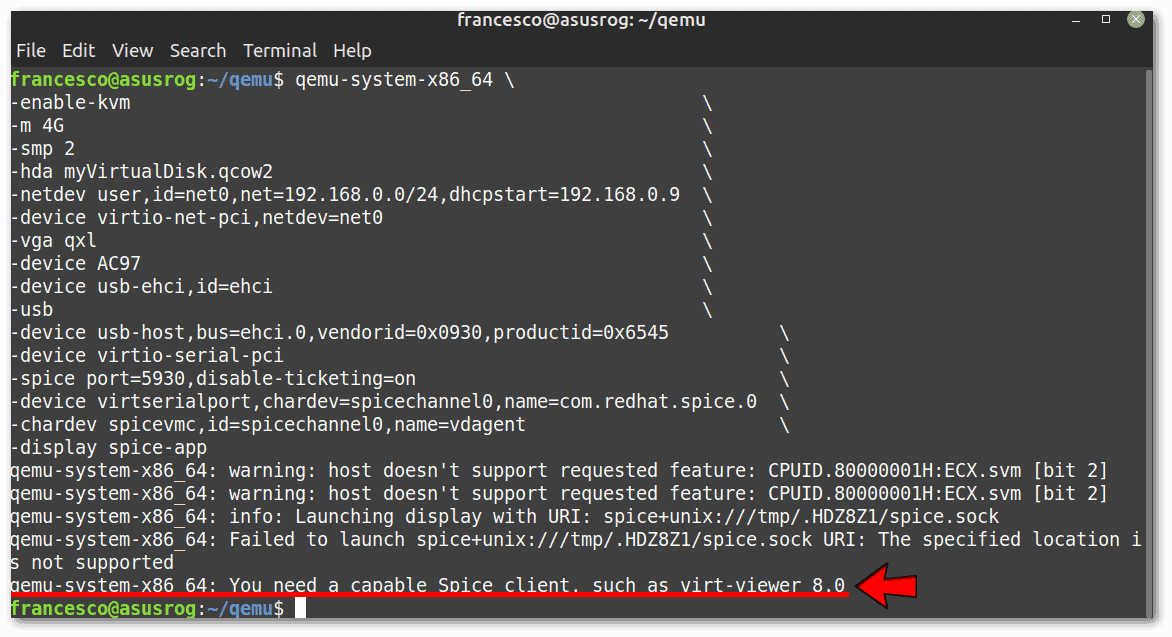 The solution is in two steps. The first is to install virt-viewer, as suggested by the error message:
$ sudo apt install virt-viewerThe second step is a temporary workaround specific to Debian and derivatives (including our test distro) for bug #1004082. Basically, we need to make sure that the ~/.config/mimeapps.list file contains the following:
[Added Associations]
[...]
x-scheme-handler/spice+unix=remote-viewer.desktop
With that done, automatic screen resizing, drag & drop, and copy & paste are available.
3.6. Sharing a Directory Between Host and Guest
Bidirectional sharing of a directory between the host and the client is simple. First, let’s create in the host the directory we wish to share, in our case /home/francesco/QEMU_Share. Then, let’s launch QEMU with the additional parameter -virtfs, specifying the following:
-virtfs local,path=/home/francesco/QEMU_Share,mount_tag=host0,security_model=mapped,id=host0We can refer to the official documentation for a detailed explanation of these options. Anyway, we only need to customize the path of the shared directory.
Let’s then create a directory in the guest for sharing, in our case /mnt/9p, and mount it:
$ sudo mkdir /mnt/9p
$ sudo mount -t 9p -o trans=virtio,version=9p2000.L host0 /mnt/9p
The directory sharing is already ready. Fortunately, even though we mounted it as root, the directory and the files inside are readable and writable without root permissions.
Finally, to make the mounting automatic on every guest reboot, we need to add the 9p modules to initramfs and a line to /etc/fstab. So, let’s add the following three lines to /etc/initramfs-tools/modules:
9p
9pnet
9pnet_virtio
Then, let’s add the following line in /etc/fstab:
host0 /mnt/9p 9p trans=virtio,version=9p2000.L 0 0For simplicity, we can add /mnt/9p to the file manager bookmarks for quick access.
After modifying the initramfs, we need to perform the update script:
sudo update-initramfs -u3.7. Snapshots of the Guest Operating System
Snapshots in QEMU are a feature to capture the state of a virtual machine at a particular moment in time and then revert to that state later if desired. This can be useful in several scenarios, such as testing software, developing new features, or debugging issues.
There are several tools to take snapshots of a running QEMU virtual machine:
- QEMU Monitor
- libvirt project-based tools, such as virt-manager, a GUI for libvirt, and virsh, a CLI utility that is part of the libvirt project
If we wanted to use virsh, we’d have to install various additional packages, fix the permissions, and, most importantly, use QEMU differently via an XML file. To maintain continuity with what we’ve done so far, let’s use QEMU Monitor, which doesn’t require any extra configuration.
Let’s start our virtual machine with the following additional option:
-monitor stdioAfter the virtual machine has finished booting, we can use the QEMU Monitor terminal, which looks like this:
qemu-system-x86_64 \
-enable-kvm        \
[...]              \
-monitor stdio
QEMU 6.2.0 monitor - type 'help' for more information
[...]
(qemu)
If the QEMU Monitor terminal isn’t visible because the (qemu) prompt is hidden by other messages, we just press Enter.
Before taking a snapshot of the current state of the virtual machine, including the RAM and all virtual disk images, we have to temporarily unmount in the guest the directory previously shared with the host:
$ sudo umount /mnt/9pThen, let’s run the following command in the QEMU Monitor to take a snapshot named snapshot1:
(qemu) savevm snapshot1Let’s make any change in the guest, e.g., adding a file, and then take another snapshot with a different name:
(qemu) savevm snapshot2To revert to the first snapshot, let’s run the following command:
(qemu) loadvm snapshot1This way, the running virtual machine reverts to the snapshot1 state. In fact, the file added before taking snapshot2 doesn’t more exist. We must be keep in mind that snapshots take up a lot of space and can fill the disk. To see all the snapshots, we use info snapshots:
(qemu) info snapshots
List of snapshots present on all disks:
ID        TAG               VM SIZE                DATE     VM CLOCK     ICOUNT
--        snapshot1        1.66 GiB 2023-02-12 21:10:02 00:07:02.767
--        snapshot2        1.99 GiB 2023-02-12 21:16:14 00:12:54.419
Let’s delete both snapshots with delvm:
(qemu) delvm snapshot2
(qemu) delvm snapshot1
(qemu) info snapshots
There is no snapshot available.
There’s no way to recover a deleted snapshot, so again, we need to be careful.
4. Conclusion
In this article, we ran a Linux distribution as a QEMU guest system using the command-line inside a Linux host.
What we’ve seen is only the beginning. For further study, let’s keep the official documentation as a reference.