

Yes, we're now running our only Summer Sale. All Courses are 30% off until 20th July, 2026:
Learn through the super-clean Baeldung Pro experience:
>> Membership and Baeldung Pro.
No ads, dark-mode and 6 months free of IntelliJ Idea Ultimate to start with.
1. Overview
Modern hardware offers multiple network interfaces. However, we need appropriate means to use them effectively. An available way is to bind together existing connections, so the system recognizes them as one. In this way, we increase redundancy or throughput.
In this tutorial, we’ll learn how to use popular network services to create network bonding.
2. Prerequisites
Let’s notice that we can bind connections in many ways. Here, we’ll use the active-backup mode with two slave connections. With this setup, we increase redundancy, as the backup connection is activated when the primary fails.
Further, we need the Linux kernel to manage network bonding. So, let’s check if the bonding kernel module is available with lsmod:
$ lsmod | grep bond
bonding               196608  0
If it isn’t the case, we need to load it with modprobe:
$ sudo modprobe bondingNext, we need at least two network interfaces. So, we’re going to use a virtual Linux system in the Oracle VM VirtualBox Manager. Subsequently, we’ll provide two NAT interfaces to simulate hardware ethernet cards.
Throughout this article, we’ll be working with Lubuntu 22.04 LTS with the kernel version 5.15.0-46-generic inside VirtualBox 6.1 on Windows 10.
Now, let’s check network interfaces with lshw:
$ sudo lshw -short -c network
[sudo] password for joe:
H/W path            Device      Class       Description
=======================================================
/0/100/3            enp0s3      network     82540EM Gigabit Ethernet Controller
/0/100/8            enp0s8      network     82540EM Gigabit Ethernet Controller
So, we have two virtual ethernet cards – enp0s3 and enp0s8.
3. Bonding With NetworkManager
Let’s use the NetworkManager service to manage network connections. Usually, this tool is available out of the box in most Linux distributions. First, let’s check if it’s running with systemctl:
$ systemctl status NetworkManager
● NetworkManager.service - Network Manager
     Loaded: loaded (/lib/systemd/system/NetworkManager.service; enabled; ve>
     Active: active (running) since Sat 2022-09-03 14:57:17 CEST; 14min ago
 # ...
If necessary, we should install NetworkManager from the network-manager package.
3.1. Using nmtui
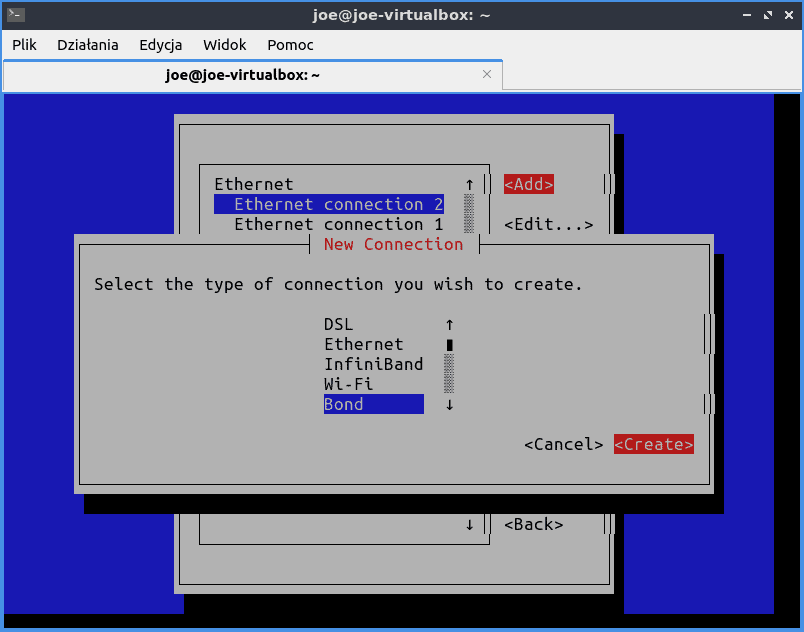
nmtui is a text user interface to configure NetworkManager. So, let’s start it and go to Edit a connection menu. Then we’re going to create a new connection with Add. Finally, let’s select Bond:
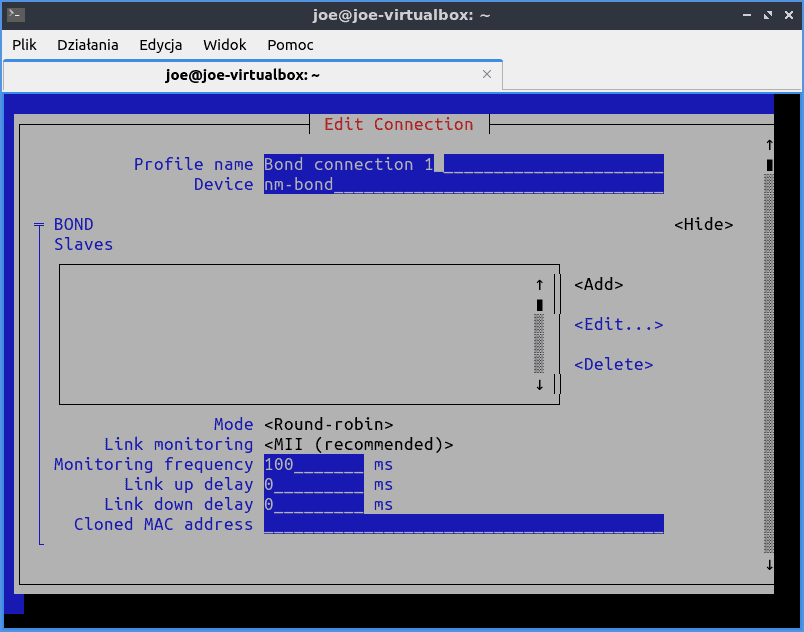
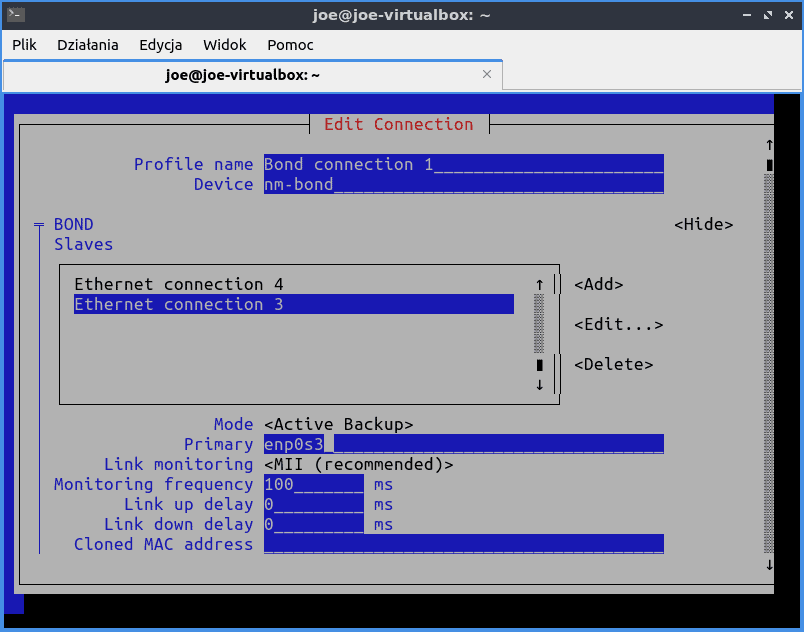
Then, let’s set the profile name and the device’s name – nm-bond:
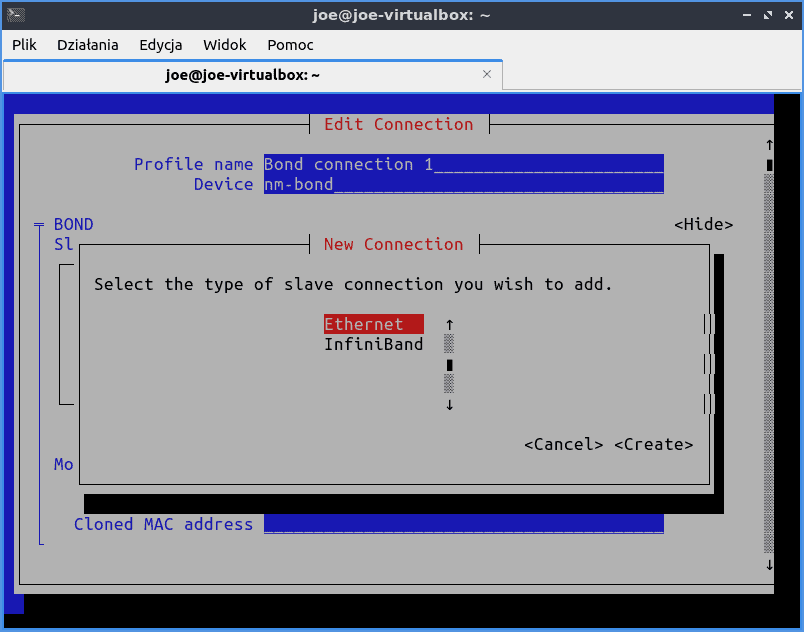
Now, let’s provide a slave connection with Add and create an Ethernet connection:
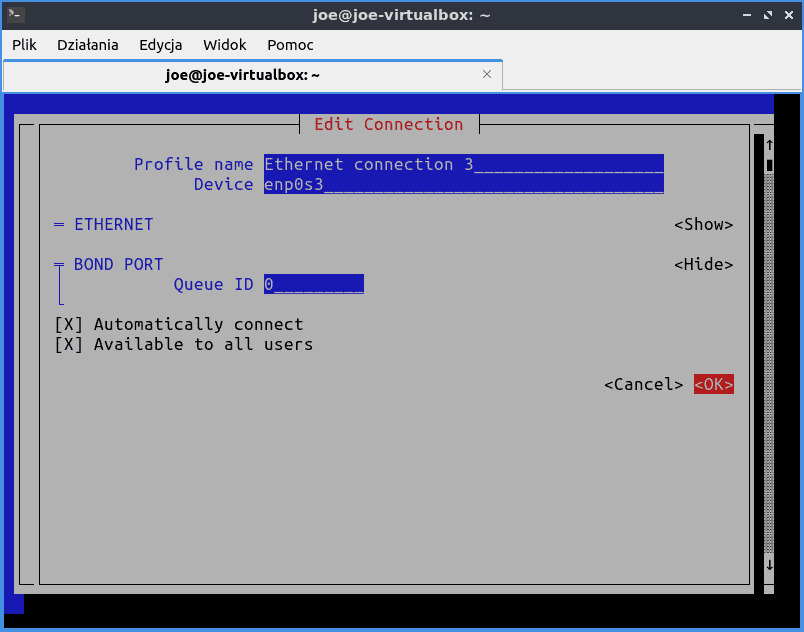
Subsequently, in the next panel, we should use one of enp0s3 or enp0s8 devices:
Finally, let’s choose Active-backup as Mode. Then we’ll be asked to specify the primary slave interface – enp0s3:
3.2. Checking Configuration
Let’s reboot the system and check the links:
$ ip link
1: lo: <LOOPBACK,UP,LOWER_UP> mtu 65536 qdisc noqueue state UNKNOWN mode DEFAULT group default qlen 1000
    link/loopback 00:00:00:00:00:00 brd 00:00:00:00:00:00
2: enp0s3: <BROADCAST,MULTICAST,SLAVE,UP,LOWER_UP> mtu 1500 qdisc fq_codel master nm-bond state UP mode DEFAULT group default qlen 1000
    link/ether 6a:23:45:28:ac:0f brd ff:ff:ff:ff:ff:ff permaddr 08:00:27:42:6c:e3
3: enp0s8: <BROADCAST,MULTICAST,SLAVE,UP,LOWER_UP> mtu 1500 qdisc fq_codel master nm-bond state UP mode DEFAULT group default qlen 1000
    link/ether 6a:23:45:28:ac:0f brd ff:ff:ff:ff:ff:ff permaddr 08:00:27:fa:13:16
4: nm-bond: <BROADCAST,MULTICAST,MASTER,UP,LOWER_UP> mtu 1500 qdisc noqueue state UP mode DEFAULT group default qlen 1000
    link/ether 6a:23:45:28:ac:0f brd ff:ff:ff:ff:ff:ff
So we can find out that the bonding is working with two slaves. Moreover, let’s notice that the MAC address of all three interfaces is the same.
Now let’s check the bonding configuration in the /proc/net/bonding/nm-bond file:
$ cat /proc/net/bonding/nm-bond
Ethernet Channel Bonding Driver: v5.15.0-47-generic

Bonding Mode: fault-tolerance (active-backup)
Primary Slave: enp0s3 (primary_reselect always)
Currently Active Slave: enp0s3
MII Status: up
MII Polling Interval (ms): 100
Up Delay (ms): 0
Down Delay (ms): 0
Peer Notification Delay (ms): 0

Slave Interface: enp0s3
MII Status: up
Speed: 1000 Mbps
Duplex: full
Link Failure Count: 0
Permanent HW addr: 08:00:27:42:6c:e3
Slave queue ID: 0

Slave Interface: enp0s8
MII Status: up
Speed: 1000 Mbps
Duplex: full
Link Failure Count: 0
Permanent HW addr: 08:00:27:fa:13:16
Slave queue ID: 0
We can find that the currently used slave link is enp0s3. In addition, the Permanent HW addr contains the MAC address of each slave interface before bonding.
3.3. Bonding Connection in Action
Let’s check how the redundancy bonding works. First, let’s ping through nm-bond:
$ ping -c 10 -I nm-bond www.baeldung.com
PING www.baeldung.com (172.66.40.248) from 10.0.2.15 nm-bond: 56(84) bytes of data.
# ...

--- www.baeldung.com ping statistics ---
10 packets transmitted, 10 received, 0% packet loss, time 9014ms
rtt min/avg/max/mdev = 14.011/14.650/15.156/0.453 ms
In addition, let’s check the active interface:
$ cat /sys/class/net/nm-bond/bonding/active_slave
enp0s3
Next, let’s just turn down the active slave enp0s3:
$ sudo ip link set enp0s3 downThen, let’s ping again:
$ ping -c 10 -I nm-bond www.baeldung.com
PING www.baeldung.com (172.66.40.248) from 10.0.2.15 nm-bond: 56(84) bytes of data.
# ...

--- www.baeldung.com ping statistics ---
10 packets transmitted, 9 received, 10% packet loss, time 9014ms
rtt min/avg/max/mdev = 13.863/14.618/15.177/0.414 ms
So we see that the connection works. Finally, let’s make sure that the bond interface has switched to enp0s8:
$ cat /sys/class/net/nm-bond/bonding/active_slave
enp0s8
4. Bonding With systemd-networkd
Instead of NetworkManager, we can use the systemd-networkd service. Assuming that we have NetworkManager working, we need to disable it:
$ systemctl disable NetworkManagerSubsequently, let’s enable systemd-networkd:
$ systemctl enable systemd-networkdIn addition, we should check if the NetworkManager-wait-online service is in use:
$ systemctl status NetworkManager-wait-online
If so, let’s disable it:
$ systemctl disable NetworkManager-wait-onlineand enable its networkd counterpart:
$ systemctl enable systemd-networkd-wait-online4.1. Configure systemd-networkd
We can provide configuration files in the /etc/systemd/network folder. Therein, files with the network extension describe the connections, while the file with netdev extension contains the bonding configuration.
Let’s notice that the files are parsed in alphabetic order. So per convention, we should start their names with numbers. Now, let’s review the setup:
$ ls -1 /etc/systemd/network
10-nd-bond.network
20-enp0s3.network
20-nd-bond.netdev
30-enp0s8.network
99-dhcp.network
First, let’s look into the bond device:
$ cat 20-nd-bond.netdev
[NetDev]
Name=nd-bond
Kind=bond

[Bond]
Mode=active-backup
PrimaryReselectPolicy=always
MIIMonitorSec=1s
So in the NetDev section, we define the type and name of the device. Next, we add the device’s details in the Bond section.
Now let’s examine the bond connection:
$ cat 10-nd-bond.network
[Match]
Name=nd-bond

[Network]
DHCP=yes
Let’s notice that the Name field in the Match section indicates that this configuration applies to the bonding device. Subsequently, the Network section says that we use DHCP.
Further, let’s move to the enslaved connections enp0s3 and enp0s8:
$ cat 20-enp0s3.network
[Match]
Name=enp0s3

[Network]
Bond=nd-bond
PrimarySlave=true
As before, the Match section says which interface this file refers to. Next, we provide the bonding device name in the Network section. Finally, we make enp0s3 the primary slave.
Similarly, for enp0s8, we have:
$ cat 30-enp0s8.network
[Match]
Name=enp0s8

[Network]
Bond=nd-bond
Finally, the 99-dhcp.network contains the fallback setup for any connection whose name matches the enp0* pattern:
$ cat 99-dhcp.network
[Match]
Name=enp0*

[Network]
DHCP=yes
4.2. Checking the networkd Service
Now let’s reboot the computer and check the service status with networkctl:
$ networkctl
IDX LINK    TYPE     OPERATIONAL SETUP
  1 lo      loopback carrier     unmanaged
  2 enp0s3  ether    enslaved    configured
  3 enp0s8  ether    enslaved    configured
  4 nd-bond bond     routable    configured

4 links listed
So we see that enp0s3 and enp0s8 are enslaved, and the nd-bond link is routable.
Further, let’s disable one slave link, e.g., enp0s8:
$ sudo ip link set enp0s8 downand check the status again:
$ networkctl
IDX LINK    TYPE     OPERATIONAL      SETUP
  1 lo      loopback carrier          unmanaged
  2 enp0s3  ether    enslaved         configured
  3 enp0s8  ether    off              configured
  4 nd-bond bond     degraded-carrier configured

4 links listed.
Let’s notice the degraded-carrier operational status, which indicates that one of the bonded links is out of use.
5. netplan
With the netplan command, we can write down the network configuration in a YAML file. netplan doesn’t manage interfaces on its own. Instead, it supplies a renderer with an appropriate configuration. Furthermore, as a renderer, we can use NetworkManager or systemd-networkd.
5.1. Configuration
Let’s create the networkd-bond.yaml file and copy it to the /etc/netplan folder:
$ cat /etc/netplan/networkd-bond.yaml
# Let network manage bond connection on this system
network:
  version: 2
  renderer: networkd
  ethernets:
    enp0s3: {}
    enp0s8: {}
  bonds:
    np-bond:
      dhcp4: yes
      interfaces:
          - enp0s3
          - enp0s8
      parameters:
          mode: active-backup
          primary: enp0s3
Let’s notice the ethernets section, which contains empty YAML maps enp0s3 and enp0s8, just to inform netplan about these interfaces.
5.2. Application and Validation
Now let’s apply the new bonding configuration:
$ sudo netplan applyThen, let’s check connections with networkctl:
$ networkctl
IDX LINK    TYPE     OPERATIONAL SETUP
  1 lo      loopback carrier     unmanaged
  2 enp0s3  ether    enslaved    configured
  3 enp0s8  ether    enslaved    configured
  4 nd-bond bond     no-carrier  configuring
  5 np-bond bond     routable    configured

5 links listed.
Let’s notice that the previous link, nd-bond is down. Instead, the new np-bond is up and working. So, let’s check its details:
$ cat /proc/net/bonding/np-bond
Ethernet Channel Bonding Driver: v5.15.0-46-generic

Bonding Mode: fault-tolerance (active-backup)
Primary Slave: enp0s3 (primary_reselect always)
# ...

Slave Interface: enp0s8
# ...

Slave Interface: enp0s3
# ...
6. Conclusion
In this article, we learned how to bind together internet interfaces. First, we shortly presented the network bonding. Then, we created a bonding interface with NetworkManager and networkd services. Next, we learned how to check the bonding setup and activity.
Finally, we introduced netplan, which translated the YAML configuration into configurations applicable to both of these services.