

Learn through the super-clean Baeldung Pro experience:
>> Membership and Baeldung Pro.
No ads, dark-mode and 6 months free of IntelliJ Idea Ultimate to start with.
Last updated: April 18, 2025
Learn through the super-clean Baeldung Pro experience:
>> Membership and Baeldung Pro.
No ads, dark-mode and 6 months free of IntelliJ Idea Ultimate to start with.
To achieve efficient routing in complex network topologies, we can configure multiple default gateways in Linux. Each of these gateways can be configured to route traffic under a specific condition or policy.
In this article, we’ll see two ways of doing this: Routing Tables and Network Bonding.
A default gateway is the primary route for traffic destined for external networks. Having multiple default gateways on a Linux device enhances network functionality and reliability. However, a single default gateway can become a single point of failure. This is avoidable, especially in scenarios where we’ve got multiple Internet Service Providers (ISPs) where we can configure redundancy for fault tolerance.
To achieve this, we can use policy-based routing with tools like iproute2.
Multiple default gateways allow a Linux device to manage traffic across multiple networks or ISPs, improving redundancy and failover capabilities. For example, if one gateway fails, the system can automatically reroute traffic through an alternative gateway, ensuring uninterrupted connectivity.
Additionally, multiple gateways support load balancing, where traffic is distributed across different paths, optimizing bandwidth usage and reducing congestion. This setup is quite useful in enterprise environments with complex networking needs, such as VPNs, multi-homed servers, or systems requiring access to separate networks simultaneously. We use ip route in Linux to configure and manage multiple gateways efficiently.
Linux routing tables are critical to the operating system’s networking stack, defining how data packets are forwarded between networks. These tables store rules and routes that guide network traffic, determining the appropriate path for each packet based on its destination address. Each entry in a Linux routing table includes the destination network, the gateway (if required), the associated interface, and metrics to prioritize routes. The routing table is managed using ip route or older commands such as route.
Linux supports advanced routing capabilities, including policy-based routing, allowing traffic to follow different rules based on factors like source address, protocol, or application.
Let’s take a scenario where we have two network interfaces enp0s3 and enp0s8 each connected to a network with an IP of 1.1.1.32/24 and 10.0.3.15/24 respectively:
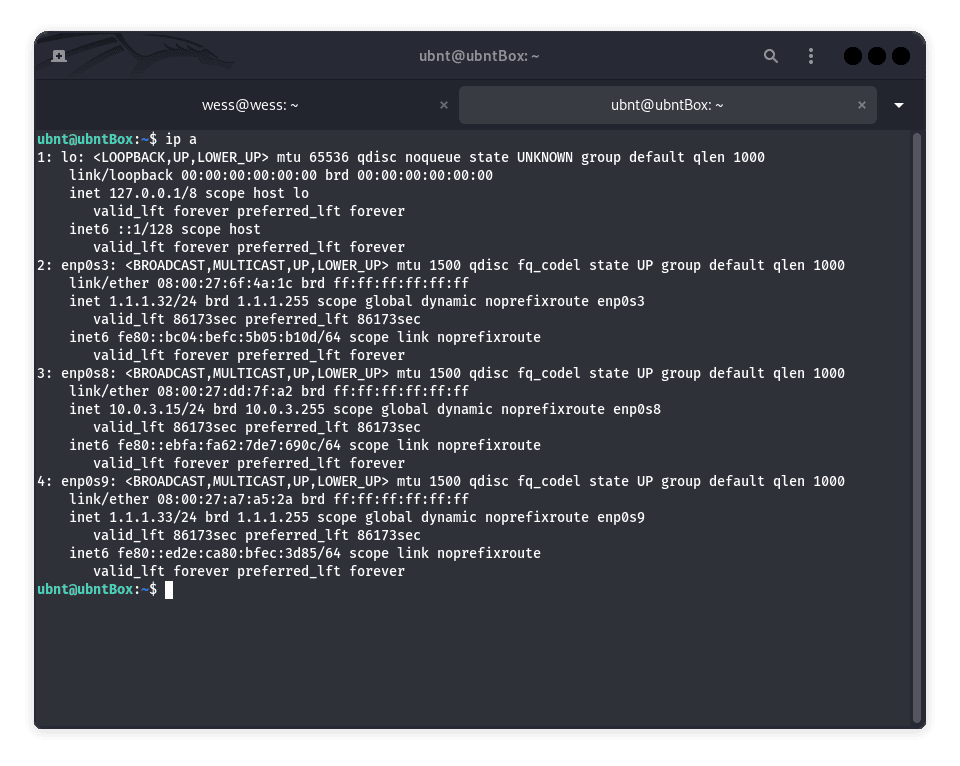
From the image above, we can see we have three active interfaces. For this example, we’ll use the enp0s3 and enp0s8.
Let’s first install iproute2:
$ sudo apt update
$ sudo apt install iproute2
Next, we’ll add two default routes, one for each network. We can’t use the traditional ip route add default method for both interfaces because only one can be the system-wide default.
Instead, we need routing tables:
#network 1 route
$ sudo ip route add 1.1.1.0/24 dev enp0s3 src 1.1.1.32 table 1
$ sudo ip route add default via 1.1.1.1 dev enp0s3 table 1

# network 2 route
$ sudo ip route add 10.0.3.0/24 dev enp0s8 src 10.0.3.15 table 2
$ sudo ip route add default via 10.0.3.2 dev enp0s8 table 2
Let’s add rules to the main routing table to determine which traffic uses which routing table:
# Add rules based on source address
$ sudo ip rule add from 1.1.1.1 table 1
$ sudo ip rule add from 10.0.3.15 table 2
and verify the configurations:
$ ip route show table 1
default via 1.1.1.1 dev enp0s3
1.1.1.0/24 dev enp0s3 scope link src 1.1.1.32
$ ip route show table 2
default via 10.0.3.2 dev enp0s8
10.0.3.0/24 dev enp0s8 scope link src 10.0.3.15
Lastly, we can view all available rules:
$ ip rule list
0:	from all lookup local
32762:	from 10.0.3.15 lookup 2
32763:	from 1.1.1.32 lookup 1
32764:	from all lookup main
32765:	from all lookup default
If we stop there, the routing tables will reset on reboot. So let’s edit the /etc/netplan/01-network-manager-all.yaml file to persist our changes:
$ sudo vi /etc/netplan/01-network-manager-all.yaml
network:
  version: 2
  renderer: NetworkManager
  ethernets:
    enp0s3:
      dhcp4: true
      routes:
        - to: 0.0.0.0/0
          via: 1.1.1.1
          metric: 100
      routing-policy:
          - from: 1.1.1.0/24
            table: 1

    enp0s8:
      dhcp4: true
      routes:
        - to: 0.0.0.0/0
          via: 10.0.3.2
          metric: 100
      routing-policy:
          - from: 10.0.3.0/24
            table: 2
Let’s break down the configuration above:
Next, let’s apply the changes:
$ sudo netplan applyNetwork bonding in Linux is a technique for combining multiple network interfaces into a single logical interface, providing increased throughput, redundancy, or both. Combining two or more interfaces allows the system to use multiple physical connections as one virtual link, improving performance and reliability. Each of the interfaces can obtain an IP address statically or through a DHCP.
Bonding modes define how the interfaces operate together. There are seven types of bond modes. They are mode=0 (Round Robin Policy), mode=1 (Active-backup), mode=2 (Balance-XOR), mode=3 (Broadcast), mode=4 (802.3ad), mode=5 (Balance-tlb) and lastly mode=6 (Balance-alb).
For this example, we’ll look at Mode 1 (Active-Backup) which only allows one interface to be active; a backup takes over if the primary fails, ensuring redundancy.
Active backup relies on a mechanism called bonding, managed by the bonding kernel module in Linux. It operates in mode 1 (active-backup). The primary interface handles all traffic while the backup interface remains idle. If the active interface fails, the system automatically switches traffic to the backup interface without user intervention.
When the primary interface is restored, traffic reverts to it.
As we begin, let’s install the bonding kernel module and test if the bonding driver is loaded through modprobe:

Let’s follow that by turning off the two interfaces we want to combine:
$ sudo ip link set enp0s3 down
$ sudo ip link set enp0s8 down
Now we’ll create the bond and add the two interfaces:
$ sudo ip link add bond0 type bond mode 802.3ad
$ sudo ip link set enp0s3 master bond0
$ sudo ip link set enp0s8 master bond0
Next, let’s turn on the bond:
$ sudo ip link set bond0 upWe can confirm if the bond is up using the ip command:

Note that we can also configure the bonding interface with the mode=1 option to enable active-backup mode.
To make our configurations persistent we need to edit the /etc/netplan/01-network-manager-all.yaml configuration file:
$ sudo vi /etc/netplan/01-network-manager-all.yaml
 network:
  version: 2
  renderer: NetworkManager
  ethernets:
    enp0s3:
      dhcp4: true
    enp0s8:
      dhcp4: true
  bonds:
    bond0:
      dhcp4: true
      interfaces:
        - enp0s3
        - enp0s8
      parameters:
        mode: active-backup
        mii-monitor-interval: 100
Following, let’s apply the changes through:
$ sudo netplan applyIf we’re using static IPs, our configuration should look like this:

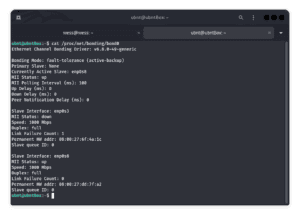
Now let’s confirm the bonding interface status to be sure it’s working:
$ cat /proc/net/bonding/bond0
Ethernet Channel Bonding Driver: v6.8.0-49-generic

Bonding Mode: fault-tolerance (active-backup)
Primary Slave: None
Currently Active Slave: enp0s3
MII Status: up
MII Polling Interval (ms): 100
Up Delay (ms): 0
Down Delay (ms): 0
Peer Notification Delay (ms): 0

Slave Interface: enp0s3
MII Status: up
Speed: 1000 Mbps
Duplex: full
Link Failure Count: 0
Permanent HW addr: 08:00:27:6f:4a:1c
Slave queue ID: 0

Slave Interface: enp0s8
MII Status: up
Speed: 1000 Mbps
Duplex: full
Link Failure Count: 0
Permanent HW addr: 08:00:27:dd:7f:a2
Slave queue ID: 0
The snippet above shows the bond we’ve created and the active slaves. Currently, enp0s3 is the active slave.
In case of network issues or a damaged enp0s3, enp0s8 will pick up automatically. Let’s try it by shutting down enp0s3:
Now that enp0s3 is down traffic will automatically switch to the second slave interface.
For Linux computers that use the interfaces configuration file, we need to edit the /etc/network/interfaces file:
$ vi /etc/network/interfaces
# network interfaces
auto bond0
iface bond0 inet static
	address 1.1.1.150
	netmask 255.255.255.0
	gateway 1.1.1.1
	dns-nameservers 1.1.1.1 8.8.8.8
	dns-search domain.local
		slaves enp0s1 enp0s2
		bond_mode 0
		bond-miimon 100
		bond_downdelay 200
		bond_updelay 200
In this tutorial, we configured multiple default gateways on a single device. We first looked at adding different gateways through custom configurations using routing tables. Next, we looked at adding multiple default gateways through active bonding/backup. Finally, we looked at how to configure it through the terminal and make it persistent using the netplan configuration file.
Having more than one default gateway in Linux enhances network flexibility and reliability. With policy-based routing and bonding, we can handle diverse networking requirements, including load balancing, redundancy, and failover mechanisms. Proper testing and documentation ensure these setups perform reliably in any environment.