

Learn through the super-clean Baeldung Pro experience:
>> Membership and Baeldung Pro.
No ads, dark-mode and 6 months free of IntelliJ Idea Ultimate to start with.
Last updated: March 18, 2024
Learn through the super-clean Baeldung Pro experience:
>> Membership and Baeldung Pro.
No ads, dark-mode and 6 months free of IntelliJ Idea Ultimate to start with.
When we request an upgrade of our VPS disk pre-configured with LVM, some providers just enlarge its space without adjusting the LVM partitioning. As a consequence, the added space remains unusable.
By way of additional restriction, we can only access the VPS via SSH.
In this tutorial, we’ll see how to manage such a situation by having the LVM use the whole disk.
We are probably using a provider with significant limitations. For instance, we can’t reboot with a live CD to make a Clonezilla backup on a remote target directory via SSH. However, let’s see other disaster recovery solutions applicable in this case.
It’s imperative to adopt at least one of the following strategies because the risk of making a disastrous mistake is too high.
A server snapshot is a point-in-time image of the entire VPS disk for data disaster recovery. Some providers indicate as “snapshots” or “backups” very similar services with different limitations, so we must refer to their technical documentation.
Usually, we don’t need to shut down the VPS when taking a snapshot. Often it’s just a matter of clicking a button in the administration web area of our VPS.
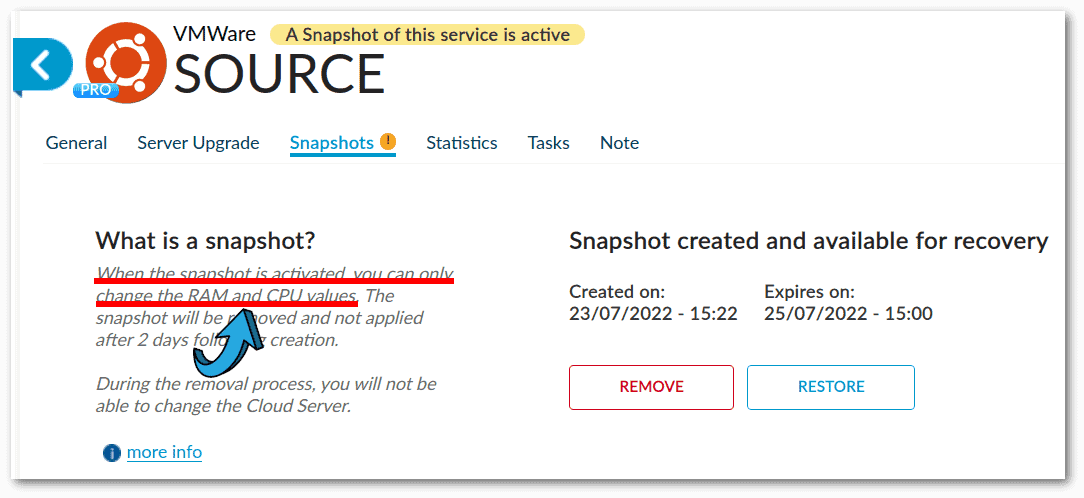
We must be careful, however, about the order of operations. First, we need to enlarge the disk and then take the snapshot.
In fact, as reported in the following Aruba Cloud Control Center screenshot, it’s not possible to change the disk’s size when a snapshot is active:
 Restoring a snapshot is similar to rebooting after a non-graceful restart. It reverts the server to a previous state.
Still, it’s not a problem, as modern file systems and databases handle this scenario well. However, taking a snapshot of a very active and write-intensive VPS is not a good idea, as we can get unexpected results. In this case, taking the snapshot while the server is turned off is best.
If the provider allows it, another possible disaster recovery solution is to shut down the VPS and export its virtual disk in the Hypervisor format, such as vmdk in the case of VMWare. Again, this is just a matter of clicking a button, as we can see in the same Control Center we saw earlier:
 This solution, however, requires that there aren’t any active snapshots.
To clone the file system hierarchy on another server, it’s good that both our servers should be as little active as possible. In particular, we should stop processes that are using the disks.
Moreover, on both machines, we must have a root account, a recent version of rsync, and the same file system (for example, ext4).
But let’s keep in mind that rsync run this way may or may not work since cloning a running system can cause unpredictable failures and side effects.
That said, let’s run rsync on the server to be cloned as follows, replacing x.x.x.x and y.y.y.y with the source and backup VPSs IPs or domains and /mybackup with the path of the backup directory:
$ SOURCE_VPS=x.x.x.x
$ ssh root@$SOURCE_VPS
[email protected]'s password:
[...]
root@SOURCE:~# BACKUP_VPS=y.y.y.y
root@SOURCE:~# REMOTEDIR=/mybackup # the directory to be created in the backup VPS
root@SOURCE:~# ssh root@$BACKUP_VPS mkdir $REMOTEDIR
[...]
[email protected]'s password:
root@SOURCE:~# rsync -axHAXS --numeric-ids --info=progress2 \
--exclude={"/dev/*","/proc/*","/sys/*","/tmp/*","/run/*","/mnt/*","/media/*","/lost+found"} \
/ root@$BACKUP_VPS:$REMOTEDIR
[email protected]'s password:
  4,280,365,231  96%   17.79MB/s    0:03:49 (xfr#98137, to-chk=0/117108)
A detailed explanation of these rsync options will clarify what we have done.
Basically, we backed up the entire root (/) directory, excluding /dev, /proc, /sys, /tmp, /run, /mnt, /media, /lost+found.
However, let’s suppose our server becomes unusable due to an error in LVM expanding. In that case, we’ll first need to reset it to the provider’s VPS pre-configuration and then run rsync in the reverse direction.
We carefully tested all the following steps on an Aruba Cloud’s VPS, which by default uses pre-configured LVM partitioning on machines running Ubuntu Server.
We’ll see two ways to enlarge an LVM disk’s space without unmounting any partitions.
We rented a Cloud Server Pro with a 10GB SSD, pre-configured with an LVM using three primary physical partitions. We then expanded its space to 20GB from the provider’s Control Center.
After that, cfdisk shows us the following:
                                     Disk: /dev/sda
                    Size: 20 GiB, 21474836480 bytes, 41943040 sectors
              Label: gpt, identifier: C9347F94-5D39-4402-A1E5-C09655336232

    Device                 Start          End      Sectors      Size Type
>>  /dev/sda1               2048         4095         2048        1M BIOS boot
    /dev/sda2               4096      1028095      1024000      500M Linux filesystem
    /dev/sda3            1028096     20969471     19941376      9.5G Linux filesystem
We can add the primary partition /dev/sda4 to occupy the new 10GB.
Beyond the partitioning program chosen, the important thing is to select “Linux LVM” as the file system type. In this case, we use the n (new partition) and t (partition type) commands of fdisk:
# fdisk /dev/sda
[...]
Command (m for help): n
Partition number (4-128, default 4):
First sector (20969472-41943006, default 20969472):
Last sector, +/-sectors or +/-size{K,M,G,T,P} (20969472-41943006, default 41943006):

Created a new partition 4 of type 'Linux filesystem' and of size 10 GiB.

Command (m for help): t
Partition number (1-4, default 4):
Partition type or alias (type L to list all): 30

Changed type of partition 'Linux filesystem' to 'Linux LVM'.

Command (m for help): w
The partition table has been altered.
Syncing disks.

# partprobe
The last command informs the operating system of partition table changes.
Let’s initialize the new partition for use with LVM:
# pvcreate /dev/sda4
  Physical volume "/dev/sda4" successfully created.
Then we need to know the name of the Volume Group (VG):
# vgdisplay
  --- Volume group ---
  VG Name               vg
[...]
The previously initialized partition must be added to that volume group:
# vgextend vg /dev/sda4
  Volume group "vg" successfully extended
Let’s check what the logical volume path is:
# lvdisplay
  --- Logical volume ---
  LV Path                /dev/vg/lv_root
[...]
That logical volume must be extended:
# lvextend /dev/vg/lv_root /dev/sda4
  Size of logical volume vg/lv_root changed from <9.51 GiB (2434 extents) to 19.50 GiB (4993 extents).
  Logical volume vg/lv_root successfully resized.
Finally, let’s resize the file system and check its new size:
# resize2fs /dev/vg/lv_root
resize2fs 1.46.5 (30-Dec-2021)
Filesystem at /dev/vg/lv_root is mounted on /; on-line resizing required
[...]
# df -h
Filesystem              Size  Used Avail Use% Mounted on
[...]
/dev/mapper/vg-lv_root   20G  4.3G   14G  24% /
[...]
Everything went well, and we achieved the LVM expansion without needing a reboot.
We expanded the disk used in the previous example to 30GB, so there’s an additional 10GB of space. Let’s check with cfdisk:
                                      Disk: /dev/sda
                    Size: 30 GiB, 32212254720 bytes, 62914560 sectors
               Label: gpt, identifier: C9347F94-5D39-4402-A1E5-C09655336232

    Device                  Start          End      Sectors      Size Type
>>  /dev/sda1                2048         4095         2048        1M BIOS boot
    /dev/sda2                4096      1028095      1024000      500M Linux filesystem
    /dev/sda3             1028096     20969471     19941376      9.5G Linux filesystem
    /dev/sda4            20969472     41943006     20973535       10G Linux LVM
    Free space           41943040     62914526     20971487       10G
A GPT disk supports up to 128 primary partitions. In comparison, an MBR disk supports only four primary partitions or three primary partitions plus one extended partition. In this case, we have GPT, so we can repeat the previous steps. Let’s suppose, however, that we are using an old server with MBR, so we can’t add new partitions. But we can enlarge /dev/sda4.
growpart extends a partition (usually the last) to fill the available space:
# growpart /dev/sda 4
CHANGED: partition=4 start=20969472 old: size=20973535 end=41943007 new: size=41945055 end=62914527
# sfdisk -V /dev/sda
/dev/sda:
No errors detected.
[...]
# partprobe
The -V option of sfdisk verified the integrity of the partitions. It’s a good practice to do this check when we resize or move partitions. Instead, we used partprobe to inform the operating system of partition table changes.
Let’s advise LVM of the change:
# pvresize /dev/sda4
  Physical volume "/dev/sda4" changed
  1 physical volume(s) resized or updated / 0 physical volume(s) not resized
Then let’s enlarge the space available on LVM:
# pvresize /dev/sda4
  Physical volume "/dev/sda4" changed
  1 physical volume(s) resized or updated / 0 physical volume(s) not resized
root@SOURCE:~# lvresize -L +10G /dev/vg/lv_root
  Size of logical volume vg/lv_root changed from 19.50 GiB (4993 extents) to 29.50 GiB (7553 extents).
  Logical volume vg/lv_root successfully resized.
Finally, we have to resize the file system and check its new size:
# resize2fs /dev/vg/lv_root
resize2fs 1.46.5 (30-Dec-2021)
Filesystem at /dev/vg/lv_root is mounted on /; on-line resizing required
[...]
# df -h
Filesystem              Size  Used Avail Use% Mounted on
[...]
/dev/mapper/vg-lv_root   29G  4.3G   24G  16% /
[...]
Again, we got the result we wanted without even a reboot.
In this article, we first considered creating a disaster recovery solution because touching partitioning is always dangerous. After that, we looked at two ways to enlarge the space available in LVM in a server accessible only via SSH.
Unused space at the end of the disk typically occurs when we enlarge a virtual disk. Depending on the VPS provider, partitions and their file systems are sometimes updated automatically. Other times we have to proceed with the manual commands we saw here.